- daniellevass / starting_library_project_AS.md
- Как собрать нативную библиотеку для Android
- Собираем Opus из исходников
- Добавляем собранные библиотеки в проект
- Add build dependencies
- Dependency types
- Groovy
- Kotlin
- Groovy
- Kotlin
- Groovy
- Kotlin
- Groovy
- Kotlin
- Groovy
- Kotlin
- Groovy
- Kotlin
- Native dependencies
- Dependency configurations
- Groovy
- Kotlin
- Deprecated Gradle configurations (available in AGP 1.0–4.2)
- Groovy
- Kotlin
- Groovy
- Kotlin
- Groovy
- Kotlin
- Add annotation processors
- Groovy
- Kotlin
- Pass arguments to annotation processors
- Groovy
- Kotlin
- Groovy
- Kotlin
- Groovy
- Kotlin
- Disable the annotation processor error check
- Groovy
- Kotlin
- Groovy
- Kotlin
- Exclude transitive dependencies
- Groovy
- Kotlin
- Exclude transitive dependencies from test configurations
- Groovy
- Kotlin
- Configure Wear OS app dependencies
- Groovy
- Kotlin
- Groovy
- Kotlin
- Remote repositories
- Groovy
- Kotlin
- Groovy
- Kotlin
- Groovy
- Kotlin
- Google’s Maven repository
- Groovy
- Kotlin
- Groovy
- Kotlin
- Programmatic access
- Offline repository from SDK Manager
- Native dependencies with the Android Gradle plugin
- Using native dependencies
- Native dependencies in AARs
- Build system configuration
- Groovy
- Kotlin
- Publishing native libraries in AARs
- Groovy
- Kotlin
- Dependency order
- View module dependencies
- Fix dependency resolution errors
- Fix duplicate class errors
- Fix conflicts between classpaths
- Apply custom build logic
- Publish variant dependencies to custom logic
- Custom dependency resolution strategies
- Groovy
- Kotlin
- Dependency information for Play Console
daniellevass / starting_library_project_AS.md
Getting Started with a library project in Android Studio
So we’re working on creating Android Material Awesome, a library which will hopefully incorperate the benefits of Material Design, Twitter’s Bootstrap, and FontAwesome. What we really wanted is a project other people can easily include into their projects using gradle dependencies. To do this we needed to create a standalone library project so we could make it as lightweight as possible for including as a dependency, and a sample app that would use it for testing. These are the steps we took to get started in Android Studio (version 1.1).
The first thing we needed to do was to create two new projects, with all the default settings (Blank Activity etc). One for our sample app, and one for our library. We added both of ours into the same GitHub repo, however you can save them wherever you like.
Fix Up Library Project
####1. Rename Module
Initially we’ll focus on our library project. Annoyingly Android Studio automatically creates you a module called app . Modules really should be uniquely named, so you’ll need to right click on the module name, click refactor and rename to something useful. We called ours library .
####2. Rename Folder
Unfortunately, this doesn’t fully rename the root folder. So using Finder (OS X) or File Explorer (Windows), you’ll need to navigate to the module folder. Rename it to match what you named your module you named it e.g. library .

Android Studio calls my module library, but Finder still says app
####3. Drag build.gradle into Android Studio
This’ll break your project! To fix it, you need to go back to Android Studio, and open the build.gradle for the module. It’ll have a little warning at the top asking you to add it to the project. Click this and wait for gradle to synchronise again! All your files should magically reappear again!

Drag the highlighted file back into Android Studio
You should see a yellow/gold banner appear at the top of your file, click it to add file to your project and wait for Android Studio to synchronise. Once it’s done, you should see all your files have magically reappeared again!

click the yellow/gold banner at the top to add file to project and synchronise
####5. Make Android Library
Whilst you still have your build.gradle file open, you’ll need to change the first line :
apply plugin: ‘com.android.application’
apply plugin: ‘com.android.library’
####6. Remove applicationId
You’ll also need to remove applicationId in defaultConfig before synchronising again.
Источник
Как собрать нативную библиотеку для Android
Собрать и заставить работать приложение с небольшим количеством нативного кода несложно. Если же вы хотите использовать нативную библиотеку, в которой много файлов, становится труднее. Сложность в том, что нативные библиотеки распространяются в виде исходного кода, который нужно компилировать под нужную архитектуру процессора. На примере аудиокодека Opus я покажу, как это сделать.

В своей предыдущей статье я на примере аудиокодека Opus показал, как решить задачу сборки нативной библиотеки для Android, но в проект был добавлен весь исходный код Opus, а так делать не хочется. По-хорошему нужно иметь в проекте уже собранные .so или .a, и используя их, писать свои врапперы на C/C++ и собирать приложение. Об этом и пойдёт речь в статье. На примере того же аудиокодека Opus я покажу, как с помощью NDK получить скомпилированные .so и .a, чтобы далее использовать их в Android-проекте.
Чтобы использовать любую нативную библиотеку, нам нужно написать враппер на C/C++, в котором мы будем вызывать методы самой библиотеки. Мы скомпилируем и соберём библиотеку Opus как статическую (.a).
Мы вызываем функцию в нашем C файле, которая описана в другой библиотеке. Для этого в начале файла пишем #include . Далее на этапе компиляции C файла, если библиотека статическая(.a), то вместо #include компилятор подставит весь код этой функции. Если динамическая(.so), то подставит только ссылку на функцию. Таким образом, при использовании статической библиотеки у нас есть весь код, который нам необходим из другой библиотеки, а при использовании динамической код будет подгружаться динамически.
Использование .so в зависимостях может уменьшить размер нашей итоговой библиотеки. Это было бы так, если бы Opus был стандартной библиотекой, но так как её нет в Android, мы должны её предоставить. Поэтому итоговый размер нашего libjniopus.so будет одинаковым, что при использовании libopus.a, что при использовании libopus.so.
Для компиляции нативных библиотек из исходников в NDK c версии 19 есть готовые удобные инструменты «из коробки». В документации описано, как их использовать. Описание довольно короткое, поэтому человек, не имеющий опыта в сборке нативных библиотек, неизбежно столкнётся со сложностями. Как их решить, я разберу ниже.
Собираем Opus из исходников
Сначала скачиваем исходники: либо из репозитория (git clone), либо архивом. У Opus есть Autoconf — утилита, которая автоматически создаёт конфигурационные скрипты. В проекте с Autoconf можно задать toolchain для компиляции, используя ENV-переменные. Autoconf, как правило, работает только на Unix подобных системах. Поэтому если у вас Windows, то вам, скорее всего, придётся использовать средства эмуляции.
В итоге мы хотим получить 4 файла библиотеки с расширением .a по одной на каждую архитектуру процессора: armeabi-v7a, arm64-v8a, x86, x86-64.
Для каждой архитектуры нужно задать свои ENV-переменные. Общими будут только NDK, HOST_TAG и TOOLCHAIN. В Linux, ENV-переменную для текущей сессии терминала можно задать, используя команду export:
Однако заданные ENV-переменные будут существовать, пока активна текущая сессия терминала, и только в ней. Если вы откроете другую сессию, то там этих переменных не будет. Чтобы каждый раз не прописывать ENV-переменные заново, можно добавить их в конец файла .bashrc, который находится в домашнем каталоге (
). Перед запуском каждой сессии терминала запускается .bashrc. Поэтому переменные, объявленные в нём, будут существовать во всех сессиях терминала. Вот ENV-переменные, которые отличаются в зависимости от архитектуры:
Сначала скомпилируем под arm64-v8a, поэтому закомментируем в .bashrc объявление ENV-переменных для остальных архитектур. Стоит отметить, что в переменных CC и CXX есть цифра 21, которая очень похожа на Android API level. Так и есть, а если быть точнее, то это ваша minSdkVersion. В нашем примере это 21, но если у вас другие потребности, можете смело поменять. В NDK доступны версии с 16 по 29 для 32-разрядных ABI (armeabi-v7a и x86) и с 21 по 29 для 64-разрядных ABI (arm64-v8a и x86-64).
Итак, мы объявили ENV-переменные, которые определяют toolchain для компиляции под выбранную архитектуру, и выкачали репозиторий с исходниками Opus. Теперь открываем Readme в папке с исходниками Opus и видим, что для компиляции библиотеки надо всего-навсего запустить:
Но не всё так просто. Таким образом мы скомпилируем библиотеку под архитектуру нашей рабочей машины, а нам надо под 4 архитектуры мобильных девайсов.
В NDK с версии r19 «из коробки» идут toolchains. Как и показано в примере на странице, нужно выставить ENV-переменные (выставили их выше в .bashrc), соответствующие архитектуре, под которую компилируется библиотека. Затем нужно запустить команду configure с соответствующим аргументом host. Для arm64-v8a получается такое:
/.bashrc необходимо запускать, чтобы изменения переменных среды для сборки «подхватывались» текущей сессией терминала без перезапуска.
После выполнения всех вышеописанных команд, в папке с исходниками Opus появится папка .libs. В ней будут находиться все артефакты компиляции, в том числе и нужный нам libopus.a.
Далее в .bashrc комментим/раскомменчиваем, чтобы активными были ENV-переменные для armeabi-v7a, и прописываем команды уже с другим аргументом host:
./autogen.sh не выполняем, так как он нужен был только для первоначальной генерации конфигурационных файлов и того самого configure, который мы запускаем.
В этот раз команда make завершится ошибкой. Я долго не понимал, из-за чего так происходит. Поискав в интернете похожие проблемы, понял, что файлы и тесты, которые создаются для определённой архитектуры, во время компиляции не удаляются автоматически после переконфигурации на другую архитектуру (запуск configure с другим host). А так как в папке с исходниками, в которой появляются все артефакты сборки, и так много файлов, понять, какие из них надо удалять потом, очень сложно.
Решение оказалось довольно простым. Можно запускать все команды для конфигурации и компиляции, не находясь в папке с исходниками Opus. Тогда можно создать свою отдельную папку для каждой архитектуры, где будут все артефакты сборки и временные файлы для этой архитектуры.
Теперь всего-то нужно создать 4 папки и последовательно сделать одни и те же действия по выставлению ENV-переменных и прописыванию команд с нужным аргументом. Это слишком долго и скучно, поэтому есть отличная возможность написать bash-скрипт, который всё это сделает за нас. Вот такой небольшой скрипт получился:
Если использовать скрипт, то объявлять ENV-переменные в .bashrc нет необходимости, так как они объявлены в скрипте.
Чтобы использовать скрипт, нужно сделать его исполняемым:
Далее необходимо прописать путь к NDK на вашей машине и поменять HOST_TAG, если вы не на Linux (в скрипте значение linux-x86_64):
- 32-bit Windows: windows
- 64-bit Windows: windows-x86_64
- macOS: darwin-x86_64
Затем запускаем скрипт таким образом:
Ему нужно передать minSdkVersion и путь к папке с исходниками Opus. Опционально можно передать путь к папке, куда поместим артефакты сборки. По умолчанию создаётся папка opus_android_build в папке, где расположен скрипт buildOpus.sh.
Выполнение скрипта займёт некоторое время. Потом в папке opus_android_build или в той, которую вы передали, будут располагаться папки с названиями ABI, под которые была скомпилирована библиотека. Соответственно, внутри каждой папки будет уже знакомая нам папка .libs, в которой лежат все артефакты сборки.
Добавляем собранные библиотеки в проект
Отлично, у нас есть 4 файла libopus.a под разные архитектуры, самое сложное позади. Осталось добавить их в наш Android-проект и поправить CmakeLists.txt, чтобы к итоговой .so линковалась скомпилированная нами статическая библиотека Opus.
У нас есть папка app/src/main/cpp, в которой лежит наш C-враппер (jniopus.c), к которому идут external вызовы из Kotlin. В ней создаём папку includes. Затем в неё копируем содержимое папки include из исходников Opus. Там находятся файлы хедеров (.h). Они нам нужны для использования функции и структуры Opus в нашем C-враппере. Файлы хедеров содержат прототипы функций и являются своего рода контрактом, который определяет, какие аргументы может принимать и возвращать та или иная функция.
После этого в той же в папке app/src/main/cpp создадим папку libopus, а внутри неё 4 папки с названиями, идентичными названиям ABI, под которые мы скомпилировали библиотеку Opus: armeabi-v7a, arm64-v8a, x86, x86-64. В каждую из них помещаем файл libopus.a, скомпилированный под соответствующую архитектуру.
Далее модифицируем CmakeLists.txt, который был в предыдущей статье, где мы собирали Opus из исходников прямо в проекте. Сначала удаляем «простыню» со всеми путями к исходникам. Затем задаём переменные для путей:
Теперь добавляем Opus в сборку:
add_library используется для добавления библиотеки в сборку. Сначала идёт имя, которое у неё будет, далее тип библиотеки STATIC(.a) или SHARED(.so) и путь к исходникам, либо слово IMPORTED, если у нас уже собранная библиотека и мы хотим её использовать. В этом случае путь к готовым (импортируемым) библиотекам указывается ниже с помощью конструкции:
ANDROID_ABI это NDK toolchain аргумент, который сам туда подставит ABI.
Для компиляции нашего С-враппера, куда идут external вызовы из Kotlin, мы оставляем:
Также оставляем библиотеку, которая идёт «из коробки» в NDK для логирования таким образом:
И в конце мы объединяем всё это вместе:
Первым параметром идёт имя итоговой библиотеки, далее идут имена библиотек, которые нужно прилинковать к нашей. Вот и всё, теперь синхронизируем проект с помощью Gradle, нажимаем Run, и готово. Приложение открывается, жмём на кнопку Start call и говорим. Если тут же слышим то, что сказали, значит всё работает как надо.
Источник
Add build dependencies
The Gradle build system in Android Studio makes it easy to include external binaries or other library modules to your build as dependencies. The dependencies can be located on your machine or in a remote repository, and any transitive dependencies they declare are automatically included as well. This page describes how to use dependencies with your Android project, including details about behaviors and configurations that are specific to the Android plugin for Gradle. For a deeper conceptual guide to Gradle dependencies, you should also see the Gradle guide for dependency management —but remember that your Android project must use only the dependency configurations defined on this page.
Dependency types
To add a dependency to your project, specify a dependency configuration such as implementation in the dependencies block of your build.gradle file.
For example, the following build.gradle file for an app module includes three different types of dependencies:
Groovy
Kotlin
Each of these requests a different kind of library dependency as follows:
Local library module dependency
Groovy
Kotlin
This declares a dependency on an Android library module named «mylibrary» (this name must match the library name defined with an include: in your settings.gradle file). When you build your app, the build system compiles the library module and packages the resulting compiled contents in the app.
Local binary dependency
Groovy
Kotlin
Gradle declares dependencies on JAR files inside your project’s module_name /libs/ directory (because Gradle reads paths relative to the build.gradle file).
Alternatively, you can specify individual files as follows:
Groovy
Kotlin
Groovy
Kotlin
This is actually shorthand for the following:
Groovy
Kotlin
This declares a dependency on version 12.3 of the «app-magic» library, inside the «com.example.android» namespace group.
Note: Remote dependencies like this require that you declare the appropriate remote repositories where Gradle should look for the library. If the library does not already exist locally, Gradle pulls it from the remote site when the build requires it (such as when you click Sync Project with Gradle Files or when you run a build).
Native dependencies
As of Android Gradle plugin 4.0, native dependencies can also be imported in the manner described in this document.
Depending on an AAR that exposes native libraries will automatically make them available to the build system used by externalNativeBuild . To access the libraries from your code, you must link to them in your native build scripts. In this document, see Using native dependencies.
Dependency configurations
Inside the dependencies block, you can declare a library dependency using one of several different dependency configurations (such as implementation shown above). Each dependency configuration provides Gradle with different instructions about how to use the dependency. The following table describes each of the configurations you can use for a dependency in your Android project. The table also compares these configurations to those that were deprecated as of Android Gradle plugin 3.0.0.
| Configuration | Behavior | ||||||||
|---|---|---|---|---|---|---|---|---|---|
| implementation | Gradle adds the dependency to the compile classpath and packages the dependency to the build output. However, when your module configures an implementation dependency, it’s letting Gradle know that you do not want the module to leak the dependency to other modules at compile time. That is, the dependency is available to other modules only at runtime. Using this dependency configuration instead of api or compile (deprecated) can result in significant build time improvements because it reduces the number of modules that the build system needs to recompile. For example, if an implementation dependency changes its API, Gradle recompiles only that dependency and the modules that directly depend on it. Most app and test modules should use this configuration. | ||||||||
| api | Gradle adds the dependency to the compile classpath and build output. When a module includes an api dependency, it’s letting Gradle know that the module wants to transitively export that dependency to other modules, so that it’s available to them at both runtime and compile time. This configuration behaves just like compile (which is now deprecated), but you should use it with caution and only with dependencies that you need to transitively export to other upstream consumers. That’s because, if an api dependency changes its external API, Gradle recompiles all modules that have access to that dependency at compile time. So, having a large number of api dependencies can significantly increase build time. Unless you want to expose a dependency’s API to a separate module, library modules should instead use implementation dependencies. | ||||||||
| compileOnly | Gradle adds the dependency to the compile classpath only (that is, it is not added to the build output). This is useful when you’re creating an Android module and you need the dependency during compilation, but it’s optional to have it present at runtime. If you use this configuration, then your library module must include a runtime condition to check whether the dependency is available, and then gracefully change its behavior so it can still function if it’s not provided. This helps reduce the size of the final app by not adding transient dependencies that aren’t critical. This configuration behaves just like provided (which is now deprecated). Note: You can’t use the compileOnly configuration with AAR dependencies. | ||||||||
| runtimeOnly | Gradle adds the dependency to the build output only, for use during runtime. That is, it is not added to the compile classpath. This configuration behaves just like apk (which is now deprecated). | ||||||||
| annotationProcessor | |||||||||
| lintPublish | Use this configuration in Android library projects to include lint checks you want Gradle to compile into a lint.jar file and package in your AAR. This causes projects that consume your AAR to also apply those lint checks. If you were previously using the lintChecks dependency configuration to include lint checks in the published AAR, you need to migrate those dependencies to instead use the lintPublish configuration. GroovyKotlinDeprecated Gradle configurations (available in AGP 1.0–4.2)
All of the above configurations apply dependencies to all build variants. If you instead want to declare a dependency for only a specific build variant source set or for a testing source set, you must capitalize the configuration name and prefix it with the name of the build variant or testing source set. For example, to add an implementation dependency only to your «free» product flavor (using a remote binary dependency), it looks like this: GroovyKotlinHowever, if you want to add a dependency for a variant that combines a product flavor and a build type, then you must initialize the configuration name in the configurations block. The following sample adds a runtimeOnly dependency to your «freeDebug» build variant (using a local binary dependency). GroovyKotlinTo add implementation dependencies for your local tests and instrumented tests , it looks like this: GroovyKotlinHowever, certain configurations don’t make sense in this situation. For example, because other modules can’t depend on androidTest , you get the following warning if you use the androidTestApi configuration: Add annotation processorsIf you add annotation processors to your compile classpath, you’ll see an error message similar to the following: To resolve this error, add annotation processors to your project by configuring your dependency using annotationProcessor as shown below: GroovyKotlinNote: Android plugin for Gradle 3.0.0+ no longer supports android-apt plugin. Pass arguments to annotation processorsIf you need to pass arguments to an annotation processor, you can do so using the AnnotationProcessorOptions block in your module’s build configuration. For example, if you want to pass primitive data types as key-value pairs, you can use the argument property, as shown below: GroovyKotlinHowever, when using Android Gradle plugin 3.2.0 and higher, you need to pass processor arguments that represent files or directories using Gradle’s CommandLineArgumentProvider interface. Using CommandLineArgumentProvider allows you or the annotation processor author to improve the correctness and performance of incremental and cached clean builds by applying incremental build property type annotations to each argument. For example, the class below implements CommandLineArgumentProvider and annotates each argument for the processor. The sample also uses the Groovy language syntax and is included directly in the module’s build.gradle file. GroovyKotlinAfter you define a class that implements CommandLineArgumentProvider , you need to create an instance and pass it to the Android plugin using the annotationProcessorOptions.compilerArgumentProvider method, as shown below. GroovyKotlinTo learn more about how implementing CommandLineArgumentProvider helps improve build performance, read Caching Java projects. Disable the annotation processor error checkIf you have dependencies on the compile classpath that include annotation processors you don’t need, you can disable the error check by adding the following to your build.gradle file. Keep in mind, the annotation processors you add to the compile classpath are still not added to the processor classpath. GroovyKotlinIf you use Kotlin and kapt: GroovyKotlinIf you experience issues after migrating your project’s annotation processors to the processor classpath, you can allow annotation processors on the compile classpath by setting includeCompileClasspath to true . However, setting this property to true is not recommended, and the option to do so will be removed in a future update of the Android plugin. Exclude transitive dependenciesAs an app grows in scope, it can contain a number of dependencies including direct dependencies and transitive dependencies (libraries which your app’s imported libraries depend on). To exclude transitive dependencies that you no longer need, you can use the exclude keyword as given below: GroovyKotlinExclude transitive dependencies from test configurationsIf you need to exclude certain transitive dependencies from your tests, the code sample shown above might not work as expected. That’s because a test configuration (e.g., androidTestImplementation ) extends the module’s implementation configuration. That is, it always contains implementation dependencies when Gradle resolves the configuration. So, to exclude transitive dependencies from your tests, you must do so at execution time as shown below: GroovyKotlinNote: You can still use the exclude keyword in the dependencies block as shown in the original code sample from the Exclude transitive dependencies section to omit transitive dependencies that are specific to the test configuration and are not included in other configurations. Configure Wear OS app dependenciesConfiguring dependencies for a Wear OS module is similar to that of any other module; that is, Wear OS modules use the same dependency configurations, such as implementation and compileOnly . Wear modules also support variant-aware dependency management. As a result, if your base app module has a dependency on a Wear module, each variant of the base module consumes the matching variant from the Wear module. If you are building a simple app with a dependency on only one Wear module, where the module configures the same variants as your base module, you need to specify the wearApp configuration in your base module’s build.gradle file as shown below: GroovyKotlinIf you have multiple Wear modules and you want to specify a different Wear module per app flavor, you can do so using the flavor WearApp configuration, as follows (however, you can’t include other dependencies that use the wearApp configuration): GroovyKotlinRemote repositoriesWhen your dependency is something other than a local library or file tree, Gradle looks for the files in whichever online repositories are specified in the repositories block of your build.gradle file. The order in which you list each repository determines the order in which Gradle searches the repositories for each project dependency. For example, if a dependency is available from both repository A and B, and you list A first, Gradle downloads the dependency from repository A. By default, new Android Studio projects specifies Google’s Maven repository and JCenter as repository locations in the project’s top-level build.gradle file, as shown below: GroovyKotlinIf you want something from the Maven central repository, then add mavenCentral() , or for a local repository use mavenLocal() : GroovyKotlinOr you can declare specific Maven or Ivy repositories as follows: GroovyKotlinFor more information, see the Gradle Repositories guide. Google’s Maven repositoryThe most recent versions of the following Android libraries are available from Google’s Maven repository: You can see all available artifacts at Google’s Maven repository index (see below for programmatic access). To add one of these libraries to your build, include Google’s Maven repository in your top-level build.gradle file: GroovyKotlinThen add the desired library to your module’s dependencies block. For example,the appcompat library looks like this: GroovyKotlinHowever, if you’re trying to use an older version of the above libraries and your dependency fails, then it’s not available in the Maven repository and you must instead get the library from the offline repository. Programmatic accessFor programmatic access to Google’s Maven artifacts, you can get an XML list of artifact groups from maven.google.com/master-index.xml. Then, for any group, you can view its library names and versions at: maven.google.com/ group_path /group-index.xml For example, libraries in the android.arch.lifecycle group are listed at maven.google.com/android/arch/lifecycle/group-index.xml. You can also download the POM and JAR files at: maven.google.com/ group_path / library / version / library — version . ext Offline repository from SDK ManagerFor libraries not available from the Google Maven repository (usually older library versions), you must download the offline Google Repository package from the SDK Manager. Then you can add these libraries to your dependencies block as usual. The offline libraries are saved in android_sdk /extras/ . Native dependencies with the Android Gradle pluginAAR libraries can contain native dependencies that the Android Gradle Plugin can consume. AGP is also capable of producing AARs that expose native libraries to their consumers. Using native dependenciesStarting with Android Gradle plugin 4.0, C/C++ dependencies can be imported from AARs linked in your build.gradle file. Gradle will automatically make these available to the native build system, but your build system must be configured to make use of the imported libraries and headers. Since C/C++ dependencies are distributed as AARs, the following links about generic AARs may be helpful:
This document focuses on how to configure your native build system and assumes you’ve already added a C/C++ dependency AAR into your project’s Gradle build environment. Native dependencies in AARsAAR dependencies of your Gradle modules can expose native libraries for use by your application. Inside the AAR, the prefab directory contains a Prefab package, which includes the headers and libraries of the native dependency. Each dependency can expose at most one Prefab package, which comprises one or more modules. A Prefab module is a single library, which could be either a shared, static, or header only library. The package and module names need to be known to make use of the libraries. By convention the package name will match the Maven artifact name and the module name will match the C/C++ library name, but this is not required. Consult the dependency’s documentation to determine what names it uses. Build system configurationAndroid Gradle Plugin 4.0 Android Gradle Plugin 4.1+ The prefab feature must be enabled for your Android Gradle module. To do so, add the following to the android block of your module’s build.gradle file: GroovyKotlinDependencies imported from an AAR are exposed to CMake via CMAKE_FIND_ROOT_PATH. This value will be set automatically by Gradle when CMake is invoked, so if your build modifies this variable be sure to append rather than assign to it. Each dependency exposes a config-file package to your build. These are imported with the find_package command. This command searches for config-file packages matching the given package name and version and exposes the targets it defines to be used in your build. For example, if your application defines libapp.so and it uses cURL, your CMakeLists.txt should include the following: app.cpp is now able to #include «curl/curl.h» , libapp.so will be automatically linked against libcurl.so when building, and libcurl.so will be included with the app. Publishing native libraries in AARsThe ability to create native AARs was first added in AGP 4.1. To export your native libraries, add the following to the android block of your library project’s build.gradle file: GroovyKotlinIn this example, the mylibrary and myotherlibrary libraries from either your ndk-build or CMake external native build will be packaged in the AAR produced by your build, and each will export the headers from the specified directory to their dependents. Dependency orderThe order in which you list your dependencies indicates the priority for each: the first library is higher priority than the second, the second is higher priority than the third, and so on. This order is important in the event that resources are merged or manifest elements are merged into your app from the libraries. For example, if your project declares the following:
Then, the flat dependency order will be as follows: This ensures that both LIB_A and LIB_B can override LIB_C ; and LIB_D is still higher priority than LIB_B because LIB_A (which depends on it) has higher priority than LIB_B . For more information about how manifests from different project sources/dependencies are merged, see Merge multiple manifest files. View module dependenciesSome direct dependencies may have dependencies of their own. These are called transitive dependencies. Rather than requiring you to manually declare each transitive dependency, Gradle automatically gathers and adds them for you. The Android plugin for Gradle provides a task that displays a list of the dependencies Gradle resolves for a given module. For each module, the report also groups the dependencies based on build variant, testing source set, and classpath. The following is sample report for an app module’s runtime classpath of its debug build variant and compile classpath of its instrumented test source set. To run the task, proceed as follows:
For more information about managing dependencies in Gradle, see Dependency management basics in the Gradle User Guide. Fix dependency resolution errorsWhen you add multiple dependencies to your app project, those direct and transitive dependencies might conflict with one another. The Android Gradle plugin tries to resolve these conflicts gracefully, but some conflicts may lead to compile time or runtime errors. To help you investigate which dependencies are contributing to errors, inspect your app’s dependency tree and look for dependencies that appear more than once or with conflicting versions. If you can’t easily identify the duplicate dependency, try using Android Studio’s UI to search for dependencies that include the duplicate class as follows:
The following sections describe the different types of dependency resolution errors you may encounter and how to fix them. Fix duplicate class errorsIf a class appears more than once on the runtime classpath, you get an error similar to the following: This error typically occurs due to one of the following circumstances:
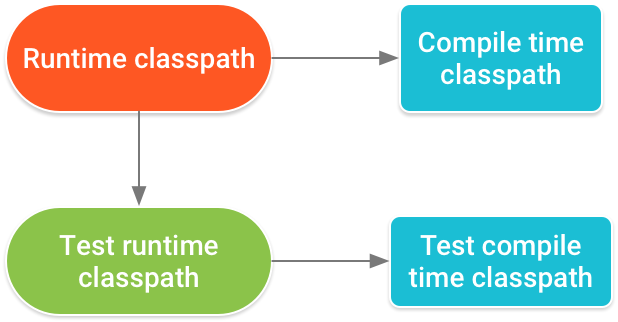
Fix conflicts between classpathsWhen Gradle resolves the compile classpath, it first resolves the runtime classpath and uses the result to determine what versions of dependencies should be added to the compile classpath. In other words, the runtime classpath determines the required version numbers for identical dependencies on downstream classpaths. Your app’s runtime classpath also determines the version numbers that Gradle requires for matching dependencies in the runtime classpath for the app’s test APK. The hierarchy of classpaths is described in figure 1. Figure 1. Version numbers of dependencies that appear across multiple classpaths must match according to this hierarchy. A conflict where different versions of the same dependency appears across multiple classpaths might occur when, for example, your app includes a version of a dependency using the implementation dependency configuration and a library module includes a different version of the dependency using the runtimeOnly configuration. When resolving dependencies on your runtime and compile time classpaths, Android Gradle plugin 3.3.0 and higher attempt to automatically fix certain downstream version conflicts. For example, if the runtime classpath includes Library A version 2.0 and the compile classpath includes Library A version 1.0, the plugin automatically updates the dependency on the compile classpath to Library A version 2.0 to avoid errors. However, if the runtime classpath includes Library A version 1.0 and the compile classpath includes Library A version 2.0, the plugin does not downgrade the dependency on the compile classpath to Library A version 1.0, and you still get an error similar to the following: To resolve this issue, do one of the following:
Apply custom build logicThis section describes advanced topics that are useful when you want to extend the Android Gradle plugin or write your own plugin. Publish variant dependencies to custom logicA library can have functionalities that other projects or sub-projects might want to use. Publishing a library is the process by which the library is made available to its consumers. Libraries can control which dependencies its consumers have access to at compile time and runtime. There are two separate configurations that hold the transitive dependencies of each classpath which must be used by consumers to consume the library as described below:
To learn more about the relationships between the different configurations, go to The Java Library plugin configurations. Custom dependency resolution strategiesA project may include a dependency on two different versions of the same library which can lead to dependency conflicts. For example, if your project depends on version 1 of module A and version 2 of module B, and module A transitively depends on version 3 of module B, there arises a dependency version conflict. To resolve this conflict, the Android Gradle plugin uses the following dependency resolution strategy: when the plugin detects that different versions of the same module are in the dependency graph, by default, it chooses the one with the highest version number. However, this strategy might not always work as you intend. To customize the dependency resolution strategy, use the following configurations to resolve specific dependencies of a variant that are needed for your task:
The Android Gradle plugin includes getters that you can use to access the configuration objects of each variant. Thus, you can use the variant API to query the dependency resolution as shown in the example below: GroovyKotlinDependency information for Play ConsoleWhen building your app using AGP 4.0.0 and higher, the plugin includes metadata that describes the library dependencies that are compiled into your app. When uploading your app, the Play Console inspects this metadata to provide alerts for known issues with SDKs and dependencies your app uses, and, in some cases, provide actionable feedback to resolve those issues. The data is compressed, encrypted by a Google Play signing key, and stored in the signing block of your release app. We recommend keeping this dependencies file for a safe and positive user experience. However, if you’d rather not share this information, you can opt out by including the following dependenciesInfo block in your module’s build.gradle file: For more information on our policies and potential issues with dependencies, see our support page on using third-party SDKs in your app. Content and code samples on this page are subject to the licenses described in the Content License. Java is a registered trademark of Oracle and/or its affiliates. Источник  Когда к мобильному устройству присоединены наушники  ОС Google Android развивается, и по всему видимому |