- Как создать калькулятор на Java — полное руководство с кодом
- Создание проекта
- Включение привязки данных в проекте
- Разработка макета калькулятора
- Общие принципы создания виджетов макета
- Создание макета калькулятора
- Внутренние компоненты калькулятора
- Обработка нажатий на цифры
- Обработка кликов по кнопкам операторов
- Заключение
- Simple Calculator App in Android Studio for Beginners
- How to build a simple calculator app – full tutorial with code
- Creating the project
- Enable data binding in your project
- Designing the Calculator layout
- Understanding the layout widgets
- Building the Calculator layout
- Calculator internals
- Handling button clicks (numbers)
- Handling button clicks (operators)
- Finally
Как создать калькулятор на Java — полное руководство с кодом
В этом руководстве мы расскажем, как создать калькулятор на Java для Android. Если вы новичок в программировании и никогда раньше не создавали приложения, ознакомьтесь с нашим предыдущим руководством по написанию первого приложения для Android:

Предполагается, что у вас есть хотя бы минимальный базовый опыт создания Android – приложений .
Полный исходный код калькулятора, описанного ниже, доступен для использования и изменения на github .
Создание проекта
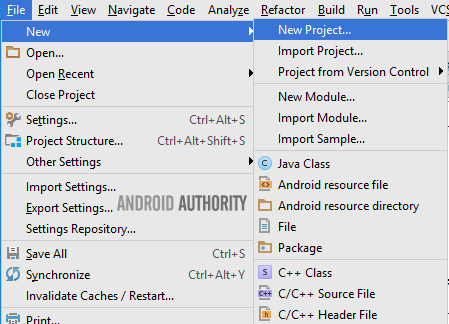
Первое, что нужно сделать — это создать в Android Studio новый проект: Start a new Android Studio project или File — New — New Project :

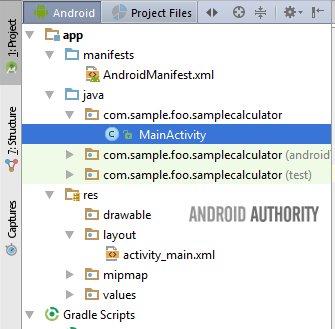
Для этого руководства мы выбрали в панели « Add an Activity to Mobile » опцию « EmptyActivity », для « MainActivity » мы оставили имя по умолчанию – « Activity ». На этом этапе структура должна выглядеть, как показано на рисунке ниже. У вас есть MainActivity внутри пакета проекта и файл activity_main.xml в папке layout :

Включение привязки данных в проекте
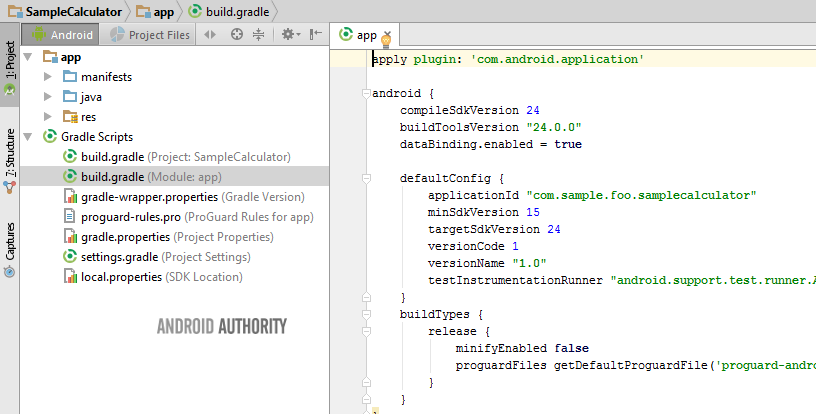
Перед тем, как создать приложение для Андроид с нуля, нужно уяснить, что использование привязки данных помогает напрямую обращаться к виджетам ( Buttons , EditText и TextView ), а не находить их с помощью методов findViewById() . Чтобы включить привязку данных, добавить следующую строку кода в файл build.gradle .

Разработка макета калькулятора
Для включения привязки данных в файле activity_main.xml требуется еще одно изменение. Оберните сгенерированный корневой тег ( RelativeLayout ) в layout , таким образом сделав его новым корневым тегом.
Как научиться создавать приложения для Андроид? Читайте наше руководство дальше.
Тег layout — это предупреждает систему построения приложения, что этот файл макета будет использовать привязку данных. Затем система генерирует для этого файла макета класс Binding . Поскольку целевой XML-файл называется activity_main.xml , система построения приложения создаст класс ActivityMainBinding , который можно использовать в приложении, как и любой другой класс Java . Имя класса составляется из имени файла макета, в котором каждое слово через подчеркивание будет начинаться с заглавной буквы, а сами подчеркивания убираются, и к имени добавляется слово « Binding ».
Теперь перейдите к файлу MainActivity.java . Создайте закрытый экземпляр ActivityMainBinding внутри вашего класса, а в методе onCreate() удалите строку setContentView () и вместо нее добавьте DataBindingUtil.setContentView() , как показано ниже.
Общие принципы создания виджетов макета
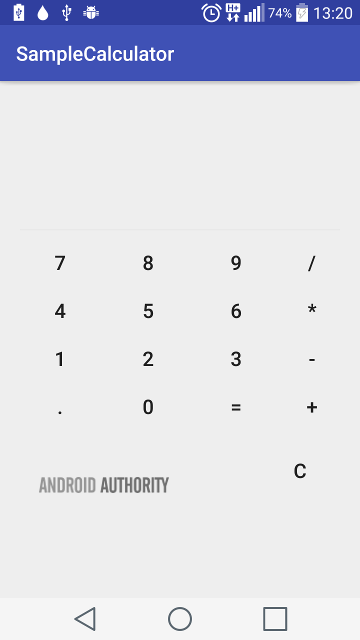
В приложении калькулятора есть четыре основных элемента:
RelativeLayout — определяет, как другие элементы будут укладываться или отображаться на экране. RelativeLayout используется для позиционирования дочерних элементов по отношению друг к другу или к самим себе.
TextView — элемент используется для отображения текста. Пользователи не должны взаимодействовать с этим элементом. С помощью TextView отображается результат вычислений.
EditText — похож на элемент TextView, с той лишь разницей, что пользователи могут взаимодействовать с ним и редактировать текст. Но поскольку калькулятор допускает только фиксированный набор вводимых данных, мы устанавливаем для него статус « не редактируемый ». Когда пользователь нажимает на цифры, мы выводим их в EditText .
Button — реагирует на клики пользователя. При создании простого приложения для Андроид мы используем кнопки для цифр и операторов действий в калькуляторе.
Создание макета калькулятора

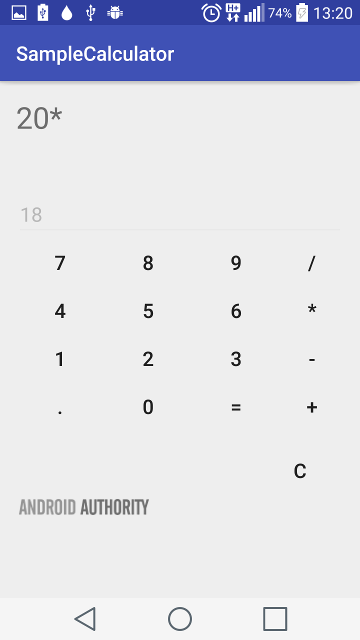
Код макета калькулятора объемный. Это связано с тем, что мы должны явно определять и тщательно позиционировать каждую из кнопок интерфейса. Ниже представлен фрагмент сокращенной версии файла макета activity_main :
Внутренние компоненты калькулятора
Перед тем, как создать приложение на телефон Android , отметим, что valueOne и valueTwo содержат цифры, которые будут использоваться. Обе переменные имеют тип double , поэтому могут содержать числа с десятичными знаками и без них. Мы устанавливаем для valueOne специальное значение NaN ( не число ) — подробнее это будет пояснено ниже.
Этот простой калькулятор сможет выполнять только операции сложения, вычитания, умножения и деления. Поэтому мы определяем четыре статических символа для представления этих операций и переменную CURRENT_ACTION , содержащую следующую операцию, которую мы намереваемся выполнить.
Затем мы используем класс DecimalFormat для форматирования результата. Конструктор десятичного формата позволяет отображать до десяти знаков после запятой.
Обработка нажатий на цифры
В нашем создаваемом простом приложении для Андроид всякий раз, когда пользователь нажимает на цифру или точку, нам нужно добавить эту цифру в editText . Пример кода ниже иллюстрирует, как это делается для цифры ноль ( 0 ).
Обработка кликов по кнопкам операторов

Обработка нажатия кнопок операторов ( действий ) выполняется по-другому. Сначала нужно выполнить все ожидающие в очереди вычисления. Поэтому мы определяем метод computeCalculation . В computeCalculation , если valueOne является допустимым числом, мы считываем valueTwo из editText и выполняем текущие операции в очереди. Если же valueOne является NaN , для valueOne присваивается цифра в editText .
Продолжаем создавать копию приложения на Андроид . Для каждого оператора мы сначала вызываем computeCalculation() , а затем устанавливаем для выбранного оператора CURRENT_ACTION . Для оператора равно (=) мы вызываем computeCalculation() , а затем очищаем содержимое valueOne и CURRENT_ACTION .
Поздравляю! Мы завершили создание простого калькулятора. Теперь вы сможете создать приложение для Андроид сами.
Заключение
Если вы запустите и протестируете данное приложение, то увидите некоторые моменты, которые можно улучшить: 1) возможность нажимать на кнопку оператора, когда editText очищен ( т. е. без необходимости ввода первой цифры ), 2) возможность продолжать вычисления после нажатия кнопки « Равно ».
Полный код примера доступен на github .
Пожалуйста, опубликуйте свои отзывы по текущей теме статьи. За комментарии, подписки, лайки, дизлайки, отклики низкий вам поклон!
Дайте знать, что вы думаете по данной теме в комментариях. Мы крайне благодарны вам за ваши комментарии, дизлайки, отклики, лайки, подписки!
Источник
Simple Calculator App in Android Studio for Beginners

We are going to design a simple functional calculator application which will perform simple arithmetic operations like addition , subtraction, multiplication and division.

Open android studio and start a new project with empty activity.
In activty_main.xml file we are going to design we have to build basic UI for the application. We will need 2 edit text fields to enter the numbers to operate on. 1 text field to display answer of the operation , 4 buttons for performing the operation and 1 for displaying the operation.
So lets design that….

After designing the UI , In MainActivity.java file we will write java code to give actions to the elements in order to make our app functional. First we will make reference to our elements in the activity.
We will create a global double ans variable inside mainactivity class and initialize it to zero.
Now we will make onClickListner to invoke a callback when a view (in this case button) is clicked and do something. In our case we need 4 onClickListner for our operations and 1 to display the answer.
The entered numbers in the edit text have to be first converted to double (use double variable as answer can also be a decimal value) variable to perform operations on them. In order to display the answer in text view we have to convert the ans variable which is in int to String.
There is still a problem if you run this code. When we to division operation by 0 the app stops working in order to avoid that we have to display a message using Toast widget.
If both the numbers are not entered then the app will crash so we have add condition for that :
This is how M ainActivity.java file we look :
Now we have simple functional calculator application.
Источник
How to build a simple calculator app – full tutorial with code

Continuing the Android Authority tradition of building simple apps (see how to build an image gallery app and how to create an SMS app), we are going to build a simple but functional calculator app. If you’re new to programming and have never built an app before, you should check out our previous tutorial on writing your first Android app. This tutorial assumes that you have at least, some basic experience writing Android apps.
Much like developing any non-trivial program, there is more than one way to do it, and if you get ten different programmers, you might get ten different ways of writing a calculator (unless they all happen to be Android Authority readers *wink*). The complete source for the calculator app written below is available on github for use, reuse and modification as much as you like.
Creating the project
The first thing to do is create a new project by either clicking on “Start a new Android Studio project”, or ‘File -> New -> New Project’.
For this calculator tutorial, we selected the EmptyActivity option on the “Add an Activity to Mobile” screen, and left the Activity name as the default MainActivity. At this point, your layout hierarchy should look like the image below. You have a MainActivity within your project package, and an activity_main.xml file in the layout directory.
Enable data binding in your project
For our sample calculator, we will setup our project to use data binding. Using data binding in this app simply helps us refer to our widgets (Buttons, EditText and TextView) directly, rather than finding them with findViewById() methods. To enable data binding, you must add the following line to your app build.gradle file.
Designing the Calculator layout
To enable data binding in our activity_main.xml file requires one last change. Wrap the generated root tag (in our case it was a RelativeLayout) within a layout tag, making the layout tag the new root tag.
The layout tag is what alerts the build system that this layout file intends to use data binding. The build system then generates a Binding class automatically for this layout file. Since the target xml file is named activity_main.xml, the build system will generate a class called ActivityMainBinding, which you can reference in your app like any other Java class. The class name is generated from the layout file name by capitalizing the first letter of each word after an underscore, removing all underscores, and adding ‘Binding’ to the name.
At this point, switch to your MainActivity.java file. Create a private ActivityMainBinding instance within your class, and in the onCreate() method, delete the setContentView() line and replace with the DataBindingUtil.setContentView() line in the code snippet below.
Understanding the layout widgets
There are four main items in our calculator app. These are:
- RelativeLayout – this item governs how the other items are laid out, or displayed on the screen. The RelativeLayout is used to position child elements in relation to each other, or to itself.
- TextView – this item is used to display text. Users are not expected to interact with this item. The result of computations are displayed using a TextView.
- EditText – this is a kind of TextView that users can edit, and change the text. However, since the calculator allows only a fixed set of inputs, we set the edit text to be non-editable. When the user clicks on numbers, we display the numbers in the EditText.
- Button – this item allows interaction by the user, and ideally, should respond to clicks by the user. We use buttons for the numbers, and operators in the calculator.
Building the Calculator layout
The calculator layout is a bit long. This is due to the fact that we have to explicitly define, and meticulously position, each of the buttons in the calculator. The snippet below is a condensed version of the activity_main layout file
Calculator internals
Our calculator has two values, valueOne and valueTwo. These values hold the numbers to be operated on. Both values are of type double, so they can hold numbers with and without decimals. We set valueOne to the special Double value NaN (not a number) for reasons that will be clearer below.
This simple calculator can only perform operations of either addition, subtraction, multiplication or division. So we define four static chars to represent these operations, and a CURRENT_ACTION variable, which holds the next operation we intend to perform.
Finally, we use the DecimalFormat class to format the output of our calculator. The decimal format constructor permits displaying up to ten decimal places.
Handling button clicks (numbers)
Whenever the user clicks a number (or dot), we simply want to add that number to the editText. The code sample below shows how we accomplish this for number zero (0).
Handling button clicks (operators)
Handling clicks on operators is a little different. We would like to perform any pending computations first. So we define a computeCalculation method. Within computeCalculation, if valueOne is a valid number, we read valueTwo from the editText, and perform the current queued operation. On the other hand, if valueOne is NaN, valueOne assigned the number in the editText.
For every operator, we call computeCalculation() first, then set CURRENT_ACTION to the selected operator, while for the equals ‘=’ operator, we call computeCalculation(), then clear the contents of both valueOne and CURRENT_ACTION.
Congratulations! You have completed your simple calculator Android app.
Finally
If you run and use the above app, you will notice some possible areas of improvements, such as 1) click an operator when the editText is clear (i.e. without entering a number first), 2) allow the user continue calculating after clicking the equals button.
As always, the complete source is available on github, and you are free (nay encouraged) to modify, and use, to your heart’s content. Hola in the comments if you found this useful, and/or want to recommend an app for a future tutorial.
Источник


