- How to fix “Android Studio doesn’t see device” in Android Studio?
- How To Solve “Android Studio doesn’t see device”
- Method 1
- Method 2
- Method 3
- Method 4
- Troubleshooting when Android Studio doesn’t recognize your device
- The Issue
- How to check whether my device is identified
- Possible Solutions
- 1) Make sure USB Debugging is enabled in your device
- 2) Make sure you have installed the android sdk
- 3) Install the Android USB drivers for your phone
- 4) Install Google USB Driver
- 5) Install a device software
- 6) Configure/Change Media Mode
- 8) Configure Knox security settings
- 9) Try Swapping USB ports and cables
- 10) Retry!
- Android Studio не видит устройство
- Debugging with Android Studio
- In this document
- See also
- Run your App in Debug Mode
- Attach the debugger to a running process
- Use the System Log
- Write log messages in your code
- View the system log
- Work with Breakpoints
- View and configure breakpoints
- Debug your app with breakpoints
- Track Object Allocation
- Analyze Runtime Metrics to Optimize your App
- Capture Screenshots and Videos
How to fix “Android Studio doesn’t see device” in Android Studio?
In Android Studio, sometimes the list of devices and emulators doesn’t list your physical device when you try to plug it in. Or you may have faces a situation when you plugged the phone in for the first time, no dialog appeared asking if you trust the computer. But the laptop is already allowed to connect to the mobile device. However, the button Run does not allow to deploy the app to the connected device because it thinks that there is no connected device. So you may get confused about what’s wrong with the device. Before doing anything, just check the following configuration. Configuring Your System to Detect Your Android Device
- Install the USB driver for your Android device.
- Enable USB debugging on your Android device.
- If necessary, install the Android development tools (JDK/SDK/NDK).
- Add your Android SDK to the RAD Studio SDK Manager.
- Connect your Android device to your development system using the USB cable provided with your device.
Even if you have done everything that is mentioned above, if you get this error “Android Studio doesn’t see device”, then you are on the right page. This article is for such programmers. In this article, there are five methods listed below to solve this issue.
How To Solve “Android Studio doesn’t see device”
Method 1
To change what your application defaults to when you click to run or debug in Android Studio, follow these steps:
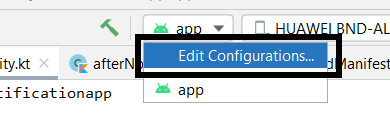
Step 1: Go to the Run (on the left corner) then click on Edit Configurations.
Or you can just click here to find the “edit configurations” tab :
Step 2: Select the project. Find the Target Device section under the General tab on the Android Application page.
That seems to be where you toggle what the project builds too. If you’re importing a project it actually defaults to Emulator, not sure why. You can also select “Open Select Deployment Target Dialog” to list both connected as well as emulated devices.
Method 2
If Android Studio doesn’t even detect your device using ‘ADB devices’. then try to switch to PTP instead of MTP on your device. To do so, just click on “File transfer via USB touch for more options” in the notification area of the device.
and then choose the PTP option.
Then you will get a popup on your device regarding access. Just try restarting Android Studio to show up there as well though.
Method 3
On your device:
Go to settings/ developer settings / allow USB debug mode
If you might have the device currently connected to your PC, then ‘allow USB debug mode’ option is disabled. Just disconnect the device and the option should now be available. If you are using Android 4.2 and newer, the Developer options are hidden by default. To make it available, go to Settings > About phone and tap Build number seven times.
Return to the previous screen to find Developer options.
Method 4
You may need to restart ADB, from the terminal. To do so just type the below commands:
- adb kill-server
- adb start-server
or from ddms(If you are using Android Studio version My Personal Notes arrow_drop_up
Источник
Troubleshooting when Android Studio doesn’t recognize your device


Senior Software Engineer

The first step of making an android application is to install a suitable IDE for the development. Android Studio powered by intelliJ is one of the most popular choices. This article provides 10 possible solutions to troubleshoot when an android device is not detected by the Android Studio.
Note: This article was written based on Windows operating System. But some of the solutions will work with any other operating system as well.
A major step of the app development is to run your application and test it. For this, you need follow one of the two possible approaches, use your own device or run the app on an android virtual device (AVD — AKA an emulator).
In my opinion, the former option is more feasible, as running the emulator can be a tiring task. The emulator takes a lot of time to start, and also feeds on your own RAM. Thus, running the app on your own device is preferable most of the time. This article is written based on the Windows-7 operating system. But these steps would work in any other similar windows versions, 8, 8.1, or 10.
The Issue
Most of the developers face the major issue of Android studio not recognizing your device, for the first time. Presented below are some of the approaches that can be followed in order to solve this problem.
How to check whether my device is identified
Go to your SDK installed location. Usually it will be something like, C:\Users\Dodan\AppData\Local\Android\sdk
Go to platform-tools directory and start your command prompt from there,
(Shift+Right click -> Open Command window here)
then type “adb devices” and press enter.
If your device is identified, you will see a message similar to the following
List of devices attached
If you cannot see a device there, try the following possible solutions. Remember to re-do this step after trying each solution to identify whether your device was identified.
Possible Solutions
1) Make sure USB Debugging is enabled in your device
This option is usually available under settings -> developer options menu of your phone. Make sure the tick is on.
2) Make sure you have installed the android sdk
You can find the sdk from the following link. If you have not installed it, download and install it from here, http://developer.android.com/sdk/installing/index.html
Usually this takes about 3GB of space from your hard disk
3) Install the Android USB drivers for your phone
Make sure to download the installer from the original manufacturer. Most other alternatives will make your life even harder.
For example, for samsung devices, you can install the original software from the from the following link.
4) Install Google USB Driver
For this first you have to start the SDK manager from your computer. It will be installed usually in the following location.
C:\Users\ \AppData\Local\Android\sdk\SDK Manager.exe
In the “Extras” section of the SDK manager, you will find an option named, “Google USB Driver”. Select it and install it.
5) Install a device software
This is not the same as the Android USB drivers. For samsung, it is the Kies software. For HTC, it will be the HTC Sync Manager. Similarly, install the software related to your device brand.
Usually your device connects to the computer as an MTP device. Sometimes, changing it to Camera(PTP) or Mass Storage(USM) solves the issue.
6) Configure/Change Media Mode
Right click “My Computer” and click “Manage”.
From the Computer Management window, select, “Device Manager”
You will see your device under “other devices”, “Portable devices” or “Universal Serial Bus Controllers”.
Right click and select the update driver option.
8) Configure Knox security settings
If your device is a samsung s6, you should additionally enable knox configurations listed under, settings->Security
9) Try Swapping USB ports and cables
Sounds weird! But this has proven to be the problem many people had. Try plugging your device to different ports, or try using different cables. Some cables may either be incompatible or damaged.
10) Retry!
I know that sounds bad. But, if any of those options does not work, you can either try restarting your machine, or reinstalling all the software, including android studio and the sdk, well may be, a different version.
Источник
Android Studio не видит устройство
Менеджер AVD в Android Studio не показывает мое устройство, но «устройства adb» показывает его. Я что-то упускаю здесь очевидное?
Чтобы изменить настройки приложения по умолчанию при нажатии кнопки «Выполнить» или «Отладка» в Android Studio, выполните следующие действия.
1. перейти к Run
2. Нажмите на Изменить конфигурации
3. Выберите проект
4. найдите раздел « Целевое устройство » на вкладке «Общие» на странице приложения Android .
Кажется, именно здесь вы переключаете то, к чему строится проект. Если вы импортируете проект, то по умолчанию используется Emulator, но не знаете почему. Вы также можете выбрать «Открыть диалог выбора целевого развертывания», чтобы отобразить список подключенных и эмулируемых устройств.
У меня недавно были проблемы с этим, и независимо от того, что я сделал (перезапустите adb, отредактируйте adb_usb.ini, перезагрузите компьютер + устройство + подкачка USB-порт, переустановите студию и т. Д. И т. Д.), Я просто не мог заставить его работать, и не мог даже определить мое устройство, используя «устройства adb». Наконец, после примерно 2 часов поиска в Google и тестирования, кто-то предложил переключиться на PTP вместо MTP на моем устройстве. Когда я сделал это, на моем устройстве появилось всплывающее окно с просьбой разрешить доступ к моему mac, и внезапно все заработало (пришлось перезапустить студию, чтобы она тоже там появилась).
Возможно, сейчас я сталкиваюсь с этой веткой, но это первый результат поиска в Google, и у меня было много проблем с поиском ответа на эту проблему, поэтому я подумал, что это следует добавить в качестве решения.
На вашем устройстве:
Зайдите в настройки / настройки разработчика / разрешить режим отладки по USB
Если опция «разрешить режим отладки USB» отключена. Тогда вы можете подключить устройство к вашему компьютеру. Отключите устройство, и опция должна быть доступна
Примечание. В Android 4.2 и новее параметры разработчика по умолчанию скрыты. Чтобы сделать его доступным, перейдите в «Настройки»> «О телефоне» и нажмите «Построить номер» семь раз. Вернитесь к предыдущему экрану, чтобы найти параметры разработчика.
Если это все еще не помогает, вы можете гуглить это с этим выражением:
Как включить опции разработчика на YOUR_PHONE_TYPE
Некоторые кабели нельзя использовать в режиме разработчика или для передачи файла . Решением было бы поменять кабель и не тратить время.
Пришлось, killall adb потому что Android Studio каким-то образом зависал и больше не хотел общаться с adb. Таким образом, мое устройство не обнаружилось.
Таким образом, выход из Android Studio, завершение всех экземпляров adb в Terminal и повторный запуск Android Studio (должен спросить, должен ли он тогда включить отладку) сработал.
Это работает для меня, выполнив следующие действия: —
Если вы используете Windows, устройство не будет отображаться из-за проблемы с драйвером.
Зайдите в диспетчер устройств (просто найдите его с помощью «Пуск») и найдите все устройства с ошибкой. Многие андроиды будут отображаться как неизвестные USB-устройства и поставляются с восклицательным знаком. Выберите это устройство и попробуйте обновить драйверы для него. для обновления часть перейдите по ссылке: универсальный АДБ
Но перед этим вы должны обновить менеджер SDK и убедиться, что установлен пакет драйвера USB Google.
По завершении файлы драйвера загружаются в каталог \ extras \ google \ usb_driver \. Подсказки : найдите «android_winusb.inf» в Windows «Пуск» и «Открыть местоположение файла», чтобы получить упомянутый каталог.
Откройте диспетчер устройств, перейдите к устройству Android, щелкните его правой кнопкой мыши и выберите «Обновить программное обеспечение драйвера», затем выберите «Обзор программного обеспечения драйвера». Следуйте ранее указанному пути к файлу, чтобы установить Google USB Driver.
Перезапустите Android Studio и Developer Options на вашем устройстве Android и снова подключите USB.
Источник
Debugging with Android Studio
In this document
See also
Android Studio enables you to debug apps running on the emulator or on an Android device. With Android Studio, you can:
- Select a device to debug your app on.
- View the system log.
- Set breakpoints in your code.
- Examine variables and evaluate expressions at run time.
- Run the debugging tools from the Android SDK.
- Capture screenshots and videos of your app.
To debug your app, Android Studio builds a debuggable version of your app, connects to a device or to the emulator, installs the app and runs it. The IDE shows the system log while your app is running and provides debugging tools to filter log messages, work with breakpoints, and control the execution flow.
Run your App in Debug Mode

Figure 1. The Choose Device window enables you to select a physical Android device or a virtual device to debug your app.
To run your app in debug mode, you build an APK signed with a debug key and install it on a physical Android device or on the Android emulator. To set up an Android device for development, see Using Hardware Devices. For more information about the emulator provided by the Android SDK, see Using the Emulator.
To debug your app in Android Studio:
- Open your project in Android Studio.
- Click Debug in the toolbar.
- On the Choose Device window, select a hardware device from the list or choose a virtual device.
- Click OK. Your app starts on the selected device.
Figure 1 shows the Choose Device window. The list shows all the Android devices connected to your computer. Select Launch Emulator to use an Android virtual device instead. Click the ellipsis  to open the Android Virtual Device Manager.
Android Studio opens the Debug tool window when you debug your app. To open the Debug window manually, click Debug . This window shows threads and variables in the Debugger tab, the device status in the Console tab, and the system log in the Logcat tab. The Debug tool window also provides other debugging tools covered in the following sections.

Figure 2. The Debug tool window in Android Studio showing the current thread and the object tree for a variable.
Attach the debugger to a running process
You don’t always have to restart your app to debug it. To debug an app that you’re already running:
- Click Attach debugger to Android proccess
 .
. - In the Choose Process window, select the device and app you want to attach the debugger to.
- To open the Debug tool window, click Debug .
 .
.Use the System Log
The system log shows system messages while you debug your app. These messages include information from apps running on the device. If you want to use the system log to debug your app, make sure your code writes log messages and prints the stack trace for exceptions while your app is in the development phase.
Write log messages in your code
To write log messages in your code, use the Log class. Log messages help you understand the execution flow by collecting the system debug output while you interact with your app. Log messages can tell you what part of your application failed. For more information about logging, see Reading and Writing Logs.
The following example shows how you might add log messages to determine if previous state information is available when your activity starts:
During development, your code can also catch exceptions and write the stack trace to the system log:
Note: Remove debug log messages and stack trace print calls from your code when you are ready to publish your app. You could do this by setting a DEBUG flag and placing debug log messages inside conditional statements.
View the system log
Both the Android DDMS (Dalvik Debug Monitor Server) and the Debug tool windows show the system log; however, the Android DDMS tool window lets you view only log messages for a particular process. To view the system log on the Android DDMS tool window:
- Start your app as described in Run your App in Debug Mode.
- Click Androidto open the Android DDMS tool window.
- If the system log is empty in the Logcat view, click Restart.
 to open the Android DDMS tool window.
Figure 4. The system log in the Android DDMS tool window.
The Android DDMS tool window gives you access to some DDMS features from Android Studio. For more information about DDMS, see Using DDMS.
The system log shows messages from Android services and other Android apps. To filter the log messages to view only the ones you are interested in, use the tools in the Android DDMS window:
- To show only log messages for a particular process, select the process in the Devices view and then click Only Show Logcat from Selected Process. If the Devices view is not available, click Restore Devices Viewon the right of the Android DDMS tool window. This button is only visible when you hide the Devices window.
- To filter log messages by log level, select a level under Log Level on the top of the Android DDMS window.
- To show only log messages that contain a particular string, enter the string in the search box and press Enter.
 . If the Devices view is not available, click Restore Devices View
 on the right of the Android DDMS tool window. This button is only visible when you hide the Devices window.
Work with Breakpoints
Breakpoints enable you to pause the execution of your app at a particular line of code, examine variables, evaluate expressions, and continue the execution line by line. Use breakpoints to determine the causes of run-time errors that you can’t fix by looking at your code only. To debug your app using breakpoints:
- Open the source file in which you want to set a breakpoint.
- Locate the line where you want to set a breakpoint and click on it.
- Click on the yellow portion of the side bar to the left of this line, as shown in figure 5.
- Start your app as described in Run your App in Debug Mode.
Android Studio pauses the execution of your app when it reaches the breakpoint. You can then use the tools in the Debug tool window to identify the cause of the error.

Figure 5. A red dot appears next to the line when you set a breakpoint.
View and configure breakpoints
To view all the breakpoints and configure breakpoint settings, click View Breakpoints on the left side of the Debug tool window. The Breakpoints window appears, as shown in figure 6.

Figure 6. The Breakpoints window lists all the current breakpoints and includes behavior settings for each.
The Breakpoints window lets you enable or disable each breakpoint from the list on the left. If a breakpoint is disabled, Android Studio does not pause your app when it hits that breakpoint. Select a breakpoint from the list to configure its settings. You can configure a breakpoint to be disabled at first and have the system enable it after a different breakpoint is hit. You can also configure whether a breakpoint should be disabled after it is hit. To set a breakpoint for any exception, select Exception Breakpoints in the list of breakpoints.
Debug your app with breakpoints
After you set breakpoints in your code, click Rerun  to start the app again. When a breakpoint is hit, Android Studio pauses the app and highlights the breakpoint in the source code. The Debug tool window lets you examine variables and control the execution step by step:
To examine the object tree for a variable, expand it in the Variables view. If the Variables view is not visible, click Restore Variables View .
To evaluate an expression at the current execution point, click Evaluate Expression .
To advance to the next line in the code (without entering a method), click Step Over .
To advance to the first line inside a method call, click Step Into .
To advance to the next line outside the current method, click Step Out .
To continue running the app normally, click Resume Program .

Figure 7. The Variables view in the Debug tool window.
Track Object Allocation
Android Studio lets you track objects that are being allocated on the Java heap and see which classes and threads are allocating these objects. This allows you to see the list of objects allocated during a period of interest. This information is valuable for assessing memory usage that can affect application performance.
To track memory allocation of objects:
- Start your app as described in Run Your App in Debug Mode.
- Click Androidto open the Android DDMS tool window.
- On the Android DDMS tool window, select the Devices | logcat tab.
- Select your device from the dropdown list.
- Select your app by its package name from the list of running apps.
- Click Start Allocation Tracking
- Interact with your app on the device.
- Click Stop Allocation Tracking


Android Studio shows the objects that the system allocated with the following information:
- Allocation order
- Allocated class
- Allocation size
- Thread ID
- Allocation method, class, and line number
- Stack trace at the point of allocation

Figure 8. Object allocation tracking in Android Studio.
Analyze Runtime Metrics to Optimize your App
Even if your application does not generate runtime errors, this does not mean it is free of problems. You should also consider the following issues:
- Does your app use memory efficiently?
- Does your app generate unnecessary network traffic?
- What methods should you focus your attention on to improve the performance of your app?
- Does your app behave properly when the user receives a phone call or a message?
The Android Device Monitor is a stand-alone tool with a graphical user interface for serveral Android application debugging and analysis tools, including the Dalvik Debug Monitor Server (DDMS). You can use the Android Device Monitor to analyze memory usage, profile methods, monitor network traffic and simulate incoming calls and messages.
To open the Android Device Monitor from Android Studio, click Monitor on the toolbar. The Android Device Monitor opens in a new window.
For more information about the Android Device Monitor and DDMS, see Device Monitor and Using DDMS.
Capture Screenshots and Videos
Android Studio enables you to capture a screenshot or a short video of the device screen while your app is running. Screenshots and videos are useful as promotional materials for your app, and you can also attach them to bug reports that you send to your development team.
To take a screenshot of your app:
- Start your app as described in Run your App in Debug Mode.
- Click Androidto open the Android DDMS tool window.
- Click Screen Captureon the left side of the Android DDMS tool window.
- Optional: To add a device frame around your screenshot, enable the Frame screenshot option.
- Click Save.
 on the left side of the Android DDMS tool window.
To take a video recording of your app:
- Start your app as described in Run your App in Debug Mode.
- Click Androidto open the Android DDMS tool window.
- Click Screen Recordon the left side of the Android DDMS tool window.
- Click Start Recording.
- Interact with your app.
- Click Stop Recording.
- Enter a file name for the recording and click OK.
 on the left side of the Android DDMS tool window.
Источник


