- Android studio cardview material design
- Внедряем материальный дизайн
- Урок 3. Создание списков и карточек в android приложениях с Material Design
- Анимации
- Примеры
- Cardview with Recyclerview Android Example [beginners]
- Cardview XML attribute
- Cardview android example with Recyclerview
- Step 1 — Adding dependencies
- Hands-on with Material Components for Android: Cards
- Part 6 of a series covering practical usage of Material Components for Android
- Setting up a Material Components theme for Android
- Attribute by attribute
- Basic usage 🏁
- Checking ☑️
- Dragging and swipe-to-dismiss ☝️
- Theming 🎨
- Color
- Typography
- Shape
Android studio cardview material design
Android Material Design CardView general template designed by Rajat Gupta
A card is a sheet of material that serves as an entry point to more detailed information. Cards may contain a photo, text, and a link about a single subject. They may display content containing elements of varying size, such as photos with captions of variable length.


Cards are a convenient means of displaying content composed of different elements. They’re also well-suited for showcasing elements whose size or supported actions vary, like photos with captions of variable length.
Cards provide context and an entry point to more robust information and views, and their content and quantity can vary greatly. Cards within a card collection can each contain a unique data set, such as a checklist with an action, a note with an action, and a note with a photo.


Don’t overload cards with extraneous information or actions.
Content hierarchy
Use hierarchy within the card to direct users’ attention to the most important information. For example, place primary content at the top of the card, or use typography to emphasize primary content.
Images can reinforce other content in a card. However, their size and placement within the card depends on whether images are the primary content or are being used to supplement other content on the card.
Text is most legible when placed on a solid color background with a sufficient contrast ratio to the text. Text placed on image backgrounds should preserve text legibility.
Cards have a constant width and variable height. The maximum height is limited to the height of the available space on a platform, but it can temporarily expand (for example, to display a comment field).
Cards do not flip over to reveal information on the back.
Supported gestures include:
The swipe gesture may be used on a per-card basis. Limit swipe gestures within a view so that they don’t overlap with one another. For example, a swipeable card should not contain a swipeable image carousel, so that only a single action occurs when the card is swiped. The pick-up-and-move gesture may be used if it is important for the user to be able to sort cards within a collection. But consider if filtering or sorting would better organize the content.
Card collection filtering and sorting
Card collections can be programmatically sorted or filtered by date, file size, alphabetical order, or other parameters.
The first item in the collection is positioned at the top left.
The order proceeds left to right and top to bottom.
Card collections only scroll vertically.
Card content that exceeds the maximum card height is truncated and does not scroll, but the card can be expanded. Once expanded, the card may exceed the maximum height of the view. In this case, the card will scroll with the card collection.
Источник
Внедряем материальный дизайн
Настало время переходить на Lollipop, друзья. Как бы смешно это не звучало.

Буквально вчера мы в Surfingbird обновили дизайн приложения и сегодня, по свежим следам, хотелось бы поделиться впечатлениями от перехода на material design.
Чтобы минимизировать количество проблем, лучше обновить все)
- Устанавливаем образ lollipop на свой
нексустелефон - Обновляем Java до 7 версии, если еще нет
- Обновляем IDE, мы используем Intellij Idea
- Обновляем SDK, не забудьте обновить Tools, Platform-tools, Build-tools, Sdk и Support library
RecyclerView это новый ViewGroup компонент, который пришел на замену List/GridView. Но он не является их потомком, скорее это альтернативная ветвь эволюции. С одной стороны, это гораздо более гибкий и более эффективно работающий компонент, с другой — в нем из коробки отсутствуют, либо делаются по другому некоторые вещи, к которым мы привыкли в List/GridView (разделители, быстрый скролл, селекторы, хидеры и т.п.).
Во-первых, по субъективным ощущениям, скроллинг стал более плавным, чем при использовании listview+viewholder, во-вторых, появилось множество прекрасных штук, так что игра несомненно стоит свеч.
Перейти на этот компонент очень просто. Закидываем в библиотеки соответствующий sdk ▸ extras ▸ android ▸ support ▸ v7 ▸ recyclerview ▸ libs▸ android-support-v7-recyclerview.jar/подключаем в богомерзком gradle или чем вы пользуетесь.
1. Обновляем адаптер, если вы уже использовали view-holder паттерн, то все привычно
Заменяем BaseAdapter(или что там у вас было) на RecyclerView.Adapter
В onCreateViewHolder — парсим layout
где, собственно ViewHolder – привычная заглушка
и переносим логику наполнения view из getView в onBindViewHolder (обращаясь к холдеру — holder.stgvImageView и т.п.)
Удаляем ставшие ненужными методы типа getItem
2. Заменяем ListView на RecyclerView
3. Продолжаем разговор.
Работа с адаптером практически не изменилась.
Стал ненужным метод отключения адаптера на момент изменения (DataSetInvalidated), нотификация об изменении осталась без изменения
Изменился метод вычисления последнего видимого элемента (для автоматической подгрузки следующей порции). Предполагаю, что эту логику лучше перенести в адаптер, но, если очень некогда, то можно так, например:
Вообще, скролинг стал более низкоуровневым, теперь можно прямо в этом методе получать информацию куда и насколько проскролено (простите мой английский)
На этом месте у вас все должно заработать. Если, например, нужно добавить разделители, то их можно добавить перекрыв класс DividerItemDecoration, например так: (вертикальные разделители)
(Ахтунг, копипаста сами знаете с какого сайта)
Но не спешите с этим! Потому что появились прекрасные Карточки!
Помню, когда я был еще совсем молодым android-разработчиком, вышел пинтерест и все офигели. Мы часами разглядывали, как они реализовали карточки переменной высоты, плавающие кнопки (или это было в Path?), не суть важно. Сейчас можно получить неплохо выглядящие карточки (в том числе, переменной высоты и прямо как в пинтерест) буквально в пару строк кода.
Подключаем cardview как library project/прописываем магическую строку в систему сборки, закидываем jar, не забыв обновить версию саппорт лайбрари.
По сути, карточки — это фрейм вокруг вашего лейаута с тенюшками и скругляшками, поэтому просто обрамляем ими ваш лэйаут:
Теперь, допустим, для планшетной версии задаем отображение в две колонки, а для телефонов в одну:
(Ахтунг, копипаста сами знаете с какого сайта)
И задаем для разных устройств разный формат отображения:
Должно получиться примерно так:
- После того, как мы выложили приложение в стор, на некоторых устройствах (почему-то на нексусах) и почему-то в том числе на 4.4.4 – приложение странным образом начало падать в районе саппорт лайбрари (причем на наших телефонах (включая нексусы) все работало). Пришлось отключить proguard, это помогло но осадок остался.
- Нам не очень понравился цвет шрифта в дефолтной светлой теме. Он очееень нежен, учитывая то, что на всех андроид устройствах цветопередача нарушена разная, поэтму мы решили перекрыть цвет шрифта на чуть более темный.
- Отключить тень у акшенбара теперь можно, например, так: getSupportActionBar().setElevation(0);
- Приложение не будет работать на бете лоллипоп так же, как не работают на ней и все остальные приложения в лоллипоп дизайне (gmail, пресса)
- Иконки акшенбара стали меньше. Мы просто перенесли их в папку (xxhdpi)
- Мы пока решили забить на анимации. Перед глазами гугл-пресса и все вроде дико красиво крутится/вертится/плавает/мигает, но мы еще не готовы к такой решительной анимации.
Глаз разработчика «замылен», сложно сказать получилось хорошо или так себе. Я почему-то ожидал большего, если честно. Динамически падающих тенюшек при скролинге, например, больше магии. А в целом, все получилось чуть свежее. Хотя, конечно, мы еще не до конца ололлипопились. Посмотреть результат можно в маркете.
Я наверняка что-то забыл. Делитесь нюансами, рецептами и советами перехода на лоллипоп в комментариях. Тема актуальная, всем нам будет полезно и интересно.
Источник
Урок 3. Создание списков и карточек в android приложениях с Material Design
Перевод документации официального сайта developer.android.com
 Рисунок 1. Виджет RecyclerView.
  Рисунок 2. Список с RecyclerView.
Чтобы использовать виджет RecyclerView, вы должны установить адаптер и layout менеджер. Чтобы создать адаптер, унаследуйтесь от класса RecyclerView.Adapter. Детали реализации зависят от особенностей вашего набора данных типа views. Для получения дополнительной информации посмотрите примеры ниже.
Layout менеджер располагает элементы view в RecyclerView и определяет, когда снова использовать элементы view, которые больше не видны пользователю. Для повторного использования view, layout менеджер может попросить адаптер заменить содержимое view другими элементами из набора данных. Таким образом повторное использование view повышает производительность путем избежания создания ненужных view или выполнения затратного поиска findViewById().
RecyclerView предоставляет эти встроенные layout менеджеры:
- LinearLayoutManager показывает элементы в списке с вертикальной или горизонтальной прокруткой.
- GridLayoutManager показывает элементы в сетке.
- StaggeredGridLayoutManager показывает элементы в ступенчатой сетке.
Чтобы создать пользовательский layout менеджер, унаследуйтесь от класса RecyclerView.LayoutManager.
Анимации
Анимации для добавления и удаления элементов по умолчанию включены в RecyclerView. Чтобы настроить эти анимации, унаследуйтесь от класса RecyclerView.ItemAnimator и используйте метод RecyclerView.setItemAnimator().
Примеры
Следующий пример кода показывает, как добавить RecyclerView в layout:
Источник
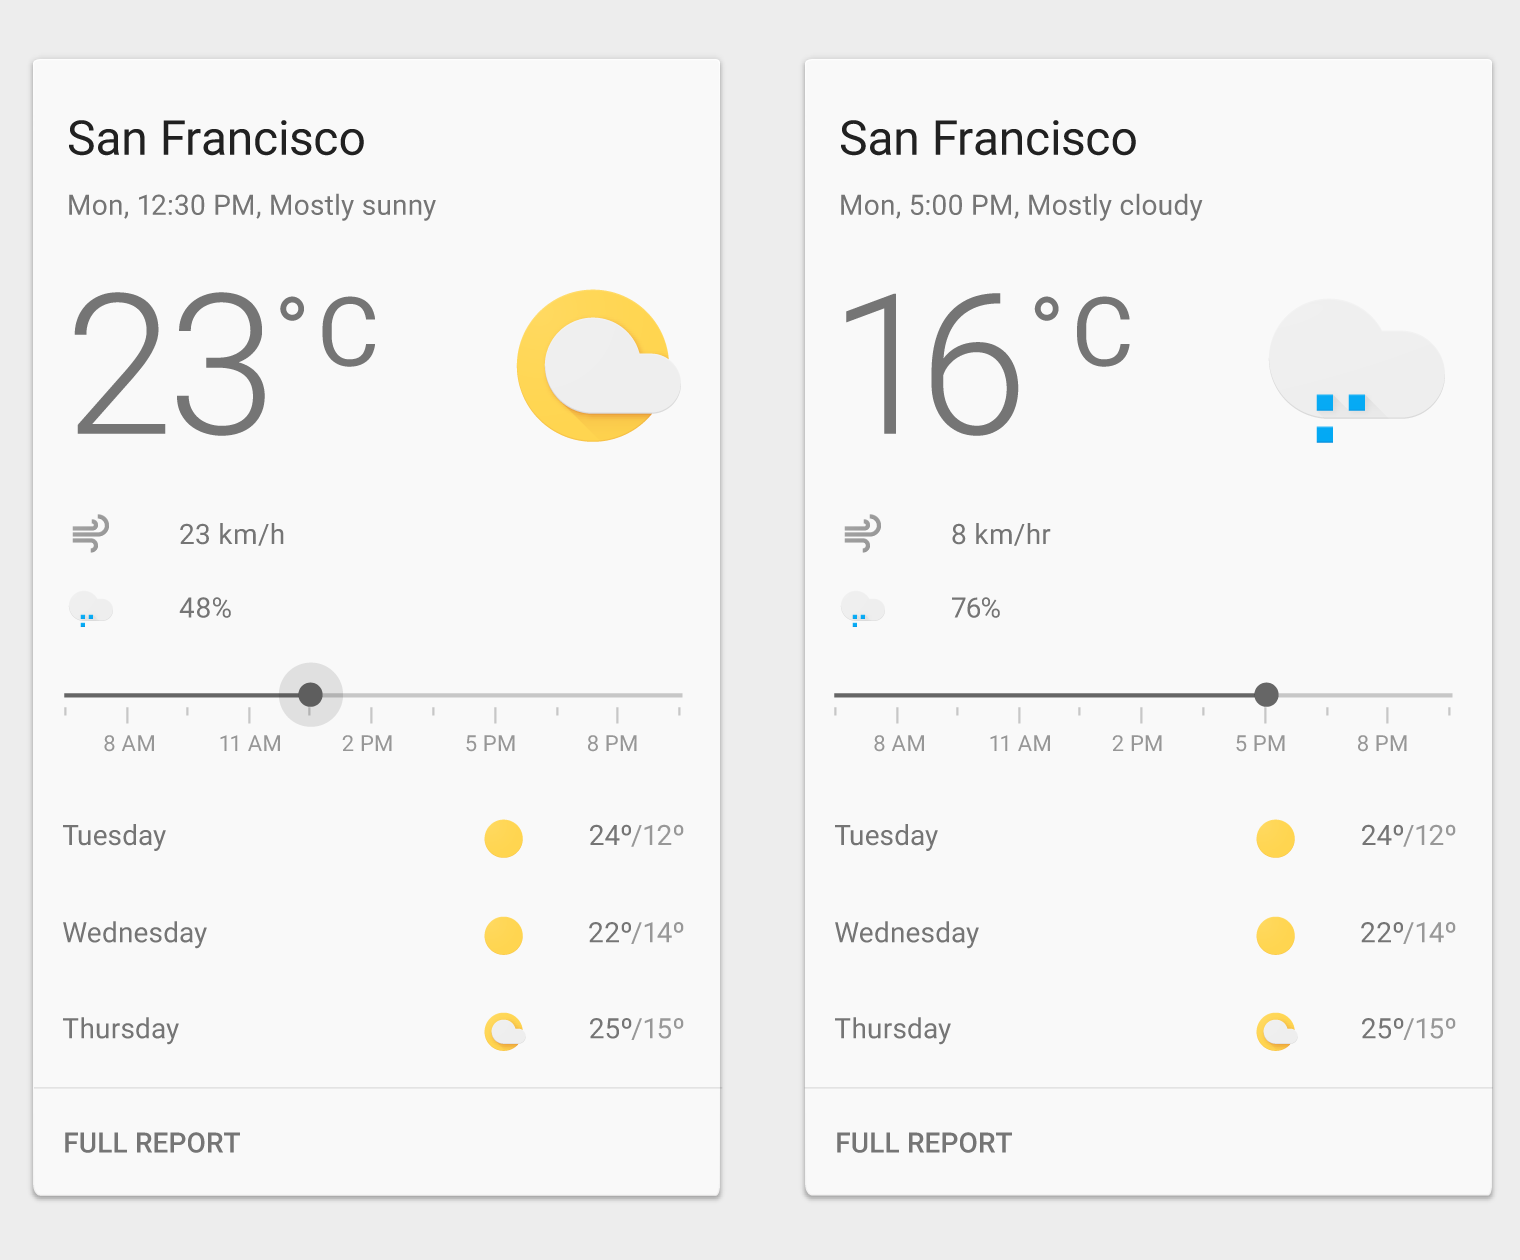
Cardview with Recyclerview Android Example [beginners]


Cardview Android is a new widget for Android, which can be used to display a card sort of a layout in android. Cardview was introduced in Material Design in API level 21 (Android 5.0 i.e Lollipop).
Since, Cardview is part of material design.It’s such a view which has all material design properties, most importantly showing shadows according to the elevation.
The best part about this view is that it extends FrameLayout and it can be displayed on all the platforms of Android since it’s available through the Support v7 library.
The design of the cardview will be looks like,

In the above picture, every boxes made with cardview in android.
Before jumping into the coding part, Let’s see the Cardview XML attribute, that makes the cardview looks beautiful.
Cardview XML attribute
CardView_cardBackgroundColor : ColorStateList: The new ColorStateList to set for the card background
CardView_cardCornerRadius : float: The radius in pixels of the corners of the rectangle shape
CardView_cardElevation : float: The backward compatible elevation in pixels.
CardView_cardMaxElevation : float: The backward compatible maximum elevation in pixels.
CardView_cardPreventCornerOverlap : boolean: Whether CardView should add extra padding to content to avoid overlaps with the CardView corners.
CardView_cardUseCompatPadding : boolean: true> if CardView should add padding for the shadows on platforms Lollipop and above.
CardView_contentPadding : Sets the padding between the Card’s edges and the children of CardView.
CardView_contentPaddingBottom : int: The bottom padding in pixels
CardView_contentPaddingLeft : int: The left padding in pixels
CardView_contentPaddingRight : int: The right padding in pixels
Done with explanation about the android cardview. Let get into the coding part.
Cardview android example with Recyclerview
In this post, I am going to create cardview with recyclerview in android to list the movies with the image and the movie title.
example application demo,
Step 1 — Adding dependencies
In this example, I am using recyclerview with cardview. But I am not going deeper into recyclerview. I am already have a post on recyclerview in android.
Источник
Hands-on with Material Components for Android: Cards
Part 6 of a series covering practical usage of Material Components for Android

This post will be covering the features and API of Card components. To find out how to handle initial setup of Material Components for Android (including the Gradle dependency and creating an app theme), please see my original post:
Setting up a Material Components theme for Android
Attribute by attribute
Cards are sheets of surface material that contain content and actions related to a single subject. This content may include text, images, links and more, and may vary in size. While there are many patterns and variations in terms of content layout, the only required element is the card container.

Basic usage 🏁
A MaterialCardView can be included in your layout like so:
Checking ☑️
A MaterialCardView can be checked to indicate selection. There is no default behavior for enabling/disabling checked state; this can be done in response to long press, for example.
Firstly, checkable behavior needs to be enabled:
We can then toggle checked state (the below example is in response to a long click):
The UI changes include an overlay color and a checked icon:

The checked icon can be changed using the checkedIcon attribute. The various color options will be discussed in the “Theming” section below.
For an advanced checking sample using RecyclerView selection, see the Material Components for Android catalog.
Dragging and swipe-to-dismiss ☝️
MaterialCardView s have built-in support for state changes specific to dragging. As with checking, no default behavior exists to implement the dragging itself. The recommended way of doing this is with ViewDragHelper and the Material Components for Android catalog includes a handy implementation class; DraggableCoordinatorLayout .
Note: It would be useful if DraggableCoordinatorLayout were included in the core Material Components for Android library to allow it to be used without having to copy the class. At the time of writing, the latest release of Material Components for Android is 1.2.0-alpha06 and this is not the case. You can star the feature request for this on the issue tracker.
Firstly, we need to change the parent container to a DraggableCoordinatorLayout :
We can then add a callback and toggle dragged state:
The UI changes include an overlay color and (animated) increased elevation:
For an advanced dragging sample using RecyclerView drag-and-drop, see the Material Components for Android catalog.
Theming 🎨
Cards can be themed in terms of the three Material Theming subsystems: color, typography and shape. When implementing a global card style, extend the Widget.MaterialComponents.CardView style and reference it in your app theme with the materialCardViewStyle attribute.
Color
The color of the card background can be customized with the cardBackgroundColor attribute. This defaults to colorSurface .
As mentioned above, the foreground color of a card is used to indicate both checked and dragged state. As such, this requires a ColorStateList , meaning a for checked/dragged states is required. It is usually transparent but uses color to indicate checking/dragging, defaulting to colorPrimary (checked)/ colorOnSurface (dragged), with different opacities per state.
The tint color of the checked icon can be customized with the checkedIconTint attribute. This defaults to colorPrimary .
The color of an optional card stroke can be customized with the strokeColor attribute. This is disabled by default.
Lastly, the color of the card touch ripple can be customized with the rippleColor attribute. It too accepts a ColorStateList and defaults to colorOnSurface (unchecked)/ colorPrimary (checked), with different opacities per state.

Typography
There is no primary text as part of card components. Text included in the contents of a card will be styled according to the class/component used as well as the fontFamily app theme attribute.

Shape
The shape of a card background can be customized with the shapeAppearance attribute. This defaults to shapeAppearanceMediumComponent .
The elevation of a card can be customized with the cardElevation attribute. This defaults to 1dp.
Interestingly, the corner size of a card’s current shape appearance can be interpolated between 0.0 and 1.0. This can be useful in animations and transitions. Use MaterialCardView#setProgress and MaterialCardView#getProgress for this.
While not strictly shape theming, it is worth mentioning that the width of an optional card stroke can be adjusted with the strokeWidth attribute. This defaults to 0dp (and will not be rendered if no strokeColor is set, regardless of width).
Источник


