- How To Set Android SDK Path In Windows And Mac
- 1. Configure Android SDK Variable In Windows.
- 1.1 Get Android SDK Install Directory Path.
- 1.2 Set %ANDROID_HOME% and %Path% System Environment Variable.
- 2. Configure Android SDK Variable In macOS.
- How to Set Java SDK Path in Android Studio?
- How to Fix the Java SDK Path?
- Method #1: For Android Studio Version 4.2 and Above
- Method #2: For Android Studio Version Below 4.2
- Method #3: Adding a new SDK to Your Android Studio
- Method #4: For the Command Line Enthusiasts
- Method #5: Using the Embedded SDK
- Method #6: Setting and Viewing SDK using the Studio Project Structure
- Different Ways to Change Android SDK Path in Android Studio
- Why There is a Need to Change Android SDK Path?
- Method 1
- Method 2
- Method 3
How To Set Android SDK Path In Windows And Mac
After you installed android studio, you still need to configure some android SDK environment variables then you can use it easily. This article will tell you how to correctly configure Android SDK environment variables such as ANDROID_HOME, PATH on Windows and macOS.
1. Configure Android SDK Variable In Windows.
1.1 Get Android SDK Install Directory Path.
Before you can configure it, you should first get the android SDK install directory follow below steps.
- Open android studio, click File —> Settings menu item in the top men bar.
- Expand Appearance & Behavior —>System Settings —>Android SDK menu item on the left side of the popup window. Then you can find the Android SDK Location directory path on the right side ( in this example, the Android SDK location path is C:\Users\Jerry\AppData\Local\Android\Sdk ), remember it.
1.2 Set %ANDROID_HOME% and %Path% System Environment Variable.
- Right-click the computer icon in Windows file explorer left side, click Properties menu item in the popup menu list. This will open the windows system configuration window.
- Click the Advanced system settings link on left panel, it will popup the System Properties window, click the Environment Variables button to open Environment Variables window.
- Click the New… button to add a new system variable, input ANDROID_HOME as the variable name, and input the Android SDK location directory path ( such as C:\Users\Administrator\AppData\Local\Android\Sdk ) as the variable value.
- Select variable Path and click Edit button and add ;%ANDROID_HOME%\tools;%ANDROID_HOME%\tools\bin;%ANDROID_HOME%\platform-tools at the end of its value. Please note the ; must be English character otherwise it will not take effect .
- Click OK to close the system environment variables settings window, open a dos window, type command adb in it. If you see output like below that means the android SDK path variable has been configured successfully.
2. Configure Android SDK Variable In macOS.
- Open Android Studio on macOS, then click Android Studio —> Preferences menu item at the left top toolbar.
- Input search keyword sdk in the search box of the popup Preferences dialog window left side.
- It will focus on the Android SDK menu item on the left side, and you can get the Android SDK Location directory path value on the right side Android SDK Location text box.
- Generally, the Android SDK is installed in the /Users/user-name/Library/Android/sdk folder on macOS.
- If you can not find the above folder in macOS finder or terminal, this is because the Library folder is a hidden folder by default, you should make the hidden folder visible by executing the command $ defaults write com. apple . finder AppleShowAllFiles TRUE in a macOS terminal window ( please read article How To Show Hidden Files In Mac OS Finder And Select Hidden Files In Html Upload File Form ).
- You can also see the hidden Library folder by opening a macOS Finder window, then click Go —> Go to Folder… menu item, and input
/Library in the popup dialog input text box, then click Go button.
Источник
How to Set Java SDK Path in Android Studio?
The Java SDK for Android is a sophisticated suite of tools for managing, monitoring, profiling, and debugging Java code written in Android Studio. But sometimes as software is unpredictable you might be caught in an error that Android Studio stopped compiling projects and says that it can’t locate the 1.7.0_21 folder. Well, this is exactly what is referred to as a missing Java SDK Path.
How to Fix the Java SDK Path?
There are several methods that can help you resolve this issue, the ones which have the highest score in fixing this problem are mentioned below:
Method #1: For Android Studio Version 4.2 and Above
Navigate to File > Project Structure > SDK Location. Upon navigating there you will find that a tab named “JDK Location”, select that and then you can set the JDK path for the current project on which you’re working.
Image I. Setting Project SDK location in 4.2 & +
Method #2: For Android Studio Version Below 4.2
Chances are that you might be rocking an older version of Android Studio, if yes then
Navigate to File > Project Structure > [Platform Settings] > SDKs
You’ll then need to either update your current SDK setup to make use of the new directory or create a new directory and then adjust the settings in your project to make use of the new directory. This will make it applicable to the present project.
Method #3: Adding a new SDK to Your Android Studio
Sometimes only updating your SDKs won’t allow you to compile projects just because the SDK has lived its life and requires an update to itself. In that scenario, you’ll need to recreate the configurations from 0.
- Navigate to Project Structure > Platform Settings > SDKs and click the “+” button.
- Go to your Android SDK folder and select “Choose” on the pop-up.
- A new pop-up window will open, asking which SDK and JDK you’d want to use. Select any Android SDK and the JDK 1.7.
Note: Change your Project SDK to the one you just established under Project Structure > Project Settings > Project. The name of the SDK should now include the new Java version that you installed.
Method #4: For the Command Line Enthusiasts
If you want to be a Geek and the above methods are just too much GUI for you, you might want to handle the SDK path using the terminal. In order to achieve that using the command line, follow the below commands in the Android Studio’s Terminal
and just like that, you’ve achieved the desired result
Note: the ‘oldjre‘ here refers to your old JRE path
Method #5: Using the Embedded SDK
If you are on Android Version 3.2 or older then you’ll be having the option of using the embedded JDK & SDK for your project and that is one of the optimal ways you can fix this issue as Android Studio will handle the management of the services in the Backend!
Navigate to File > Project Structure > JDK Location and Checkmark the box saying “Use embedded JDK (recommended)”.
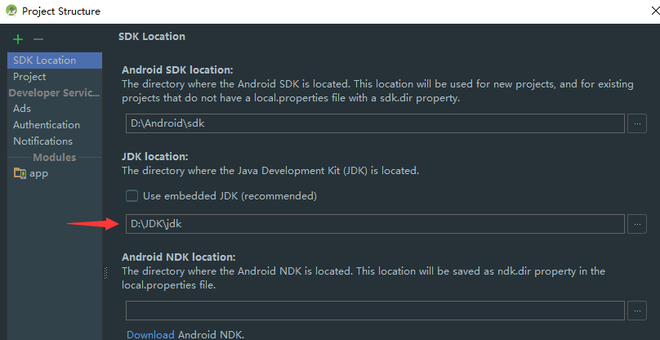
Image II. Checking the Recommended JDK Location
Method #6: Setting and Viewing SDK using the Studio Project Structure
If all the above-mentioned ways didn’t work out for you, the best you can do is to get the SDK path of another Android Studio Project and then providing that path to your particular project (as in Method #1)
Press Ctrl (Command on Mac) + Alt + Shift + S
Then in the SDK Location tab, you will find your SDK Location, just copy it and paste it in the SDK Location as mentioned in Method #1.
Источник
Different Ways to Change Android SDK Path in Android Studio
Android SDK is one of the most useful components which is required to develop Android Applications. Android SDK is also referred to as the Android Software Development Kit which provides so many features which are required in Android which are given below:
- A sample source code.
- An Emulator.
- Debugger.
- Required set of libraries.
- Required APIs for Android development with their documentation.
- Tutorials required for Android OS development.
Why There is a Need to Change Android SDK Path?
Android SDK comes itself when we download Android Studio. It downloads when we download our Android Studio. But many times due to some issue in our pc these SDK files may get deleted. And without your Android SDK Android studio is not able to work and we cannot develop any application. Android SDK is the heart of Android studio. We can easily download Android SDK from the android developers’ site, but we have to set the path for this SDK in our Android studio as well to use this SDK.
Now the point that comes here is how we can change the SDK path for our Android application in Android Studio. So in this article, we are going to discuss three different methods to Change Android SDK Path in Android Studio.
Method 1
Step 1: Create a new Project in Android Studio
Navigate to the File > New > New Project and create your new project. The language used for this will not matter as this process will be the same for both java as well as Kotlin.
Step 2: Opening project structure
Navigate to the File > Click on Project structure which is shown in the list and click on the Project structure option. After clicking that option you will get to see the below screen.

Inside the above screen, click on the SDK Location option you will get to see the below screen.
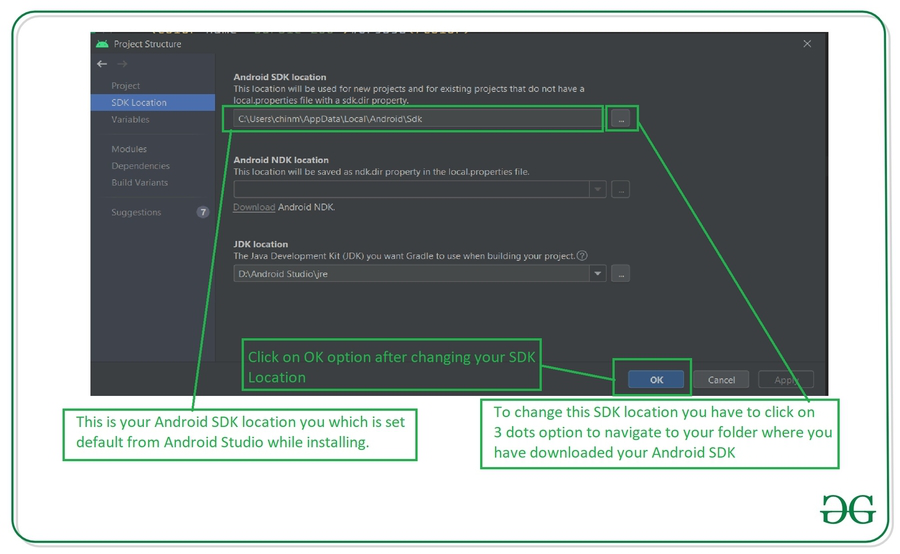
In the above image, you will get to see the current SDK location for your Android Studio. To change this SDK location you have to click on the 3 dots which are being displayed and then select your SDK location folder. After selecting this folder click on the OK option to save your SDK path.
Step 3: Sync your project after adding your SDK path
Now sync your project with Gradle files to check that SDK is working fine. To do this click on File > you will get to see the option as Sync Project With Gradle files option click on that option and sync your project. On successful sync of your project, your SDK location is set perfectly and now you are good to go in developing Android Applications.
Method 2
Step 1: Create a new Project in Android Studio
Navigate to the File > New > New Project and create your new project. The language used for this will not matter as this process will be the same for both java as well as Kotlin.
Step 2: Opening Android Studio Settings
Navigate to the File > Settings option you will get to see below dialog screen. Inside that screen. Click on Appearance and Behavior option > System Settings options and then click on the Android SDK option to get to see the below screen.

Inside this screen, you will get to see your SDK path. You can update your SDK path by clicking on the Edit option. After that select your SDK path, then click on Apply option, and then click on the OK option.
Step 3: Sync your project after adding your SDK path
Now sync your project with Gradle files to check that SDK is working fine. To do this click on File > you will get to see the option as Sync Project With Gradle files option click on that option and sync your project. On successful sync of your project, your SDK location is set perfectly and now you are good to go in developing Android Applications.
Method 3
Step 1: Create a new Project in Android Studio
Navigate to the File > New > New Project and create your new project. The language used for this will not matter as this process will be the same for both java as well as Kotlin.
Step 2: Opening project structure.
Inside your Android Studio in the top right corner, You can get to see the icon below the image for opening the project structure. Click on that option to open your project structure option. You will get to see the below screen. For opening this Project Structure we can also use a shortcut key as:
| Windows | Ctrl+Alt+Shift+S |
| Mac OS | Command + ; (semi-colan) |
| Linux | Ctrl+Alt+Shift+S |

After clicking on this option we simply have to follow Step 1 to update our Android SDK.
Inside the above screen, click on the SDK Location option you will get to see the below screen.
In the above image, you will get to see the current SDK location for your Android Studio. To change this SDK location you have to click on the 3 dots which are being displayed and then select your SDK location folder. After selecting this folder click on the OK option to save your SDK path.
Step 3: Sync your project after adding your SDK path
Now sync your project with Gradle files to check that SDK is working fine. To do this click on File > you will get to see the option as Sync Project With Gradle files option click on that option and sync your project. On successful sync of your project, your SDK location is set perfectly and now you are good to go in developing Android Applications.
Источник


