Working with Logcat
Logcat is an important part of everyday development. If you see one of those «Force Close» or «Has Stopped» dialogs, the first thing you will want to do is examine the Java stack trace that is associated with this crash. These are logged to a facility known as Logcat, its purpose is to display all logs coming from your device. It displays logs from an emulator or a real device connected.
We can see the following messages in Logcat:
- System.out.println
- exceptions
- android.util.Log
To properly log messages from your application you should use the android.util.Log class. This class defines the familiar informational, warning, and error methods that you can filter in the Logcat pane to see just what you want to see. Every log message has a tag associated with it, which is used to identify the source of a log message. It usually identifies the class or activity where the log call occurs.
Here are some sample Log commands categorized by severity:
It’s best to use the appropriate log level for the message you want to log. It is recommend to define a unique debug tag string for each class so that you can easily track down where a log message originated. You can use this tag to filter the logging data and find only the messages you are interested in.
The recommended way to define Tag string:
How to open Logcat?
By keyboard shortcut alt + 6
By clicking the main menu bar View > Tool Windows > Logcat .
By clicking the Logcat Tool Button from the bottom of Android Studio.
The following Logcat pane will appear on bottom of Android Studio.
Following is the description of some important options highlighted in above image:
Device selection menu
App selection menu
Filter messages based on log level, where messages for your chosen level or higher will be displayed
Use the search field to filter items based on a search string
When this menu is set to Show only selected application, only those messages relating to the app selected in the menu marked as 2 will be displayed in the Logcat panel. Choosing No Filter will display all the messages generated by the device or emulator.
Logcat levels
To get the most out of your application, Logcat has several levels of log messages, so Android Studio provides multiple ways of filtering the logcat output. One method is to use the Log Level dropdown menu, to filter based on log level, open this dropdown and select anything other than the default Verbose option.
Verbose: Display all log messages
Debug: Displays log messages that are useful during development
Info: Displays expected log messages for regular usage
Warn: Displays possible issues that are not yet errors
Error: Displays issues that have caused errors
Assert: Displays issues that should never happen
Making a custom level in Logcat
Every Android log message includes a tag. You can use these tags with filters defined in Logcat. To open Logcat pane, click «Show only selected application» drop-down menu from the top right and select «Edit Filter Configuration». This opens a «Create New Logcat Filter» dialog:
Provide the following information to create a new filter:
Filter name: give a unique name.
Log Tag: Every log message has a tag associated with it, which indicates the system component the message originated from. If you want to see messages that originate from a certain system component only, you can enter that component’s tag here. It is used to identify the source of a log message. It usually identifies the class or activity where the log call occurs.
Log Message: If you only want to see messages that contain certain elements or character strings, specify them in the Log Message field.
Package Name: If you want your filter to display messages that relate to a certain package only, enter this package name here.
PID: If you only want to see messages that refer to a specific process, enter that process ID here.
Customizing log messages font colors and style
Open Android Studio Settings from the main menu File > Settings or by pressing keyboard shortcut Ctrl + Alt + S . In the search field, enter Logcat. Editor > Color & Fonts > Android Logcat preferences appears:
To change these options, you must save a copy of the current Theme by clicking the Save as button and enter some suitable name. Now select each log level one by one and apply your own font and background color, make log message bolt or italic and etc.
Note: before starting the customization, uncheck the Use inherited attributes box, otherwise you won’t be able to edit these options.
Select a log level from the list (e.g. Assert)
If you want to change font color, check Foreground and click its color box to customize the font color
To change the background color of font, check Background and click its color box to customize the background color
Check Error stripe mark to display a mark at the end of message and click its color box to customize the mark color
Check Effects then select the effect from the drop down menu (e.g. underline, strikeout, or dotted line etc) and click its color box to customize the mark color.
To apply changes, click on Apply and then OK.
How to clear logs
The «trash can» icon atop the tool strip on the left is the «clear log» tool.
Clicking it will appear to clear Logcat. It definitely clears your LogCat view, so you will only see messages logged after you cleared it, though, that this does not actually clear the logs from the device or emulator.
Note: Log has impact on performance. Excessive logging impacts device and application performance. At a minimum, debug and verbose logging should be used only for development purposes and removed prior to application publication.
Источник
How to Change Color of Logcat in Android Studio?
In this article, you will see how to change the color of Logcat. Before moving further let’s know about Logcat. A Logcat is a command-line tool that dumps the system log messages. Suppose you are developing an application that contains 3000 lines of code and now after running the application it crashes. Now here comes the role of Logcat. The Logcat will show why the application is crashed it will show the errors you have made and the exceptions that occurred in the application. Basically, it is used for debugging purposes. All this process is done using the Log class.
Following are the Log commands or methods that are present in the Log class:
- Log.d(“TAG”,”Debug Message”);
- Log.e(“TAG”,”Error Message”);
- Log.i(“TAG”,”Information Message”);
- Log.w(“TAG”,”Warning Message”);
- Log.v(“TAG”,”Verbose Message”);
- Log.wtf(“TAG”,”Assert Message”);
Now let’s see How to change the color of Logcat. To set the Different colors of Logcat Follow the below instructions:
Step 1: Go to the File > Settings > Editor > Color Scheme > Android Logcat. Now Unmark the checkbox “Inherit values from”
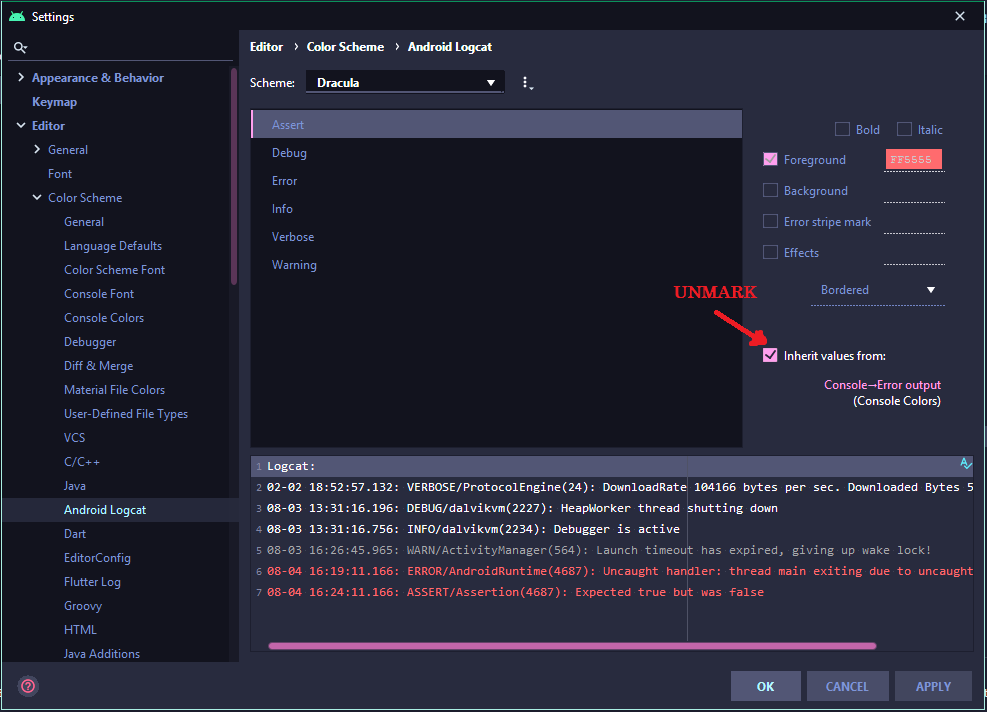
Step 2: Select the log level whose color you want to change such as. Assert, Error, Debug, etc. Select the color for that log, don’t forget to mark the Checkbox.
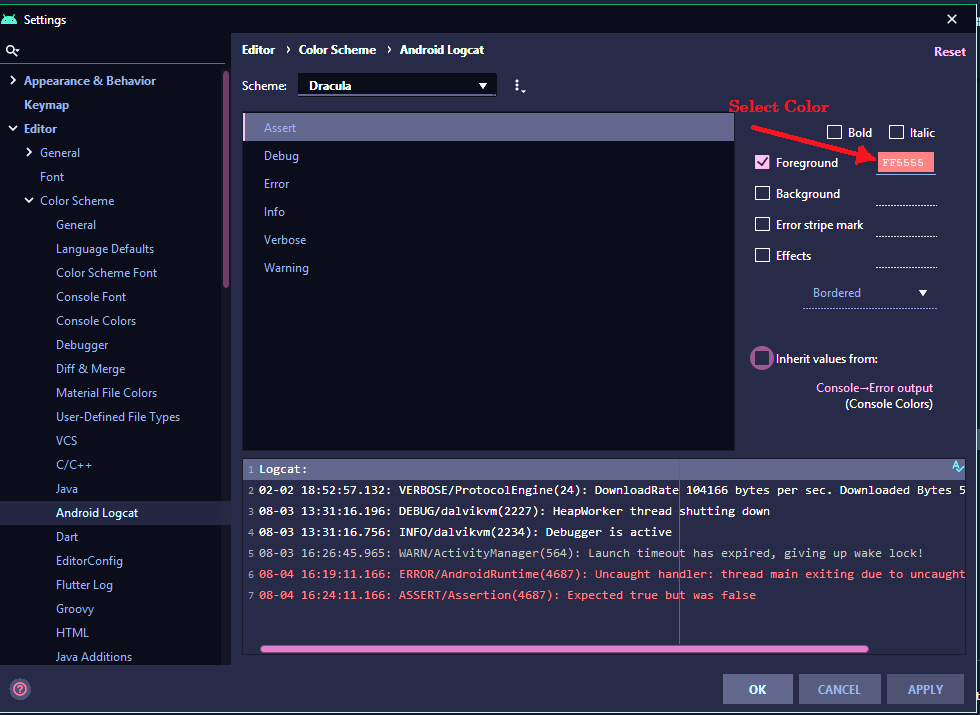
After selecting the colors, you will get output like the below screen.

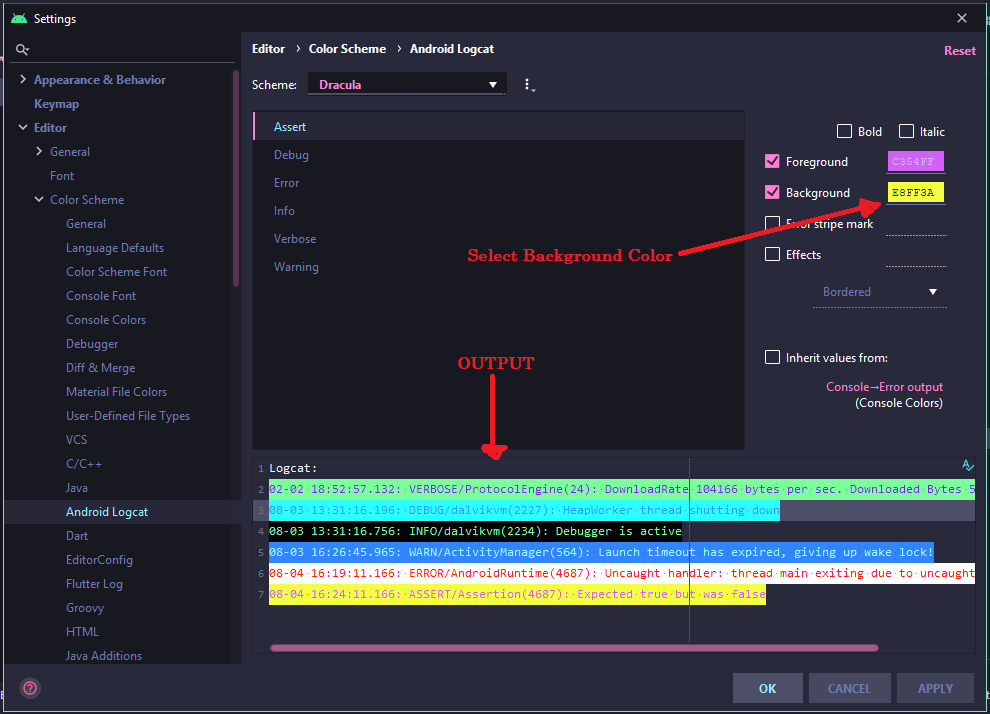
If you want to change the background color also then, Mark the Checkbox of Background and then choose any color you want. After choosing the color, you can see the output like the below screen. To apply changes, click on Apply and then OK.
Now if you don’t want the colored logcat, you can set the colors to default. To do so, click on Reset and then APPLY, and then OK.
Источник
Android studio colorful logcat
A colorful and highly configurable alternative to the adb logcat command from the Android SDK.
Note: logcat-color is targetted at OS X and Linux, and does not currently work in Windows.
Installation with pip / easy_install (may require sudo)
Installation from source (requires setuptools, may require sudo)
To get the source, simply download and extract a release tarball. Alternatively, you can clone the logcat-color git repository directly:
To install logcat-color from the source directory, run:
Run and colorify adb logcat
Colorify an old logcat text file you have laying around
Pipe logcat-color to egrep for only the tags you care about
Run logcat-color with a custom profile for filters, colors, and custom arguments)
logcat-color also supports most of the standard adb / logcat arguments, making it a suitable full-time replacement for adb logcat
For command line usage documentation:
logcat-color supports a configuration file at $HOME/.logcat-color
The configuration file is simply a python script, with a few interesting variables and types available to it.
Sample .logcat-color
Profiles live in the logcat-color configuration file, and allow logcat-color to customize ADB and logging even further.
In short, a single Profile can:
- Filter based on arbitrary log data.
- Use custom adb command line arguments, devices, and log formats
- Customize display and color configuration.
A profile is created by simply calling the Profile python constructor with various named arguments. The only required argument is the Profile’s name :
You can then have logcat-color use this profile by providing it on the command line. For example:
To customize the Profile, simply pass more named arguments to the Profile constructor. This is a list of all the currently supported named arguments:
- buffers : A list of logcat buffers to display. By default logcat uses only the main system buffer. See the Android documentation for logcat buffers for more information.
- device : Specifies the device this profile is intended for. Valid values: True (connect to first available device), or a string with the serial ID of the device as reported by adb devices
- emulator : Similar to device , but providing True connects to the first available emulator instead.
- filters : A list or tuple of custom filters.
- format : The logcat format to use. By default logcat uses the brief format. See the Android documentation for logcat formats for more information.
- name : The profile name (required).
- priorities : A list or tuple of priority levels. logcat-color will exclude any messages that contain priorities not in this list. Valid priorities: V (verbose), D (debug), I (info), W (warn), E (error), F (fatal).
- tags : A list, tuple, or dict of logcat tag names. logcat-color will exclude any messages that contain tags not in this list. When a dict is used, you can also assign custom colors to each tag. Valid tag colors: RED , GREEN , YELLOW , BLUE , MAGENTA , CYAN , WHITE
- wrap : Whether or not to wrap the message column. Default is True .
- packages : An array containing the packages that you want to filter on. this will be applied in addition to the filters.
Here is an extended example:
Filters allow your profile to have complete control over what log data you actually see when you run logcat-color.
logcat-color will run each line of log output through the list of filters in your profile. Only when the entire list of filters have accepted the line will it actually be displayed. This is the equivalent of logically ANDing the results of each filter. If you require different logic, you should use a custom function filter, and combine the results of various filters manually.
There are currently two different kinds of filters:
When the regex matches the message portion of a line of logcat output, that line will then be matched against the next filter. For example:
When the function returns True for a line of log output, that line will then be matched against the next filter. The function will be passed a data dictionary that contains all of the log data:
- «priority» : One of the logcat priorities: V (verbose), D (debug), I (info), W (warn), E (error), F (fatal). Availability: All logcat formats.
- «message» : The log message itself Availability: All logcat formats.
- «tag» : The Tag of this log message. Availability: All logcat formats except thread .
- «pid» : The PID of the process that logged the message (in string form). Availability: All logcat formats except tag .
- «tid» : The ID of the thread that logged the message (in string form). Availability: thread , threadtime , and long formats.
- «date» : The date of the log message (in string form). Availability: time , threadtime , and long formats.
- «time» : The time of the log message (in string form). Availability: time , threadtime , and long formats.
Notice that many of these fields are conditional based on the logcat output format. Be careful when constructing the logic of function filters, as the field you are filtering may not exist in the message!
An example of a function filter:
When you only care about a few (or one) application this will pass all messages to you by that application.
Note: This will require the application’s startup message to be accessible via the current logback trace. The best bet it to start logcat-color then start the app.
An example of package filters

Thanks to Jeff Sharkey for the original script that logcat-color is based on, coloredlogcat.py.
About
A colorful and highly configurable alternative to the standard «adb logcat» command from the Android SDK
Источник
Logcat

В Android SDK входит набор инструментов, предназначенных для отладки. Самый важный инструмент при отладке — это LogCat (очень красивое название, которое можно перевести как Логичный Кот). Он отображает сообщения логов (журнал логов), рассылаемые при помощи различных методов.
Рассмотрим на примере. Очень часто программисту нужно вывести куда-то промежуточные результаты, чтобы понять, почему программа не работает. Особо хитрые временно размещают на экране текстовую метку и выводят туда сообщение при помощи метода textView.setText(«Здесь был Васька»). Но есть способ лучше. В Android есть специальный класс android.util.Log для подобных случаев.
Класс android.util.Log позволяет разбивать сообщения по категориям в зависимости от важности. Для разбивки по категориям используются специальные методы, которые легко запомнить по первым буквам, указывающие на категорию:
- Log.e() — ошибки (error)
- Log.w() — предупреждения (warning)
- Log.i() — информация (info)
- Log.d() — отладка (degub)
- Log.v() — подробности (verbose)
- Log.wtf() — очень серьёзная ошибка! (What a Terrible Failure!, работает начиная с Android 2.2)
- Log.meow() — когда жрать дадут? (MEOW!) Недокументированный метод, используйте на свой страх и риск. Работает не на всех устройствах
В первом параметре метода используется строка, называемая тегом. Обычно принято объявлять глобальную статическую строковую переменную TAG в начале кода:
Некоторые в сложных проектах используют следующий вариант, чтобы понимать, в каком классе происходит вызов:
Далее уже в любом месте вашей программы вы вызываете нужный метод журналирования с этим тегом:
Также используется в исключениях:
Пользователи не видят этот журнал. Но, вы, как разработчик, можете увидеть его через программу LogCat, доступный в Android Studio.
Полный вид сообщения выглядит следующим образом.
03-09 20:44:14.460 3851-3879 / ru.alexanderklimov.cat I/OpenGLRenderer : Initialized EGL, version 1.4
- 03-09 20:44:14.460 Date/Time
- 3851-3879 Process & Thread IDs
- ru.alexanderklimov.cat Package name
- I/OpenGLRenderer Tag
- Initialized EGL, version 1.4 Message
Подобные длинные сообщения не всегда удобны для чтения. Вы можете убрать ненужные элементы. Для этого выберите значок LogCat Header в виде шестерёнки и уберите флажки у опций.

В LogCat вы можете отфильтровать сообщение по заданному типу, чтобы видеть на экране только свои сообщения. Для этого выберите нужный тип тега из выпадающего списка Verbose.
Типы сообщений можно раскрасить разными цветами через настройки File | Settings | Editor | Colors Scheme | Android Logcat.
Для отслеживания сообщений с заданным текстом введите в поле поиска нужную строку и нажмите Enter.
Также активно используйте варианты из других выпадающих списков. Например, выбирайте свой пакет из второй колонки, а в последней выбирайте Show only selected application. Для более точной настройки используйте Edit Fiter Configuration.

По умолчанию, окно LogCat выводится в нижней части студии. При желании, можно выбрать другие варианты через значок настроек окна.
LogCat также можно запустить из командной строки:
Параметры командной строки смотрите в документации.
Быстрое отключение журналирования
Настоятельно рекомендуется удалять все вызовы LogCat в готовых приложениях. Если проект очень большой и вызовы журналирования разбросаны по всем местам кода, то ручное удаление (или комментирование) становится утомительным занятием. Многие разработчики используют следующую хитрость — создают обёртку вокруг вызова методов LogCat.
Теперь остаётся только присвоить нужное значение переменной isDebug перед созданием готового apk-файла для распространения.
Способ устарел. В 17-й версии Android Build Tools появился класс BuildConfig, содержащий статическое поле DEBUG. Можно проверить следующим образом:
Способ для продвинутых — например, требуется релиз с выводом в лог, или наоборот — debug с выключенным выводом. В этом случае можно создать собственный параметр и добавить его в секцию buildType gradle-файла:
В этом случае конфигурация releaseWithLog будет являться релизной сборкой с ведением логов. Естественно, в коде слегка поменяется проверка:
LogCat на устройстве
Попался в сети пример для просмотра сообщений LogCat на устройстве. С примером не разбирался, оставлю здесь на память.
Источник


