- Configuration
- In this document
- See also
- Update channels
- Proxy Settings
- Setting up the Android Studio Proxy
- Android Plugin for Gradle HTTP proxy settings
- SDK Manager HTTP Proxy Settings
- Configuring Android Studio
- Intro
- Show line numbers
- Camel humps
- Field naming conventions
- Private member access between outer and inner classes
- Imports on the fly
- Android log colors
- Android studio configuration file
- Article Directory
- 1. Configure dependencies for offline compilation
- Second, add offline components in the Gradle configuration
- 3. Other settings
- Конфигурация приложения в Android: быстрая разработка
Configuration
In this document
See also
During installation, Android Studio provides wizards and templates that verify your system requirements, such as the Java Development Kit (JDK) and available RAM, and configure default settings, such as an optimized default Android Virtual Device (AVD) emulation and updated system images. This document describes additional configuration settings you may want to use to customize your use of Android Studio.
For specific documentation about emulator and device setup and use, see Managing Virtual Devices, Using Hardware Devices, and OEM USB Drivers.
Update channels
Android Studio provides four update channels to keep Android Studio up-to-date based on your code-level preference:
- Canary channel: Canary builds provide bleeding edge releases, updated about weekly. While these builds do get tested, they are still subject to bugs, as we want people to see what’s new as soon as possible. This is not recommended for production.
- Dev channel: Dev builds are hand-picked older canary builds that survived the test of time. They are updated roughly bi-weekly or monthly.
- Beta channel: Beta builds are used for beta-quality releases before a production release.
- Stable channel: Used for stable, production-ready versions.
By default, Android Studio uses the Stable channel. Use File > Settings > Appearance & Behavior System Settings > Updates to change your channel setting.
Proxy Settings
Proxies serve as intermediary connection points between HTTP clients and web servers that add security and privacy to internet connections.
To support running Android Studio behind a firewall, set the proxy settings for the Android Studio IDE and the SDK Manager. Use the Android Studio IDE HTTP Proxy settings page to set the HTTP proxy settings for Android Studio. The SDK Manager has a separate HTTP Proxy settings page.
When running the Android Plugin for Gradle from the command line or on machines where Android Studio is not installed, such as continuous integration servers, set the proxy settings in the Gradle build file.
Note: After the initial installation of the Android Studio bundle, Android Studio can run with internet access or off-line. However, Android Studio requires an internet connection for Setup Wizard synchronization, 3rd-party library access, access to remote repositories, Gradle initialization and synchronization, and Android Studio version updates.
Setting up the Android Studio Proxy
Android Studio supports HTTP proxy settings so you can run Android Studio behind a firewall or secure network. To set the HTTP proxy settings in Android Studio:
- From the main menu choose File > Settings > Appearance & Behavior — System Settings — HTTP Proxy.
- In Android Studio, open the IDE Settings dialog.
- On Windows and Linux, choose File > Settings > IDE Setting — HTTP Proxy.
- On Mac, choose Android Studio > Preferences > IDE Setting — HTTP Proxy.
The HTTP Proxy page appears.
- Select auto-detection to use an auto-configuration URL to configure the proxy settings or manual to enter each of the settings. For a detailed explanation of these settings, see HTTP Proxy.
- Click Apply to enable the proxy settings.
Android Plugin for Gradle HTTP proxy settings
For application-specific HTTP proxy settings, set the proxy settings in the build.gradle file as required for each application module.
For project-wide HTTP proxy settings, set the proxy settings in the gradle/gradle.properties file.
For information about using Gradle properties for proxy settings, see the Gradle User Guide.
Note: When using Android Studio, the settings in the Android Studio IDE HTTP proxy settings page override the HTTP proxy settings in the gradle.properties file.
SDK Manager HTTP Proxy Settings
SDK Manager proxy settings enable proxy internet access for Android package and library updates from SDK Manager packages.
To set the SDK Manager settings for proxy internet access, start the SDK Manager and open the SDK Manager page.
- On Windows, select Tools > Options from the menu bar.
- On Mac and Linux, choose Tools > Options from the system menu bar.
The Android SDK Manager page appears. Enter the settings and click Apply.
Источник
Configuring Android Studio

Intro
Android Studio has a cool feature to Import and Export settings. So during installation of new Android Studio version I usually import my previous settings. But recently a bad thing happened to me — I have lost my Android Studio settings file.
My advice to you: always keep a backup of your Android Studio settings files somewhere on the cloud.
And since I am configuring my Android Studio from scratch anyway, below are some things which may be useful for you.
Show line numbers
When I first fired up Android Studio and started using it, one of the first things I wanted to do was to be able to see line numbers within the file. I was always curious why this thing is not turned on by default?


- In toolbar menu select File| Settings
- Choose Editor| General| Appearance
- Tick on Show line numbers

Camel humps
Android Studio doesn’t respect ‘Camel Humps’ words when you navigate through your code with pressed Ctrl+Left/Right arrow keys.


- In toolbar menu select File| Settings
- Choose Editor| General| Smart Keys
- Tick on Use ‘Camel Humps’ words

Note: if you still want to select the whole word on mouse double click go to
- In toolbar menu select File| Settings
- Choose Editor| General
- Remove tick on ‘Honor Camel Humps words settings when selecting on double click’
Field naming conventions
If you want to follow field naming conventions from Android Code Style Guidelines for Contributors first read Jake Wharton’s article — Just Say mNo to Hungarian Notation. Still, there is one thing which Android Studio can automatically do for us — generate field name prefix for:
- Non-public, non-static field names start with m.
- Static field names start with s.

- In toolbar menu select File| Settings
- Choose Editor| Code Style| Java
- Select Code Generation tab
- Add m prefix for field and s prefix for static field

Private member access between outer and inner classes
There is one inspection in Android Studio that I think should be turned on by default:
- In toolbar menu select File| Settings
- Choose Editor| Inspections
- Tick on Java|J2ME|Private member access between outer and inner classes
This inspection will help you to decrease methods count, achieve greater performance and less use of memory. If you want to know more just read inspection description and Jake Wharton’s talk — Exploring Java’s Hidden Costs.
Imports on the fly
In Android Studio there are shortcuts to auto import or clean-up none used imports. But we live in 2015 right? Those things should be done on the fly.

- In toolbar menu select File| Settings
- Choose Editor| General| Auto Import
- Tick on Optimize imports on the fly
- Tick on Add unambiguous imports on the fly

Android log colors
With default Darcula theme Logcat highlighting I am not able to recognize type of log.

I prefer to use bright colors from plain old Android Holo theme.

- In toolbar menu select File| Settings
- Choose Editor| Colors & Fonts| Android Logcat
- Click on Save As… button and create new color schema
- Change all colors to ‘Holo theme colors’ (Uncheck ‘Use inherited attributes’ for every color)
Источник
Android studio configuration file
Android Studio completely offline development configuration
Article Directory
If you can visit the official website of Android, you can visithttps://developer.android.com/studio/intro/studio-config Check out the official offline development model.
1. Configure dependencies for offline compilation
Download the 2 offline packages given by the official, you can directly in theBaidu cloud diskDownload it! After downloading the offline component, extract the contents to the following directory (mainly to extract offline-gmaven-stable.zip, this offline-android-gradle-plugin-preview.zip is not necessary), if the directory does not exist yet, you can Create this directory:
- On Windows:% USER_HOME% /. Android / manual-offline-m2 /
- On macOS and Linux:
note:
- The manual-offline-m2 folder is more critical. In the future, if you want to add some dependencies offline, you need to put these dependencies in this folder.
- If you directly copy the cached dependent libraries of Android Studio directly on a networked computer, it is generally problematic. For example, if you directly copy the gson jar package, you also need to copy the folder name on the gson package. come,com.google.code.gson\gson\2.8.0\gson-2.8.0.jar, If this is the case, you need to be offlinemanual-offline-m2Under the folder, create a folder in the above path step by step, the folder under the innermost layer is placedgson-2.8.0.jarIf this is not the case, Android Studio cannot recognize the dependent packages in an offline environment.
Second, add offline components in the Gradle configuration
You need to tell the Android compilation system to use the offline components you have downloaded, and we need to create a script.
1. Create an empty text file using the following path and folder name:
- On Windows:% USER_HOME% /. Gradle / init.d / offline.gradle
- On macOS and Linux:
/ .gradle / init.d / offline.gradle
2. Open the text and add the following script:
3. (Optional) If you want to verify that the offline components are working properly, remove the online code base from the project’s build.gradle file (see below). After confirming that your project will compile correctly without using these code bases, you can put them back in the build.gradle file.
4. AS configuration offline compilation
3. File> Settings> Build, Execution, Deployment> Gradle Check Offline work
3. Other settings
Here is only a detailed description of the offline configuration of Android Studio, and there are some important steps that are not explained in detail here:
- Install Android Studio
- Unzip the Android SDK compressed package to any convenient location, set the AS SDK location to this location: file> Appearance & Behavior> System settings> Android SDK
Android Studio offline development configuration is basically these, detailed records for future reference.sawg ^0^
Источник
Конфигурация приложения в Android: быстрая разработка
 При разработке мобильных приложений зачастую возникает необходимость хранить настройки приложения (выбранную пользователем цветовую тему, пароль доступа к приложению, параметры синхронизации с сервером и т.д.). Поскольку такие задачи возникают довольно часто, в Google позаботились о разработчиках и создали механизм для быстрой и легкой реализации данного функционала. Этот механизм позволяет легко создавать, сохранять, отображать и производить разные манипуляции с настройками приложения. Мало того он позволяет автоматически создавать пользовательский интерфейс. При описании типа параметра настроек — автоматически генерируется часть пользовательского интерфейса в зависимости от типа параметра (boolean — чекбокс, String — поле ввода, . ) без написания кода. Звучит неплохо для быстрой разработки, не так ли?
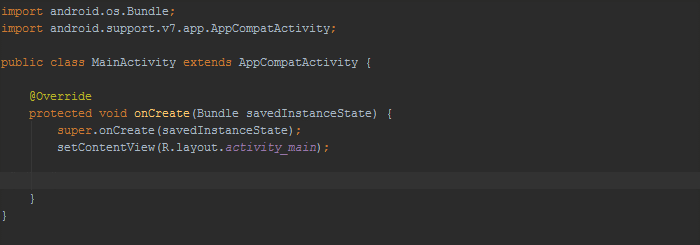
Первым шагом в реализации механизма настроек приложения является наследования активности экрана вашего приложения от класса PreferenceActivity. Этот класс наследован от класса ListActivity
и позволяет создавать пользовательский интерфейс по описанию в XML файле ресурсов. Мало того, этот класс позволяет автоматически сохранять настройки в SharedPreferences незаметно для вас. SharedPreferences — интерфейс позволяющий обращаться и манипулировать данными настройки приложения вручную с помощью вызова метода getSharedPreferences из вашего Activity (подробнее Android Essentials: Application Preferences). Для того что бы увязать вместе наш класс унаследованный от PreferenceActivity и XML файл описывающий параметры конфигурации используется метод addPreferencesFromResource:
- .
- @Override
- public void onCreate ( Bundle savedInstanceState ) <
- super . onCreate ( savedInstanceState ) ;
- addPreferencesFromResource ( R. xml . preferences ) ;
- >
- .
Теперь необходимо создать файл res/xml/preferences.xml который является описанием нашего списка параметров конфигурации приложения и будет подхвачен нашим PreferenceActivity. Этот XML файл имеет специфический формат позволяющий описывать типы параметров конфигурации. Все типы вытекают из класса Preference который представляет собой базовый блок пользовательского интерфейса и генерирует View которое в последствии отобразится в нужном месте пользовательского интерфейса и будет ассоциироваться с объектом SharedPreferences который можно будет извлекать и сохранять. Рассмотрим часто используемые подклассы, которые используются для описание типов параметров конфигурации:
- CheckBoxPreference: чекбокс, представляет параметры типа boolean.
- RingtonePreference: позволяет выбирать рингтон из доступных на устройстве. URI выбранного файла рингтона будет представлен в виде строки.
- EditTextPreference: строка ввода текста, представляет параметры типа String.
- ListPreference: показывает список возможных значений параметра в виде диалога, представляет параметры типа String.
Также необходимо отметить, что отдельные параметры могут группироваться в категории с помощью класса PreferenceCategory, который группирует объекты Preference и выводит неактивный заголовок группы.
Теперь опишем, что же мы хотим видеть в нашем XML описании. У нас будет две категории. В первой разместим CheckBoxPreference который будет активировать/дезактивировать синхронизацию данных нашего гипотетического приложения и ListPreference в которым будем задавать частоту синхронизации данных. Как вы уже наверняка заметили, между этими двумя параметрами есть зависимость, если первый не выбран, то второй нужно дезактивировать. Это достигается с помощью использования атрибута android:dependency. Во второй категории мы разместим EditTextPreference с помощью которого будем задавать текст приветствия. Представим все это в виде XML:
- version = «1.0» encoding = «utf-8» ?>
- >
- name = «updateInterval» >
- name = «1000» > Every 1 second >
- name = «5000» > Every 5 seconds >
- name = «30000» > Every 30 seconds >
- name = «60000» > Every 1 minute >
- name = «300000» > Every 5 minutes >
- >
- name = «updateIntervalValues» >
- name = «1000» > 1000 >
- name = «5000» > 5000 >
- name = «30000» > 30000 >
- name = «60000» > 60000 >
- name = «300000» > 300000 >
- >
- >
- android:key = «pin»
- android:title = «PIN code»
- android:summary = «If login screen is enabled»
- android:dialogTitle = «PIN code»
- android:dialogMessage = «Provide a PIN»
- android:defaultValue = «»
- android:inputType = «number»
- android:password = «true»
- android:dependency = «runLoginScreen»
- />
- package com.javacodegeeks.android.preferences ;
- import android.content.Intent ;
- import android.os.Bundle ;
- import android.preference.PreferenceActivity ;
- import android.view.Menu ;
- import android.view.MenuItem ;
- public class QuickPrefsActivity extends PreferenceActivity <
- @Override
- public void onCreate ( Bundle savedInstanceState ) <
- super . onCreate ( savedInstanceState ) ;
- addPreferencesFromResource ( R. xml . preferences ) ;
- >
- @Override
- public boolean onCreateOptionsMenu ( Menu menu ) <
- menu. add ( Menu . NONE , 0 , 0 , «Show current settings» ) ;
- return super . onCreateOptionsMenu ( menu ) ;
- >
- @Override
- public boolean onOptionsItemSelected ( MenuItem item ) <
- switch ( item. getItemId ( ) ) <
- case 0 :
- startActivity ( new Intent ( this , ShowSettingsActivity. class ) ) ;
- return true ;
- >
- return false ;
- >
- >
Мы создали опционное меню с одним элементом MenuItem с помощью метода onCreateOptionsMenu. Когда пользователь кликает на элемент меню, мы обрабатываем это событие в методе onOptionsItemSelected и запускаем новую активность используя метод startActivity. (подробнее Using options menus and customized dialogs for user interaction, Launching new activities with intents).
Теперь создадим вторую активность ShowSettingsActivity для отображения параметров конфигурации приложения. Но вначале мы должны описать новую активность в manifest файле AndroidManifest.xml:
- package com.javacodegeeks.android.preferences ;
- import android.app.Activity ;
- import android.content.SharedPreferences ;
- import android.os.Bundle ;
- import android.preference.PreferenceManager ;
- import android.widget.TextView ;
- public class ShowSettingsActivity extends Activity <
- @Override
- protected void onCreate ( Bundle savedInstanceState ) <
- super . onCreate ( savedInstanceState ) ;
- setContentView ( R. layout . show_settings_layout ) ;
- SharedPreferences sharedPrefs = PreferenceManager. getDefaultSharedPreferences ( this ) ;
- StringBuilder builder = new StringBuilder ( ) ;
- builder. append ( «n» + sharedPrefs. getBoolean ( «perform_updates» , false ) ) ;
- builder. append ( «n» + sharedPrefs. getString ( «updates_interval» , «-1» ) ) ;
- builder. append ( «n» + sharedPrefs. getString ( «welcome_message» , «NULL» ) ) ;
- TextView settingsTextView = ( TextView ) findViewById ( R. id . settings_text_view ) ;
- settingsTextView. setText ( builder. toString ( ) ) ;
- >
- >
Здесь мы извлекаем параметры конфигурации приложения в виде класса SharedPreferences с помощью статического метода getDefaultSharedPreferences класса PreferenceManager. Далее, в зависимости от типа данных параметра, мы используем соответствующий метод извлечения данных (например getBoolean или getString). Второй аргумент в методе извлечения данных — значение по умолчанию, на тот случай если параметр с таким именем еще не был задан. В качестве имен параметров мы используем ключи заданные в XML файле preferences.xml. Значения параметров конкатенируются и выводятся в TextView.
Вот описание простого пользовательского интерфейса для второй активности:
- version = «1.0» encoding = «utf-8» ?>
- xmlns:android = «schemas.android.com/apk/res/android»
- android:orientation = «vertical»
- android:layout_width = «fill_parent»
- android:layout_height = «fill_parent»
- >
android:id = «@+id/settings_text_view» android:layout_width = «fill_parent» android:layout_height = «wrap_content» /> >
Давайте запустим приложение, мы увидим список наших параметров:

Кликаем на “Updates Interval” и видим список возможных значений:
Кликаем на “Welcome Message” и видим редактирование текста приветствия:
Посмотрим на заданные параметры. Кликнете на кнопке меню и выберете единственный элемент “Show current settings”. Запуститься вторая активность в которой мы увидим значения наших параметров конфигурации:
Это все. Как видите, это действительно просто. Удачи!
Источник


