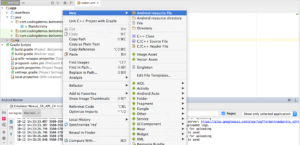
- Add Context Menu Icon in android
- Answers
- Полный список
- Context Menu in Android with Example
- Example
- Tek Eye
- Take Your First Steps in Implementing Context Menus in Android
- Define Menu Captions
- Define the Menu XML
- Set an ImageView
- Tell Android a View Has a Context Menu
- Show the Context Menu When Requested
- Act on the Selected Item
- Full Java Code for the ContextMenu Demo
- See Also
- Archived Comments
- Do you have a question or comment about this article?
- Android Options Menu Icon – Adding Icon to Menu Item
Add Context Menu Icon in android
I have a Listview with a ContextMenu, but when I setIcon for ContextMenu look like it doesn’t work
Answers
Context menus do not support icons.
Note: Context menu items do not support icons or shortcut keys.

Since version 24.2.0 of the support library, the v7 version of ActionBarDrawerToggle has offered the setDrawerArrowDrawable() method as a means to customize the toggle icon. DrawerArrowDrawable is the class that provides that default icon, and it can be subclassed to alter it as needed.
As an example, the BadgeDrawerArrowDrawable class overrides the draw() method to add a basic red and white badge after the superclass draws itself. This allows the hamburger-arrow animation to be preserved underneath.
An instance of this can be set on the toggle any time after it’s instantiated, and the badge’s properties set directly on the drawable as needed.
As the OP noted below, the Context used for the custom DrawerArrowDrawable should be obtained with ActionBar#getThemedContext() or Toolbar#getContext() to ensure the correct style values are used. For example:

To simplify things a bit, it might be preferable to subclass ActionBarDrawerToggle as well, and handle everything through the toggle instance.
With this, the custom badge drawable will be set automatically, and everything toggle-related can be managed through a single object.
BadgeDrawerToggle is a drop-in replacement for ActionBarDrawerToggle , and its constructors are exactly the same.
Источник
Полный список
В этом уроке мы:
— создадим контекстное меню
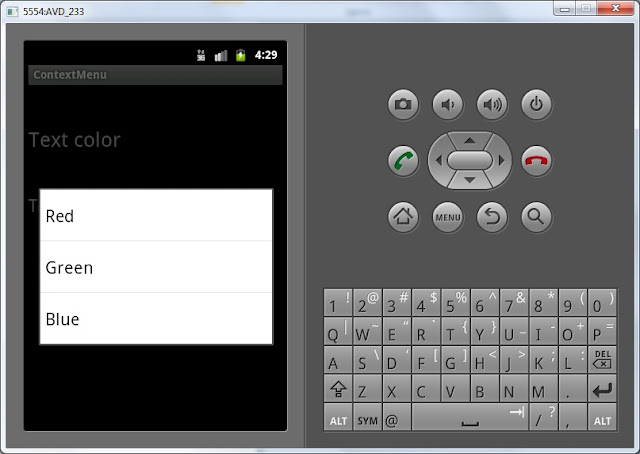
Контекстное меню вызывается в Андроид длительным нажатием на каком-либо экранном компоненте. Обычно оно используется в списках, когда на экран выводится список однородных объектов (например письма в почт.ящике) и, чтобы выполнить действие с одним из этих объектов, мы вызываем контекстное меню для него. Но т.к. списки мы еще не проходили, сделаем пример попроще и будем вызывать контекстное меню для TextView.
Project name: P0151_ContextMenu
Build Target: Android 2.3.3
Application name: ContextMenu
Package name: ru.startandroid.develop.contextmenu
Create Activity: MainActivity
Откроем main.xml и нарисуем там два TextView:
Для первого TextView мы сделаем контекстное меню, с помощью которого будем менять цвет текста. Для второго – будем менять размер текста.
Принцип создания контекстного меню похож на создание обычного меню. Но есть и отличия.
Метод создания onCreateContextMenu вызывается каждый раз перед показом меню. На вход ему передается:
— ContextMenu, в который мы будем добавлять пункты
— View — элемент экрана, для которого вызвано контекстное меню
— ContextMenu.ContextMenuInfo – содержит доп.информацию, когда контекстное меню вызвано для элемента списка. Пока мы это не используем, но, когда будем изучать списки, увидим, что штука полезная.
Метод обработки onContextItemSelected аналогичный методу onOptionsItemSelected для обычного меню. На вход передается MenuItem – пункт меню, который был нажат.
Также нам понадобится третий метод registerForContextMenu. На вход ему передается View и это означает, что для этой View необходимо создавать контекстное меню. Если не выполнить этот метод, контекстное меню для View создаваться не будет.
Давайте кодить, открываем MainActivity.java. Опишем и найдем TextView и укажем, что необходимо создавать для них контекстное меню.
Теперь опишем создание контекстных меню. Используем константы для хранения ID пунктов меню.
Обратите внимание, что мы по ID определяем View, для которого вызвано контекстное меню и в зависимости от этого создаем определенное меню. Т.е. если контекстное меню вызвано для tvColor, то мы создаем меню с перечислением цветов, а если для tvSize – с размерами шрифта.
В качестве ID пунктов мы использовали константы. Группировку и сортировку не используем, поэтому используем нули в качестве соответствующих параметров.
Можно все сохранить и запустить. При долгом нажатии на TextView должны появляться контекстные меню.
Но нажатие на них ничего не дает, т.к. мы не прописали обработку в методе onContextItemSelected. Давайте пропишем:
В этом методе мы определяем по ID, какой пункт меню был нажат. И выполняем соответствующие действия: меняем цвет текста для tvColor или размер шрифта для tvSize. Сохраняем, запускаем и проверяем, что контекстные меню теперь реагируют на нажатия и делают то, что от них требуется.
Для расширения кругозора я хотел бы еще кое-что написать по этой теме. Возможно, это покажется пока сложноватым, так что если вдруг будет непонятно, ничего страшного. Итак, мысли вслух.
Мы использовали метод registerForContextMenu (View view) для включения контекстного меню для определенного View. Этот метод принадлежит классу Activity. Я посмотрел исходники этого метода, там написано следующее:
Вспоминаем наш урок по обработчикам и смотрим хелп по методу setOnCreateContextMenuListener (View.OnCreateContextMenuListener l). Получается, что View в качестве обработчика создания контекстного меню использует объект this. В данном случае, этот код в Activity, значит this – это Activity и есть. Т.е. когда View хочет показать контекстное меню, оно обращается к обработчику (Activity), а он уже выполняет свой метод onCreateContextMenu. Т.е. тот же самый принцип, что и при обычном нажатии (Click).
И строка в MainActivity.java:
абсолютно равнозначна этой строке:
Вообще мы можем создать свой объект, реализующий интерфейс View.OnCreateContextMenuListener и использовать его вместо Activity в качестве обработчика создания контекстного меню.
Не забывайте, что для контекстного меню вы также можете использовать XML-способ, который был рассмотрен в конце прошлого урока. Попробуйте сделать этот же урок, но уже с использованием XML-меню.
Полный код урока:
На следующем уроке:
— рисуем экран программно, а не через layout-файл
Присоединяйтесь к нам в Telegram:
— в канале StartAndroid публикуются ссылки на новые статьи с сайта startandroid.ru и интересные материалы с хабра, medium.com и т.п.
— в чатах решаем возникающие вопросы и проблемы по различным темам: Android, Kotlin, RxJava, Dagger, Тестирование
— ну и если просто хочется поговорить с коллегами по разработке, то есть чат Флудильня
— новый чат Performance для обсуждения проблем производительности и для ваших пожеланий по содержанию курса по этой теме
Источник
Context Menu in Android with Example
In Android, there are three types of menus available to define a set of options and actions in the Android apps. The lists of menus in Android applications are the following:
- Android options menu
- Android context menu
- Android popup menu
Here in this article let’s discuss the detail of Context Menu. In Android, the context menu is like a floating menu and arises when the user has long pressed or clicks on an item and is beneficial for implementing functions that define the specific content or reference frame effect. The Android context menu is alike to the right-click menu in Windows or Linux. In the Android system, the context menu provides actions that change a specific element or context frame in the user interface and one can provide a context menu for any view. The context menu will not support any object shortcuts and object icons. Note that we are going to implement this project using the Java language. A sample GIF is given below to get an idea about what we are going to do in this article.

Example
Step 1: Create a New Project
To create a new project in Android Studio please refer to How to Create/Start a New Project in Android Studio. Note that select Java as the programming language.
Источник
Tek Eye
This tutorial provides an Android context menu example, using the aptly named ContextMenu class. On a Windows PC system the context menu is sometimes referred to as the right-click menu. (Though using this term is not recommended in case the user is left handed and has switched the mouse, in which case the context menu requires the left-click!)
(This Android context menu tutorial assumes that Android Studio is installed, a basic App can be created and run, and the code in this article can be correctly copied into Android Studio. The example code can be changed to meet your own requirements. When entering code in Studio add import statements when prompted by pressing Alt-Enter.)
Take Your First Steps in Implementing Context Menus in Android
A context menu is a menu of options that apply to the item immediately under the pointer (mouse or finger). The parts required to implement a simple context menu are:
- Define the menu captions, usually in a string resource file.
- Define the menu layout in an XML file.
- Tell Android a View is using a context menu.
- When the context menu is requested show it.
- React to the selected menu item.
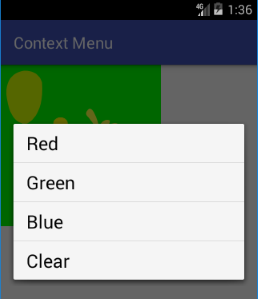
The example code presented here is going to call the setColorFilter method of an ImageView using a context menu. This will be used to add a basic image effect to a bitmap graphic by applying a red, blue or green filter. Start by creating a new project in Android Studio, here called Context Menu.
Define Menu Captions
The menu captions are simple string resources. In Android Studio use the File menu (or Studio’s Project explorer context menu) then New and Android resource file (or Values resource file). Call the file something meaningful, such as color menu_captions.xml, and click OK.
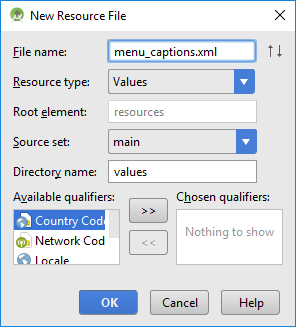
Add four strings with the values Red, Blue, Green and Clear. You will have a file similar to this (alternatively the values can added to the existing strings.xml file):
Define the Menu XML
In a similar way to the first step create a new resource file. This time the Resource type is set to Menu. Name the new menu file appropriately, such as color_menu.xml, click OK. (The file is creared in a res/menu folder.)

Add Menu Item four times from the Palette, setting the title to each caption string and giving each item an id. The menu file has a menu element at the root and an item element for each menu option required. Each item has an id and title (the title points to the captions created above). The file will look similar to this:
Set an ImageView
See the Tek Eye article Displaying a Bitmap in Android to add an ImageView to the app. The clown graphic used here is in the Zipped Simple Clown graphic resources to be added to the res folder.

Tell Android a View Has a Context Menu
This is easy, one line of code calling the Activity’s registerForContextMenu method, passing in the View that needs the menu. Many Views can use the same context menu or different context menus, which menu to use is determined when it is requested to be created. Place this line of code at the bottom of the onCreate method in the MainActivity.java, if your ImageView has a different id change it appropriately :
Show the Context Menu When Requested
The Activity handling the View that needs the context menu uses onCreateContextMenu. The View id (using the method getId) can be tested if it is needed to display different context menus. Here just the one is being used, notice how the call to inflate takes the name of the menu file:
Act on the Selected Item
For onContextItemSelected the menu item selected is passed in, this is tested to perform the correct action:
True is returned when the menu has been correctly handled. Now when you hold down on the image a menu appears and you can select an option to apply a simple filter:
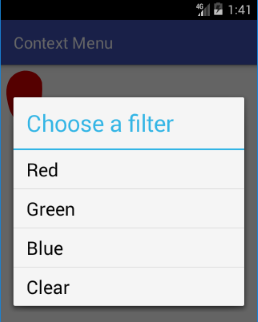
Adding a title to the menu is straightforward. Before the menu is inflated call the setHeaderTitle method:
(The setHeaderTitle method has a version that supports getting the string from a resource file.)
Full Java Code for the ContextMenu Demo
Here is the full class code used:
See Also
- Download the code for this example, available in context-menu.zip
- Android Example Projects
- Free Launcher Icons, Menu Icons and Android Graphics
Archived Comments
Pawan on May 6, 2013 at 11:33 am said: Very nice tutorial.
Author: Daniel S. Fowler Published: 2012-11-19 Updated: 2017-06-02


Do you have a question or comment about this article?
(Alternatively, use the email address at the bottom of the web page.)
↓markdown↓ CMS is fast and simple. Build websites quickly and publish easily. For beginner to expert.
Free Android Projects and Samples:
Источник
Android Options Menu Icon – Adding Icon to Menu Item
Hi and welcome to another tutorial from Codingdemos, in this tutorial you will learn how to create android options menu icon. If you are new to the Android options menu, then I suggest you watch the tutorial that I did on the channel that shows you how to do it.
By the end of this article, we will have an app that looks like this. (Large preview)
In this tutorial we will be using the following:
- – Android studio version 2.3.3
– Android emulator Nexus 5X with API 24
– Minimum SDK API 16
1- Open up Android Studio and create a new project and give it a name, in our case we’ve named it (OptionsMenuIcon), choose API 16 as the minimum SDK, then choose a blank activity and click “Finish” and wait for Android Studio to build your project.
2- To be able to use a toolbar, we need to change the parent them. Open styles.xml file and change the parent theme from parent=»Theme.AppCompat.Light.DarkActionBar» to parent=»Theme.AppCompat.Light.NoActionBar»
3- Open activity_main.xml file and add the toolbar
4- Let’s create a menu file that will have the menu items, right click on res folder → New → Android resource file , give the file a name and select Menu from the Resource type dropdown list.
How to create menu folder and file in Android studio. (Large preview)
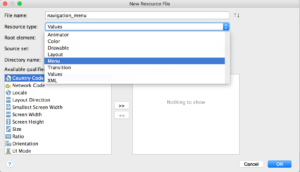
How to create a resource file in Android studio. (Large preview)
5- Next we need to look for icons that we can use them for an android menu item, thankfully android studio can help us to get those icons that we need. Click res → New → Vector Asset . Choose the icon that you want by clicking on the android icon, click “Next” button and then click “Finish”.
6- Now we can add android menu items with icons, we will have 4 menu items. 1 menu item will be the root while the other 3 menu items will be grouped under a single Menu .
7- Open MainActivity.java file to declare the toolbar and give the toolbar the ability to have those options menu show up.
8- Let’s create options menu by overriding onCreateOptionsMenu and inflating the menu file that we created earlier
9- To be able to respond to user action, we need to override onOptionsItemSelected , so that whenever they tap on any of those menu items we show an android toast message.
Compile and run the app; you will see android options menu appear in the Android toolbar with menu items. When you tap on any of those menu items an android toast message appears on the screen. The source code for options menu tutorial is available on Github
Источник


