- Android studio countdowntimer это
- Создание таймера CountDownTimer в Android на примере
- Count Down Timer Class
- Definition
- Remarks
- Constructors
- Properties
- Methods
- Explicit Interface Implementations
- Extension Methods
- Android Count Down Timer Tutorial
- Let’s Get it Working
- Basic Usage
- Step 1) Creating New Project
- Step 2) Defining strings,colors and styles
- Step 3) Adding drawable
- Step 4) Creating the layout
- Step 5) Writing Code in MainActivity class
- Working with Countdown Timer in Android Studio Using Kotlin
- What is a countdown?
- How to implement the countdown timer from scratch using Kotlin on Android Studio
- 1. Start a new project on Android studio
- 2. Configure your Project
- 3. Lets design our view
- 5. Kotlin code for the Countdown Timer
Android studio countdowntimer это
В этом небольшом уроке мы научимся использовать в своем приложении такую простую и распространенную штуку, как CountDownTimer — счетчик обратного отсчета. Этот элемент Android интерфейса, как и любой другой мобильной или компьютерной ОС каждому из нас знаком до боли. Сколько времени вы убили глядя на надпись в файлообменнике — ссылка будет доступна через 10, 9, 8. Теперь пришло время и нам научиться делать в своем приложении такую пакость.
Создаем новый проект, выбираем Blank Activity и Android 2.2+. Пользовательский интерфейс нашего сегодняшнего приложения будет прост как дважды два — всего лишь один элемент TextView, в котором будет происходить текстовое отображение обратного отсчета. Открываем файл activity_main.xml и добавляем туда элемент TextView:
Создание таймера обратного отсчета совсем не сложно, для этого используется специальный встроенный класс под названием CountDownTimer. При настройке таймера такого типа используется всего 2 переменные: время до окончания обратного отсчета и шаг, с которым происходит отсчет, все это в миллисекундах. В классе CountDownTimer используется два метода: onTick () и onFinish (). В методе onTick () происходит настройка обновления текстовой информации о изменении показаний таймера, а в методе onFinish () происходит настройка желаемых действий после окончания обратного отсчета (например, подождите 3, 2, 1. Скачать файл, или переход на другой экран, что то в этом роде).
Мы сделаем простейшую программу, в которой таймер обратного отсчета будет отсчитывать 20 секунд, после чего в элементе TextView будет появляться надпись «Бабах!» (как будто мы сделали таймер на бомбе).
Чтобы это сотворить, открываем файл MainActivity.java и добавляем сюда код:
Запускаем и проверяем работоспособность нашего таймера обратного отсчета:
Источник
Создание таймера CountDownTimer в Android на примере
 Проблема
Вам нужен простой таймер обратного отсчета, программа, которая будет отсчитывать заданное количество секунд, пока не достигнет нуля.
Решение
Платформа Android поставляется со встроенным классом для создания таймера обратного отсчета CountDownTimers . Он прост в использовании, эффективен и работоспособен (это само собой разумеется!).
Обсуждение
Для создания таймера обратного отсчета выполните следующие действия.
- Создайте подкласс Конструктор этого класса принимает два аргумента: CountDownTimer (long millisInFuture, long countDownlnterval) . Первый — это количество миллисекунд с того момента, когда нужно сделать интервал; на данный момент будет вызываться метод подкласса onFinish() . Второй — частота в миллисекундах, определяющая, как часто вы хотите получать уведомления о том, что таймер все еще работает. Это типично для обновления монитора прогресса или другого обмена данными с пользователем. Ваш метод подкласса onTick() будет вызываться каждый раз по истечении данного количества миллисекунд.
- Переопределите методы onTick()
- Создайте новый экземпляр класса
- Вызовите метод start() для вновь созданного экземпляра!
Пример программы для таймера обратного отсчета состоит из компоновки XML (показанной в примере 1) и некоторого кода Java (показанного в примере 2). При запуске он должен выглядеть примерно так, как показано на рис. 1, хотя время, вероятно, будет иным.
Пример 1. Файл main.xml
Пример 2. Файл Main, java
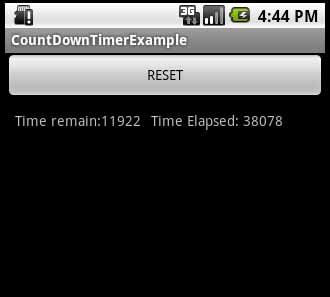
Рис. 1. Сброс таймера
URL-адрес для загрузки исходного кода
Исходный код этого примера можно посмотреть и скачать на странице Github.
Источник
Count Down Timer Class
Definition
Some information relates to prerelease product that may be substantially modified before it’s released. Microsoft makes no warranties, express or implied, with respect to the information provided here.
Schedule a countdown until a time in the future, with regular notifications on intervals along the way.
Remarks
Portions of this page are modifications based on work created and shared by the Android Open Source Project and used according to terms described in the Creative Commons 2.5 Attribution License.
Constructors
A constructor used when creating managed representations of JNI objects; called by the runtime.
Properties
Returns the runtime class of this Object .
(Inherited from Object)
The handle to the underlying Android instance.
(Inherited from Object)
This API supports the Mono for Android infrastructure and is not intended to be used directly from your code.
This API supports the Mono for Android infrastructure and is not intended to be used directly from your code.
Methods
Cancel the countdown.
Creates and returns a copy of this object.
(Inherited from Object)
Indicates whether some other object is «equal to» this one.
(Inherited from Object)
Returns a hash code value for the object.
(Inherited from Object)
Called by the garbage collector on an object when garbage collection determines that there are no more references to the object.
(Inherited from Object)
Wakes up a single thread that is waiting on this object’s monitor.
(Inherited from Object)
Wakes up all threads that are waiting on this object’s monitor.
(Inherited from Object)
Callback fired when the time is up.
Callback fired on regular interval.
Sets the Handle property.
(Inherited from Object)
Start the countdown.
Returns a string representation of the object.
(Inherited from Object)
Causes the current thread to wait until another thread invokes the java.lang.Object#notify() method or the java.lang.Object#notifyAll() method for this object.
(Inherited from Object)
Causes the current thread to wait until another thread invokes the java.lang.Object#notify() method or the java.lang.Object#notifyAll() method for this object.
(Inherited from Object)
Causes the current thread to wait until another thread invokes the java.lang.Object#notify() method or the java.lang.Object#notifyAll() method for this object.
(Inherited from Object)
Explicit Interface Implementations
| IJavaPeerable.Disposed() | (Inherited from Object) |
| IJavaPeerable.DisposeUnlessReferenced() | (Inherited from Object) |
| IJavaPeerable.Finalized() | (Inherited from Object) |
| IJavaPeerable.JniManagedPeerState | (Inherited from Object) |
| IJavaPeerable.SetJniIdentityHashCode(Int32) | (Inherited from Object) |
| IJavaPeerable.SetJniManagedPeerState(JniManagedPeerStates) | (Inherited from Object) |
| IJavaPeerable.SetPeerReference(JniObjectReference) | (Inherited from Object) |
Extension Methods
Performs an Android runtime-checked type conversion.
Источник
Android Count Down Timer Tutorial
A countdown is a sequence of backward counting to indicate the time remaining before an event is scheduled to occur. To achieve countdown Android comes with a built-in CountDownTimer class for constructing CountDownTimers. Its easy to use, efficient and works.This class is an abstract class whose methods need to be overridden to implement it in our project.
Let’s Get it Working
In this tutorial we are going to learn the basic usage of CountDownTimer. To really understand the usage of count down timer we will create an app. This app show the circular progress bar , time and start/stop image to control the count down timer.
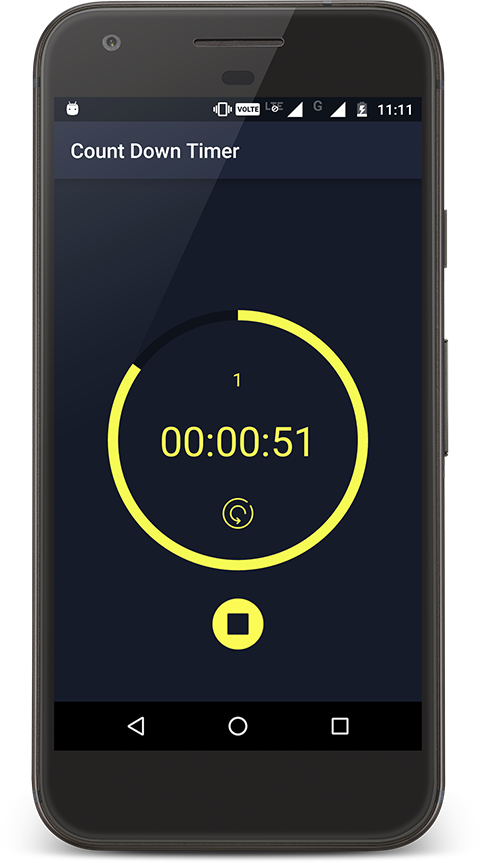
Count Down Timer App


Basic Usage
Implementing a Count Down Timer in your app won’t take more than two steps. First you need to create an object of in-built abstract class named CountDownTimer. This class is used to Schedule a countdown until a time in the future, with regular notifications on intervals along the way.
Second you have to start the count down timer via invoking start() method.
Step 1) Creating New Project
Create a new project in Android Studio from File ⇒ New Project Fill the required information like project name and package name of the project. When it prompts you to select the default activity, select Empty Activity and proceed.
Step 2) Defining strings,colors and styles
2.1 Add the below string values to the strings.xml located in res ⇒ values ⇒ strings.xml.
2.2 Add the below color values to the colors.xml located in res ⇒ values ⇒ colors.xml.
2.3 Add the below style values to the styles.xml located in res ⇒ values ⇒ styles.xml.
Step 3) Adding drawable
Before creating layout we have to write custom drawable xmls for circular progress bar .And also need some images for start, stop and reset icon.
3.1 Create new drawable resource file by right click on drawable ⇒ New ⇒ Drawable resource file name it drawable_circle_yellow.xml and add the below code to it. This file will create a yellow hollow circle of 10dp of thicknes.
3.2 Again Create new drawable resource file by right click on drawable ⇒ New ⇒ Drawable resource file name it drawable_circle_dark_blue.xml and add the below code to it. This file will create a blue hollow circle of 10dp of thicknes.
3.3 Download the images zip. Unzip it and place all the images in drawable folder.
Step 4) Creating the layout
Now add the below code to activity_main.xml located in res ⇒ layout ⇒ activity_main.xml. This code will create a view show above in the screen shot i.e a circular progress bar to show the time elapsed progress, input field to enter minutes, text field to show the time, start/stop and reset image to control the count down timer.
Step 5) Writing Code in MainActivity class
Now add the below code to MainActivity.java located in java ⇒ project’s package ⇒ MainActivity. Here i have written code to initialize views, added click listeners on it ,methods to control start stop reset functionality.
→ initViews() to intialize views.
→ initListeners() to initialize the click listeners.
→ setTimerValues() fetches the input minute value from the edit text, convert minutes to milliseconds that is required for count down timer.
→ startCountDownTimer() initializes the abstract class count down timer object with two implemented methods onTick(long milliSeconds) and onFinish(). onTick(long milliSeconds) Callback is fired on regular interval and onFinish() Callback is fired when the time is up. With count down timer object i started it by calling countDownTimer.start();
→ stopCountDownTimer() stops the count down timer by calling cancel() method.
→ startStop() contains start/stop functionality for count down timer and also make changes in views.
→ hmsTimeFormatter(long milliSeconds) convert the milliseconds to HH:mm:ss time format.
Count Down Timer
Enjoy Coding and Share Knowledge
Источник
Working with Countdown Timer in Android Studio Using Kotlin

Mar 7, 2020 · 6 min read
This tutorial shows you how to implement a countdown timer from scratch using android studio.
Before we dive into the whole technical aspect of this tutorial let’s try and understand what a countdown is or the need for a countdown timer.
What is a countdown?
A countdown is an act of counting down numerals in reverse o rder to zero. We all make use of countdown in our daily lives, is it when you and couple of friends are playing hide-and-seek or when you heat a delicious meal in the microwave or when Lebron James hit a clutch three pointer to win the championship as the clock winds down to 0.

There are lot of examples of times and moment we make use of countdown timers, the famous one we all know is at the launch of a rocket going to space or the countdown to a new year .
So we can see countdown timers are really important. Let get down to coding shall we.
How to implement the countdown timer from scratch using Kotlin on Android Studio
Before going ahead with this tutorial I’m assuming you having basic understanding of Kotlin programming and android studio.
Lets get to work!
1. Start a new project on Android studio
Select the empty activity so we would be able to create our own views

2. Configure your Project
You can name your app whatever like, i would be using CountdownApp

3. Lets design our view
Android development make use of the XML coding to design views for android apps.
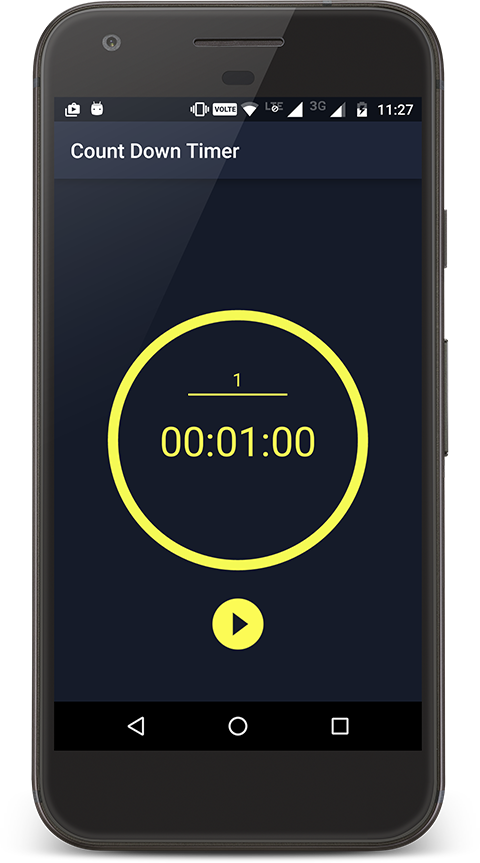
So we are making use of the constraintlayout an EditText which takes our input, A TextView to display the progress of our timer and 2 Button to pause and cancel our Timer. Our second button is invisible because we want to only show that button whenever the timer is paused.
Now our app looks like this

5. Kotlin code for the Countdown Timer
Explanation of code
The Countdown timer package in android takes in time in milliseconds, so we had to convert our time to milliseconds and 1 minute equal to 60000 milliseconds.
start_mili_seconds initializes our timer text to start countdown from one minute in the absent of an inputted minute. The is_running variable helps us check if our timer is running so we are able to change the button text and also make the reset button visible whenever the is_running variable is true.
On click of the button that triggers the timer, we check if is_running is true we run the pauseTimer() function which changes the button text to pause and makes the reset button visible and also pause the timer, or else it takes the text from the EditText and converts it to a milliseconds and pass it as a parameter to the startTimer() function which then start our timer.
The startTimer() function consist of the whole logic we need to start our countdown, first we create a global variable:
which makes out CountDownTimer class available where we need it, now we need to initialize the countdown_timer
we make use of object declaration to initialize our CountDownTimer class which takes in 2 arguments:
- The time you intend to countdown in seconds and for us we named it as time_in_seconds
- The amount of time reduced in seconds, here we are using 1000 that’s per milliseconds reduce the time_in_seconds
It has two (2) implemented methods which are the onTick() and onFinish()
The onTick updates our UI text ( Textview) on the time remaining for the countdown to reach zero.
The updateTextUI() function converts our time_in_milliseconds and display it in actual minute and seconds so the user is able to understand and monitor the countdown timer.
Once the countdown is finished the onFinish() loads a confetti function which displays konfetti around the screen for successful completion of the countdown
To be able to use the Konfetti in your app you need to add this to your build.gradle file
and also add this to your MainActivity.kt file
Now that we have our countdown and konfetti. we want to be able to reset our timer when we want and that’s why we have the resetTimer() function
This function resets our timer back to 0 and hides the reset button so we start the timer all over again.
Источник


