- How to Create Classes in Android Studio?
- Creating Java Class in Android Studio
- Step by Step Implementation
- Creating Kotlin Class in Android Studio
- Step by Step Implementation
- Создание собственных классов в Java: свойства, методы, конструкторы
- Создание класса: свойства и методы
- Конструкторы
- How To Create New Java Class In Android Studio
- 1.How To Create New Java Class In Android Studio.
- 2. Java Class SMSBean Usage Example.
- Android tutorial — How to Create New Java Class in Android Studio — android studio tutorial
- What is Java Class?
- New Java Class in Android Studio :
- How to Create New Java Class in Android Studio:
- Related Searches to How to Create New Java Class in Android Studio
- My Blog
- Sharing my experiences on various technical aspects
- Create new Class extends a SuperClass- Android Studio
- Create a Class extends a SuperClass
How to Create Classes in Android Studio?
In Android during the project development most of the time there is a need for classes in the projects. For example, in the case of CRUD operation, we need a model class to insert and retrieve data. Also to hold the info in our custom view we need to create a getter setter class. So basically in android , there are two types of classes we can create and we use frequently .
- Creating Java Class
- Creating Kotlin Class
So in this article, we are going to create both Java and Kotlin class in Android studio.
Creating Java Class in Android Studio
A class is a user-defined blueprint or prototype from which objects are created. It represents the set of properties or methods that are common to all objects of one type. In general, java class declarations can include these components, in order:
- Modifiers: A class can be public or has default access (Refer this for details).
- class keyword: class keyword is used to create a class.
- Class name: The name should begin with an initial letter (capitalized by convention).
- Superclass(if any): The name of the class’s parent (superclass), if any, preceded by the keyword extends. A class can only extend (subclass) one parent.
- Interfaces(if any): A comma-separated list of interfaces implemented by the class, if any, preceded by the keyword implements. A class can implement more than one interface.
- Body: The class body surrounded by braces, < >.
Step by Step Implementation
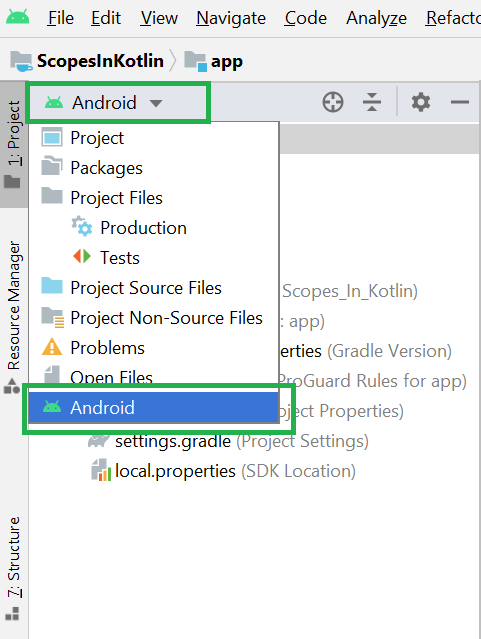
Step 1: Go to Android Studio and open the project in Android mode as shown in the below image.
Step 2: Now go to the app > java > your package name > right-click > New > Java Class as shown in the below image.

Step 3: After completing step 2 a pop-up screen will arise like below. Here enter your class name and choose Class and click the Enter button.

After completing the above steps successfully you can find your Java class here. Go to the app > java > your package name > GeeksforGeeks.java. And you can write your own Java code here.

Creating Kotlin Class in Android Studio
Like Java, the class is a blueprint for the objects having similar properties. We need to define a class before creating an object and the class keyword is used to define a class. The kotlin class declaration consists of the class name, class header, and class body enclosed with curly braces.
Where:
Class name: every class has a specific name
Class header: header consist of parameters and constructors of a class
Class body: surrounded by curly braces, contains member functions and other property
Both the header and the class body are optional; if there is nothing in between curly braces then the class body can be omitted. For example:
Step by Step Implementation
Step 1: Go to Android Studio and open the project in Android mode as shown in the below image.
Step 2: Now go to the app > java > your package name > right-click > New > Kotlin File/Class as shown in the below image.

Step 3: After completing step 2 a pop-up screen will arise like below. Here enter your class name and choose Class and click the Enter button.
Источник
Создание собственных классов в Java: свойства, методы, конструкторы
Создание класса: свойства и методы
Рассмотрим пример создания простейшего класса. Давайте с его помощью смоделируем окружности на координатной плоскости.
Каждая такая окружность, как известно, будет определяться своим центром (т.е. точкой с двумя числовыми координатами) и радиусом (т.е. его длиной, представляемой в виде числа). Таким образом, окружность на координатной плоскости характеризуют 3 вещественных числа. Значит в нашем классе должно быть три соответствующих свойства.
Пока не будем пытаться решать серьёзных задач с помощью класса, а наделим его следующими возможностями: созданную на основе класса окружность должно быть возможно выводить на экран (в виде описания её характеристик), перемещать (т.е. совершать преобразование движения, меняя координаты её центра) и масштабировать (т.е. совершать преобразование подобия, меняя радиус окружности).
Конструкторы
Когда мы создаём объект командой Circle o1 = new Circle(); используется так называемый конструктор по умолчанию (или конструктор без параметров) — это специальный метод класса, мы его не определяли явно, но даже если его не определить он создаётся автоматически, выполняется при создании каждого нового объекта и присваивает первоначальные значения его свойствам (инициализирует их). Значения по умолчанию для свойств зависят от их типа (0 или 0.0 для чиловых типов, false для логического типа и т.д.).
Конструктор по умолчанию можно описать явно и при этом задать началльные значения для свойств нового объекта, отличные от значений по умолчанию.
От остальных методов конструктор отличается тем, что имеет то же самое имя, что и весь класс, а также не имеет типа возвращаемого значения (по сути, в результате своей работы конструктор возвращает новый объект нужного класса).
Источник
How To Create New Java Class In Android Studio
In android development, the java class is commonly used to implement business logic processes such as database access, send emails, send short messages etc. We always use one java class to encapsulate some related functions.
So we can think java class as the Model role in the MVC pattern. This example will show you how to create a new java class in android studio, and we will create a SMSBean java class that will implement short message send and receives functions.
1.How To Create New Java Class In Android Studio.
- Launch Android Studio, create a new project. You can read the article How To Create New Android Studio Project to learn more.
- After that right-click the default package in the android studio Project View’s Android subview, then click the New —> Java Class menu item.
- You can also click the New —> Package menu item to create a new package or sub-package under exist package. In this example, we create a sub-package model under the existing com.dev2qa.example package.
- Then there will popup a dialog that will let you input java class-related information. Input class name SMSBean in the Name input text box, select Class in the Kind drop-down list, do not input any superclass, do not implement any interface. Input package name value such as com.dev2qa.example.model. Click the OK button.
- After clicking the OK button, the java class SMSBean has been created successfully. We will add two methods in it, one is sendSMS(), the other is receiveSMS(), please see code comments for detail.
2. Java Class SMSBean Usage Example.
This example will use SMSBean as a short messages manager object, it has two methods sendSMS() and receiveSMS().
The user interface of this example is not complex, there will have two buttons on the screen one is used to send short messages, the other is used to receive short messages. When you click any of the two buttons, an AlertDialog will pop up showing some messages.
If you can not watch the above video, you can see it on the youtube URL https://youtu.be/VhM3qIQkuD8
So if you want to run this example, you should create a new activity and layout XML files to implement the user interface. You can read the below articles if you do not know how to create activity and use event listener.
Источник
Android tutorial — How to Create New Java Class in Android Studio — android studio tutorial
What is Java Class?
- In Java, the new keyword is used to create new objects. There are three steps when creating an object from a class − Declaration − A variable declaration with a variable name with an object type. So basically, an object is created from a class.

New Java Class in Android Studio :
- With the Create New Class dialog and file templates, Android Studio helps you to quickly create the following new classes and types:
- Java classes
- Enumeration and singleton classes
- Interface and annotation types

How to Create New Java Class in Android Studio:
- Step 1: Firstly, Select app > Java > package > Right Click on package. After that Click on New > Java Class. Remember to choose your package in which you want to create new class.
- Step 2: After that Enter Class name and Click on OK. Here we create Class Animal as shown in figure below.
- Step 3: New Java Class will be created in your Android project.
Related Searches to How to Create New Java Class in Android Studio
World’s No 1 Animated self learning Website with Informative tutorials explaining the code and the choices behind it all.
Источник
My Blog
Sharing my experiences on various technical aspects
Home » Create new Class extends a SuperClass- Android Studio
Create new Class extends a SuperClass- Android Studio
In Android studio, If you want to create a new Class extends a SuperClass, built-in menu doesn’t provide option for it.
Create a Class extends a SuperClass
Where as you can only Create a new Class and then manually write down extends Superclass.
Image 1 Image 2To add Create new Class which extends a SuperClass, you need to Create a new Template
Press Ctrl+Alt+S to open Settings window, here search for File and Code Templates
Click + button to add new template, give a name as Inheritance(you can give any name) and write this below code
Apply it and the Click Ok button. as shown below
Now go to project and try to create new class as shown Image 1 above..
and you’ll see newly added template in dropdown as shown below.
Select it and then you’ll be asked to enter Super class name. Enter your Super class name.
You’ll see new Class created with SuperClass.
Источник


 Image 1
  Image 2


