- Different Ways to fix “DELETE_FAILED_INTERNAL_ERROR” Error while Installing APK in Android Studio
- Method 1: Uninstalling the APK which is present in your device or Emulator
- Method 2: Updating the version code and version name of the apk in build.gradle file
- Method 3: Disabling Instant run in Android Studio
- Method 4: Disabling Instant run option in Android Studio using Shortcut keys
- Android Studio 3.0 Preview: Error while Installing APK #165
- Comments
- ghostbuster91 commented Jun 24, 2017 •
- ghostbuster91 commented Jun 24, 2017 •
- ghostbuster91 commented Jun 24, 2017
- ghostbuster91 commented Jun 27, 2017
- ghostbuster91 commented Jun 27, 2017
- ghostbuster91 commented Jun 27, 2017
- MichaelRocks commented Jul 27, 2017 •
- ghostbuster91 commented Jul 28, 2017
- Mauker1 commented Nov 3, 2017
- MichaelRocks commented Nov 7, 2017
- Mauker1 commented Nov 7, 2017
- ghostbuster91 commented Feb 21, 2018
- FIX: Android Emulator error installing APK on Windows
- How can I fix APK installation error for Android Emulator?
- 1. Use a better alternative: LDPlayer
- LDPlayer
- 2. Disable Instant Run
- 3. Enable USB debugging
- 4. Update drivers
- 5. Rebuild the project
- 6. Sync with Gradle
- 7. Run Invalidate caches/restart
- 8. Reinstall Android Studio
- Frequently Asked Questions
Different Ways to fix “DELETE_FAILED_INTERNAL_ERROR” Error while Installing APK in Android Studio
In Android Studio when building a new APK or while installing an application from Android Studio. You will get to see errors as shown in the title such as “DELETE FAILED INTERNAL ERROR“. This error is generally due to conflicts in the APK version while installing a new Android app. This is how the error dialog pops up on the screen
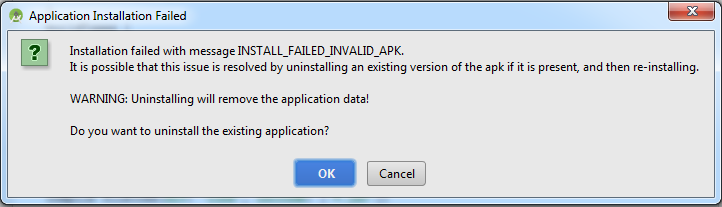
Failure: Install failed invalid apk
Error: While installing apk,
So in this article, we will take a look at solving this issue in 4 different ways.
- Method 1: Uninstalling the APK which is present in your device or Emulator
- Method 2: Updating the version code and version name of the apk in build.gradle file
- Method 3: Disabling Instant run in Android Studio
- Method 4: Disabling Instant run option in Android Studio using Shortcut keys
Note: Method 3 and Method 4 work only in lower versions of the android studio below 3.0.
Method 1: Uninstalling the APK which is present in your device or Emulator
To solve this issue the most common solution is to uninstall the apk which is already present in your device or emulator and then again install the APK in your device. This issue is generally caused when the version code of the installed apk conflicts with the apk version which we are trying to install in our android or emulator. So in this case we have to uninstall the apk and install the new apk.
Method 2: Updating the version code and version name of the apk in build.gradle file
First of all, we have to uninstall the apk which is already installed in our device or emulator. After that, we will update the apk version name and version code of our application and then again install this application. For updating the version name and code of the apk we have to navigate to the build.gradle of our Android Studio project. Navigate to the app > Gradle Scripts > build.gradle(:app) and then update the version code and name in your Gradle file. You can get to see the code below. Comments are added in the code to get to know in more detail. Navigate to the android section in build.gradle file.
After updating your version code now sync your project and again build your apk and run your application. This method will solve the issue.
Method 3: Disabling Instant run in Android Studio
In this method, we will be disabling the instant run in our android studio so when installing a new apk in our emulator or android device the app will be installed in our device without any error. Below is the step-by-step implementation for disabling Instant run in your android studio.
Note: This method works only in lower versions of the android studio below 3.0.
Step by step guide for disabling the instant run feature:
Navigate to the Files option in the top bar of android studio. In that option click on the File > Settings. You will get to see this option on the below screen.
After clicking on the settings option you will get to see the below screen. Inside this screen navigate to the Build, Execution, Deployment option and then click on the Instant run option.
Inside this screen, we have to uncheck the options which are shown on the above screen.
After unchecking all the options we have to click on Apply option and then click on the OK option to save these changes and proceed further.
Method 4: Disabling Instant run option in Android Studio using Shortcut keys
In this method, we will be disabling the instant run in our android studio using shortcut keys so when installing a new apk in our emulator or android device the app will be installed in our device without any error. Below is the step-by-step implementation for disabling Instant run in your android studio.
Note: This method works only in lower versions of the android studio below 3.0.
Step by step guide for disabling the instant run feature:
Press the shortcut key Ctrl + Shift + A and you will get to see a search bar after that search for an instant run option and then click on the Instant run option you will get to see the below screen.
And rest of the work is same as method 3.
Источник
Android Studio 3.0 Preview: Error while Installing APK #165
Comments
ghostbuster91 commented Jun 24, 2017 •
It looks like the newest gradle produces additional file called output.json which contains path to the built apk file, which is obviously wrong because building was done on remote machine.
The text was updated successfully, but these errors were encountered:
ghostbuster91 commented Jun 24, 2017 •
I’ve checked and this file has nothing to do with that. The only thing I found which fix this issue is to turn off mainframer, build your apk locally and turn it on. (Don’t forget to kill the daemons which are consuming your memory)
ghostbuster91 commented Jun 24, 2017
I am still not sure if it is connected to gradle or to AS.
It occurs when you build your apk for the first time since last restart using mainframer.
ghostbuster91 commented Jun 27, 2017
I cannot reproduce it on any machine despite my home one. Will investigate it further.
ghostbuster91 commented Jun 27, 2017
ghostbuster91 commented Jun 27, 2017
So the next step would be to build AS from sources and debug this class together with ApkProvider implementations: GradleApkProvider, FileSystemApkProvider and NonGradleApkProvider
How to: http://tools.android.com/build/studio
MichaelRocks commented Jul 27, 2017 •
I think this problem is related to the output.json file in case you don’t use splits. So I wrote a simple snippet that patches generated output.json files and managed to use mainframer with the new build tools.
In order to use this snippet you need to add -ProotDirOverride=/path/to/your/project command-line argument when running gradle or gradlew with mainframer.sh .
You’d better clean the project on the local and the remote machines before using the snippet for the first time. Also you need the project to be synced.
ghostbuster91 commented Jul 28, 2017
@MichaelRocks thanks for sharing.
My first guess was that this behaviour is connected with output.json but removing/modifying it didn’t make any difference. So it looks like the AS caches the values from it somehow.
Maybe I will be able to prepare some automated workaround based on the script you wrote, but it is not the way I would like to go.
Mauker1 commented Nov 3, 2017
What’s is this output.json used for anyway? Tried to find what it was and I didn’t really find anything useful.
MichaelRocks commented Nov 7, 2017
@Mauker1 This is a file generated by Android Gradle plugin. It’s located in $projectDir/build/intermediates/manifest/$variant/$buildType/output.json . Seems it’s used by Android Studio when you’re trying to run your application.
Mauker1 commented Nov 7, 2017
Gotcha. I also noticed the presence of this file once I upgraded to 3.0. I tried to look on the release notes and other related docs, and didn’t find anything regarding it. I wonder exactly how important/useful this file really is.
ghostbuster91 commented Feb 21, 2018
I couldn’t reproduce it on AS 3.0.1 stable
You can’t perform that action at this time.
You signed in with another tab or window. Reload to refresh your session. You signed out in another tab or window. Reload to refresh your session.
Источник
FIX: Android Emulator error installing APK on Windows

- Android Emulator can be used to test Android apps or even run them on your Windows computer.
- If you get an error installing the APK on your PC, waste no more time and take a look at our tips.
- Don’t worry about any issue you encounter while using an emulator. Confidently visit this Android section and find the perfect solution.
- For similar articles such as this one, don’t hesitate to check out the Emulators Hub on our website.

- Lets you play multiple games for multiple Google Play accounts
- A first-class playing performance for your PC
- Offers a highly customizable key mapping for the best in-game control
play all your favorite
mobile games on PC
Play Android Games on PC now
Android Emulator found in the Android Studio SDK is a vastly used tool by all developers for the Android platform.
Testing projects by installing APKs is an important step, but it seemingly won’t work for users who run the SDK on Windows. The installation error appears and they can’t finalize the installation.
We provided you with some troubleshooting steps below, by virtue of the Stack Overflow community. The most prominent insights we found are enlisted below so do give them a try.
How can I fix APK installation error for Android Emulator?
- Use a better alternative: LDPlayer
- Disable Instant run
- Enable USB debugging
- Update drivers
- Rebuild the project
- Sync with Gradle
- Run Invalidate caches/restart
- Reinstall Android Studio
1. Use a better alternative: LDPlayer

Getting an Android Emulator error while installing APK on Windows is unpleasant. Instead of feeling sorry for yourself and wasting valuable time, you should better think of an alternative from the start.
We are talking about LDPlayer. There are quite a few Android emulators that are too heavy or require extra tweaking.
That’s not the case with LDPlayer – installing it is an error-free process and it works great out of the box. Some of the included gamer-oriented features are multi-instance sync and high FPS/graphics.
You can even download the app or game you have min by using individual APK files. Even if an app isn’t available on LD Store, you can easily download and install its APK file into the emulator.
Just drag-drop the APK files on the LDPlayer window and it will start installing the app automatically. That’s how easy it really is.
LDPlayer
Tired of getting Android Emulator errors while installing the APK? Transform your PC into an Android gaming platform with LDPlayer!
2. Disable Instant Run

- Open the File option.
- Select Settings.
- Choose Build, Execution, Deployment.
- Select Instant Run.
- Uncheck the Enable Instant Run to hot-swap code/resource changes. on deploy (default enabled) box.
One of the most-suggested and, apparently, the most appraised troubleshooting tip is this one. We suggest disabling the Instant Run option.
After that, an APK installation was working as intended. Follow the above steps to disable the Instant run feature in Android Emulator.
3. Enable USB debugging

- On your phone, open Settings > About.
- Tap 7 times on the Build number to enable Developer options.
- Get back and open Developer options.
- Enable USB debugging.
Enabling this option is done on your handset and found in the Developer Options section. If it’s off, you won’t be able to install any APK project on your device.
Afterward, once you connect your handset with the PC, you should see the prompt. Make sure to allow USB debugging for that individual PC.
All you need to do is to follow the above steps to enable USB debugging on an Android device.
4. Update drivers
Verifying that your drivers are properly installed and up to date is an important step when trying to complete the APK installation procedure.
Therefore, make sure to install ADB and handset drivers. They’re, like all other drivers, found in Device Manager. After that, the problem should be gone.
Doing this manually, however, can become quite time-consuming. Let’s automate this job and use a specialized driver updater tool.
You simply need to download this tool, install it, and perform a scan, then update all the drivers in just one click.
⇒ Get Driverfix
5. Rebuild the project

- Open Android Studio.
- Click on Build.
- Click Clean project/Build.
- Finally, click the Rebuild project option.
Rebuilding the project might help, as well. Some users suggested that the Clean and then Rebuild commands provided them with the resolution.
When the project was successfully rebuilt, users were able to install the APK to their handsets without any issues.
Use the above procedure in order to clean and rebuild a project in Android Emulator.
6. Sync with Gradle

- Open the File option.
- Choose Syncproject with Gradle files.
- Wait it out and try installing the APK again.
If you use the Gradle automation system when developing (and chances are you do), the problem might lie in a sync failure.
In order to address this possible culprit, we suggest syncing it with the project. That should allow you to install APK without the error. Therefore, don’t hesitate to refer to the above procedure.
7. Run Invalidate caches/restart

- Choose the File option.
- Select Invalidate caches/restart.
- Click Invalidate and restart.
As with any other application, Android Studio stores all kinds of cached data. This speeds up the in-app processes but tends to create issues when creating new inputs and projects.
Therefore, there’s the command which resets cache completely and it’s found under the File option in the Main bar.
8. Reinstall Android Studio
Finally, if none of the previous solutions worked this out, we suggest reinstalling the Android Studio client. This is the last resort, judging on the reports of affected developers.
We hope it’ll help you too. You can download the Android Studio suite right away.
With that said, we can conclude this article. In case you have any alternative questions or suggestions, feel free to post them in the comments section below.
Frequently Asked Questions
Go to Tools -> Android -> AVD Manager and under actions select Cold Boot Now. This will restart the emulator.
If the Android Emulator fails to start, there might be out-of-date drivers installed.
Right-click on your Android Virtual Device (AVD) and select Stop to turn off the phone emulator.
Источник


