- Работа с файловой системой
- Чтение и сохранение файлов
- Saving Files
- This lesson teaches you to
- You should also read
- Choose Internal or External Storage
- Obtain Permissions for External Storage
- Save a File on Internal Storage
- Save a File on External Storage
- Query Free Space
- Delete a File
- Tek Eye
- Free Projects to Illustrate Android Programming Techniques
- List of Free Android Example Projects
- List of Free Android Example List Handling Projects
- List of Free Android Example UI Projects
- See Also
- Archived Comments
- Do you have a question or comment about this article?
Работа с файловой системой
Чтение и сохранение файлов
Работа с настройками уровня activity и приложения позволяет сохранить небольшие данные отдельных типов (string, int), но для работы с большими массивами данных, такими как графически файлы, файлы мультимедиа и т.д., нам придется обращаться к файловой системе.
ОС Android построена на основе Linux. Этот факт находит свое отражение в работе с файлами. Так, в путях к файлам в качестве разграничителя в Linux использует слеш «/», а не обратный слеш «\» (как в Windows). А все названия файлов и каталогов являются регистрозависимыми, то есть «data» это не то же самое, что и «Data».
Приложение Android сохраняет свои данные в каталоге /data/data/ / и, как правило, относительно этого каталога будет идти работа.
Для работы с файлами абстрактный класс android.content.Context определяет ряд методов:
boolean deleteFile (String name) : удаляет определенный файл
String[] fileList () : получает все файлы, которые содержатся в подкаталоге /files в каталоге приложения
File getCacheDir() : получает ссылку на подкаталог cache в каталоге приложения
File getDir(String dirName, int mode) : получает ссылку на подкаталог в каталоге приложения, если такого подкаталога нет, то он создается
File getExternalCacheDir() : получает ссылку на папку /cache внешней файловой системы устройства
File getExternalFilesDir(String type) : получает ссылку на каталог /files внешней файловой системы устройства
File getFileStreamPath(String filename) : возвращает абсолютный путь к файлу в файловой системе
FileInputStream openFileInput(String filename) : открывает файл для чтения
FileOutputStream openFileOutput (String name, int mode) : открывает файл для записи
Все файлы, которые создаются и редактируются в приложении, как правило, хранятся в подкаталоге /files в каталоге приложения.
Для непосредственного чтения и записи файлов применяются также стандартные классы Java из пакета java.io.
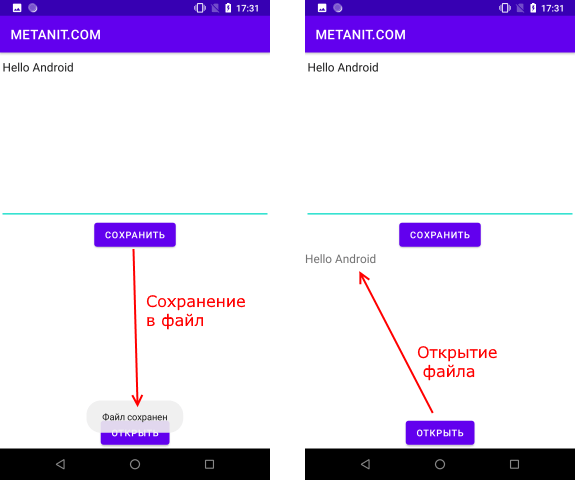
Итак, применим функционал чтения-записи файлов в приложении. Пусть у нас будет следующая примитивная разметка layout:
Поле EditText предназначено для ввода текста, а TextView — для вывода ранее сохраненного текста. Для сохранения и восстановления текста добавлены две кнопки.
Теперь в коде Activity пропишем обработчики кнопок с сохранением и чтением файла:
При нажатии на кнопку сохранения будет создаваться поток вывода FileOutputStream fos = openFileOutput(FILE_NAME, MODE_PRIVATE)
В данном случае введенный текст будет сохраняться в файл «content.txt». При этом будет использоваться режим MODE_PRIVATE
Система позволяет создавать файлы с двумя разными режимами:
MODE_PRIVATE : файлы могут быть доступны только владельцу приложения (режим по умолчанию)
MODE_APPEND : данные могут быть добавлены в конец файла
Поэтому в данном случае если файл «content.txt» уже существует, то он будет перезаписан. Если же нам надо было дописать файл, тогда надо было бы использовать режим MODE_APPEND:
Для чтения файла применяется поток ввода FileInputStream :
Подробнее про использование потоков ввода-вывода можно прочитать в руководстве по Java: https://metanit.com/java/tutorial/6.3.php
В итоге после нажатия кнопки сохранения весь текст будет сохранен в файле /data/data/название_пакета/files/content.txt
Где физически находится созданный файл? Чтобы увидеть его на подключенном устройстве перейдем в Android Stud в меню к пункту View -> Tool Windows -> Device File Explorer

После этого откроектся окно Device File Explorer для просмотра файловой системы устройства. И в папке data/data/[название_пакета_приложения]/files мы сможем найти сохраненный файл.
Источник
Saving Files
This lesson teaches you to
You should also read
Android uses a file system that’s similar to disk-based file systems on other platforms. This lesson describes how to work with the Android file system to read and write files with the File APIs.
A File object is suited to reading or writing large amounts of data in start-to-finish order without skipping around. For example, it’s good for image files or anything exchanged over a network.
This lesson shows how to perform basic file-related tasks in your app. The lesson assumes that you are familiar with the basics of the Linux file system and the standard file input/output APIs in java.io .
Choose Internal or External Storage
All Android devices have two file storage areas: «internal» and «external» storage. These names come from the early days of Android, when most devices offered built-in non-volatile memory (internal storage), plus a removable storage medium such as a micro SD card (external storage). Some devices divide the permanent storage space into «internal» and «external» partitions, so even without a removable storage medium, there are always two storage spaces and the API behavior is the same whether the external storage is removable or not. The following lists summarize the facts about each storage space.
- It’s always available.
- Files saved here are accessible by only your app by default.
- When the user uninstalls your app, the system removes all your app’s files from internal storage.
Internal storage is best when you want to be sure that neither the user nor other apps can access your files.
- It’s not always available, because the user can mount the external storage as USB storage and in some cases remove it from the device.
- It’s world-readable, so files saved here may be read outside of your control.
- When the user uninstalls your app, the system removes your app’s files from here only if you save them in the directory from getExternalFilesDir() .
External storage is the best place for files that don’t require access restrictions and for files that you want to share with other apps or allow the user to access with a computer.
Tip: Although apps are installed onto the internal storage by default, you can specify the android:installLocation attribute in your manifest so your app may be installed on external storage. Users appreciate this option when the APK size is very large and they have an external storage space that’s larger than the internal storage. For more information, see App Install Location.
Obtain Permissions for External Storage
To write to the external storage, you must request the WRITE_EXTERNAL_STORAGE permission in your manifest file:
Caution: Currently, all apps have the ability to read the external storage without a special permission. However, this will change in a future release. If your app needs to read the external storage (but not write to it), then you will need to declare the READ_EXTERNAL_STORAGE permission. To ensure that your app continues to work as expected, you should declare this permission now, before the change takes effect.
However, if your app uses the WRITE_EXTERNAL_STORAGE permission, then it implicitly has permission to read the external storage as well.
You don’t need any permissions to save files on the internal storage. Your application always has permission to read and write files in its internal storage directory.
Save a File on Internal Storage
When saving a file to internal storage, you can acquire the appropriate directory as a File by calling one of two methods:
getFilesDir() Returns a File representing an internal directory for your app. getCacheDir() Returns a File representing an internal directory for your app’s temporary cache files. Be sure to delete each file once it is no longer needed and implement a reasonable size limit for the amount of memory you use at any given time, such as 1MB. If the system begins running low on storage, it may delete your cache files without warning.
To create a new file in one of these directories, you can use the File() constructor, passing the File provided by one of the above methods that specifies your internal storage directory. For example:
Alternatively, you can call openFileOutput() to get a FileOutputStream that writes to a file in your internal directory. For example, here’s how to write some text to a file:
Or, if you need to cache some files, you should instead use createTempFile() . For example, the following method extracts the file name from a URL and creates a file with that name in your app’s internal cache directory:
Note: Your app’s internal storage directory is specified by your app’s package name in a special location of the Android file system. Technically, another app can read your internal files if you set the file mode to be readable. However, the other app would also need to know your app package name and file names. Other apps cannot browse your internal directories and do not have read or write access unless you explicitly set the files to be readable or writable. So as long as you use MODE_PRIVATE for your files on the internal storage, they are never accessible to other apps.
Save a File on External Storage
Because the external storage may be unavailable—such as when the user has mounted the storage to a PC or has removed the SD card that provides the external storage—you should always verify that the volume is available before accessing it. You can query the external storage state by calling getExternalStorageState() . If the returned state is equal to MEDIA_MOUNTED , then you can read and write your files. For example, the following methods are useful to determine the storage availability:
Although the external storage is modifiable by the user and other apps, there are two categories of files you might save here:
Public files Files that should be freely available to other apps and to the user. When the user uninstalls your app, these files should remain available to the user.
For example, photos captured by your app or other downloaded files.
Private files Files that rightfully belong to your app and should be deleted when the user uninstalls your app. Although these files are technically accessible by the user and other apps because they are on the external storage, they are files that realistically don’t provide value to the user outside your app. When the user uninstalls your app, the system deletes all files in your app’s external private directory.
For example, additional resources downloaded by your app or temporary media files.
If you want to save public files on the external storage, use the getExternalStoragePublicDirectory() method to get a File representing the appropriate directory on the external storage. The method takes an argument specifying the type of file you want to save so that they can be logically organized with other public files, such as DIRECTORY_MUSIC or DIRECTORY_PICTURES . For example:
If you want to save files that are private to your app, you can acquire the appropriate directory by calling getExternalFilesDir() and passing it a name indicating the type of directory you’d like. Each directory created this way is added to a parent directory that encapsulates all your app’s external storage files, which the system deletes when the user uninstalls your app.
For example, here’s a method you can use to create a directory for an individual photo album:
If none of the pre-defined sub-directory names suit your files, you can instead call getExternalFilesDir() and pass null . This returns the root directory for your app’s private directory on the external storage.
Remember that getExternalFilesDir() creates a directory inside a directory that is deleted when the user uninstalls your app. If the files you’re saving should remain available after the user uninstalls your app—such as when your app is a camera and the user will want to keep the photos—you should instead use getExternalStoragePublicDirectory() .
Regardless of whether you use getExternalStoragePublicDirectory() for files that are shared or getExternalFilesDir() for files that are private to your app, it’s important that you use directory names provided by API constants like DIRECTORY_PICTURES . These directory names ensure that the files are treated properly by the system. For instance, files saved in DIRECTORY_RINGTONES are categorized by the system media scanner as ringtones instead of music.
Query Free Space
If you know ahead of time how much data you’re saving, you can find out whether sufficient space is available without causing an IOException by calling getFreeSpace() or getTotalSpace() . These methods provide the current available space and the total space in the storage volume, respectively. This information is also useful to avoid filling the storage volume above a certain threshold.
However, the system does not guarantee that you can write as many bytes as are indicated by getFreeSpace() . If the number returned is a few MB more than the size of the data you want to save, or if the file system is less than 90% full, then it’s probably safe to proceed. Otherwise, you probably shouldn’t write to storage.
Note: You aren’t required to check the amount of available space before you save your file. You can instead try writing the file right away, then catch an IOException if one occurs. You may need to do this if you don’t know exactly how much space you need. For example, if you change the file’s encoding before you save it by converting a PNG image to JPEG, you won’t know the file’s size beforehand.
Delete a File
You should always delete files that you no longer need. The most straightforward way to delete a file is to have the opened file reference call delete() on itself.
If the file is saved on internal storage, you can also ask the Context to locate and delete a file by calling deleteFile() :
Note: When the user uninstalls your app, the Android system deletes the following:
- All files you saved on internal storage
- All files you saved on external storage using getExternalFilesDir() .
However, you should manually delete all cached files created with getCacheDir() on a regular basis and also regularly delete other files you no longer need.
Источник
Tek Eye
The lists of Android sample projects in this article illustrate various Android programming techniques. Scroll down or click on these topics for free Android example projects on:
The Android projects listed below cover a wide range of subjects. All the following projects were tested in the version of Android Studio available at the time. Studio is a free Integrated Development Environment (IDE) provided by Google for Android app development. (An IDE is a software environment used for writing software, in this case Android apps).
All these free Android example projects come with the source code in a zip archive for importing into Android Studio. A tutorial web page provides a lesson for each of the projects. The example source code is ready to run in Android Studio. Extract the sample app project and use Android Studio import. How? Here’s a quick guide:
- Extract the zip file contents to the required location (preserving directory structure). Studio does not move the project.
- Run Android Studio and use the Import project option. Import is on the New option from the File menu, or on Studio’s Welcome screen. (To get to the Welcome dialog close any open projects.)
- Select the project directory, or the top level build.gradle file in the project directory.
- Accept the sync Gradle message (if displayed) and wait for the IDE to finish configuring the project (look at the status bar at the bottom of Studio).
- When the Run icon (play button) on the toolbar goes green the example project is ready to use.
When opening projects in updated versions of Studio import errors can occur. See the article Opening Pre-Android Studio 3 Projects for tips on resolving errors caused by updates to Studio.
(Import instructions also appear in each zip archive in the file instructions.txt.)
Free Projects to Illustrate Android Programming Techniques
This list of Android example projects will expand as other Android tutorials and code examples are added to the site. A full list of all the Tek Eye Android articles can be found in the Index. A few of the Android examples were contributed to the O’Reilly Android Cookbook. The following tables contain:
- A link to the tutorial article for each Android example project.
- A link to a zip file containing the source code for the example project that can be extracted and then imported into Studio.
- In the pipeline: A link to a compiled version of the example as a signed installable Android packages (.apk file). Ready for executing immediately on an Android device or emulator.
List of Free Android Example Projects
| Article | Source | Package |
|---|---|---|
| Your First Android Java Program | HelloWorld.zip | planned |
| Start a Second Android Activity | secondscreen.zip | planned |
| Android String Resources Gotchas | stringsxml.zip | planned |
| Android AsyncTask Class Helps Avoid ANRs | slowprocess.zip | planned |
| Different Ways to Code Android Event Listeners | codinglisteners.zip | planned |
| Testing Android’s Activity Lifecycle | lifecycletesting.zip | planned |
| Saving Activity State in an App when it’s Interrupted | restorestate.zip | planned |
| Use the ZXing Barcode Scanner in an Android App | scanbarcode.zip | planned |
| Animated Images in Android | lights.zip | lights.apk |
| Web Search Example In Android | websearch.zip | planned |
| Android Dice Roller Source Code | android_dice_roller.zip | Dice.apk |
| Email Contact Form Using ACTION_SEND | send-email-example.zip | planned |
| Changing the Font for Android TextViews | fonts.zip | planned |
| Understanding Screen Resolutions and Density | density-test.zip | planned |
| Android API Demos | apidemos.zip | planned |
| Android Bitmap Loading | bitmap-loading.zip | planned |
List of Free Android Example List Handling Projects
| Article | Source | Package |
|---|---|---|
| Add a Simple List to an App | simplelist.zip | planned |
| Change ListView Text Color in Android | redlist.zip | planned |
| Two Line Lists in Android | two_line_listactivity.zip | planned |
| Multi Line ListView Entries in Android | multi-line.zip | planned |
| Read the Selection From a Multi Line ListView | read-multi-line.zip | planned |
List of Free Android Example UI Projects
| Article | Source | Package |
|---|---|---|
| Access Android View in Activity | view-id.zip | planned |
| Displaying a Bitmap in Android | imageview-bitmap.zip | planned |
| Add a Border to an Android Layout | layoutborder.zip | planned |
| No Tooltips for Android — Use Hint | hintexample.zip | planned |
| Limit EditText Input with Attributes and TextWatcher | percentage.zip | planned |
| Android Portrait and Landscape Screen Layout Example | portrait-landscape.zip | planned |
| ImageButton Graphics with Inkscape | buttonpress.zip | planned |
| Android 9 Patch Image Files for Buttons and Borders | ninepatch.zip | planned |
| About Box in Android App Using AlertBuilder | aboutbox.zip | planned |
| Swipe View Android Example for Screen Paging | text_swiper.zip | planned |
| How to Get View Size in Android | view-size.zip | planned |
| Load Values into an Android Spinner | loading_spinner.zip | planned |
| Changing Android Spinner Text Size with Styles | styling_spinner.zip | planned |
| Android Menu Vs Action Bar with Example Code | menu-demo.zip | planned |
| Context Menu Example for Android | context-menu.zip | planned |
| SeekBar Demo for Android | seekbar-demo.zip | planned |
| UI Update Demo for Android | is-prime-app.zip | planned |
| Pop-up Window Demo for Android | android-pop-up.zip | planned |
| Android Color Picker Tutorial | color-picker.zip | planned |
| HTML5 in Android App for WebView Display | show-html.zip | planned |
See Also
- There are free Android Developer online samples for the Android SDK available via Studio, see the article Android SDK Samples.
- View the Tek Eye full Index for other Android articles and other interesting technical articles.
- There are samples filterable by language and technology type on the Android Developers website.
- For some interesting fun facts on Android see the Android Infographic at techjury.
Archived Comments
Leo Stalin on January 9, 2013 at 10:56 am said: I am an Android programming beginner.
Tek Eye on January 9, 2013 at 4:45 pm in reply to Leo Stalin said:
Arun kumar G on February 9, 2013 at 2:41 pm said: Hello Sir. This is very useful for me as I’m trying to get into the Android field. I need your help a lot sir. Definitely I’ll utilize you a lot. Thank you Sir.
Bimal on February 23, 2014 at 6:00 am said: Hi! I’m very new in android. I’m a VB developer. Now I need a simple project as follows. How can I get this project. I need source code with full comment. After reading the comment I can compile it my self. I use Android Studio. Thank you.
The project should have 5 editboxes, 1 combo and 1 command button. User will enter numbers in EditBox1. The length may be 16-18 numbers. Then user will select a item from combo. Combo should have 5 items. Then user will click on the button. In click event of the button, I want first 5 number need to go in EditBox2. Second 4 number need to go in EditBox3. Rest of the number need to go in EditBox4. In the last textbox number length may be 7,8 or 9. After breakdown of the string I want to find sum of all EditBoxes: Editbox1 + Editbox2 + EditBox3.
Then I want to subtract a number from the sum value. (Editbox1 + Editbox2 + EditBox3) – a number like 5560 or 6612 or 4258 etc. The subtraction number may be variable, because it depends on list item selected by user. Then I want the result in a Editbox5.
I need this project in email. My email is gpbimal@yahoo.com. If it is payable I will pay for this.
Tek Eye on February 24, 2014 at 8:35 am in reply to Bimal said: If you are familiar with VB take a look at these alternative Android programming IDEs:
Vladislav Bauer on August 10, 2014 at 11:56 am said: A lot of useful open source libraries, tools and projects could be found here: https://android-arsenal.com/
Tek Eye on August 11, 2014 at 10:42 am in reply to Vladislav Bauer said: Thanks for the link, a good place for Android developers to browse for components and other useful items.
Arya on October 4, 2014 at 5:45 am said: Good one.
Sushmita Singh on October 1, 2015 at 10:00 am said: Hey I want an shopping site related mini project.
Asad on October 8, 2016 at 3:39 pm said: How to open zip files in android studio?
Tek Eye on October 10, 2016 at 7:26 am in reply to Asad said: Extract the files first. A good utility for zip files is 7-Zip. Instructions for Studio are at the top of this page.
Geethadevi on January 29, 2017 at 7:39 am said: Useful to illustrate the Android programming techniques.
Author: Daniel S. Fowler Published: 2011-11-23 Updated: 2019-07-21


Do you have a question or comment about this article?
(Alternatively, use the email address at the bottom of the web page.)
↓markdown↓ CMS is fast and simple. Build websites quickly and publish easily. For beginner to expert.
Free Android Projects and Samples:
Источник


