- Настройка Android Studio
- Отображение номера строки
- Разделители методов
- Выделение изменённых файлов звёздочкой
- Использование стиля «Верблюжьи горбы»
- Импортирование на лету, «imports on the fly»
- Цветовая гамма
- Настройка цветовой гаммы редактора Java
- Настройка цветовой гаммы окна консоли
- Кодировка
- Именование полей, методы get/set
- Configuring Android Studio
- Intro
- Show line numbers
- Camel humps
- Field naming conventions
- Private member access between outer and inner classes
- Imports on the fly
- Android log colors
- Configuration
- In this document
- See also
- Update channels
- Proxy Settings
- Setting up the Android Studio Proxy
- Android Plugin for Gradle HTTP proxy settings
- SDK Manager HTTP Proxy Settings
Настройка Android Studio
В Android Studio имеется возможность определить собственный стиль представления информации в редакторе, сохранить все настройки в отдельный файл, который в дальнейшем можно импортировать в новую версию IDE. Здесь на странице описываются некоторые возможности настройки интерфейса среды разработки. Это даёт Вам возможность понять где искать и как определить тот или иной стиль представления информации.
Чтобы открыть окно настроек в окне приветствия нажмите «Configure» в нижней части формы и во всплывающем меню выберите пункт «Settings». как это представлено на следующем скриншоте :
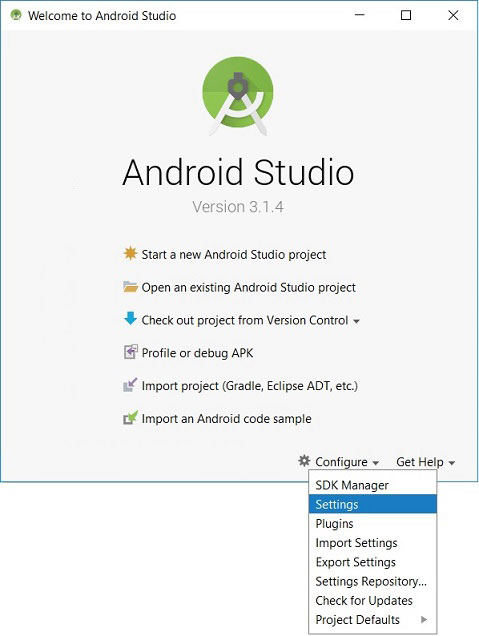
Всплывающее меню раздела конфигурации включает пункты импорта и экспорта настроек (Import Settings, Export Settings), о чем было сказано выше.
Отображение номера строки
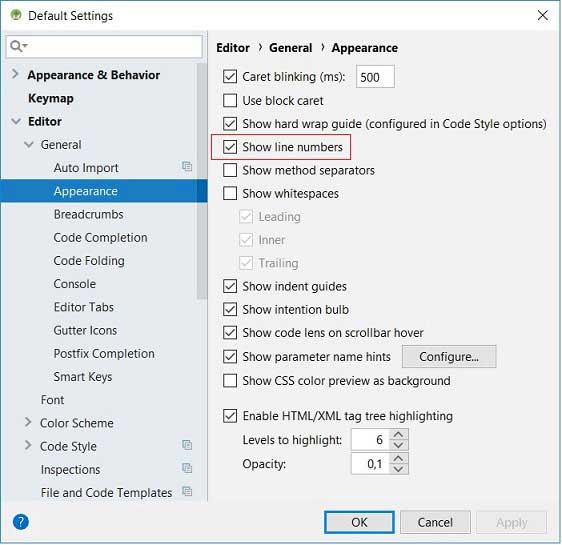
Чтобы отображать номера строк кода в среде разработки необходимо в левой части окна настроек среды разработки IDE выбрать пункт меню Editor/General/Appearance и в правой части установить (не снимать) галочку в чекбоксе «Show line numbers».
Разделители методов
Между методами класса можно установить разделительную черту. Это очень удобно для наглядного отделения одного метода от другого. Чтобы не делать это вручную, можно процесс автоматизировать установкой флага в чекбоксе «Show method separators» (см. скриншот выше).
Выделение изменённых файлов звёздочкой
Часто в различных редакторах изменённые, но не сохранённые файлы на вкладках помечаются звёздочкой. Так работает в Eclipse, Notepad++ и многих других редакторах. Чтобы данную функцию включить в Android Studio необходимо выделить пункт меню Editor/General/Editor Tabs и в панели установить флажок в чекбоксе «Mark modified tabs with asterisk».
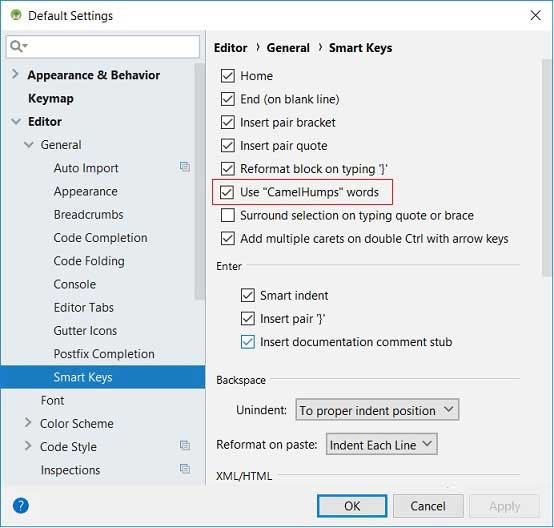
Использование стиля «Верблюжьи горбы»
Стиль редактирования «Верблюжьи горбы» определяет навигацию курсора при использовании клавиш ‘Ctrl+ стрелки влево/вправо’. Ниже представлены анимационные изображения, демонстрирующие использование стиля «Верблюжьи горбы».
 |
| Навигация по словам |
 |
| Навигация с помощью «Верблюжьих горбов» |
Для использования в среде разработки стиля навигации «Верблюжьи горбы» выберите в окне настроек пункт меню Editor/General/Smart Keys и в правой части установите галочку в чекбоксе «Use «CamelHumps» words».
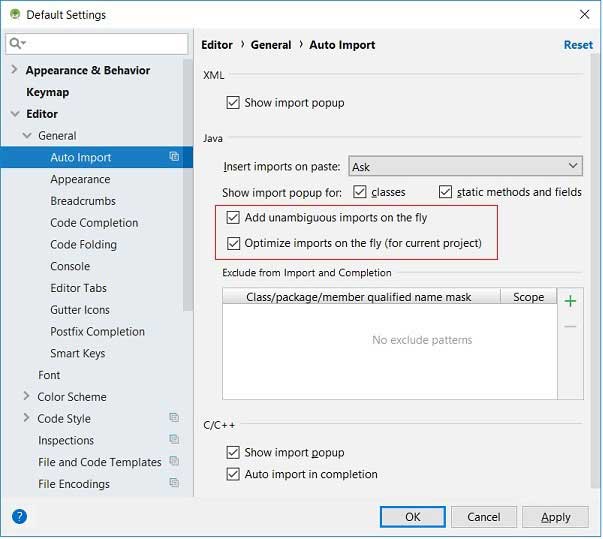
Импортирование на лету, «imports on the fly»
В Android Studio имеется функция автоматического импорта («imports on the fly») и очистки неиспользуемых импортов в Java коде. Ниже представлены анимационные изображения, демонстрирующие использование функции «imports on the fly».
 |
| Без функции «импорт на лету» |
 |
| С функцией «импорт на лету» |
Для установки в среде разработки функции «импорт на лету» выберите в окне настроек пункт меню Editor/General/Auto Import и в правой части установите галочку в чекбоксах «Add unambiguous imports on the fly» и «Optimize imports on the fly», как это представлено на следующем скриншоте.
Цветовая гамма
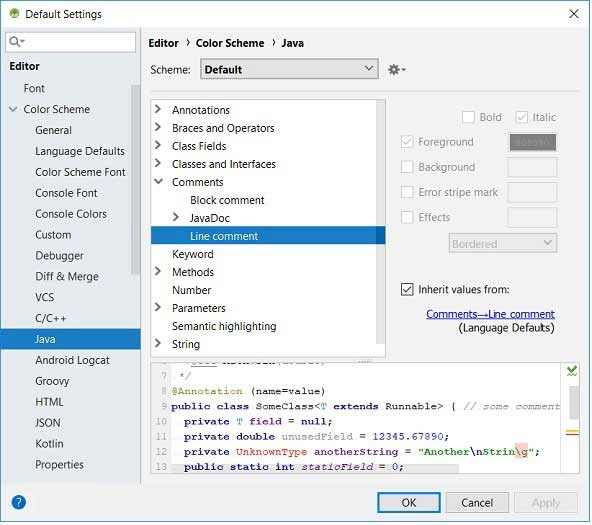
Android Studio позволяет настроить шрифты и цветовую гамму окон редактирования, отладки, консоли для различных языков программирования (Java, C/C++, Groovy) и форматов представления информации (HTML, JSON). На следующих двух скриншотах представлены панели настроек Java и консоли.
Настройка цветовой гаммы редактора Java
Настройка цветовой гаммы окна консоли
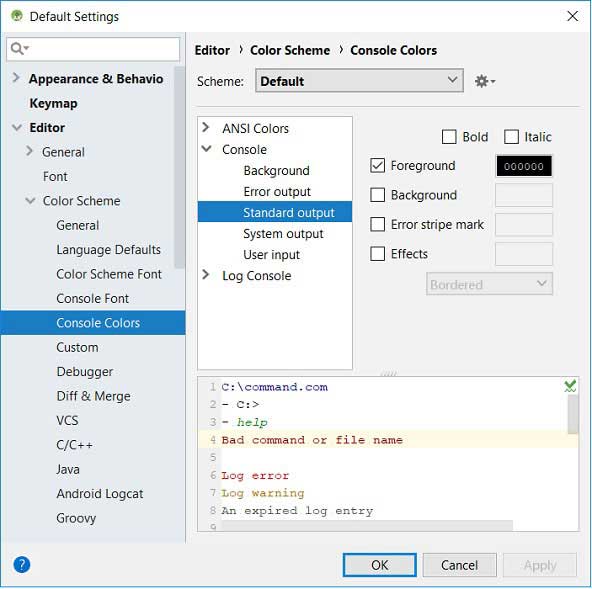
Студия версии 3.1.4 поставляется с двумя предустановленными темами: Default (IntelliJ), Darcula. По умолчанию, используется тема Default со светлым фоном (выпадающий список Scheme). Интерес для программистов IntelliJ представляет тема с чёрным фоном Darcula; здесь обыгрывается слово «dark». Чтобы переключиться на «тёмную тему», поменяйте её в выпадающем списке Scheme.
Кодировка
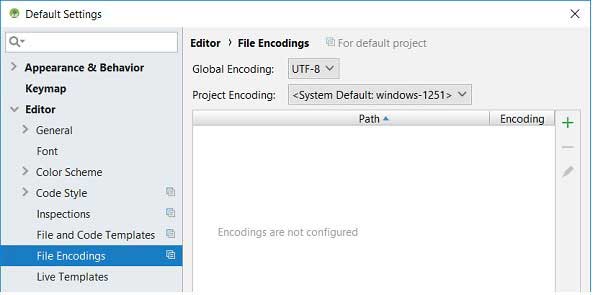
Для изменения кодировки новых проектов и текущего необходимо выделить пункт меню в окне конфигурации File/Settings/Editor/File Encodings и определить значения «Global Encoding» и «Project Encoding». В Android Studio по умолчанию используется в качестве глобальной кодировки UTF-8, а для кодировки проектов используется «системная по умолчанию». У многих разработчиков в качестве системной используется win-1251, с которой могут быть связаны проблемы при выводе строковых сообщений.
Именование полей, методы get/set
Android Studio умеет самостоятельно генерировать так называемые методы get/set класса на основе его полей. Чтобы использовать правильный стиль кодирования согласно ковенции ‘Android Code Style Guidelines for Contributors’, необходимо сначала определить настройки распознавания префиксов ‘m’ (member) и ‘s’ (static) в названии переменных. Для этого следует открыть панель настроек Editor/Code Style/Java и перейти на вкладку ‘Code Generation’. В разделе Naming в поле Naming Prefix строки Field введите префикс ‘m’. После добавьте префикс ‘s’ для статических полей в строке ‘Static field’.
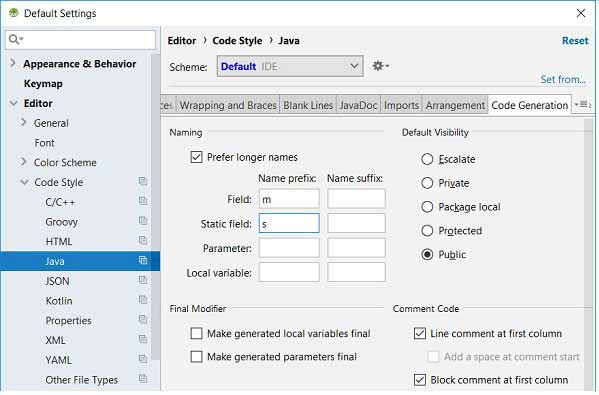
Подобная настройка подскажет IDE о необходимости генерирации методов для поля без соответствующего префикса в его наименовании. Например, для поля mCatName будет создан метод setCatName() вместо setMCatName().
Для генерации в файле класса с полями методов get/set щёлкните правой кнопкой мыши после конструктора и в раскрывшемся меню выберите команду ‘Generate…| Getter And Setter’, определите в открывшемся окне поля класса и щёлкните на кнопке OK, чтобы IDE сгенерировала get/set методы для каждого выделенного поля класса.
Источник
Configuring Android Studio

Intro
Android Studio has a cool feature to Import and Export settings. So during installation of new Android Studio version I usually import my previous settings. But recently a bad thing happened to me — I have lost my Android Studio settings file.
My advice to you: always keep a backup of your Android Studio settings files somewhere on the cloud.
And since I am configuring my Android Studio from scratch anyway, below are some things which may be useful for you.
Show line numbers
When I first fired up Android Studio and started using it, one of the first things I wanted to do was to be able to see line numbers within the file. I was always curious why this thing is not turned on by default?


- In toolbar menu select File| Settings
- Choose Editor| General| Appearance
- Tick on Show line numbers

Camel humps
Android Studio doesn’t respect ‘Camel Humps’ words when you navigate through your code with pressed Ctrl+Left/Right arrow keys.


- In toolbar menu select File| Settings
- Choose Editor| General| Smart Keys
- Tick on Use ‘Camel Humps’ words

Note: if you still want to select the whole word on mouse double click go to
- In toolbar menu select File| Settings
- Choose Editor| General
- Remove tick on ‘Honor Camel Humps words settings when selecting on double click’
Field naming conventions
If you want to follow field naming conventions from Android Code Style Guidelines for Contributors first read Jake Wharton’s article — Just Say mNo to Hungarian Notation. Still, there is one thing which Android Studio can automatically do for us — generate field name prefix for:
- Non-public, non-static field names start with m.
- Static field names start with s.

- In toolbar menu select File| Settings
- Choose Editor| Code Style| Java
- Select Code Generation tab
- Add m prefix for field and s prefix for static field

Private member access between outer and inner classes
There is one inspection in Android Studio that I think should be turned on by default:
- In toolbar menu select File| Settings
- Choose Editor| Inspections
- Tick on Java|J2ME|Private member access between outer and inner classes
This inspection will help you to decrease methods count, achieve greater performance and less use of memory. If you want to know more just read inspection description and Jake Wharton’s talk — Exploring Java’s Hidden Costs.
Imports on the fly
In Android Studio there are shortcuts to auto import or clean-up none used imports. But we live in 2015 right? Those things should be done on the fly.


- In toolbar menu select File| Settings
- Choose Editor| General| Auto Import
- Tick on Optimize imports on the fly
- Tick on Add unambiguous imports on the fly

Android log colors
With default Darcula theme Logcat highlighting I am not able to recognize type of log.

I prefer to use bright colors from plain old Android Holo theme.

- In toolbar menu select File| Settings
- Choose Editor| Colors & Fonts| Android Logcat
- Click on Save As… button and create new color schema
- Change all colors to ‘Holo theme colors’ (Uncheck ‘Use inherited attributes’ for every color)
Источник
Configuration
In this document
See also
During installation, Android Studio provides wizards and templates that verify your system requirements, such as the Java Development Kit (JDK) and available RAM, and configure default settings, such as an optimized default Android Virtual Device (AVD) emulation and updated system images. This document describes additional configuration settings you may want to use to customize your use of Android Studio.
For specific documentation about emulator and device setup and use, see Managing Virtual Devices, Using Hardware Devices, and OEM USB Drivers.
Update channels
Android Studio provides four update channels to keep Android Studio up-to-date based on your code-level preference:
- Canary channel: Canary builds provide bleeding edge releases, updated about weekly. While these builds do get tested, they are still subject to bugs, as we want people to see what’s new as soon as possible. This is not recommended for production.
- Dev channel: Dev builds are hand-picked older canary builds that survived the test of time. They are updated roughly bi-weekly or monthly.
- Beta channel: Beta builds are used for beta-quality releases before a production release.
- Stable channel: Used for stable, production-ready versions.
By default, Android Studio uses the Stable channel. Use File > Settings > Appearance & Behavior System Settings > Updates to change your channel setting.
Proxy Settings
Proxies serve as intermediary connection points between HTTP clients and web servers that add security and privacy to internet connections.
To support running Android Studio behind a firewall, set the proxy settings for the Android Studio IDE and the SDK Manager. Use the Android Studio IDE HTTP Proxy settings page to set the HTTP proxy settings for Android Studio. The SDK Manager has a separate HTTP Proxy settings page.
When running the Android Plugin for Gradle from the command line or on machines where Android Studio is not installed, such as continuous integration servers, set the proxy settings in the Gradle build file.
Note: After the initial installation of the Android Studio bundle, Android Studio can run with internet access or off-line. However, Android Studio requires an internet connection for Setup Wizard synchronization, 3rd-party library access, access to remote repositories, Gradle initialization and synchronization, and Android Studio version updates.
Setting up the Android Studio Proxy
Android Studio supports HTTP proxy settings so you can run Android Studio behind a firewall or secure network. To set the HTTP proxy settings in Android Studio:
- From the main menu choose File > Settings > Appearance & Behavior — System Settings — HTTP Proxy.
- In Android Studio, open the IDE Settings dialog.
- On Windows and Linux, choose File > Settings > IDE Setting — HTTP Proxy.
- On Mac, choose Android Studio > Preferences > IDE Setting — HTTP Proxy.
The HTTP Proxy page appears.
- Select auto-detection to use an auto-configuration URL to configure the proxy settings or manual to enter each of the settings. For a detailed explanation of these settings, see HTTP Proxy.
- Click Apply to enable the proxy settings.
Android Plugin for Gradle HTTP proxy settings
For application-specific HTTP proxy settings, set the proxy settings in the build.gradle file as required for each application module.
For project-wide HTTP proxy settings, set the proxy settings in the gradle/gradle.properties file.
For information about using Gradle properties for proxy settings, see the Gradle User Guide.
Note: When using Android Studio, the settings in the Android Studio IDE HTTP proxy settings page override the HTTP proxy settings in the gradle.properties file.
SDK Manager HTTP Proxy Settings
SDK Manager proxy settings enable proxy internet access for Android package and library updates from SDK Manager packages.
To set the SDK Manager settings for proxy internet access, start the SDK Manager and open the SDK Manager page.
- On Windows, select Tools > Options from the menu bar.
- On Mac and Linux, choose Tools > Options from the system menu bar.
The Android SDK Manager page appears. Enter the settings and click Apply.
Источник


