- How to Export jar File from Android Studio Project
- Export jar file using Android Studio
- How to Export and Import Java Documentation in Android Studio
- Building Android and Java Library with Gradle
- Generating Java Documentation and Source Code in Android Studio
- Javadoc
- What about source code?
- How to Attach Javadoc to Dependent Libraries
- How to make Android apps without IDE from command line
- How to do Android development faster without Gradle
- IntelliJ IDE, but not Gradle
- 1. Install Java
- 2. Install all SDK tools
- Download Android Studio and SDK Tools | Android Studio
- Download the official Android IDE and developer tools to build apps for Android phones, tablets, wearables, TVs, and…
- 3. Code the application
- How to use JavaMail on Android (without Gradle)
- Hello guys!
- 4. Build the code
- 5. Sign the package
- 6. Align the package
- 7. Test the application
- 8. Make a script
- Notes
- Как экспортировать проект Android Studio?
How to Export jar File from Android Studio Project

Sometimes, you may have downloaded some library sources and would like to export it as a jar file using Android Studio. So in this quick tutorial, we will see how to export jar file using Android Studio.
Export jar file using Android Studio
- Check out the library source code from the repository.
- Import checkout library in your android studio.
- Modify your build.gradle
- If your current module is a library project then you need to properly recognize ‘android-library’ plugin as mention below.
apply plugin: ‘com.android.library’
compileSdkVersion ‘Google Inc.:Google APIs:16’
proguardFiles getDefaultProguardFile(‘proguard-android.txt’), ‘proguard-rules.pro’
task makeJar(type: Copy) <
rename (‘classes.jar’, ‘myLib.jar’)
into(‘release/’) //you can change this directory where you want to copy your .jar
task clearJar(type: Delete) <
For generating .jar, follow below steps,
- Open the terminal.
- Move to your project root directory.
- Call makejar function which you have added in build.gradle
- Example :-> D:\Users\MyWorkspace\project > gradlew makejar
After following all the above steps you will find “myLib.jar” under the release folder.
Hope you can now easily export jar from your Android studio project. If you have any queries drop it in the comments.
Источник
How to Export and Import Java Documentation in Android Studio
When creating an Android library for distribution, besides the class package, source code and documentation are also needed in order to assist developers. Although Eclipse is convenient that you just need to right-click on the project and choose export to generate Javadoc and JAR file, more and more Android developer gets started to use Android Studio instead of Eclipse ADT. In this tutorial, l will show you how to pack and attach Java documentation and source code in Android Studio from scratch.
Building Android and Java Library with Gradle
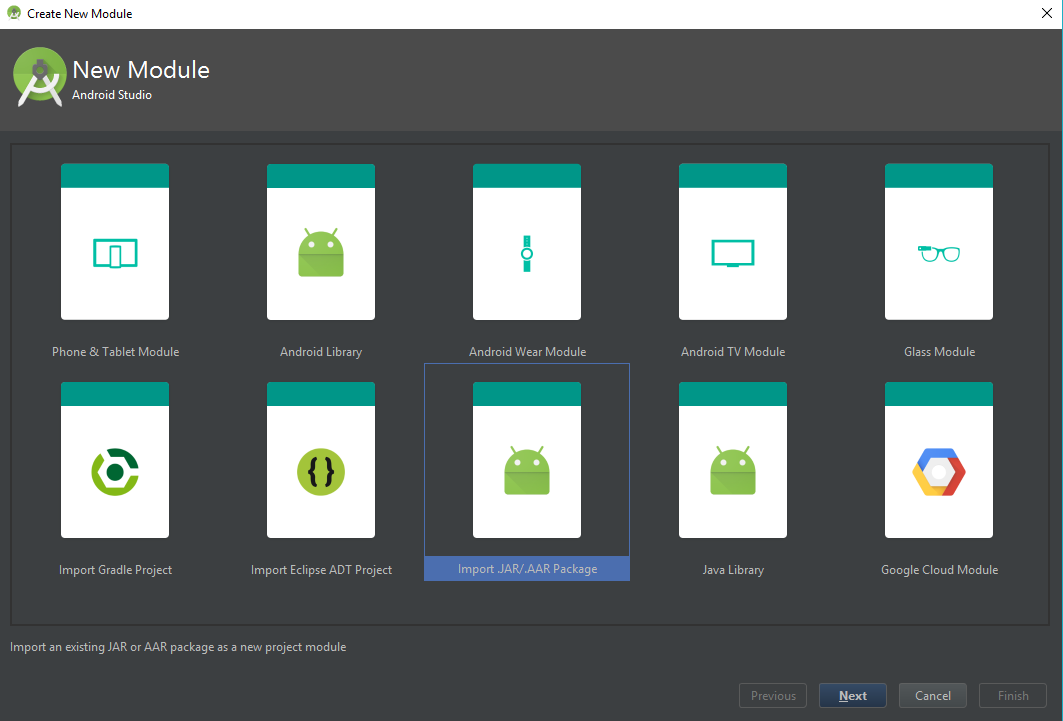
To create a library, open Android Studio and click File > New Module. There are two options: Android Library and Java Library:
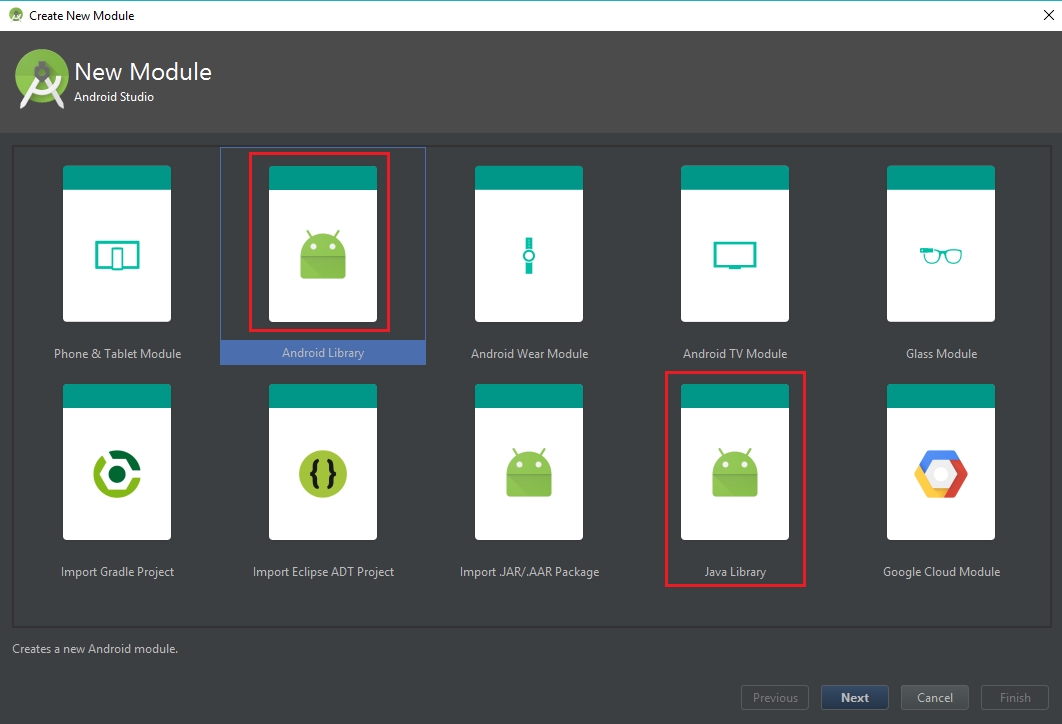
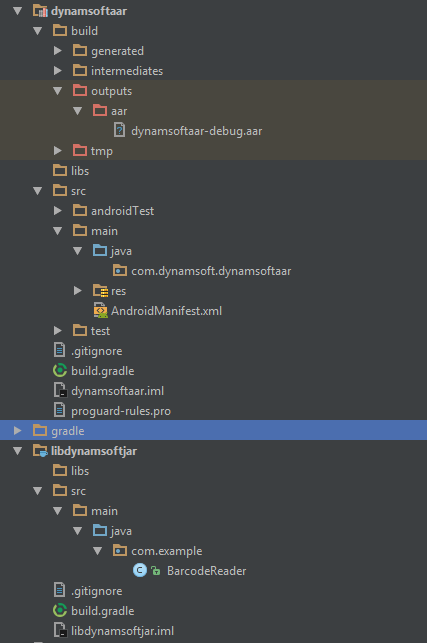
Android Library will generate AAR File whereas Java Library will generate JAR file. AAR includes more resource than JAR. Especially if you want to distribute both *.so and *.jar, AAR is a better choice. See the structure difference between the two modules:
You may have noticed that Android Studio can trigger auto-build for AAR but not for JAR. Android Studio integrates Gradle as the building tool. We need to take a further step to see how Gradle works.
Generating Java Documentation and Source Code in Android Studio
Javadoc
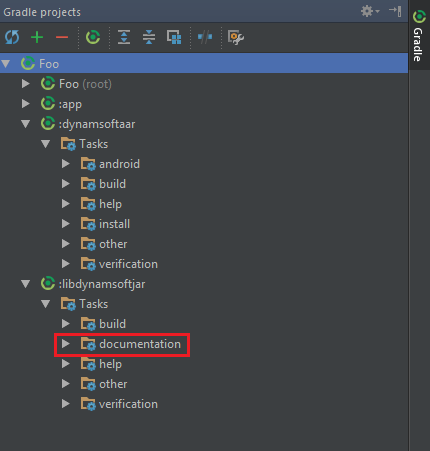
Open Gradle panel, you will see all available tasks:
The tasks are related to Gradle plugin and tasks written in build.gradle.
The plugin for Android:
The plugin for Java:
We can choose task build to generate AAR and JAR files. I’m using Gradle plugin for Android 2.2.0-alpha1, which does not support generating Java documentation. To generate Javadoc for AAR, select the library project and click menu Tools > Generate JavaDoc:
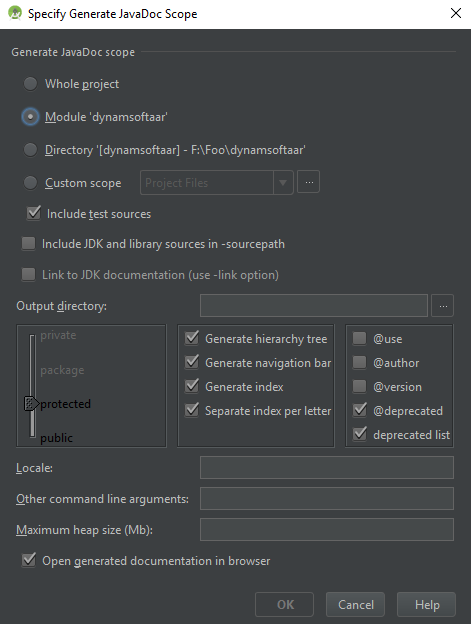
Specify the output directory to generate Java documentation.
What about source code?
Since there is no pre-built task for packaging source code, we can make sources.jar ourselves. Add the following code to the build.gradle files of JAR and AAR modules:
After triggering the task, sources.jar will be generated under build\libs.
How to Attach Javadoc to Dependent Libraries
Copy the JAR file into folder libs.
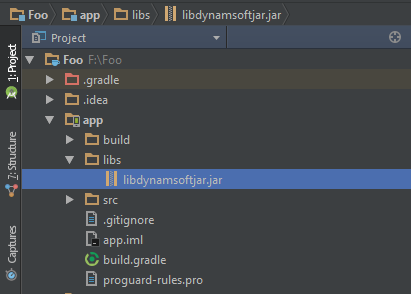
Right-click it to pop up the context menu, and then select Add As Library:

The library will be automatically added to build.gradle > dependencies. In the meantime, there is an XML file libdynamsoftjar.xml generated under

Here is the file content:
Specify the paths of Javadoc and source code. Switch to Java code and press Ctrl + Q to see Java documentation.
The way of attaching Java documentation for AAR is similar.
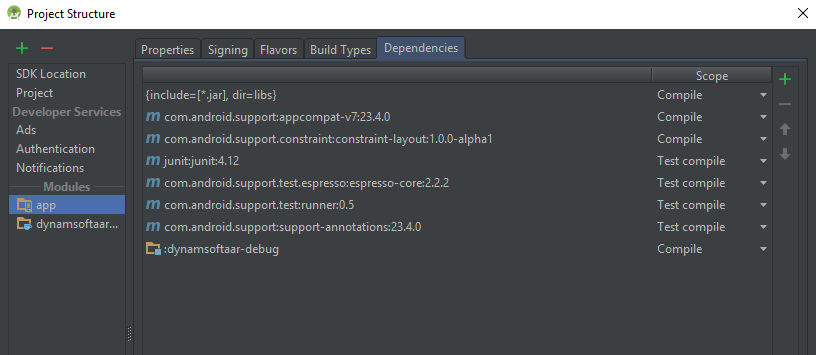
Create a new module to import AAR file:
Assume its name is dynamsoftaar-debug.aar. Press Ctrl+Shift+Alt+S to open project setting. Add the dependent module:
An XML file dynamsoftaar_debug_unspecified.xml will be automatically generated:
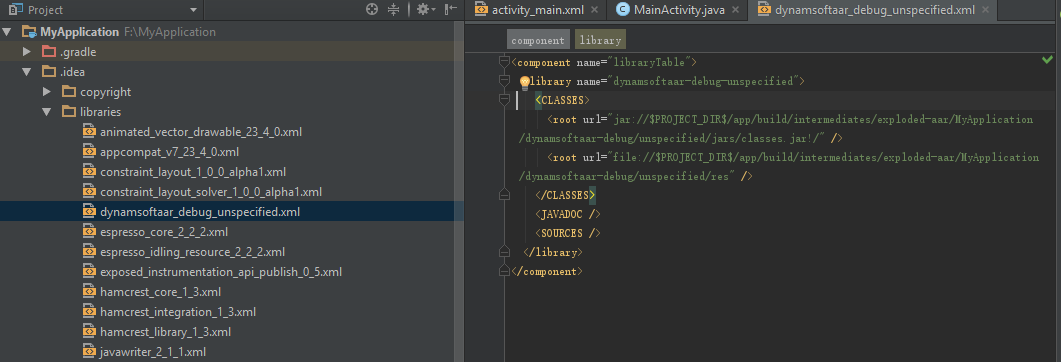
Edit the file to add the paths of Javadoc and sources.
Источник
How to make Android apps without IDE from command line

Nov 26, 2017 · 5 min read
A HelloWorld without Android Studio
Update: I’ve made a new course that explain how you can avoid Android Studio and Gradle, but still use IntelliJ iDE:
How to do Android development faster without Gradle
IntelliJ IDE, but not Gradle
In this tutorial, I will show you how you can build/compile an APK (an A n droid app) from your java code using terminal (on Linux) without IDE or in other words without Android Studio. At the end, I will also show you a script to automate the process. In this example, I will use Android API 19 (4.4 Kitkat) to make a simple HelloWorld. I want to say that I will do this tutorial without android command which is deprecated.
1. Install Java
First, you need to install java, in my case, I install the headless version because I don’t use graphics (only command line):
2. Install all SDK tools
Then download the last SDK tools of Android which you can find here:
Download Android Studio and SDK Tools | Android Studio
Download the official Android IDE and developer tools to build apps for Android phones, tablets, wearables, TVs, and…
I recommend to unzip it in the /opt directory inside another directory that we will call “android-sdk”:
Now, we have to install platform tools (which contain ADB), an Android API and build tools.
In fact, if you are on Debian, you can avoid installing platform-tools package and only install ADB like that:
3. Code the application
In this example, I want to compile a simple HelloWorld. So, first, we need to make a project directory:
Then we have to make the files tree:
If you use exernal libraries (.jar files), also make a folder for them:
You have an example here:
How to use JavaMail on Android (without Gradle)
Hello guys!
Make the file src/com/example/helloandroid/MainActivity.java and put that inside:
Make the strings.xml file in the res/values folder. It contains all the text that your application uses:
The activity_main.xml is a layout file which have to be in res/layout:
You also have to add the file AndroidManifest.xml at the root:
4. Build the code
Now, I recommend to store the project path in a variable:
First, we need generate the R.java file which is necessary for our code:
- -m instructs aapt to create directories under the location specified by -J
- -J specifies where the output goes. Saying -J src will create a file like src/com/example/helloandroid/R.java
- -S specifies where is the res directory with the drawables, layouts, etc.
- -I tells aapt where the android.jar is. You can find yours in a location like android-sdk/platforms/android-/android.jar
Now, we have to compile the .java files:
If you have use an external, add it the classpath:
The compiled .class files are in obj folder, but Android can’t read them. We have to translate them in a file called “classes.dex” which will be read by the dalvik Android runtime:
But if you use external libraries, do rather:
If you have the error UNEXPECTED TOP-LEVEL EXCEPTION , it can be because you use old build tools and DX try to translate java 1.7 rather than 1.8. To solve the problem, you have to specify 1.7 java version in the previous javac command:
The -source option specify the java version of your source files. Note that we can use previous versions of Java even we use OpenJDK 8 (or 1.8).
We can now put everything in an APK:
Be aware: until now, we used three AAPT commands, the first and the second one are similar but they don’t do the same. You have to copy the classes.dex file at the root of project like above! Otherwise, AAPT won’t put this file at right place in the APK archive (because an APK is like a .zip file).
The generated package can’t be installed by Android because it’s unaligned and unsigned.
If you want, you can check the content of the package like this:
5. Sign the package
To do so, we firstly create a new keystore with the command keytool given by Java:
Just answer the questions and put a password.
You can sign an APK like this:
Note that apksigner only exist since Build Tools 24.0.3.
6. Align the package
It’s as simple as that:
Alignment increase the performance of the application and may reduce memory use.
7. Test the application
To test the application, connect your smartphone with a USB cable and use ADB:
But before run this command, I recommend to run this one:
If there is an error during installation or running, you see it with that command.
Voila! Here’s the result:

8. Make a script
If you don’t want to run all these steps every time you would like to compile your app, make a script! Here’s mine:
Notes
- You can remove “test” if you just want to compile without testing.
- This script only compile and run the app on the phone. But I can also make a script to automatically generate a new project like this one. I think I have a good idea to do so, but I need to know if you are interested. If it’s the case, please leave a comment or send me an e-mail.
- I can also complete the script for external libraries. Likewise, let me know if you want this.
If you have any questions, don’t hesitate to ask them below or by e-mail ;-)! EDIT: Well I’m very busy actually…
Источник
Как экспортировать проект Android Studio?
Я только начал использовать Android Studio IDE, и я уже выпустил и опубликовал простой APK в магазине Google Play. Проблема в том, что я сделал это на работе. Теперь я загрузил Android Studio в свой дом, и я хочу продолжить работу и исправлять ошибки в моем проекте. Я вижу, что есть Import Project на главном экране Android Studio, но откуда я экспортирую проект, чтобы импортировать его? Я попробовал Zipping всю папку Project и импортировал его, но он не работал очень хорошо.
В Android Studio перейдите в « File затем « Close Project . Затем возьмите папку (в папке рабочего пространства) проекта и скопируйте ее во флэш-память или что угодно. Затем, когда вам станет комфортно дома, скопируйте эту папку в папку рабочей области, которую вы уже создали, откройте Android Studio и перейдите в « File затем « Open и импортируйте этот проект в рабочее пространство.
Проблема с этим заключается в том, что вы ищете неправильный термин здесь, потому что в Android экспорт проекта означает его компиляцию в файл .apk (не экспортируя проект). Импорт / экспорт используется для управления .apk , вам нужен проект Open / Close, другая вещь – просто копировать / вставлять.
Как уже упоминалось в других ответах, на данный момент андроид-студия не предоставляет этого из коробки. Однако есть способы сделать это легко.
Как упомянуто @Elad Lavi, вы должны рассмотреть облачный хостинг вашего исходного кода. Checkout github, bitbucket, gitlab и т. Д. Все это предоставляет частные репозитории, некоторые бесплатные, некоторые нет.
Если все, что вам нужно, это просто заархивировать источники, вы можете добиться этого, используя git- git archive . Вот шаги:
Примечание. Если вы собираетесь отправить это по электронной почте, вам нужно удалить gradlew.bat из zip-файла.
Оба этих решения возможны благодаря VCS, как git.
Кажется, что в Android Studio отсутствуют некоторые функции, которые имеет Eclipse (что удивительно, учитывая выбор, чтобы сделать официальную IDE для Android Studio).
Eclipse имел возможность экспортировать zip-файлы, которые можно было бы отправить по электронной почте, например. Если вы заархивируете папку из своей рабочей области и попытаетесь отправить ее через Gmail, например, Gmail откажется, поскольку папка содержит исполняемый файл. Очевидно, вы можете удалять файлы, но это неэффективно, если вы делаете это часто, возвращаясь с работы.
Вот решение: вы можете использовать контроль источника. Android Studio поддерживает это. Ваш код будет сохранен в Интернете. Гит сделает трюк. Посмотрите под «VCS» в верхнем меню в Android Studio. Он также имеет много других преимуществ. Один из недостатков заключается в том, что если вы используете GitHub бесплатно, ваш код будет открытым исходным кодом, и каждый сможет его увидеть.
Контроль источника – лучший способ справиться с этой проблемой, если вы не хотите платить, тогда попробуйте bitbucket
Это бесплатно, позволяет частное репо для группы из 5 человек.
Окна:
Сначала откройте окно команд и установите местоположение вашей папки проекта студии Android так:
Затем введите в нем команду ниже:
Затем дождитесь полного процесса очистки. После завершения его теперь застегните свой проект, как показано ниже:
- Щелкните правой кнопкой мыши на папке проекта
- Затем выберите « Отправить»
- Выбрать сжатый с помощью zip
По-видимому, в «сборках» каталогов проекта есть много «мертвой древесины».
В linux / unix простой способ получить чистую приватную резервную копию – использовать команду «tar» вместе с опцией «–exclude = String».
Например, чтобы создать архив всех моих приложений, исключая каталоги сборки, у меня есть скрипт, который создает следующие 2 команды:
Источник


