- Полный список
- Прочее
- Простой способ добавить геолокацию в свой проект для Android
- Android Get Current Location Programmatically Latitude Longitude
- 1. Get Current Location In Android
- Step 1. Create a new project in Android Studio.
- Step 2. Update build.gradle(Module:app) file
- Step 3. Implement necessary interfaces
- Step 4. Declare instances:
- Step 5. Put following in onCreate() method
- Step 6. Last but not least, put required permissions in AndroidManifest.xml
- Descriptions of the various methods
- 2. Get Address From Current Location In Android
- Step 1. Manifest Permissions
- Step 2. Some Dependencies
- Step 3. Main XML file
- Step 4. Main Java Class
- Checking the Code
- 3. Android Get Latitude And Longitude From Address
- Read Fetched Address
- Step 1. Geo Coding Class
- Step 2. XML file for main activity
- Step 3. Writing Main File
- Looking Main Class Deeply
- 106 thoughts on “Android Get Current Location Programmatically Latitude Longitude”
Полный список
— получаем данные о местоположении
Android устройства могут предоставить нам данные по нашему текущему местоположению. Это, конечно, очень удобно и вовсю используется для, например, пользования картой, получения актуальной для вашей местности информации (прогноз погоды), всевозможных чекинов и пр.
Реализация этого всего вполне проста. Мы вешаем слушателя на провайдера и получаем данные. На данный момент есть два провайдера: GPS и Network.
GPS – тут все понятно, это данные с GPS-спутников.
Network – это координаты, которые можно получить через сотовую связь или WiFi. Для этого провайдера нужен инет.
Напишем простое приложение, которое будет запрашивать и отображать координаты.
Project name: P1381_Location
Build Target: Android 2.3.3
Application name: Location
Package name: ru.startandroid.develop.p1381location
Create Activity: MainActivity
В strings.xml добавим строки:
Несколько TextView, в которые мы будем выводить данные, и кнопка для открытия настроек местоположения.
В onCreate определяем TextView-компоненты и получаем LocationManager, через который и будем работать.
В onResume вешаем слушателя с помощью метода requestLocationUpdates. На вход передаем:
— тип провайдера: GPS_PROVIDER или NETWORK_PROVIDER
— минимальное время (в миллисекундах) между получением данных. Я укажу здесь 10 секунд, мне этого вполне хватит. Если хотите получать координаты без задержек – передавайте 0. Но учитывайте, что это только минимальное время. Реальное ожидание может быть дольше.
— минимальное расстояние (в метрах). Т.е. если ваше местоположение изменилось на указанное кол-во метров, то вам придут новые координаты.
— слушатель, объект locationListener, который рассмотрим ниже
Также здесь обновляем на экране инфу о включенности провайдеров.
В onPause отключаем слушателя методом removeUpdates.
locationListener – слушатель, реализует интерфейс LocationListener с методами:
onLocationChanged – новые данные о местоположении, объект Location. Здесь мы вызываем свой метод showLocation, который на экране отобразит данные о местоположении.
onProviderDisabled – указанный провайдер был отключен юзером. В этом методе вызываем свой метод checkEnabled, который на экране обновит текущие статусы провайдеров.
onProviderEnabled – указанный провайдер был включен юзером. Тут также вызываем checkEnabled. Далее методом getLastKnownLocation (он может вернуть null) запрашиваем последнее доступное местоположение от включенного провайдера и отображаем его. Оно может быть вполне актуальным, если вы до этого использовали какое-либо приложение с определением местоположения.
onStatusChanged – изменился статус указанного провайдера. В поле status могут быть значения OUT_OF_SERVICE (данные будут недоступны долгое время), TEMPORARILY_UNAVAILABLE (данные временно недоступны), AVAILABLE (все ок, данные доступны). В этом методе мы просто выводим новый статус на экран.
Провайдеры включаются и отключаются в настройках системы. Тем самым, просто определяется доступен ли провайдер для получения от него координат. Чуть позже увидим, как можно отправить юзера в эти настройки. Программное включение/выключение провайдеров через стандартные методы недоступно.
Далее идут свои методы.
showLocation на вход берет Location, определяет его провайдера методом getProvider и отображает координаты в соответствующем текстовом поле.
formatLocation на вход берет Location, читает из него данные и форматирует из них строку. Какие данные он берет: getLatitude – широта, getLongitude – долгота, getTime – время определения.
checkEnabled определяет включены или выключены провайдеры методом isProviderEnabled и отображает эту инфу на экране.
Метод onClickLocationSettings срабатывает по нажатию кнопки Location settings и открывает настройки, чтобы пользователь мог включить или выключить провайдер. Для этого используется Intent с action = ACTION_LOCATION_SOURCE_SETTINGS.
Осталось в манифесте прописать разрешение на определение координат — ACCESS_FINE_LOCATION, которое позволит нам использовать и Network и GPS. Также существует разрешение ACCESS_COARSE_LOCATION, но оно дает доступ только к Network-провайдеру.
С кодом все, давайте смотреть, что получилось. Все сохраняем и запускаем приложение.
У меня на планшете сейчас выключен GPS, выключен WiFi, вставлена симка и выключен мобильный интернет.
Запускаю приложение и вижу такую картину:
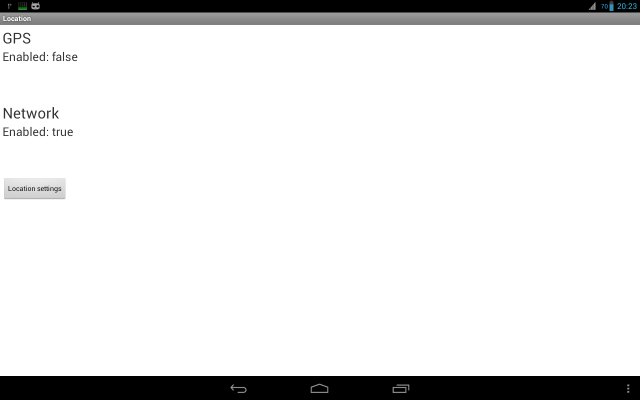
GPS выключен, Network включен. Но инета нет, поэтому Network мне ничего не дает. Надо включить либо мобильный инет, либо WiFi.
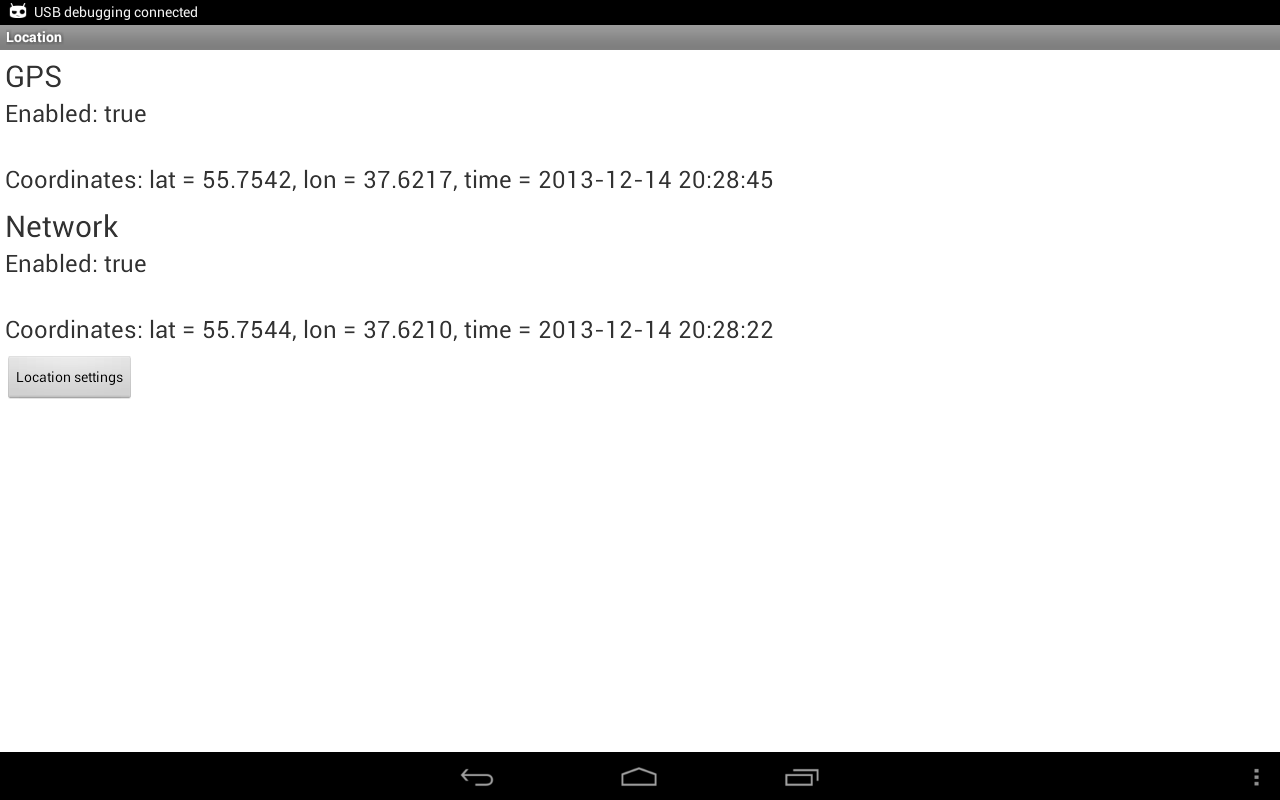
Я включаю WiFi. Проходит секунд 15-20 и инфа с Network пошла

Видим широту, долготу и время.
Напомню, что мы ставили минимальную скорость обновления – 10 сек. Но у меня провайдер Network выдает данные не чаще, чем раз в минуту.
Теперь давайте включим GPS. Для этого мы специально повесили кнопку Location settings, которую надо будет нажать пользователю, чтобы перейти в настройки. Жмем кнопку.
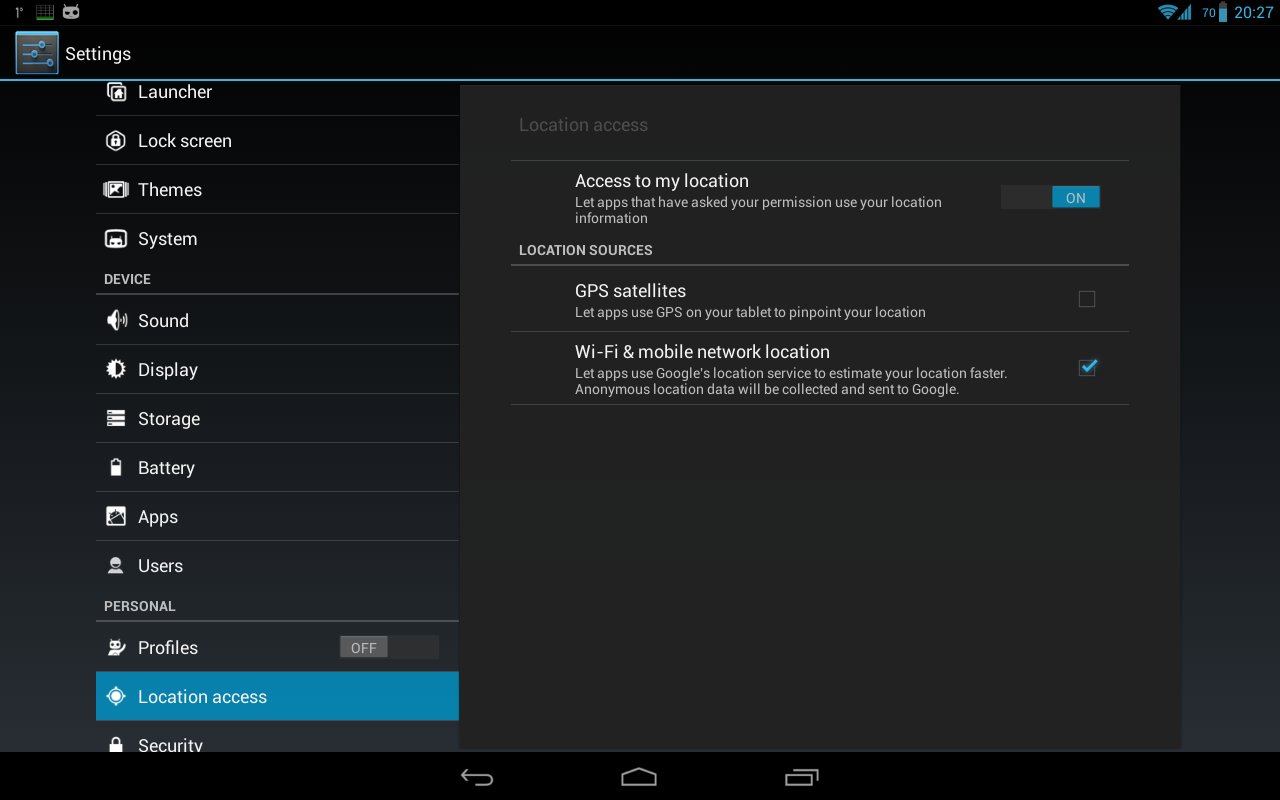
Видим, что GPS выключен, а Network включен. Наше приложение показывало все верно.
Разумеется, GPS можно включать и выключать через быстрые настройки системы (справа сверху). Но не все пользователи об этом знают. А тут мы их точно направим.
Включаем GPS и жмем Назад, чтобы вернуться в приложение.

GPS теперь показывает что он включен, ждем координаты. Для этого имеет смысл подойти к окну, больше вероятности, что поймаем сигнал.
В итоге сигнал пойман и получен результат.
У GPS через какое-то время включился статус 2 (AVAILABLE).
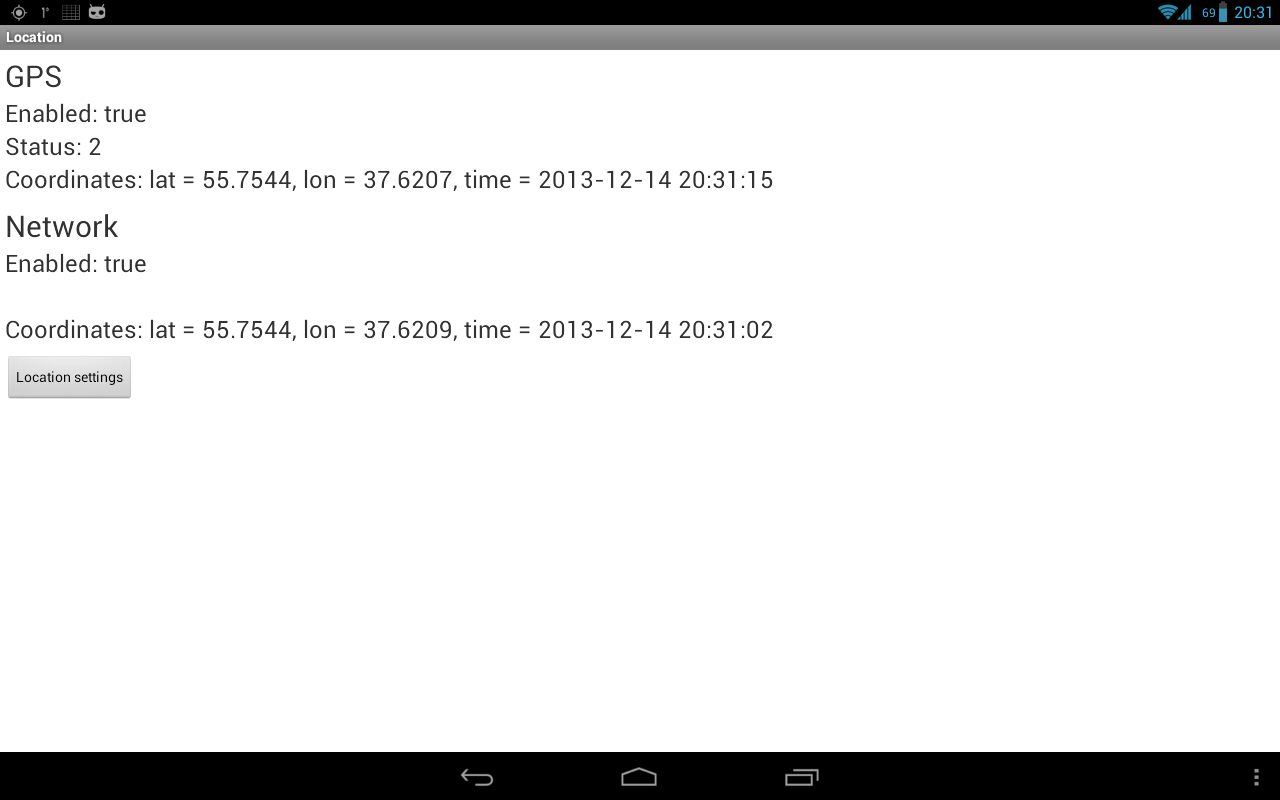
А у Network тишина со статусом. Не знаю, нормально это или нет.
Если с GPS сигналом все ок, то каждые 10 сек вы будете получать инфу о вашем местоположении. Если убрать планшет от окна, получим плохой сигнал: данные могут приходить реже и статус у меня иногда меняется на 1 (TEMPORARILY_UNAVAILABLE).
Прочее
Есть еще третий тип провайдера — PASSIVE_PROVIDER. Сам по себе этот провайдер никакие данные не вернет. Но повесив на него слушателя, вы сможете получать данные о местоположении, когда кто-то еще в системе пытается определить местоположение через обычные провайдеры. Система будет дублировать результаты и вам.
Метод getAllProviders вернет вам список всех доступных провайдеров. Метод getProviders(boolean enabledOnly) вернет либо все, либо только включенные.
Объект Location кроме координат, времени и провайдера имеет еще несколько атрибутов, которые могут прийти и пустыми:
getAccuracy – точность показания в метрах
getAltitude – высота над уровнем моря в метрах
getSpeed – скорость движения в м/с
getBearing – насколько я понял, это угол, на который текущая траектория движения отклоняется от траектории на север. Он же азимут.
Местоположение можно протестировать и через AVD эмулятор. Для этого надо в Eclipse открыть DDMS (Window > Open Perspective > DDMS) и выбрать вкладку Emulator Control. Внизу будет вкладка Manual, на которой есть поля для ввода координат и кнопка отправки.
На следующем уроке:
— создаем приложение с картой
— настраиваем карту и обрабатываем ее события
— программно меняем положение камеры
Присоединяйтесь к нам в Telegram:
— в канале StartAndroid публикуются ссылки на новые статьи с сайта startandroid.ru и интересные материалы с хабра, medium.com и т.п.
— в чатах решаем возникающие вопросы и проблемы по различным темам: Android, Kotlin, RxJava, Dagger, Тестирование
— ну и если просто хочется поговорить с коллегами по разработке, то есть чат Флудильня
— новый чат Performance для обсуждения проблем производительности и для ваших пожеланий по содержанию курса по этой теме
Источник
Простой способ добавить геолокацию в свой проект для Android
Долго я прочёсывал интернет в поисках простого решения, как мне в проект добавить 1 только класс и больше не беспокоиться о проблемах геолокации.
Критерии были такие:
1) решить всё в 1 классе, как можно меньше используя внешний код.
2) у пользователя должна быть всегда под рукой 1 static переменная в которой указанно его местоположение и больше ни о чём он знать не должен.
Большинство постов не отвечало на поставленный вопрос: конечно сначала нужно обратиться к сервису, потом нужно установить listner, потом вы можете посмотреть на трёхстраничный краткий пример как это делать.
В итоге я написал свой класс, с которым и хочу вас познакомить: он прост в использовании и с ним сможет справиться любой: просто добавьте его в проект и будет вам счастье.
Итак, что же здесь есть?
Класс разделен на 3 части:
1) imHere — переменная типа Location, в которой будет всегда доступна самая последняя информация о местоположении пользователя.
2) функция SetUpLocationListener — в любом случае нам нужна будет начальная установка для того, чтобы система начала сама без нашего участия выполнять обновление переменной imHere.
3) все остальные обязательные части LocationListener, которые можно переделать по собственному желанию.
Итак, как это работает?
1) создаем класс MyLocationListener
2) копируем в него код написанный выше
3) в основной функции (например MainActivity) ближе к началу запускаем:
или для любителей потоков
4) теперь у нас всегда и в любой части нашего проекта есть переменная MyLocationListener.imHere типа Location, в которой хранится самое последнее местоположение пользователя и множество дополнительной информации, как например скорость или точность определения местоположения.
И в заключение: это принципиальный код и тут есть что улучшать. Например нужно учитывать, что первое время локация может быть не определена и imHere будет null, но это всё не скоро: сейчас у нас есть класс, который позволяет нам без лишних усилий и с минимумом знаний добавить геолокацию в свой проект.
(!) Не забудьте: в зависимости от выбранного провайдера нужно добавить в манифест соответствующее разрешение. Например используемый выше GPS_PROVIDER требует добавления следующей строчки в манифест:
Источник
Android Get Current Location Programmatically Latitude Longitude

How to get current location in android (latitude and longitude) with GPS is the today’s example.
Along with current location, we will also see how you can get address from current location and how to get latitude and longitude of any particular place or address.
1. Get Current Location In Android
It is necessary to find current location in android studio programmatically when you are developing location-based applications.
Globally, the location of any object is found in terms of the latitude and longitude.
For example, if you want to find restaurants near by you, you need your current gps location latitude and longitude.
With the help of latitude and longitude, you will be able to find location regardless of how far the object is from you.
In current GPS location android example tutorial, you will learn to get current latitude and longitude of Android device.
We will use Google’s FusedLocationAPI for getting current location with latitude and longitude.
Show the output of the tutorial in the below video.
Follow all the below steps carefully to get the current location.
Step 1. Create a new project in Android Studio.
Make a fresh new project in Android Studio. Make sure you have select Empty activity as a Main Activity while creating a new project.
Step 2. Update build.gradle(Module:app) file
Add below source code in build.gradle(Module:app)
We need to use google’s play services to accomplish our task of getting current latitude and longitude.
Above line will import all the necessary classes from google api.
Step 3. Implement necessary interfaces
These interfaces are required.
All the above interfaces are required for using google’s fusedlocation API.
We also need to override necessary methods associated with these interfaces.
Step 4. Declare instances:
Declare Necessary statements as per below source code.
All these instances will help to use location services of the android architecture.
Step 5. Put following in onCreate() method
Update your onCreate() method as per following:
Step 6. Last but not least, put required permissions in AndroidManifest.xml
Below two permissions are must to get desired results.
If you are targeting marshmallow and after versions (targetSdkVersion >=23) then you have to check for run-time permissions.
Now full source code:
AndroidManifest.xml
build.gradle(Module:app)
activity_main.xml
In the above layout file, I have used four TextViews. Two are static which will give you reference about which digit is latitude and which is other.
Other two textview represents the location factors and will be changed frequently.
After implementing interfaces, you need to override all of it’s required methods. Here is the full source code with those methods in MainActivity.java class.
Source snippet for the MainActivity.java file.
Descriptions of the various methods
In above class, there is a method
This method is used to check whether location service is on or off in your phone. If off, then it will pop up one dialog, which will take the user to settings to enable location service.
showAlert()
This method will prompt a dialog if the location settings of the device is off. Title of the dialog will tell user about this. From here, user can turn on the location or can simply ignore it.
startLocationUpdates()
In this method, android will finally use google’s FusedLocation API to fetch the current latitude and longitude of the android device.
onLocationChanged()
Latitude and Longitude are very sensitive factors. It changes constantly every seconds to fetch the exact gps location of the device.
When these two factors have changed their values, this method onLocationChanged() will be called every second.
I have updated the textview values which represents the latitude and longitude in this method.
We will get the values of latitude and longitude in the long variable format because we must consider 7 to 8 decimal digits for the accuracy of the gps location.
If you have any query or questions then use comment section to ask them.
I will be happy to solve your questions as quickly as possible.
2. Get Address From Current Location In Android
Learn about Android Get Current Address Location From Latitude Longitude in this tutorial.
Learn how to get location name from latitude and longitude in android.
In this tutorial, we will get current country, state, city, postal or pin code, zip code and location name from latitude and longitude.
For this purpose, we will use Geocoder and Address classes from android library.
Step 1. Manifest Permissions
First of all, make a fresh new project in the android studio.
Select “Empty activity” as a main activity.
In order to fetch the current location, we need to have some permissions from the user.
Write down the below lines in AndroidManifest.xml file.
We need to ask for runtime permissions in this case because location permission is sensitive in terms of user’s security and privacy.
We will ask it using dexter library in the main activity later.
Step 2. Some Dependencies
In your build.gradle(Module : app) file, add the following two lines
First line is for fetching the classes from google. These classes will help us to get the current location in terms of latitude and longitude of the user.
Second line is for dexter library which will help us to simplify the process of asking runtime location permissions.
Step 3. Main XML file
In your activity_main.xml file, add the following code snippet
Above main XML file includes one Button and several Text views.
When the user will click the button, we will fetch the address from current latitude and longitude.
We will fill the text views with the information like country, city, state, pin code, zip code etc.
Step 4. Main Java Class
Following is the source code for the MainActivity.java class.
Checking the Code
Let us see how the source code of Main Activity will work.
First of all, consider the following lines
With this code, compiler will define objects of various useful classes.
Classes like GoogleApiClient, Location, LocationManager, LocationRequest etc. will help us to get the current latitude and longitude.
Then there are objects of text view and button widgets.
Two double variables latitude and longitude will hold the co ordinates.
Now read the code of the onCreate() method.
First of all, compiler will call requestMultiplePermissions() method.
Code for requestMultiplePermissions() method is as the below
As you can see that we are asking for ACCESS_COARSE_LOCATION and ACCESS_FINE_LOCATION in this method.
If the user have given all the permissions then compiler will show a toast like “All permissions are granted!”
Otherwise, it will call the openSettingDialog() method.
source code for openSettingDialog() method is as the following
Compiler will show one alert dialog to the user.
It has two buttons. One is Cancel and another is “Take me to settings.”
when the user will call “Take me to settings.” button, compiler will open the app settings, from where user can turn on the permissions.
Now again see the onCreate() method.
After requestMultiplePermissions() method, compiler will call checkLocation() method.
This method will check whether the location service of android device is on or off.
If it is off then, compiler will pop up one alert dialog and will tell user to turn on the location service.
Now some overriden methods are there. For example, onConnected(), onConnectionSuspendend(), onConnectionFailed(), onStart(), onStop() and onLocationChanged().
All these methods are related to getting current location.
Compiler will call onLocationChanged() method every 2 seconds. This method will give us updated latitude and longitudes.
Source code for onLocationChanged() method is as the following
Compiler will store latitude and longitude in global variables.
When the user will click the button, compiler will call setAddress() method.
setAddress() method will get two parameters. One latitude and another will longitude.
We will pass global variables as these parameter, so this method will always get updated current co ordinates.
Code structure for setAddress() method is as the below
In this method, compiler will first create the object of Geocoder class.
Then it will create a list with the objects of Address class.
.getFromLocation() method will give us the address associated with the latitude and longitude.
Result given by .getFromLocation() method will give us full address, city, country, state, pin code and finally we will set these information in various text views.
3. Android Get Latitude And Longitude From Address
Android Get Latitude And Longitude From Address is the today’s main topic.
We will fetch the co ordinates in form of latitude and longitude from the address of the location.
There may be some case where user do not know his/her current location in terms of latitude and longitude but he can write his address.
In such case, you need to fetch the co ordinates from the address given by the user.
This tutorial will guide you how to insert this feature in your android application with easy and simple coding lines.
User will enter the address in the edit box. Our code will get the co ordinates (latitude and longitude) from this address using Address, Geocoder and Message class.
Read Fetched Address
Watch the below video to show how this demo tutorial is working.
Step 1. Geo Coding Class
First of all, make a new class named GeocodingLocation.java
Source code for GeocodingLocation.java is as the following
Above class is primarily using three classes : Geocoder, Address and Message.
Compiler will first start one thread.
Inside this thread, it will create the object of the Geocoder class.
Then it will fetch the latitude and longitude using .getFromLocationName() method.
An object of List class will hold the output given by .getFromLocationName() method. Object of Address class will get output from List class object.
After this, an object of StringBuilder class will fetch co ordinates and than a string variable will finally get latitude and longitude from given address.
Step 2. XML file for main activity
When you create a new project in android studio, system creates two files automatically.
One of them is activity_main.xml.
Copy the below code snippet in activity_main.xml.
There are some UI widgets in the above file.
Two buttons, two text views and one edit text is present.
In the edit text, user can input the address. By default, I have written one address.
Below this edit text, there will be two buttons. One button will erase the text from the edit text when user clicks it.
Other button will fetch the latitude and longitude from the address when it is clicked.
Step 3. Writing Main File
Write down the below source code in MainActivity.java file
Looking Main Class Deeply
Consider the below code
Compiler will create the objects of Button, Text view and Edit text etc. classes.
Now look at the below code
Compiler will execute the above code when the user clicks on the erase button.
It will set the null or empty text on the edit text.
Now read the following code structure
When the user clicks “GET LATITUDE LONGITUDE” button, compiler will run the above code lines.
It will first get the address in the string format from the edit text.
Then it will create the object of the GeocodingLocation class.
Then compiler will user .getAddressFromLocation() method.
.getAddressFromLocation() method will get the address in string format as the first parameter, application context as a second parameter and object of GeocoderHandler() as the last parameter.
Below is the code writings for GeocoderHandler class.
Here, handleMessage() method will get the object of the Message class in it’s first parameter.
Then compiler will get the data from this object using Bundle class.
From this bundle, compiler will get the latitude and longitude in the string format using .getString(“address”) class.
Finally, compiler will set this latitude and longitude in the text view.
106 thoughts on “Android Get Current Location Programmatically Latitude Longitude”
Hello,
Latest version for google play service is “9.4.0”, can I use this version instead of “9.0.2”, which is mentioned on the above blog post?
Yes, you can always use latest version of Google API.
Thank Hardik bro i am developing an app ..i need your help.
what kind of help you need?
Hey!
First off, great tutorial!
Secondly, my questions:
I am new to android, but I am quite good in java. I work in android studio 1.5(do I need to update it?). I wonder if this code can be used as is for broadcasting the location to other devices with the same app, and then somehow plot the coordinates on google maps, such that a nearby person can be notified of the position of another person?
Or do I have to do a lot of tweaks in this code?
You can implement this code on Android Studio 1.5 (No need to update). This code will give you latitude and longitude of your device, for broadcasting these latlong you can send them to server and from server all other devices can get them and then you can show it on google map. So this tutorial will give you only coordinates of your device, for your whole purpose, you have to do lot of tweaks as you guessed.
Thanks 🙂
is it also possible to store this value in SharedPreferences and keeping the mode MODE_WORLD_READABLE so that every one can see it.
i wan to ask, this code can get every current gps location each minute
Thank you very much for amazing tutorial, it’s nice and easy to understand.
Thanks for your words and do share our site with other learners.
Источник


