- Программно получить номер телефона Android телефона
- 15 ответов
- предостережения:
- Update: этот ответ больше не доступен, поскольку Whatsapp перестал выставлять номер телефона как имя учетной записи, любезно игнорируйте этот ответ.
- Android Contacts : Get Contact Details Phone Number Programmatically
- 1. Android Get Contact Details Programmatically
- Step 2: Updating AndroidManifest.xml file
- Step 3: Updating activity_main.xml file
- Step 4: Preparing MainActivity.java class
- Step 5: Description of MainActivity.java
- 2. Android Get Contact List And Display in ListView
- Step 2: Updating AndroidManifest.xml file
- Step 3: Adding ListView Item file
- Step 4: Creating a model class
- Step 5: Making a custom adapter class
- Step 6: Updating MainActivity
- Step 7: Describing MainActivity.java class
- 4 thoughts on “Android Contacts : Get Contact Details Phone Number Programmatically”
- How to Make Calls and Use SMS in Android Apps
- 1. How to Make A Call
- Create a New Android Studio Project
- Lay Out the Screen
- Modify the MainActivity Class
- 2. Monitoring Phone Call Events
- Add the Permission
- Create the PhoneStateListener Object
- Listening to the Phone Call State
- How to Use the Emulator to Make Calls and Send SMS Messages
- 3. Monitoring Phone Call Events in the Background
- Create a BroadcastReceiver
- Modify AndroidManifest.xml
- Monitoring Outgoing Calls
- 4. Sending SMS Messages
- Set Up the Layout
- Modify the MainActivity
- Run the App
- 5. Sending SMS Messages Directly
- Add Permission in AndroidManifest.xml
- Modify the MainActivity class
- 6. Receiving an SMS Message
- Add the Permission
- Create a Broadcast Receiver
- Conclusion
- Android Sensors in Depth: Proximity and Gyroscope
- 6 Do’s and Don’ts for a Great Android User Experience
- Background Audio in Android With MediaSessionCompat
- Migrate an Android App to Material Design
Программно получить номер телефона Android телефона
Как я могу программно получить номер телефона устройства, на котором работает мое приложение на Android?
15 ответов
предостережения:
в соответствии с высоко оцененными комментариями, есть несколько предостережений, чтобы быть в курсе. Это может вернуться null или «» или даже «. » , и он может вернуть устаревший номер телефона, который больше не действителен. Если вы хотите что-то, что однозначно идентифицирует устройство, вы должны использовать getDeviceId() вместо.
нет гарантированного решения этой проблемы, потому что номер телефона физически не хранится на всех SIM-картах или не транслируется из сети на телефон. Это особенно верно в некоторых странах, которые требуют проверки физического адреса, при этом присвоение номера происходит только после этого. Присвоение номера телефона происходит в сети — и может быть изменено без изменения SIM-карты или устройства (например, так поддерживается перенос).
Я знаю, что это боль, но скорее всего, лучшее решение — просто попросить пользователя ввести свой номер телефона один раз и сохранить его.
Update: этот ответ больше не доступен, поскольку Whatsapp перестал выставлять номер телефона как имя учетной записи, любезно игнорируйте этот ответ.
на самом деле есть альтернативное решение, которое вы можете рассмотреть, если вы не можете получить его через службу телефонии.
на сегодняшний день Вы можете положиться на другое большое приложение Whatsapp, используя AccountManager. Миллионы устройств установить это приложение, и если вы не можете получить номер телефона через TelephonyManager, можете попробовать.
Проверьте actype для учетной записи whatsapp
конечно, вы не можете получить его, если пользователь не установил Whatsapp, но его стоит попробовать в любом случае. И помните, что вы всегда должны просить пользователя о подтверждении.
как опубликовано в my ранее ответа
использовать ниже код :
В AndroidManifest.xml, дайте следующее разрешение:
но помните, что этот код не всегда работает, так как номер сотового телефона зависит от SIM-карты и оператора сети / оператора сотового телефона.
кроме того, попробуйте проверить в Телефон— > Настройки — > О — > Телефон Идентичность, если вы можете просмотреть Номер там, вероятность получения номера телефона сверху кодом выше. Если вы не смогли посмотреть номер телефона в настройках, то вы не сможете получить через этот код!
Предложенный Обходной Путь:
- получить номер телефона пользователя в качестве ручного ввода от пользователя.
- отправить код на мобильный номер пользователя с помощью SMS.
- попросить пользователя ввести код для подтверждения телефона число.
- сохраните номер в sharedpreference.
выполните вышеуказанные 4 шага как однократное действие во время первого запуска приложения. Позже, когда требуется номер телефона, используйте значение, доступное в разделе Общие предпочтения.
иногда, ниже возвращает код null или пустую строку.
есть еще один способ, которым вы сможете получить свой номер телефона, я не тестировал это на нескольких устройствах, но выше код не работает каждый раз.
попробовать ниже код:
вам нужно будет добавить эти два разрешения.
надеюсь, это поможет, Спасибо!
просто хочу добавить немного здесь, чтобы выше объяснения в приведенных выше ответах. Что сэкономит время и для других.
в моем случае этот метод не вернул номер мобильного телефона, была возвращена пустая строка. Именно из-за этого случая я перенес свой номер на новую sim-карту. Поэтому, если я зайду в Настройки>О телефоне>статус>мой номер телефона, он покажет мне «неизвестно».
существует новый Android api, который позволяет пользователю выбирать свой номер телефона без необходимости разрешения. Взгляните на: https://android-developers.googleblog.com/2017/10/effective-phone-number-verification.html
Это более упрощенный ответ:
TelephonyManager не является правильным решением, потому что в некоторых случаях номер не хранится в SIM-карте, из-за моего предложения,вы должны использовать общие предпочтения для хранения номера телефона пользователя в первый раз, когда приложение открыто, и после этого номер будет использоваться всякий раз, когда вам нужно в приложении.
прежде всего, получение мобильного номера пользователей противоречит этической политике, раньше это было возможно, но теперь, согласно моим исследованиям, для этого нет твердого решения, используя некоторый код, можно получить номер мобильного телефона, но нет гарантии, что он будет работать только на нескольких устройствах. После долгих исследований я нашел только три решения, но они не работают на все устройства.
есть следующая причина, почему мы не получаем.
1.Android-устройство и новая Sim-карта Карты не хранить мобильный телефон, если мобильный номер не доступен на устройстве и на SIM-карте, как это возможно, чтобы получить номер, если SIM-карта с мобильным номером, то по телефону менеджер мы можем получить число, мудрый он будет возвращать «null» или «» или «. «
Примечание: — я протестировал это решение в следующем устройстве Moto x, Samsung Tab 4, Samsung S4, Nexus 5 и Redmi 2 prime, но он не работает каждый время возвращает пустую строку, так что вывод напрасный
- этот метод работает только в Redmi 2 prime, но для этого нужно добавить прочитайте разрешение контакта в манифесте.
Примечание: — это также не гарантированное и эффективное решение, я тестировал это решение во многих устройствах, но он работал только в Redmi 2 prime что такое двойное sim-устройство, оно дает мне два мобильных номера, первый из которых правильно, но второй не принадлежит моему второму sim это принадлежит моя старая sim-карта, которую я не использую.
- в моем исследовании я обнаружил, что раньше можно было получить номер мобильного телефона с помощью учетной записи WhatsApp, но теперь новая версия Whatsapp не хранит номер мобильного пользователя.
вывод:- Android не имеет никакого гарантированного решения, чтобы получить номер мобильного пользователя программно.
предложение:- 1. Если вы хотите проверить номер мобильного телефона пользователя, попросите пользователь, чтобы предоставить свой номер, с помощью otp вы можете проверить это.
- если вы хотите идентифицировать устройство пользователя, для этого вы можете легко получить номер IMEI устройства.
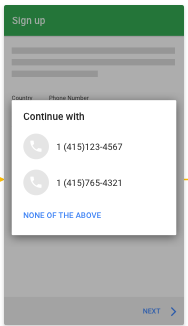
Так вот как вы запрашиваете номер телефона через API Play Services без разрешения и хаков. источник и полный пример.
в свою сборку.gradle (версия 10.2.X и выше):
в вашей деятельности (код упрощен):
это создаст такой диалог:
хотя можно иметь несколько учетных записей голосовой почты, при вызове с вашего собственного номера перевозчики направляют вас на голосовую почту. Итак, TelephonyManager.getVoiceMailNumber() или TelephonyManager.getCompleteVoiceMailNumber() , в зависимости от вкуса, который вам нужен.
надеюсь, что это помогает.
маленький вклад. В моем случае код запустил исключение ошибки. Мне нужно было поставить аннотацию, которая для кода будет запущена и исправить эту проблему. Здесь я позволяю этот код.
во время работы над приложением безопасности, которое нужно было получить номер телефона, кто так когда-либо мой телефон может попасть в их руки, я должен был сделать это; 1. получите завершенную загрузку, а затем попробуйте получить Line1_Number из telephonyManager, который возвращает результат строки. 2. сравните результат строки с моим собственным номером телефона, и если они не совпадают или строка возвращает null, то, 3. тайно отправить SMS, содержащий результат строки плюс специальный знак на мой номер офиса. 4. если не удается отправить сообщение, запустите служба и продолжайте пытаться после каждого часа, пока отправленное SMS в ожидании намерения не вернется успешным. С помощью этих шагов я мог бы получить номер человека, использующего мой потерянный телефон. это не имеет значения, если человек заряжен.
Источник
Android Contacts : Get Contact Details Phone Number Programmatically

Hello, all learners. Welcome to Android Contacts tutorial with example.
In this get contact list details Android Studio programmatically tutorial we will learn how to retrieve contact name, phone number, email, etc. information in Android app programmatically.
Two examples are there in this post as per the below.
1. Android Get Contact Details Programmatically
Contact based application will need to access contact details, this tutorial will guide you for this purpose.
First, check the output of get contact list details Android Studio programmatically then we will implement it.
Step 2: Updating AndroidManifest.xml file
add required permissions between …. tag.
Final code for AndroidManifest.xml file
Step 3: Updating activity_main.xml file
We will make user interface for getting name, phone number and email address.
Three textviews are used for this purpose.
Copy and paste below source code in activity_main.xml file
Step 4: Preparing MainActivity.java class
Add following source code in MainActivity.java class
Step 5: Description of MainActivity.java
Following source code will open contact list on button click.
After clicking on contact list item, onActivityResult() method is called.
Below line will get name of contact
Below source code will check whether contact has a phone number or not.
If contact has phone number, then it will be got by following
Following source code will take the Email address.
Then finally, all text are set in respected textviews
So all for get contact list details android studio programmatically example tutorial. Thank you.
2. Android Get Contact List And Display in ListView
Welcome to android get contact list with phone numbers tutorial.
Get contact list in Android Studio example guides you to get a contact list and show in the custom listview.
Get contact list in Android example will show how to show all contacts alphabetically.
First, go through the output, then we will develop with Android Studio.
Step 2: Updating AndroidManifest.xml file
add required permissions between …. tag.
Final code for AndroidManifest.xml file
Step 3: Adding ListView Item file
Make a new layout resource file named “lv_item.xml”
Step 4: Creating a model class
Create a new class named “ContactModel.”
Step 5: Making a custom adapter class
Prepare a new class and give a name as “CustomAdapter.”
Step 6: Updating MainActivity
Update activity_main.xml as below source code
Update MainActivity.java class as following
Step 7: Describing MainActivity.java class
Let’s make an eye on below source code
We are using Cursor class to get details about contacts.
We will store contact’s name and phone number in two different variables.
After that, we will create a object of ContactModel class and will add this object to the contactModelArrayList.
After getting all the contacts information, we will set whole information in ListView.
So the end for get contact list in android studio programmatically tutorial. Thank you.
4 thoughts on “Android Contacts : Get Contact Details Phone Number Programmatically”
hi,
i got problem,
when i open contact list, list is open successfully, but when i press back without click on contact, app got crash
See your logcat, which line is making crash?
Hi, this code was so help full for me, i need some more help from u, i need to select specific number of a person, for eg: i have saved someones name with two or more numbers so how could i select specific number. if u can help me, let me know, thank you.
I also need to dig out about selecting specific number.
I will make separate tutorial on this topic in near future.
Источник
How to Make Calls and Use SMS in Android Apps
In this tutorial, you’ll learn about the Android Telephony and SMS API. You’ll learn how to make a call from your app and how to monitor phone call events, as well as how to send and receive SMS.
1. How to Make A Call
To start off, I’ll show you how to initiate a call from your application either by using the phone dialer app or directly from your app to make it easier for your users.
Create a New Android Studio Project
Fire up Android Studio and create a new project with an empty activity called MainActivity .


Lay Out the Screen
For now, our layout will just have an EditText field and a Dial button:


Modify the MainActivity Class
In the code block below, we are creating an ACTION_DIAL intent to display the phone dialer. The phone number is parsed from our tel URI scheme: tel:XXXXXXXX . Note that you don’t need any permission for this to work:
If you run the app and click the dial button, you’ll be taken to the dialer app, and from there you have to actually dial the number. You can change this flow to actually make the call from within your app by simply changing the ACTION_DIAL intent to ACTION_CALL instead. This will require the android.permission.CALL_PHONE permission, though.


2. Monitoring Phone Call Events
In this section, we are going to learn how to monitor phone call events in the Android system. The phone can be in three states:
- idle (when it is unused)
- ringing (when there is an incoming call)
- off-hook (when the call is answered)
Add the Permission
We need the permission READ_PHONE_STATE to be able to monitor the phone state. Add it to AndroidManifest.xml:
Create the PhoneStateListener Object
We create an object of the PhoneStateListener class, and then override its onCallStateChanged() method (in IntelliJ it is easy to do this with Control-O, and then select or search for the method to override). We’ll handle changes to the call state changes by displaying a Toast . Note that we can also access the incoming phone numbers when this method is triggered:
Depending on your application needs, you could also override one of these other event methods: onCellInfoChanged() , onCallForwardingIndicatorChanged() , onCellLocationChanged() , or onSignalStrengthChanged() .
Listening to the Phone Call State
In order to begin listening to the phone call state, we need to get the TelephonyManager from the system service and initialize it in onCreate() .
In the onResume() method, we can begin to listen using the TelephonyManager listen() method, passing it the PhoneStateListener instance and the static LISTEN_CALL_STATE . We stop listening in the onStop() method by passing the LISTEN_NONE as the second argument to listen() .
Other phone listening options possible are LISTEN_CELL_LOCATION , LISTEN_SIGNAL_STRENGTH , LISTEN_CALL_FORWARDING_INDICATOR , and LISTEN_CELL_INFO .
Finally, run the app and make sure an incoming call comes in.


This monitoring will only work when the app is in the foreground. For this to work in the background (when our application is not running), we would need to create a BroadcastReceiver so that even if the app isn’t running, we can still monitor for phone call states. Depending on your app requirements, that could be a much better way to listen for phone call state changes. I’ll show you how to do this in the next section.
Be aware that we are only monitoring incoming calls. For us to monitor outgoing calls, we need additional permissions. To monitor outgoing calls, include the following line in your AndroidManifest.xml file.
How to Use the Emulator to Make Calls and Send SMS Messages
You can use your emulator to simulate making a call or sending an SMS message, but you’ll need to do a little setup. Open your emulator, click the last button on the right-side navigation bar to open the extended control dialog, and then select the phone control button.


3. Monitoring Phone Call Events in the Background
Create a BroadcastReceiver
Just like in the previous section, we need to create an event listener to monitor phone state changes. The major difference is that this time we’ll extend the BroadcastReceiver base class so we can listen for the phone call state even if the application is not running. Be sure not to register the listener more than once! Our check for this is on line 36.
Modify AndroidManifest.xml
A broadcast receiver works only if it is registered. We need to tell the Android system about our broadcast receiver by registering it in the AndroidManifest.xml file by connecting our PhoneCallStateReceiver class to the that describes the system broadcast we wish to receive—in this case, PHONE_STATE .
Monitoring Outgoing Calls
For outgoing calls, you need to include the NEW_OUTGOING_CALL action intent in the of the receiver in AndroidManifest.xml.
To get the phone number of the intended outgoing call, inside the onReceive(Context, Intent) method, we get the number from the intent as an extra. To prevent that intended call from going through, we can call setResultData() and pass it a null argument. The resultData is used as the actual number to call.
You can learn more about broadcasts and broadcast receivers in our tutorial here on Envato Tuts+:


4. Sending SMS Messages
You have just two major choices for sending SMS: using the device SMS client application or skipping the client by sending the SMS directly from your app. We’ll look at both scenarios, and you can decide which one is better for your use case. Let’s start by sending an SMS using the device SMS client.
Set Up the Layout
First, we need to modify our main layout to have an EditText field for the message and a Send Message button.
Modify the MainActivity
Inside our onCreate() method in our MainActivity class, create an intent with ACTION_SENDTO as the first argument and a smsto:
URI as the second argument. The text message will be the value of the sms_body extra:
Here, the SMS client will monitor the status of the message delivery.
Run the App
When all required fields are entered, clicking the Send SMS button will open the user’s SMS client, or will give the user options to select an app if one hasn’t already been chosen.


5. Sending SMS Messages Directly
Next let’s see how to send the SMS directly from our application instead of using the device SMS client.
Add Permission in AndroidManifest.xml
As usual, we need to register the permission in AndroidManifest.xml.
Modify the MainActivity class
Next, for Android 6.0 (API level 23) and above, we need to request the SEND_SMS permission during runtime.
To learn more about Android runtime permissions and how they’ve changed in version 6.0, check out our tutorial here on Envato Tuts+:


To send an SMS, we get the default SmsManager instance and then call its sendTextMessage() method, passing in the phone number as the first argument and the message as the second argument:
To monitor the status of delivery, the SMSManager sendTextMessage() method has two optional PendingIntent parameters: sentIntent and deliveryIntent .
If you want to use sentIntent , watch for the result code Activity.RESULT_OK on success, or one of RESULT_ERROR_GENERIC_FAILURE , RESULT_ERROR_RADIO_OFF , and RESULT_ERROR_NULL_PDU to indicate an error.
6. Receiving an SMS Message
For your app to begin receiving SMS messages from the user’s phone, its best to have a broadcast receiver registered so that it can be alerted when a new SMS arrives even if your app is not running in the foreground.
Add the Permission
Add the RECEIVE_SMS permission to AndroidManifest.xml:
Next, we need to check and see if the app has permission to receive SMS messages at runtime. So in the MainActivity class, check for the RECEIVE_SMS permission. If it is not found, request it.
Create a Broadcast Receiver
We are retrieving each object of the SmsMessage class by using the method createFromPdu(byte[] pdu) , passing it a PDU (protocol data unit). We are then adding it to our messages array.
To support API 23 and above, you should include the format String extra (either «3gpp» for GSM/UMTS/LTE messages in 3GPP format or «3gpp2» for CDMA/LTE messages in 3GPP2 format).
Now, run the app, close it, and send your emulated phone an SMS.


Conclusion
In this tutorial, you learned about:
- making a call from your app
- monitoring phone call events
- sending SMS messages using either the device messaging app or directly from your own app
- receiving SMS messages in the background
There’s lots more you can do with phone calls and SMS messages in Android. Visit the Android Telephony API and the SMSManager API documentation to learn more.
In the meantime, check out some of our other posts on Android development!


Android Sensors in Depth: Proximity and Gyroscope


6 Do’s and Don’ts for a Great Android User Experience


Background Audio in Android With MediaSessionCompat


Migrate an Android App to Material Design
Источник


