- Add GitHub Login to an Android App
- adriantache/GitHubExplorer
- Explore repositories and download files. Contribute to adriantache/GitHubExplorer development by creating an account on…
- GitHub API v3
- Get started with one of our guides, or jump straight into the API documentation.
- Getting Public Repos
- Getting Private Repos (Basic Authentication)
- Getting Private Repos (Two Factor Authentication — OAuth2 Token)
- Creating a personal access token
- In this article
- Scopes for OAuth Apps
- In this article
- Help us make these docs great!
Add GitHub Login to an Android App

Or how I figured out dealing with incomplete documentation
I’m currently searching for a job as a Mobile Developer in the Geneva area so I’m applying to all sorts of positions and companies. One of them asked me to make a simple app that can browse a user’s repositories on GitHub, including authentication so you can see your own private repos (did you know we now have unlimited private repos for free on GitHub!). Here’s the finished code if you just want to have a look, but otherwise read on to see the necessary steps:
adriantache/GitHubExplorer
Explore repositories and download files. Contribute to adriantache/GitHubExplorer development by creating an account on…
I have to preface this by saying that before this assignment I really had no idea how to use OAuth and I’ve only sent simple GET requests to APIs. I’m sure that for some people this article is just a whole lot of duh! but for me it was a learning experience and so I wanted to share it.
The first thing I did to start this app was, of course, to consult the GitHub API documentation:
GitHub API v3
Get started with one of our guides, or jump straight into the API documentation.
The documentation exposes two main endpoints to get a list of repos:
So let’s start with the simple use case:
Getting Public Repos
This is as easy as making a get request to the API and decoding the response. I’ve used OKHTTP inside an AsyncTask to make the request and then I simply decode it into an ArrayList of repo names (code is shortened and simplified):
Getting Private Repos (Basic Authentication)
In order to get private repos we have to log in, of course. And this is where the confusion started for me. The documentation talks a lot about OAuth2 and tokens and secrets and the only examples they give are using curl . So I started searching the documentation and then online and lo and behold, Basic Authentication is a technical term! To summarize, basic authentication is essentially sending an Authorization header which contains the string Basic followed by a base64 encode of
So here’s how the code changes:
As you can see, not much changes, we simply change the endpoint and add that authorization header.
Getting Private Repos (Two Factor Authentication — OAuth2 Token)
This is where things get a bit more complex. The process itself isn’t too complicated once you understand how it works, which is like this: if 2FA is active, when you try to log in using basic authentication the API returns a 401 response and the error message Must specify two-factor authentication OTP code. At that point, if SMS 2FA is active, the platform should send out a OTP SMS to the user containing the code. Please note, however, that SMS 2FA for GitHub is finicky and might not work at all in some countries!
So to detect that we add the following in our try block in doInBackground :
Since we’ve returned this we ask the user for their 2FA password. Technically speaking that’s all we need to access their repos list, but if we want to do more than that we need to acquire an authorization token from GitHub. For this, we need to send a login request to the authorizations endpoint:
In order to request an authorization we must send a POST request in which we specify as JSON a title for the authorization. I found the easiest way to do this without using a try/catch block is by creating the JSON object from a HashMap. So we add this to the doInBackground method of the AsyncTask:
If the authentication is successful, the API will reply with a JSON containing a token field with our authentication token. I have made a method to extract it and save it to SharedPreferences for easy access:
Afterwards, we can login as we do with Basic Authentication, the only difference being that instead of sending a header that contains:
we send one that contains “token” instead of “Basic”, followed by the token of our authorization:
And since I’m saving the token as SharedPreferences, we can easily check if we have a token for a certain username by using contains :
And that’s it, we now have full access to the GitHub API! If you have any questions make sure to have a look at the full code on my GitHub page using the link at the top of the article or just leave a comment below!
Thanks for reading this article. You can connect with me on LinkedIn.
I’m currently looking for a job in the Geneva area , Switzerland, so please contact me if you know someone in need of a Mobile Developer with Java/Kotlin (Android) and JavaScript (React Native Android/iOS) experience.
If you liked this article, please hit the clap icon 👏 to show your support.
Источник
Creating a personal access token
In this article
You should create a personal access token to use in place of a password with the command line or with the API.
Note: If you use GitHub CLI to authenticate to GitHub on the command line, you can skip generating a personal access token and authenticate via the web browser instead. For more information about authenticating with GitHub CLI, see gh auth login .
Personal access tokens (PATs) are an alternative to using passwords for authentication to GitHub when using the GitHub API or the command line.
If you want to use a PAT to access resources owned by an organization that uses SAML SSO, you must authorize the PAT. For more information, see «About authentication with SAML single sign-on» and «Authorizing a personal access token for use with SAML single sign-on.»
As a security precaution, GitHub automatically removes personal access tokens that haven’t been used in a year. To provide additional security, we highly recommend adding an expiration to your personal access tokens.
A token with no assigned scopes can only access public information. To use your token to access repositories from the command line, select repo . For more information, see «Available scopes».
Creating a token
Verify your email address, if it hasn’t been verified yet.
In the upper-right corner of any page, click your profile photo, then click Settings. 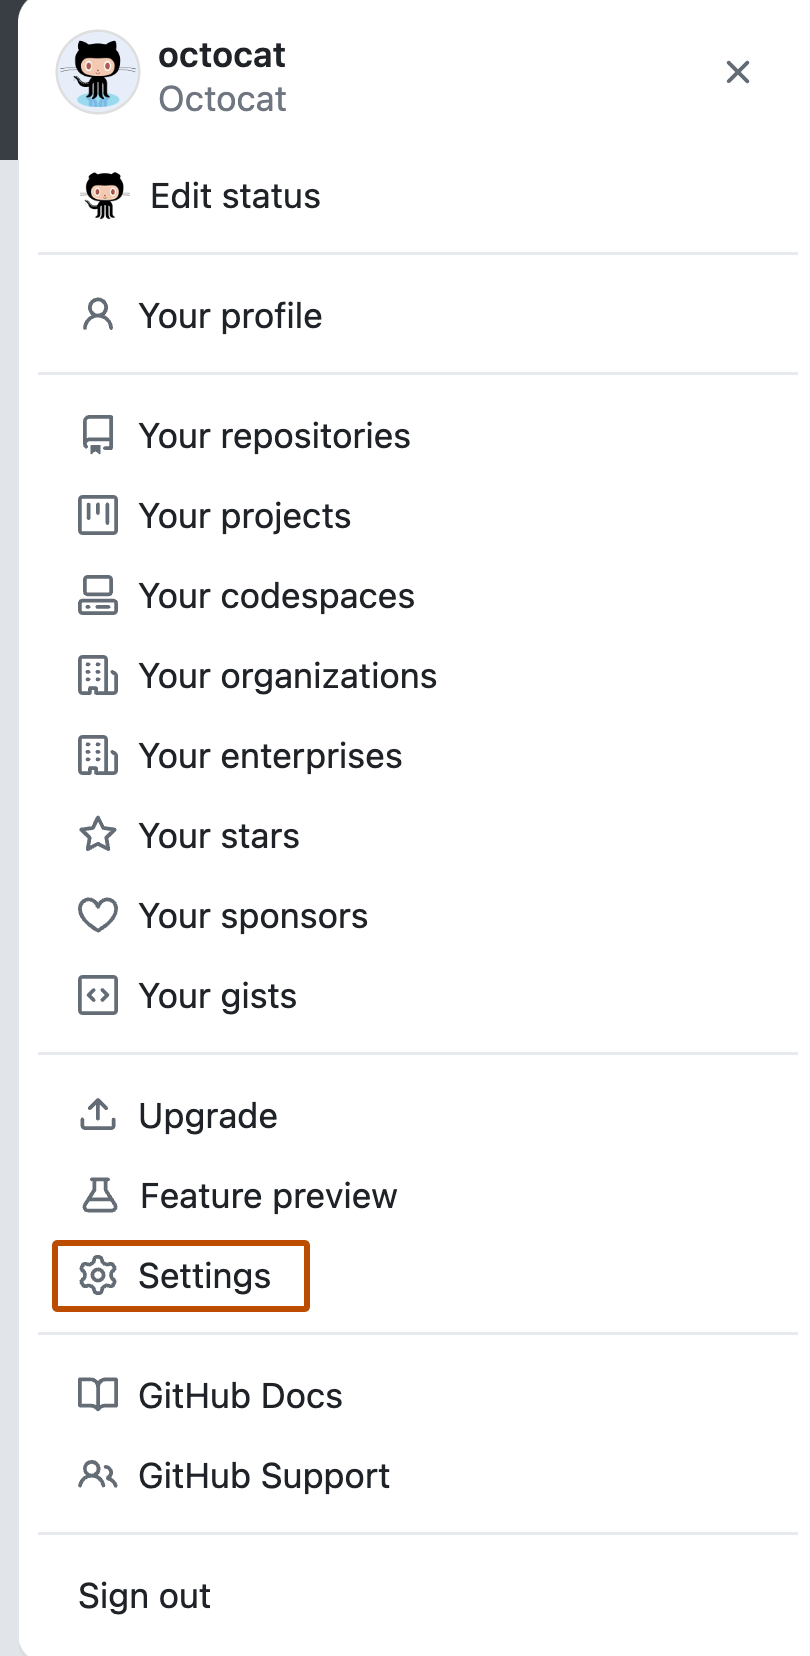
In the left sidebar, click Developer settings. 
In the left sidebar, click Personal access tokens. 
Click Generate new token. 
Give your token a descriptive name. 
To give your token an expiration, select the Expiration drop-down menu, then click a default or use the calendar picker. 
Select the scopes, or permissions, you’d like to grant this token. To use your token to access repositories from the command line, select repo.

Click Generate token. 

Warning: Treat your tokens like passwords and keep them secret. When working with the API, use tokens as environment variables instead of hardcoding them into your programs.
To use your token to authenticate to an organization that uses SAML SSO, authorize the token for use with a SAML single-sign-on organization.
Using a token on the command line
Once you have a token, you can enter it instead of your password when performing Git operations over HTTPS.
For example, on the command line you would enter the following:
Personal access tokens can only be used for HTTPS Git operations. If your repository uses an SSH remote URL, you will need to switch the remote from SSH to HTTPS.
If you are not prompted for your username and password, your credentials may be cached on your computer. You can update your credentials in the Keychain to replace your old password with the token.
Instead of manually entering your PAT for every HTTPS Git operation, you can cache your PAT with a Git client. Git will temporarily store your credentials in memory until an expiry interval has passed. You can also store the token in a plain text file that Git can read before every request. For more information, see «Caching your GitHub credentials in Git.»
Источник
Scopes for OAuth Apps
In this article
Scopes let you specify exactly what type of access you need. Scopes limit access for OAuth tokens. They do not grant any additional permission beyond that which the user already has.
When setting up an OAuth App on GitHub, requested scopes are displayed to the user on the authorization form.
Note: If you’re building a GitHub App, you don’t need to provide scopes in your authorization request. For more on this, see «Identifying and authorizing users for GitHub Apps.»
If your OAuth App doesn’t have access to a browser, such as a CLI tool, then you don’t need to specify a scope for users to authenticate to your app. For more information, see «Authorizing OAuth apps.»
Check headers to see what OAuth scopes you have, and what the API action accepts:
- X-OAuth-Scopes lists the scopes your token has authorized.
- X-Accepted-OAuth-Scopes lists the scopes that the action checks for.
| Name | Description |
|---|---|
| (no scope) | Grants read-only access to public information (including user profile info, repository info, and gists) |
| repo | Grants full access to repositories, including private repositories. That includes read/write access to code, commit statuses, repository and organization projects, invitations, collaborators, adding team memberships, deployment statuses, and repository webhooks for repositories and organizations. Also grants ability to manage user projects. |
| repo:status | Grants read/write access to commit statuses in public and private repositories. This scope is only necessary to grant other users or services access to private repository commit statuses without granting access to the code. |
| repo_deployment | Grants access to deployment statuses for public and private repositories. This scope is only necessary to grant other users or services access to deployment statuses, without granting access to the code. |
| public_repo | Limits access to public repositories. That includes read/write access to code, commit statuses, repository projects, collaborators, and deployment statuses for public repositories and organizations. Also required for starring public repositories. |
| repo:invite | Grants accept/decline abilities for invitations to collaborate on a repository. This scope is only necessary to grant other users or services access to invites without granting access to the code. |
| security_events | Grants: read and write access to security events in the code scanning API read and write access to security events in the secret scanning API This scope is only necessary to grant other users or services access to security events without granting access to the code. |
| admin:repo_hook | Grants read, write, ping, and delete access to repository hooks in public or private repositories. The repo and public_repo scopes grant full access to repositories, including repository hooks. Use the admin:repo_hook scope to limit access to only repository hooks. |
| write:repo_hook | Grants read, write, and ping access to hooks in public or private repositories. |
| read:repo_hook | Grants read and ping access to hooks in public or private repositories. |
| admin:org | Fully manage the organization and its teams, projects, and memberships. |
| write:org | Read and write access to organization membership, organization projects, and team membership. |
| read:org | Read-only access to organization membership, organization projects, and team membership. |
| admin:public_key | Fully manage public keys. |
| write:public_key | Create, list, and view details for public keys. |
| read:public_key | List and view details for public keys. |
| admin:org_hook | Grants read, write, ping, and delete access to organization hooks. Note: OAuth tokens will only be able to perform these actions on organization hooks which were created by the OAuth App. Personal access tokens will only be able to perform these actions on organization hooks created by a user. |
| gist | Grants write access to gists. |
| notifications | Grants: read access to a user’s notifications mark as read access to threads watch and unwatch access to a repository, and read, write, and delete access to thread subscriptions. |
| user | Grants read/write access to profile info only. Note that this scope includes user:email and user:follow . |
| read:user | Grants access to read a user’s profile data. |
| user:email | Grants read access to a user’s email addresses. |
| user:follow | Grants access to follow or unfollow other users. |
| delete_repo | Grants access to delete adminable repositories. |
| write:discussion | Allows read and write access for team discussions. |
| read:discussion | Allows read access for team discussions. |
| write:packages | Grants access to upload or publish a package in GitHub Packages. For more information, see «Publishing a package». |
| read:packages | Grants access to download or install packages from GitHub Packages. For more information, see «Installing a package». |
| delete:packages | Grants access to delete packages from GitHub Packages. For more information, see «Deleting and restoring a package.» |
| admin:gpg_key | Fully manage GPG keys. |
| write:gpg_key | Create, list, and view details for GPG keys. |
| read:gpg_key | List and view details for GPG keys. |
| codespace | Grants the ability to create and manage codespaces. Codespaces can expose a GITHUB_TOKEN which may have a different set of scopes. For more information, see «Security in Codespaces.» |
| workflow | Grants the ability to add and update GitHub Actions workflow files. Workflow files can be committed without this scope if the same file (with both the same path and contents) exists on another branch in the same repository. Workflow files can expose GITHUB_TOKEN which may have a different set of scopes. For more information, see «Authentication in a workflow.» |
Note: Your OAuth App can request the scopes in the initial redirection. You can specify multiple scopes by separating them with a space using %20 :
Requested scopes and granted scopes
The scope attribute lists scopes attached to the token that were granted by the user. Normally, these scopes will be identical to what you requested. However, users can edit their scopes, effectively granting your application less access than you originally requested. Also, users can edit token scopes after the OAuth flow is completed. You should be aware of this possibility and adjust your application’s behavior accordingly.
It’s important to handle error cases where a user chooses to grant you less access than you originally requested. For example, applications can warn or otherwise communicate with their users that they will see reduced functionality or be unable to perform some actions.
Also, applications can always send users back through the flow again to get additional permission, but don’t forget that users can always say no.
Check out the Basics of Authentication guide, which provides tips on handling modifiable token scopes.
When requesting multiple scopes, the token is saved with a normalized list of scopes, discarding those that are implicitly included by another requested scope. For example, requesting user,gist,user:email will result in a token with user and gist scopes only since the access granted with user:email scope is included in the user scope.
Help us make these docs great!
All GitHub docs are open source. See something that’s wrong or unclear? Submit a pull request.
Источник


