- Login with Google Using Firebase Authentication in Android Studio (Tutorial)
- How Does It Work? (Video)
- Login with Google Using Firebase in Android Studio (Step by Step)
- Create a new project in Android Studio
- Adding Firebase to Android Project
- Building UI
- Adding functionality
- Running the application
- Авторизация через Google в Android и проверка токена на сервере
- Небольшая подготовка
- Добавляем действие на кнопку
- Необходимые области доступа
- Регистрация нашего приложения.
- Код получения токена
- Проверяем токен на сервере. (PHP)
- Google Login and Logout in Android With Firebase (Kotlin Implementation)
Login with Google Using Firebase Authentication in Android Studio (Tutorial)
Do you want to make your users fall in love with your app by creating a smooth UX through login Google account using Firebase? If yes, go ahead to read on.
I don’t need to emphasize what modern users have become — they want the fastest mobile, fastest internet, and fastest pizza delivery.
You might be thinking what’s wrong on asking the critical pieces of information like email, first and last name, and password.
The problem is that users are addicted to the apps that allow instant sign in with Google.
Furthermore, you must understand one fundamental rule in your life to be good at anything. You have to follow the best competitors in the world.
What does it mean?
It means you’ll need to follow the same standards, frameworks, and techniques that the best competitors implement in their apps since they’ve hired the best CRO, ASO and copywriter experts.
TL;DR of the feature is that it:
- Saves time for both the developers and the end-users.
- Gets all the information that you need like: name & emails
How Does It Work? (Video)
More than a billion users are already signed in with Google Play with their Google accounts. When an app authenticates and gets all the information from Google Play.
If a user isn’t signed in with Google Play, it’s essential to sign in to enjoy the app that is an unlikely cause.
Login with Google Using Firebase in Android Studio (Step by Step)
Create a new project in Android Studio
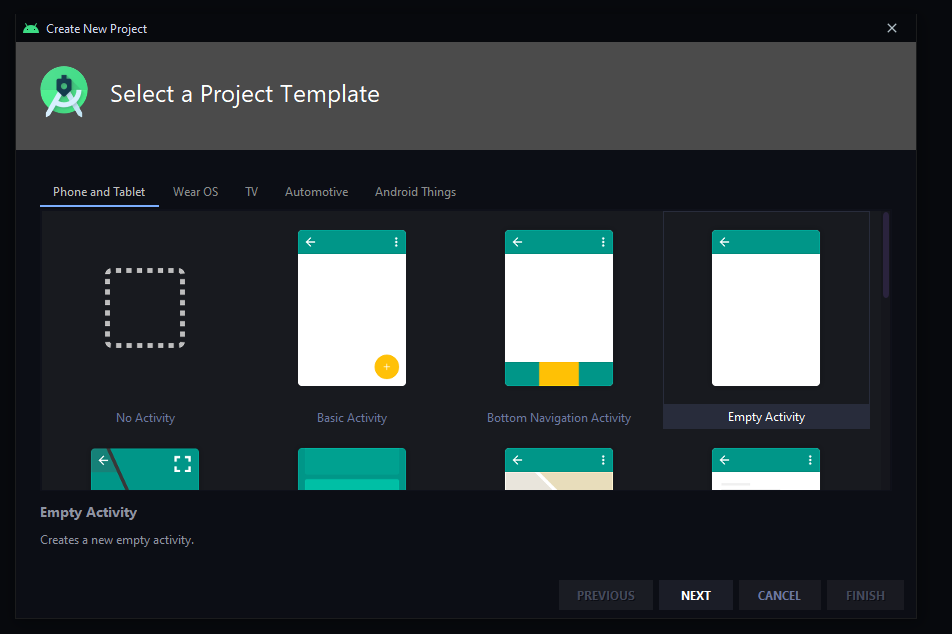
Create a New Project in Android Studio. How? You need to click on File -> New -> New Projects.
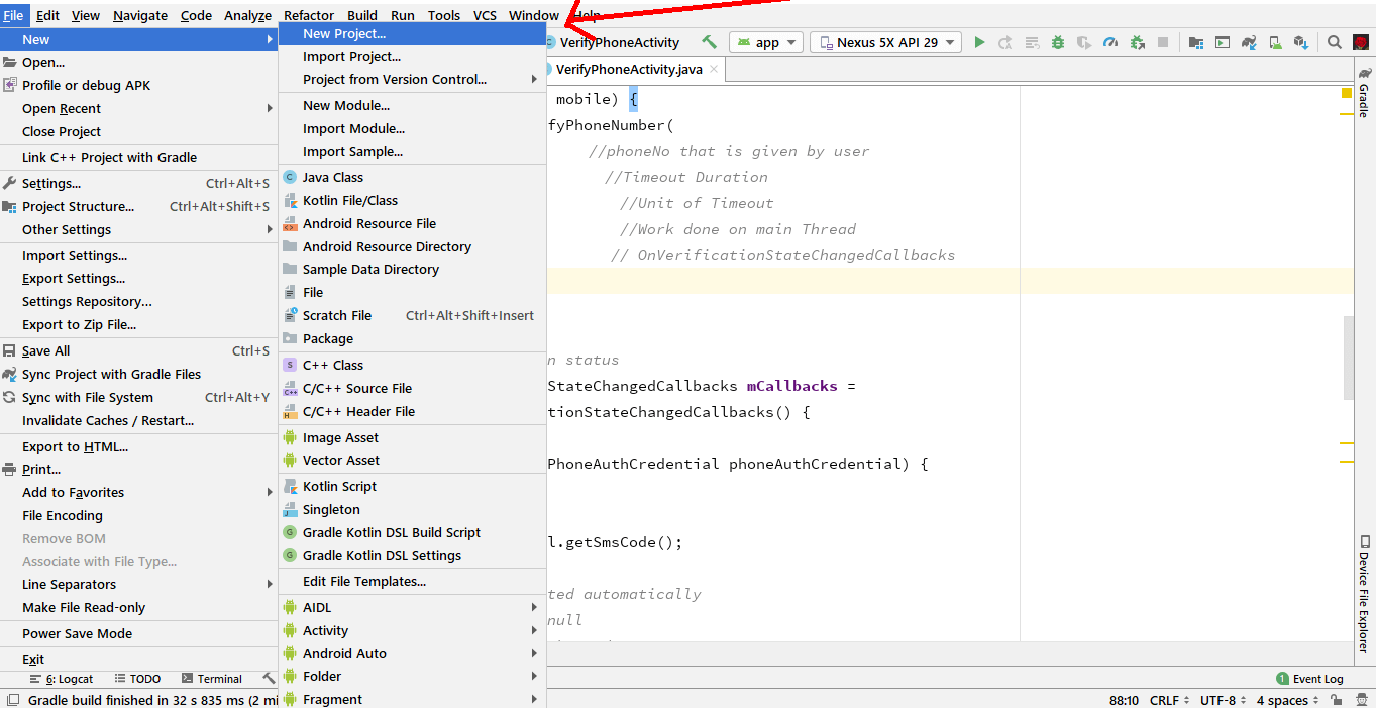
Click on Empty Activity -> Next
![]()
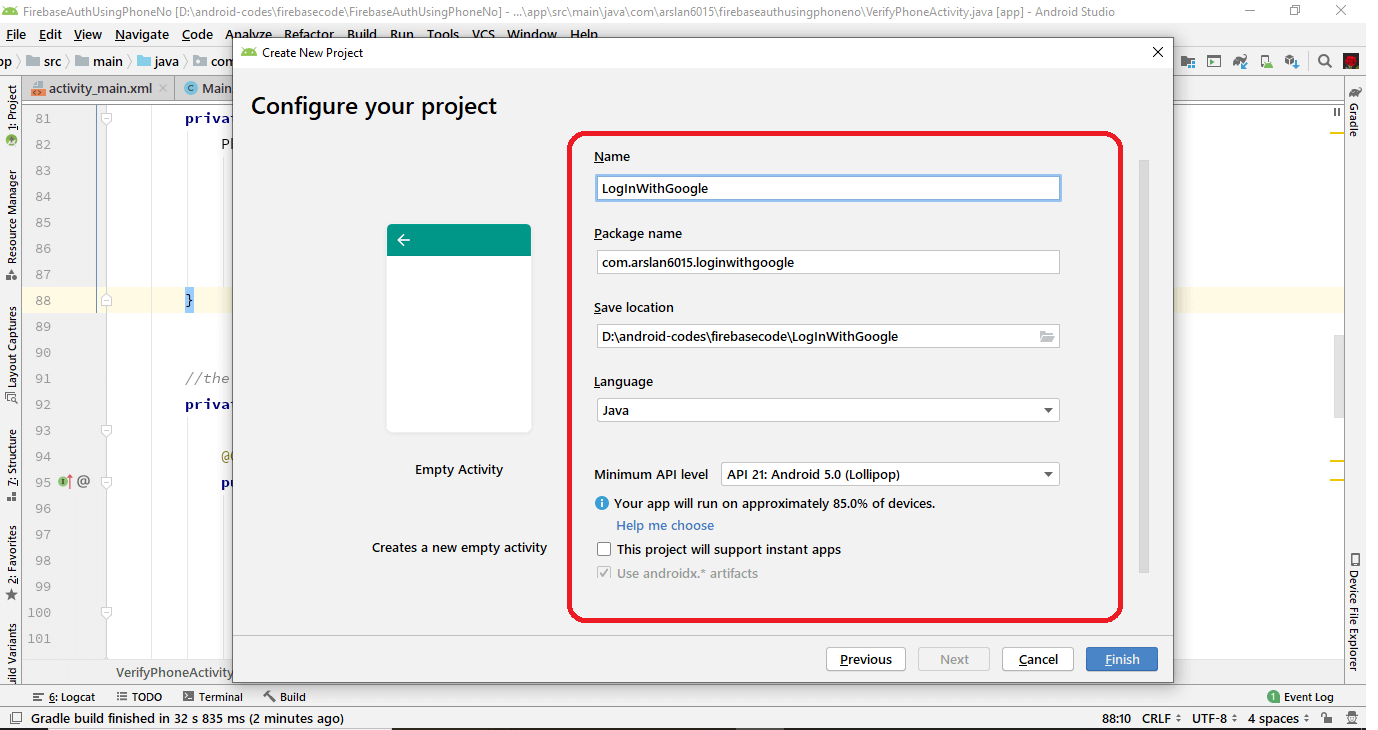
Enter Name -> and Click Next
Adding Firebase to Android Project
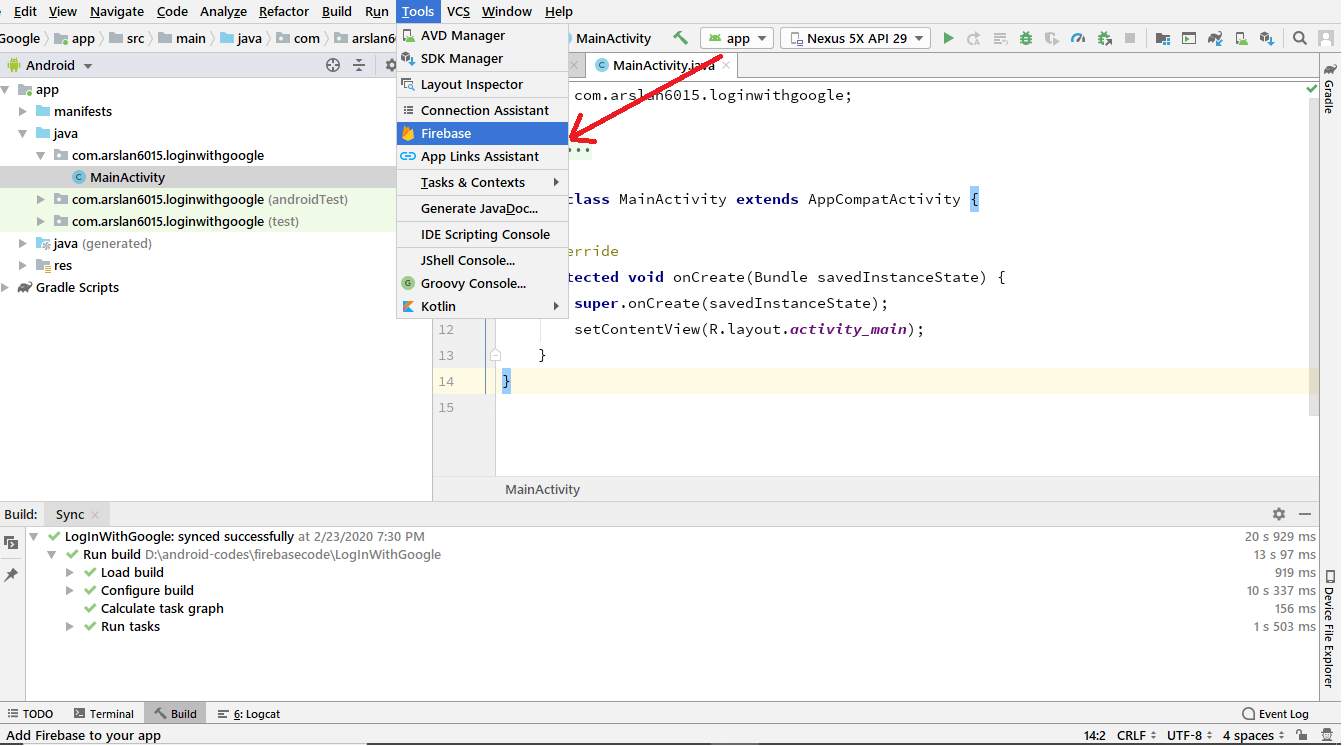
Add Firebase to your project.
by clicking on Tools -> Firebase
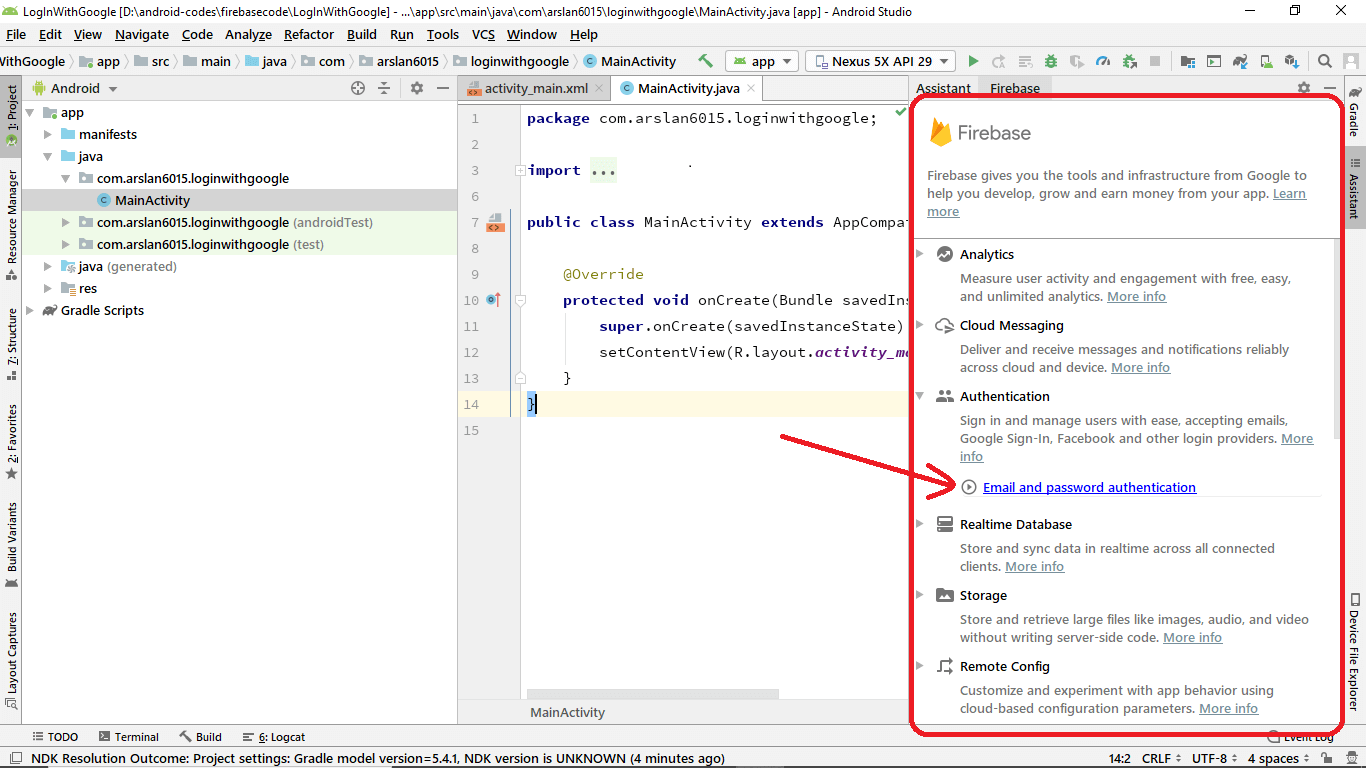
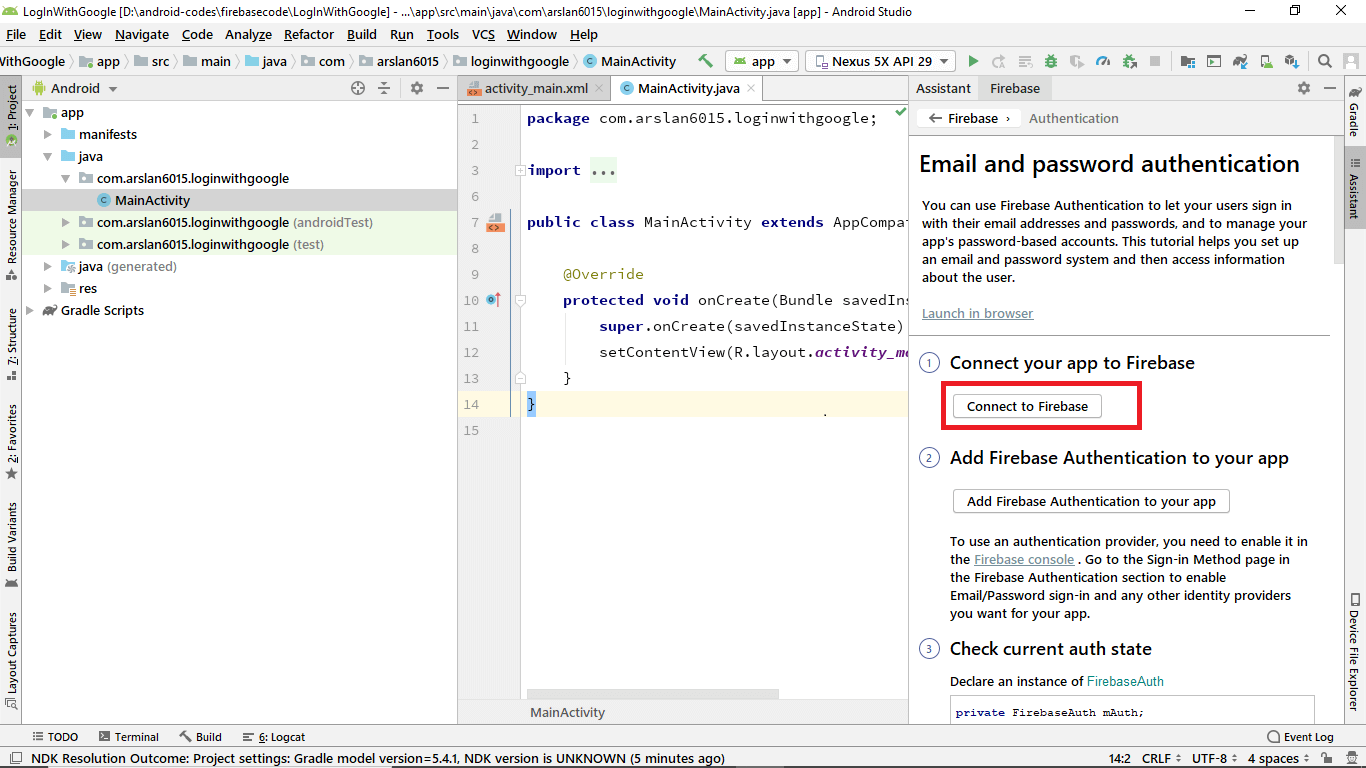
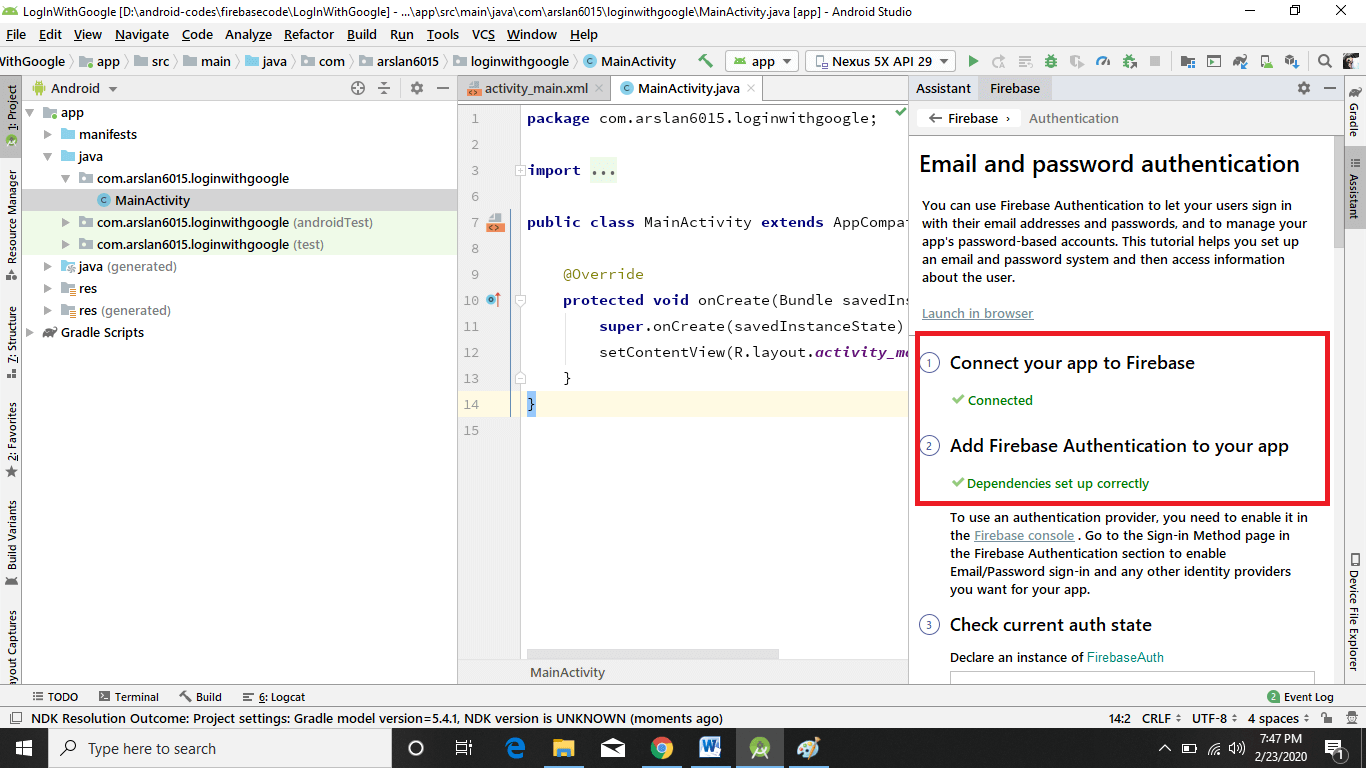
Now Firebase Assistant is open on the right side as you can see in the image below, then click on Email and Password Authentication.
Now click Connect to Firebase
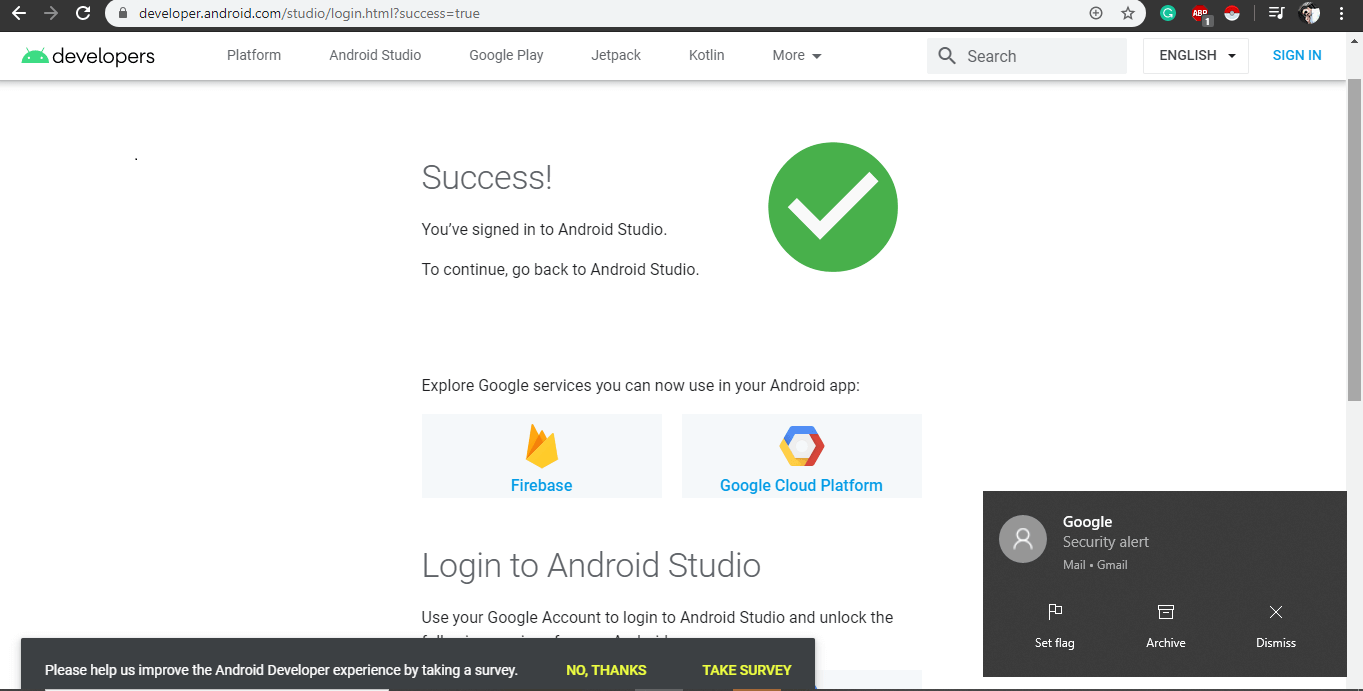
Now if you are not signed with Android Studio then a window appears in the browser where you’ll need sign in to Google account.

Then click Next.

Now you are logged in on Android Studio and an email is also sent through google to your computer stating that “You’ve signed in with Android Studio“.
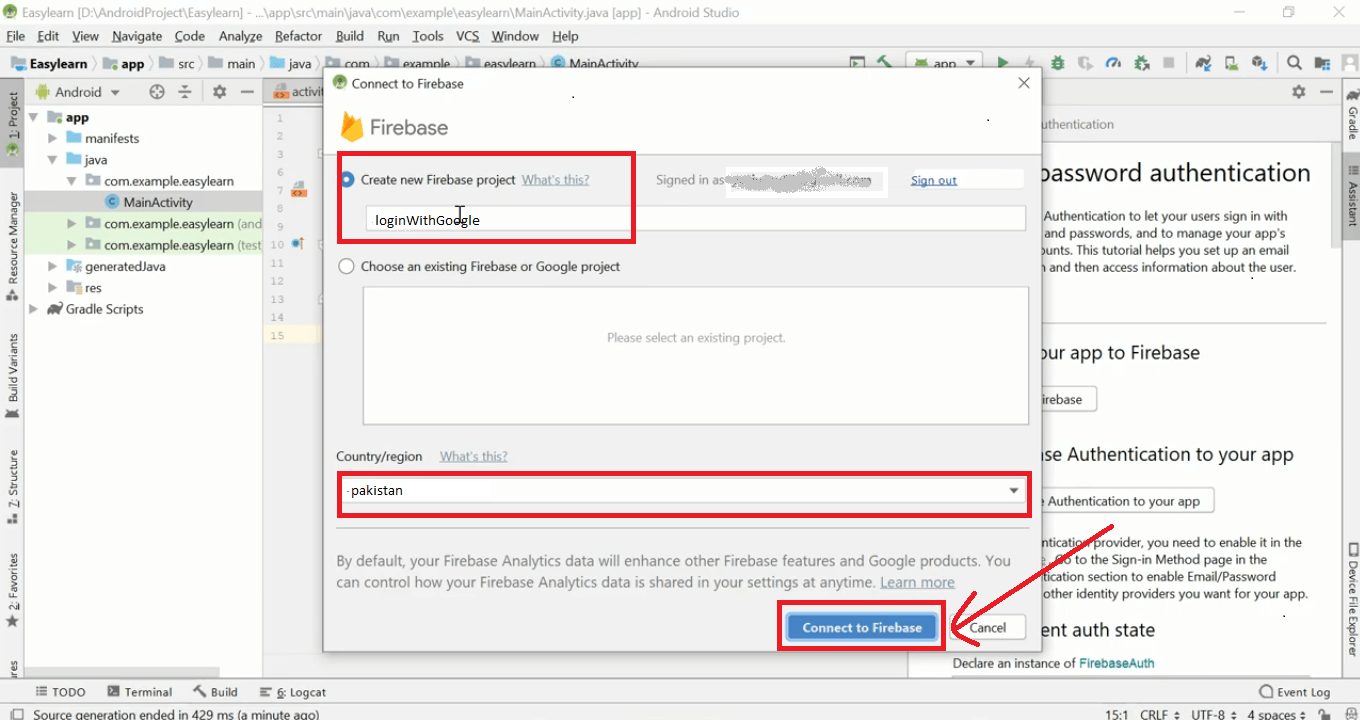
Now open Android Studio you can see a popup box appear just like below. Enter ProjectName (if you want to change) then Select Country and click Connect to Firebase.
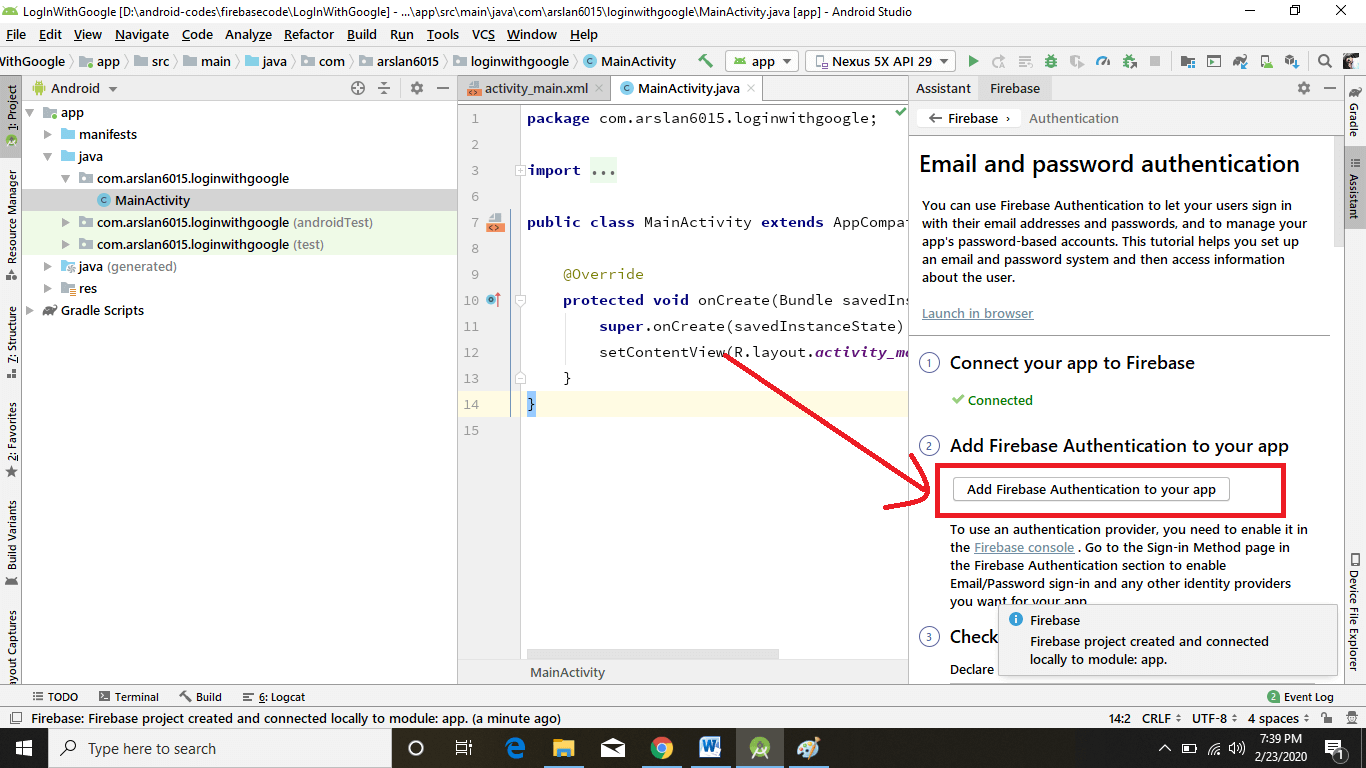
You’re good to go if you see a green color text ✔️ Connected on the bottom right side of the screen. Now click on Add Firebase Authentication to your app.
A popup box appears now click Accept Changes. This will add some dependencies to your project at the app-level and the Project-level.

Now you can see dependencies set up correctly.
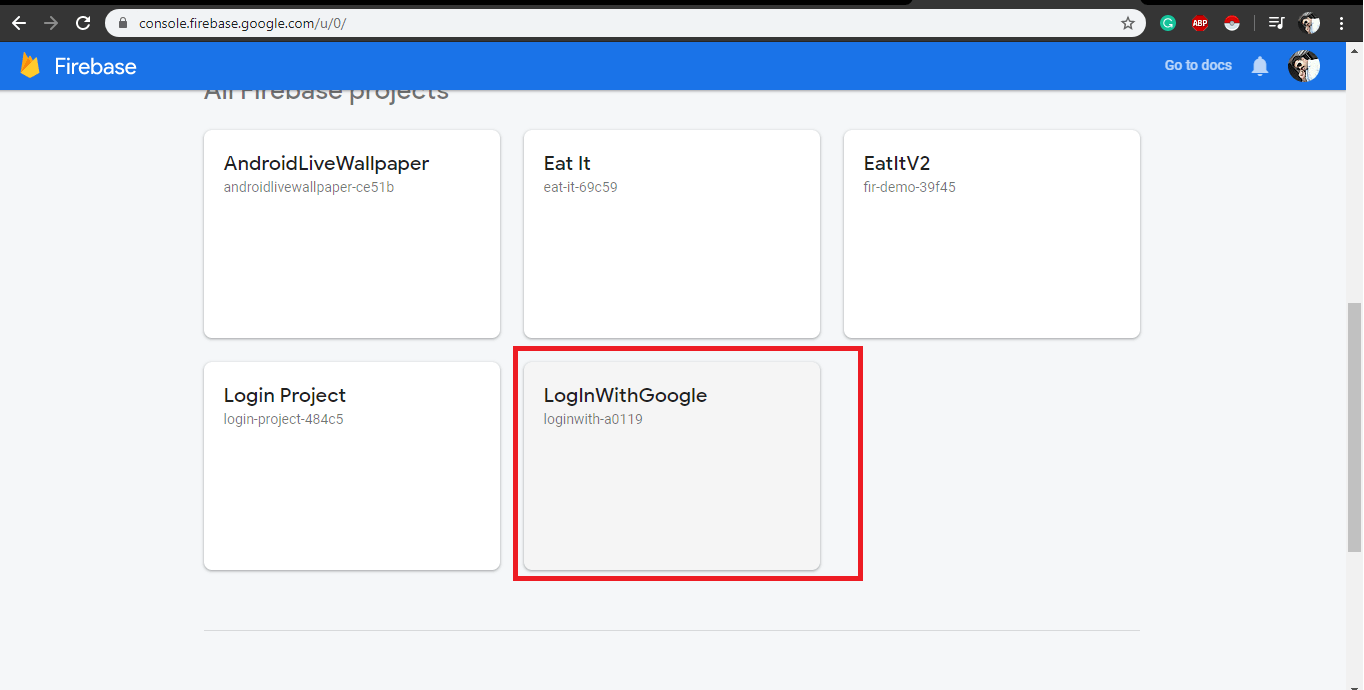
Now open https://console.firebase.google.com/ and log in here with the same account that you are logged in with Android Studio. Now you can see your project has been added. Click on it.
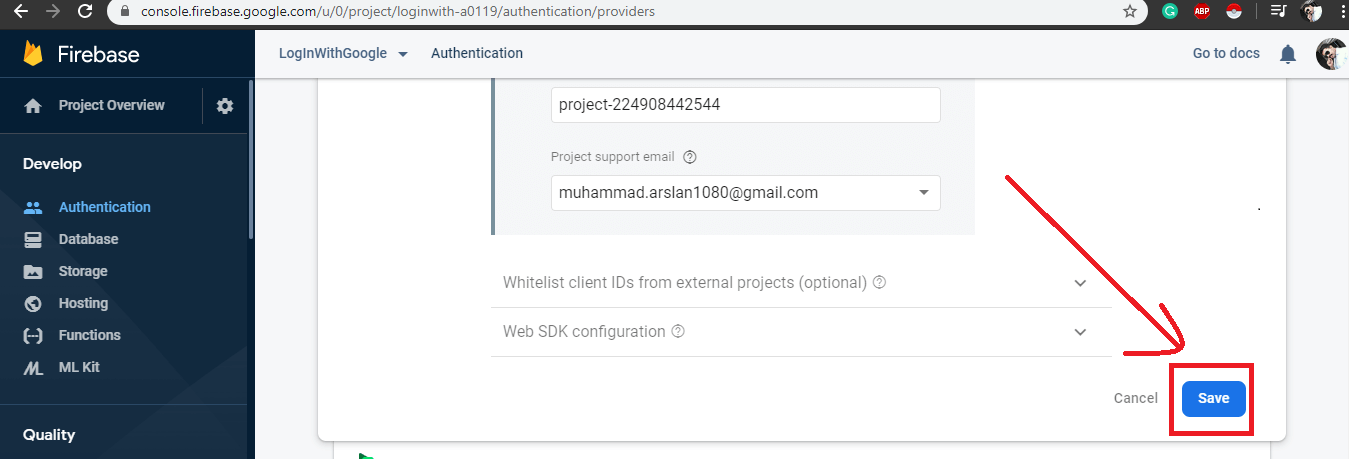
Now click on Authentication Tab -> Sign-In method -> click Google -> Enable Toggle button -> Select Email Address .

Click Save.
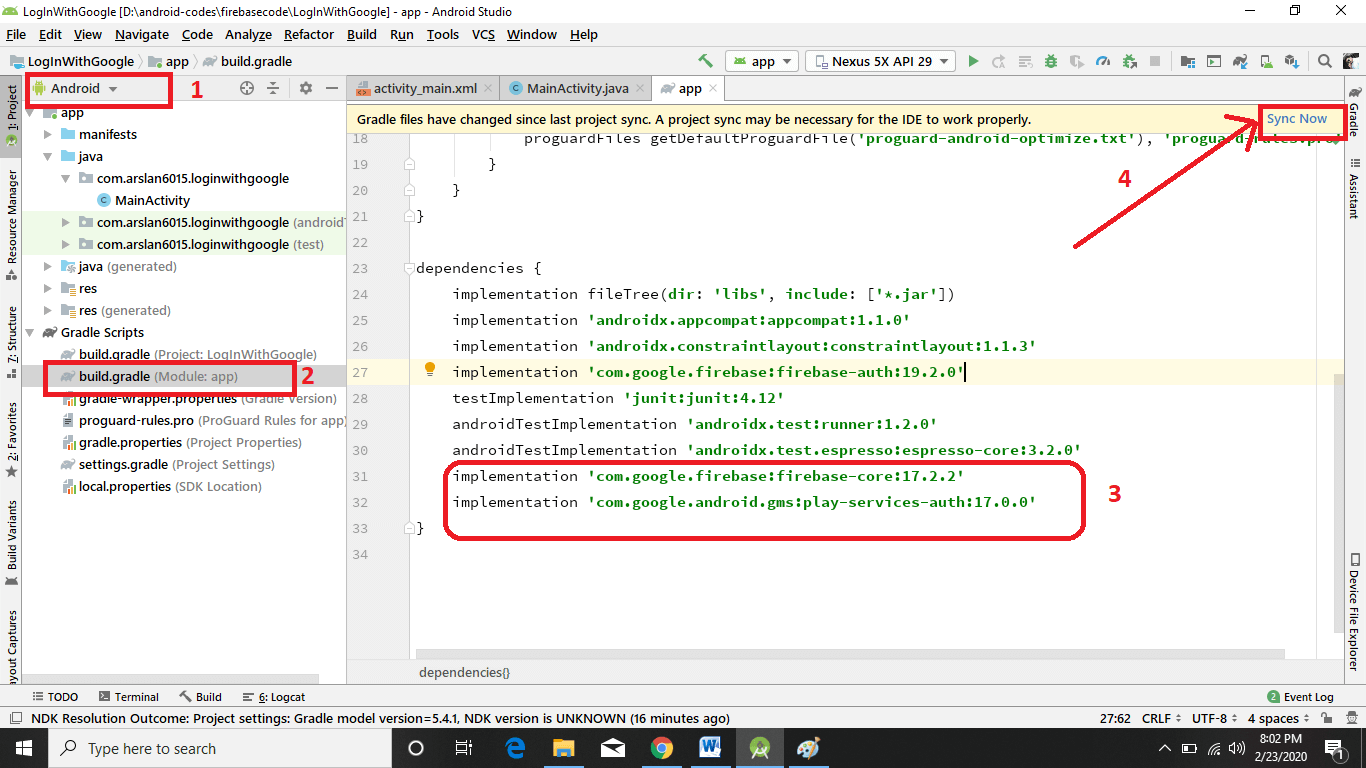
Now open Android Studio -> Select Android -> Gradle Script -> Open build.Gradle file
Now add these two dependencies and click Sync Now.
Building UI
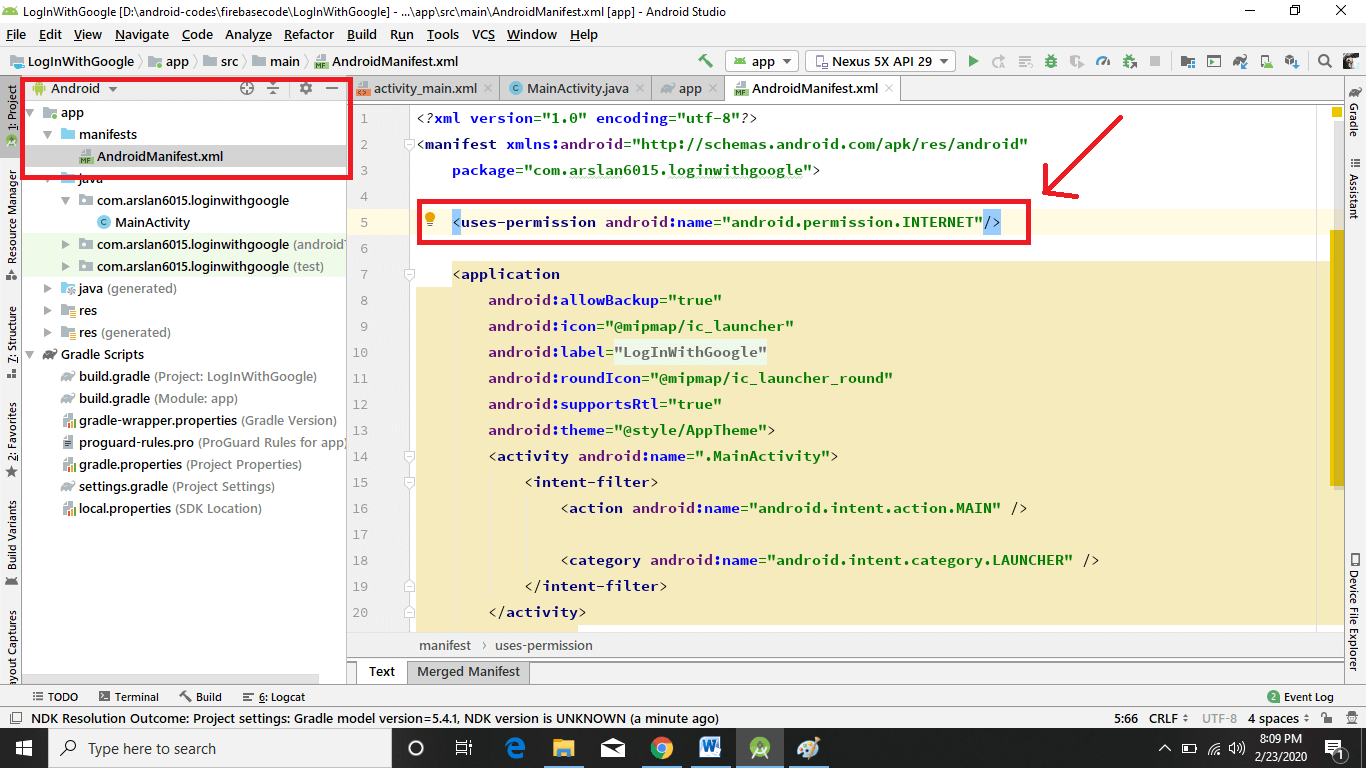
Before we start building the interface and start coding the functionality, we need to add internet permission in the Android Manifest file. I am doing it at the very beginning because I often forget to add it and then start scratching my head that why the code is not working!
Add Internet permission in AndroidManifest.xml
Enter code in activity_main.xml
Adding functionality
Enter code in MainActivity.java
Running the application
Run the app and now you can see the output as shown above in the video and you can also see in Firebase console that a new user is added

I hope you have understood how the Firebase Authentication works with Google, and how you can provide the “Continue with Google” button to your Android App.
Not interested in Google Sign in? You can:
Don’t forget to ask a question. I understand many people feel being an idiot in asking a question, please don’t feel hesitation. I’ll be delighted to answer your simplest or hardest question.
Источник
Авторизация через Google в Android и проверка токена на сервере
Недавно мне захотелось создать личный проект на андроиде, и основной вопрос был такой: как однозначно идентифицировать пользователя заставляя его делать как можно меньше телодвижений? Конечно же это аккаунт Google. Я пытался пробовать множество примеров в сети — однако API несколько раз обновилось за время своего существования, многие методы не работали, мои вопросы в Google+ по этому поводу либо были вообще никак не восприняты окружением, либо были вроде «Никогда такое не делал».
В этой статье я постараюсь как можно более просто для новичков (вроде меня) описать мой метод авторизации в Google на андроид, получения токена и проверке этого самого токена на сервере.
Небольшая подготовка
Для начала — у вас должны быть установлены Google Play Services в SDK. После их установки можно будет импортировать все необходимые библиотеки. Статья пишется с расчетом на Android Studio — он сам подсказывает, что необходимо импортировать.
У вас должно быть создано активити с кнопкой.
Чтобы было привычнее пользователю можете создать стандартную кнопку Google+ Sing-In
Выглядеть она будет вот так: 
Просто добавьте в ваш Layout:
Добавляем действие на кнопку
Пишем в нашем активити:
Собственно присвоим кнопке действие — вызов интенда выбора аккаунта. Если вы работаете в Android Studio он сам вам подскажет, какие библиотеки нужно импортировать, так что это подробно тут я расписывать не буду.
startActivityForResult(intent, 123); — задает код с которым произойдет возврат. 123 это код возврата, он может быть каким угодно. Это необходимо, когда вы делаете несколько интендов, и вам надо обработать их по разному.
Необходимые области доступа
Обьявите эти переменные в классе. Это необходимые нам области доступа. Первый написано в google: «Позволяет определить аутентифицированного пользователя. Для этого при вызове API необходимо указать me вместо идентификатора пользователя Google+. » Второе разрешение нам необходимо для получения личных данных пользователя (Имя, Фамилия, адрес G+ страницы, аватар), и последнее для получения E-mail. Я посчитал это важным, ведь это вполне неизменный идентификатор для записи в бд.
Регистрация нашего приложения.
Изначально забыл этот пункт — исправляюсь.
Нам необходимо зайти на code.google.com/apis/console создать там проект, зайти в Credentials и создать новый Client ID для OAuth выбрав пункт Installed Application -> Android. Там нам необходимо ввести название нашего пакета и SHA1 сумму нашего ключа.
С этим у меня на самом деле было много проблем решил достаточно костыльным способом.
Нашел debug.keystore в %USERPROFILE%\.android\debug.keystore поместил в папку с проектом и прописал в build.grandle:
После чего нам нужно выполнить команду:
keytool -exportcert -alias androiddebugkey -keystore
/.android/debug.keystore -v -list
Сам keytool можно найти в SDK. Из вывода копируем SHA1 в нужное поле.
Как я понимаю метод временный, и для нормальной работы надо создать нормальный ключ. Но для тестирования этого достаточно.
Код получения токена
Где 123 — ваш код, который вы указали ранее, где AcrivityName — название вашего актитивити. Грубо говоря — мы скармливаем функции получения токена необходимые разрешения и имя аккаунта. И заметьте — это все происходит в фоновом режиме, после чего полученный токен передается в написанную мною функцию reg. Она уже отправляет токен и все необходимые данные на сервер.
Так как разрабатываю недавно, с исключениями пока что беда, если есть предложение — напишите в личку или в комментарии.
Проверяем токен на сервере. (PHP)
Хочу обратить внимание, полученный нами токен имеет тип Online. И действует он лишь 10 минут. Для получения offline токена (чтобы дольше работать с ним с сервера) обратитесь к этой инструкции developers.google.com/accounts/docs/CrossClientAuth
Собственно скармливаем токен в googleapis и забираем полученный JSON ответ.
Источник
Google Login and Logout in Android With Firebase (Kotlin Implementation)

A detailed explanation of how to implement Google Login and Logout in your Android App
Google Sign-In is a secure way to authenticate users in your apps. It reduces the hassle of dealing and handling those extra passwords by the user to get authenticated to the app. One can use the same Google login option to authenticate to multiple apps. This saves us from clicking that “Forgot Password?” button every time someone forgets the login password.
These days most of the apps we use have an option of Google Login for user authentication thereby the user experience easy and effective.
In this article, I am going to demonstrate the implementation of Google Login-and Logout using Firebase in Kotlin using Android Studio. Let’s get started:)
Step 1: Create an Android Studio project by selecting an empty activity. You can name your project in any way you want, I have named it GoogleLoginLogOut. Do not forget to select the language as Kotlin. Select the minimum SDK version 21 ie. Android 5.0 Lolipop.

Step 2: Add Firebase to your Android Studio Project as shown below.
- Click on tools, then click on Firebase.

2. Click on Authentication in the Firebase Assistant and then select Email and Password Authentication. After this, you will see the option for Connecting to Firebase, you need to click on that option.

3. Now you’ll be directed to the firebase console page on your browser where you have to create a project by clicking on “Add Project”. Then click on continue. Kindly disable Google Analytics for this project. We don’t need it for now.

4. Click on “Create Project” and click on “Connect”. Now you will see that Firebase is connected to your Android Studio Project.

Click on “Add Firebase Authentication to your app” to set up the dependencies correctly.


Step 3: To enable the authentication provider, we need to include some dependencies in the App Level Gradle file which are given as follows.
Add the following dependency to Project Level Gradle
Click on “Sync Now” after adding these dependencies.

You can see that the build is successful and dependencies are set up correctly. To authenticate your client, add your SHA-1 to your firebase project in the firebase console. To obtain your SHA-1 fingerprint, run the signing report in Android Studio.
Now, go to the firebase console and open your project there. Click on project settings and then click on “Add a fingerprint” and paste your SHA-1 fingerprint there and save it.
Step 4: Now we need to select the Sign-In Method. For this, go to Authentication in Firebase Console on your browser, click on the “Sign-In Method”. You’ll see the option for Google Sign-In. Enable it, add your email id and save it.

Step5: Now we can start implementing Google Sign-In in our Android Studio project by adding some code.
Before integrating google sign-in, let’s work a little bit on the UI of the app. We need to create an empty activity named LoginScreen.kt that takes us to the MainActivity of our app.

Set the LoginScreen.kt as the launcher activity while creating it.
Now for the UI of the login screen, we need to add the following code in activity_login_screen.xml.
This is how our login screen looks after adding the above XML code. By clicking on the button we will be directed to MainActivity.kt where we will implement Google Logout.

Step 6: Now we will be integrating Google Login in our app. Add the following code to LoginScreen.kt
- First, we get the shared instance of the FirebaseAuth object, Req Code and GoogleSigninClient in LoginScreen.kt
2. We have to configure the GoogleSignInOptions object, call requestIdToken in LoginScreen.kt
You must pass the server’s client ID to the requestIdToken method. This is done in the following way:
Click on this page to get the server’s client ID. Then click on “Configure Project”. Then select your project in the drop-down list. In my case it is GoogleLoginLogout.

Copy your package name and SHA-1 fingerprint and paste in the following dialog box where you have to configure the Auth Client.

Copy the client ID after clicking on “Create” and pass it inside the requestIdToken method as a String resource.
Step 7: After this, we have to create signInGoogle() function, onActivityResult() and handleResult() function LoginScreen.kt.
Step 8: Make a Kotlin object named SavedPreference in order to access the user credentials anywhere in the app and add the following code there:
Step9: Now we have to call the signInGoogle() method on click of the button in the login screen that we made earlier. This is done in on create method of LoginScreen.kt.
Step10: To ensure that we directly reach MainActivity when the account is Logged in, we add the following code in LoginScreen.kt as well:
This completes Google Login Implementation in Android Studio using Firebase. When I log in to my app using my Gmail ID, it takes me to the MainActivity and my user credentials automatically update in the Firebase Authentication user list as follows.

Step11: Since GoogleLogin is implemented, we will now proceed with the implementation of Google Logout.
Inside activity_main.xml create a button which when clicked, logs out the user from the app. Add the following code to activity_main.xml for the same.
Step12: Now we will implement the Logout on click of the “LOGOUT” button. This directs us to the login screen again. The following code is written in MainActivity.kt to make the Logout feature functional.
We have to configure the GoogleSignInOptions object, call requestIdToken in Mainactivity.kt as follows:
After this, we will implement logout on click of the LOGOUT button
Clicking this logs us out of our app and so that we can log in again with some other Gmail ID or the same ID if we want.
So this was the entire implementation of Google login and Google logout using Firebase. You can integrate this feature in your android apps to ease out user authentication.
Kindly try implementing this feature and tell me how did you like the tutorial.
Leave your suggestions in the comments below about what tutorials should I make further.
If you liked the implementation please do not forget to click the 👏 button. Thank you:)
Kindly check the project on my Github account for more reference
Источник


