- Gradle
- Задаём имя APK при компиляции
- Оптимизатор кода R8
- Сжимаем итоговый APK
- Класс BuildConfig
- Разделяем отладочную и финальную версию
- Прячем секретную информацию
- Автогенерация версии кода
- settings.gradle
- gradle.properties (Project Properties)
- Режим параллельного выполнения
- Gradle-демон
- Режим конфигурации при необходимости
- Меняем номер версии библиотек в одном месте
- Настройки в Android Studio
- Gradle Task
- Узнать debug.keystore: MD5 и SHA1
- Gradle Console
- Terminal
- Добавление зависимостей через интерфейс студии
- Дополнительное чтение
- Add build dependencies
- Dependency types
- Groovy
- Kotlin
- Groovy
- Kotlin
- Groovy
- Kotlin
- Groovy
- Kotlin
- Groovy
- Kotlin
- Groovy
- Kotlin
- Native dependencies
- Dependency configurations
- Groovy
- Kotlin
- Deprecated Gradle configurations (available in AGP 1.0–4.2)
- Groovy
- Kotlin
- Groovy
- Kotlin
- Groovy
- Kotlin
- Add annotation processors
- Groovy
- Kotlin
- Pass arguments to annotation processors
- Groovy
- Kotlin
- Groovy
- Kotlin
- Groovy
- Kotlin
- Disable the annotation processor error check
- Groovy
- Kotlin
- Groovy
- Kotlin
- Exclude transitive dependencies
- Groovy
- Kotlin
- Exclude transitive dependencies from test configurations
- Groovy
- Kotlin
- Configure Wear OS app dependencies
- Groovy
- Kotlin
- Groovy
- Kotlin
- Remote repositories
- Groovy
- Kotlin
- Groovy
- Kotlin
- Groovy
- Kotlin
- Google’s Maven repository
- Groovy
- Kotlin
- Groovy
- Kotlin
- Programmatic access
- Offline repository from SDK Manager
- Native dependencies with the Android Gradle plugin
- Using native dependencies
- Native dependencies in AARs
- Build system configuration
- Groovy
- Kotlin
- Publishing native libraries in AARs
- Groovy
- Kotlin
- Dependency order
- View module dependencies
- Fix dependency resolution errors
- Fix duplicate class errors
- Fix conflicts between classpaths
- Apply custom build logic
- Publish variant dependencies to custom logic
- Custom dependency resolution strategies
- Groovy
- Kotlin
- Dependency information for Play Console
Gradle
Gradle — система автоматической сборки, построенная на принципах Apache Ant и Apache Maven. В Eclipse использовалась система Ant, но большинство разработчиков даже не замечало её работы. В основном возможности системы использовались в конторах для автоматизации различных задач. В Android Studio такой номер не пройдёт. Gradle сопровождает вас во время разработки постоянно. Поначалу, если вы перешли с Eclipse, Gradle сильно раздражает своими действиями. Но позже вы оцените её удобство и может даже полюбите её.
Gradle не является изобретением для Android Studio, система была разработана раньше и использовалась в приложениях для Java, Scala и других языках.
Система сборки Gradle очень мощная и сложная, чтобы о ней рассказать в двух словах. Есть целые книги о ней. Сами команды в Gradle представляют собой обычный текст с использованием синтаксиса Groove для конфигурации. Но нам не нужно знать всё. Познакомимся поближе с системой и научимся пользоваться ей.
Создайте новый проект или откройте любой существующий проект из Android Studio и посмотрите на структуру проекта.
В последних версиях студии файлы Gradle выделили в отдельную папку Gradle Script. Раскройте её. В основном вас должен интересовать файл build.gradle, который относится к модулю. Рядом с этим файлом в скобках будет написано Module: app. Двойным щелчком откройте его, вы увидите, что файл является текстовым.
Также есть файл build.gradle, который относится к проекту. Но с ним работают реже. Так находятся настройки для репозиториев и самого Gradle.
Вернёмся к файлу модуля, вы увидите много интересной информации. Например, вы там можете увидеть настройки, которые раньше вы могли видеть в манифесте — номера версий, номера SDK и так далее. Забегая вперёд, скажу, что здесь можно добавить всего одну волшебную строчку и нужная библиотека сама скачается из интернета и установится в проекте. Красота!
Однако вернёмся в корневую папку. Кроме файлов build.gradle мы можем заметить файлы gradle.properties, settings.gradle и другие. Трогать их не нужно.
В корневой папке также есть файлы gradlew и gradlew.bat для работы с Gradle Wrapper. В принципе вам не нужно знать о них ничего. Но для параноиков есть информация — если вы часто импортируете проекты из неизвестных источников, то они содержат файл gradle/wrapper/gradle-wrapper.properties. Откройте его текстовым редактором и посмотрите на адрес у distributionUrl. Путь должен вести на официальный сай //services.gradle.org или на внутренний корпоративный сервер. Другие адреса должны вызвать тревогу.
Вы могли заметить, что по сравнению с Eclipse изменилась структура файлов. В папке app находится папка src, а ней папка main, в которых папки java, res и файл манифеста. Новая структура лучше отвечает требованиям Gradle для управления файлами.
Вы, например, можете создавать альтернативные папки с ресурсами и с помощью build.gradle подключить их к проекту.
В этом примере мы указали, что существуют новая папка presentations в папке /src/main/ наряду с существующими папками java и res. Внутри созданной папки есть ещё две папки layout и animations, которые содержат файлы ресурсов.
Только помните, что вам нужно избегать конфликта имён при слиянии всех файлов при сборке.
Значение sourceSets указывает Gradle, какие папки следует использовать. Этим приёмом пользуются продвинутые программисты. Мы пока не будем использовать такую технику.
Другая полезная возможность — создавать разные версии приложений, например, демо-версию и платную версию. Немного об этом рассказано здесь.
Номер версии приложения и требования к версии Android прописаны в секции defaultConfig. Если у вас сохранились старые версии приложений, то в манифесте можете удалить данные записи. По-моему, там даже выводится соответствующая подсказка. Даже если вы эти данные в манифесте не удалите, то значения из gradle.build имеют больший приоритет и перепишут значения в манифесте при не совпадении.
Подключение библиотеки происходит одной строчкой. Например, нужно добавить библиотеку Picasso:
В Android Studio 3.0 используется новая версия Gradle, в которой compile считается устаревшей. Вместо него следует использовать новое слово implementation.
Есть похожая команда, которая подключает библиотеку, которая будет использоваться только для отладки приложения и в релизной версии она не нужна.
Далее включаете синхронизацию и через несколько секунд в папке появляется нужная библиотека, готовая к использованию. Сама библиотека скачивается с специального хранилища-репозитория JCenter. Данный репозиторий используется по умолчанию и прописан в buil.gradle проекта.
Можно указать другой репозиторий, например, Maven Central.
Для поиска через Maven-репозиторий используйте The Central Repository Search Engine.
Библиотеку можно подключать и старым способом, используя jar-файл, но такой способ уходит в прошлое.
Сам файл нужно скопировать в папку /libs.
При любом изменении файла недостаточно его сохранить. Нужно также произвести синхронизацию. Наверху обычно появляется жёлтая полоска с ссылкой Sync Now.
Задаём имя APK при компиляции
Можно задать собственное имя при компиляции проекта. Например, так.
Получим имя MyName-1.0.12-release.apk
Оптимизатор кода R8
Оптимизатор кода R8 имеет следующие возможности: урезание байт-кода, сжатие, обфускация, оптимизация, удаление «синтаксического сахара», преобразование в DEX. Оптимизатор может производить все операции за один шаг, что даёт сильное улучшение производительности. R8 был введён в Android Gradle plugin 3.3.0. Вам нужно только включить его.
R8 разработан для работы с существующими ProGuard-правилами, хотя возможны ситуации, когда нужно переработать правила.
Сжимаем итоговый APK
В Gradle 1.4 появилась возможность сжать итоговый файл, убрав неиспользуемые ресурсы, в том числе из библиотек, например, Google Play Services.
Во время сборки приложения вы можете увидеть строку:
Другой способ убрать неиспользуемые ресурсы конфигурации. Например, вам не нужные локализованные ресурсы для всех языков, которые входят в библиотеку Google Play Services или Android Support Library и др. Оставим только нужные языки. Возможно, вы также не хотите поддерживать mdpi или tvdpi-разрешения в своём приложении. Мы можем установить языки и разрешения, которые используются в приложении, остальные будут исключены, что позволит уменьшить вес приложения.
Можно перенести ключи из манифеста.
Чтобы их не светить, например, если выкладывать код на Гитхабе, то сделаем так.
И в манифесте переделаем код.
В большинстве случаев это сработает, но иногда ключ требуется при компиляции и указанный пример может не сработать. В таком случае применяют другой вариант через manifestPlaceholders.
В манифесте пишем.
Класс BuildConfig
В статье LogCat упоминался способ быстрого отключения журналирования.
Суть в следующем. Когда вы создаёте новые переменные в блоках defaultConfig или buildTypes (ветки debug и release), то Gradle создаёт специальный класс BuildConfig, и вы можете получить доступ к этим переменным.
Например, добавим переменную в defaultConfig
На языке Java это равносильно String YOUR_TOKEN = «ABRAKADABRA»;
Теперь мы можем обратиться к созданной строке.
С секцией buildType ситуация интереснее. У секции есть два блока debug и release. Можно создать переменные с разными значениями, которые будут использоваться в зависимости от ситуации. Например, у вас есть собственное API для сервера. Для тестирования вы используете один адрес, а для финальной версии — другой адрес. Тогда вы просто указываете разные адреса в разных ветках. Переменные могут быть не только строковыми.
Создаём код для перехода на веб-страницу.
Теперь вам не нужно переписывать каждый раз код. Загружаться будет страница по нужному адресу автоматически.
Разделяем отладочную и финальную версию
По такому же принципу можно организовать запуск новой версии программы, не затрагивая программу, которую вы установили с Google Play. Допустим вы на своём телефоне установили своё собственное приложение через Google Play. Теперь вам нужно написать новую версию и проверить на своём телефоне. Из-за конфликта имён новое тестируемое приложение перепишет финальную версию или вообще не установится. Поможет следующий трюк.
В специальных переменных applicationIdSuffix и versionNameSuffix мы задаём суффиксы, чтобы избежать конфликта. А в переменной resValue указываем название программы для отладочной и финальных версий, чтобы на устройстве можно было их найти. Не забудьте при этом удалить строковый ресурс app_name в res/values/strings.xml, иначе получите ошибку при компиляции. Теперь можете спокойно запускать приложение с новым кодом, не боясь повредить своё любимое приложение.
Прячем секретную информацию
Следующий совет больше подходит для компаний. Когда подписывается приложение, то нужно указывать пароль, хранилище и т.д. Чтобы их не светить в студии, можно прописать их в переменных и поместить в секцию signingConfigs. Сервер сам найдёт нужные ключи и воспользуется ими в своих сценариях.
Автогенерация версии кода
Нашёл совет, сам не применял. Не обязательно вручную менять версию приложения в атрибутах versionCode и versionName, можно сделать через переменные, а они сами подставятся в нужное место. На любителя.
settings.gradle
Файл settings.gradle обычно состоит из одной строчки.
Это означает, что у вас используется один проект для работы. Если вы будете подключать другие проекты, то здесь появятся новые строки.
gradle.properties (Project Properties)
Несколько советов по настройке файла gradle.properties.
Режим параллельного выполнения
В этом файле можно найти закомментированную строку # org.gradle.parallel=true. Если модули вашего проекта не используют друг друга как зависимости, создавая перекрёстные ссылки, можно включать режим параллельного выполнения, что ускорит скорость сборки до
Gradle-демон
Включение на компьютере демона Gradle даст значительный прирост в скорости сборки.
Режим конфигурации при необходимости
Если в проекте используется много модулей, то можно включить режим конфигурации при необходимости. Ускорение будет заметно при большом количестве используемых модулей:
Меняем номер версии библиотек в одном месте
Очень часто в проекте используются взаимосвязанные библиотеки с одинаковыми номерами.
Можно быстро поменять у всех номера через переменную. Для этого используется секция ext, в которой указывается переменная и номер версии. Затем в секции dependencies номер версии заменяется на имя переменной
Обратите внимание, что одинарные кавычки заменяются на двойные, а символ $ указывает на строковый тип.
Расширенная версия с разными переменными в другом виде.
Если в проекте используются несколько модулей с одинаковыми зависимостями, то эти записи можно перенести в корневой build.gradle, чтобы не менять номера версий в каждом модуле.
Настройки в Android Studio
Рассмотрим настройки, доступные в Android Studio. Закройте текущий проект, чтобы увидеть стартовое окно студии. В правой части нажмите на пункт Configure. В следующем окне выберите пункт Settings, чтобы оказаться в окне настроек студии. В левой части найдите пункт Build, Execution, Deployment, затем подпункт Build Tools, далее подпункт Gradle. По умолчанию, там всё чисто, только указан путь у Service directory path. Это были общие настройки.
Теперь рассмотрим настройки, относящиеся к проекту. Запустите любой проект в Android Studio. Выберите меню File | Settings. . Снова пройдитесь по пунктам Build, Execution, Deployment | Build Tools | Gradle. Вы увидите практически такое же окно с небольшими изменениями. Теперь поле Linked Gradle Projects не будет пустым, а также появятся дополнительные настройки. По умолчанию рекомендуют использовать Use default gradle wrapper.
Gradle Task
На правой стороне Android Studio имеется вертикальная вкладка Gradle, которую можно развернуть. Она содержит список задач (task), которая выполняет Gradle при работе с текущим проектом. Вы можете выделить любую из этих задач и запустить её двойным щелчком. Можно выделить несколько задач.
Узнать debug.keystore: MD5 и SHA1
Иногда требуется узнать значения debug.keystore: MD5 и SHA1. Обычно их получают через командную строку. Но это долго и неудобно, так как нужно помнить все аргументы. Есть способ проще. Открываем вкладку Gradle, нажимаем на кнопку со стрелками Refresh all Gradle Projects. Затем последовательно открываем элементы Tasks | android и запускаем команду signingReport. В нижнем окне Run увидите нужную информацию.
Gradle Console
Когда выполняется какая-то задача Gradle, то ход её выполнения можно увидеть в окне Gradle Console. Открыть её можно через вкладку Gradle Console в нижней правой части студии.
Terminal
Запускать задачи Gradle можно и в окне Terminal.
На панели инструментов имеется значок Sync Project with Gradle Files, которую следует использовать при редактировании файлов Gradle. Как правило, студия также выводит предупреждающее сообщение с ссылкой при изменении файла, которая делает ту же работу.
Добавление зависимостей через интерфейс студии
В статье описывался способ включения библиотеки в проект через редактирование файла build.gradle. Существует альтернативный вариант через настройки студии. Щёлкните правой кнопкой мыши на имени модуля (app) и выберите пункт Open Module Settings (быстрая клавиша F4). В правой части окна находятся вкладки, которые оказывают влияние на файл build.gradle. Например, вкладка Dependencies содержит подключаемые библиотеки.
Чтобы добавить новую зависимость, нажмите на значок с плюсом и выберите нужный вариант, например, Library dependency. Откроется список доступных библиотек из репозитория Maven.
Дополнительное чтение
В примере работы с PDF-файлами в папке assets использована операция запрета на сжатие файлов, которое происходит по умолчанию.
Задачи Gradle — теория для общего развития.
Источник
Add build dependencies
The Gradle build system in Android Studio makes it easy to include external binaries or other library modules to your build as dependencies. The dependencies can be located on your machine or in a remote repository, and any transitive dependencies they declare are automatically included as well. This page describes how to use dependencies with your Android project, including details about behaviors and configurations that are specific to the Android plugin for Gradle. For a deeper conceptual guide to Gradle dependencies, you should also see the Gradle guide for dependency management —but remember that your Android project must use only the dependency configurations defined on this page.
Dependency types
To add a dependency to your project, specify a dependency configuration such as implementation in the dependencies block of your build.gradle file.
For example, the following build.gradle file for an app module includes three different types of dependencies:
Groovy
Kotlin
Each of these requests a different kind of library dependency as follows:
Local library module dependency
Groovy
Kotlin
This declares a dependency on an Android library module named «mylibrary» (this name must match the library name defined with an include: in your settings.gradle file). When you build your app, the build system compiles the library module and packages the resulting compiled contents in the app.
Local binary dependency
Groovy
Kotlin
Gradle declares dependencies on JAR files inside your project’s module_name /libs/ directory (because Gradle reads paths relative to the build.gradle file).
Alternatively, you can specify individual files as follows:
Groovy
Kotlin
Groovy
Kotlin
This is actually shorthand for the following:
Groovy
Kotlin
This declares a dependency on version 12.3 of the «app-magic» library, inside the «com.example.android» namespace group.
Note: Remote dependencies like this require that you declare the appropriate remote repositories where Gradle should look for the library. If the library does not already exist locally, Gradle pulls it from the remote site when the build requires it (such as when you click Sync Project with Gradle Files or when you run a build).
Native dependencies
As of Android Gradle plugin 4.0, native dependencies can also be imported in the manner described in this document.
Depending on an AAR that exposes native libraries will automatically make them available to the build system used by externalNativeBuild . To access the libraries from your code, you must link to them in your native build scripts. In this document, see Using native dependencies.
Dependency configurations
Inside the dependencies block, you can declare a library dependency using one of several different dependency configurations (such as implementation shown above). Each dependency configuration provides Gradle with different instructions about how to use the dependency. The following table describes each of the configurations you can use for a dependency in your Android project. The table also compares these configurations to those that were deprecated as of Android Gradle plugin 3.0.0.
| Configuration | Behavior | ||||||||
|---|---|---|---|---|---|---|---|---|---|
| implementation | Gradle adds the dependency to the compile classpath and packages the dependency to the build output. However, when your module configures an implementation dependency, it’s letting Gradle know that you do not want the module to leak the dependency to other modules at compile time. That is, the dependency is available to other modules only at runtime. Using this dependency configuration instead of api or compile (deprecated) can result in significant build time improvements because it reduces the number of modules that the build system needs to recompile. For example, if an implementation dependency changes its API, Gradle recompiles only that dependency and the modules that directly depend on it. Most app and test modules should use this configuration. | ||||||||
| api | Gradle adds the dependency to the compile classpath and build output. When a module includes an api dependency, it’s letting Gradle know that the module wants to transitively export that dependency to other modules, so that it’s available to them at both runtime and compile time. This configuration behaves just like compile (which is now deprecated), but you should use it with caution and only with dependencies that you need to transitively export to other upstream consumers. That’s because, if an api dependency changes its external API, Gradle recompiles all modules that have access to that dependency at compile time. So, having a large number of api dependencies can significantly increase build time. Unless you want to expose a dependency’s API to a separate module, library modules should instead use implementation dependencies. | ||||||||
| compileOnly | Gradle adds the dependency to the compile classpath only (that is, it is not added to the build output). This is useful when you’re creating an Android module and you need the dependency during compilation, but it’s optional to have it present at runtime. If you use this configuration, then your library module must include a runtime condition to check whether the dependency is available, and then gracefully change its behavior so it can still function if it’s not provided. This helps reduce the size of the final app by not adding transient dependencies that aren’t critical. This configuration behaves just like provided (which is now deprecated). Note: You can’t use the compileOnly configuration with AAR dependencies. | ||||||||
| runtimeOnly | Gradle adds the dependency to the build output only, for use during runtime. That is, it is not added to the compile classpath. This configuration behaves just like apk (which is now deprecated). | ||||||||
| annotationProcessor | |||||||||
| lintPublish | Use this configuration in Android library projects to include lint checks you want Gradle to compile into a lint.jar file and package in your AAR. This causes projects that consume your AAR to also apply those lint checks. If you were previously using the lintChecks dependency configuration to include lint checks in the published AAR, you need to migrate those dependencies to instead use the lintPublish configuration. GroovyKotlinDeprecated Gradle configurations (available in AGP 1.0–4.2)
All of the above configurations apply dependencies to all build variants. If you instead want to declare a dependency for only a specific build variant source set or for a testing source set, you must capitalize the configuration name and prefix it with the name of the build variant or testing source set. For example, to add an implementation dependency only to your «free» product flavor (using a remote binary dependency), it looks like this: GroovyKotlinHowever, if you want to add a dependency for a variant that combines a product flavor and a build type, then you must initialize the configuration name in the configurations block. The following sample adds a runtimeOnly dependency to your «freeDebug» build variant (using a local binary dependency). GroovyKotlinTo add implementation dependencies for your local tests and instrumented tests , it looks like this: GroovyKotlinHowever, certain configurations don’t make sense in this situation. For example, because other modules can’t depend on androidTest , you get the following warning if you use the androidTestApi configuration: Add annotation processorsIf you add annotation processors to your compile classpath, you’ll see an error message similar to the following: To resolve this error, add annotation processors to your project by configuring your dependency using annotationProcessor as shown below: GroovyKotlinNote: Android plugin for Gradle 3.0.0+ no longer supports android-apt plugin. Pass arguments to annotation processorsIf you need to pass arguments to an annotation processor, you can do so using the AnnotationProcessorOptions block in your module’s build configuration. For example, if you want to pass primitive data types as key-value pairs, you can use the argument property, as shown below: GroovyKotlinHowever, when using Android Gradle plugin 3.2.0 and higher, you need to pass processor arguments that represent files or directories using Gradle’s CommandLineArgumentProvider interface. Using CommandLineArgumentProvider allows you or the annotation processor author to improve the correctness and performance of incremental and cached clean builds by applying incremental build property type annotations to each argument. For example, the class below implements CommandLineArgumentProvider and annotates each argument for the processor. The sample also uses the Groovy language syntax and is included directly in the module’s build.gradle file. GroovyKotlinAfter you define a class that implements CommandLineArgumentProvider , you need to create an instance and pass it to the Android plugin using the annotationProcessorOptions.compilerArgumentProvider method, as shown below. GroovyKotlinTo learn more about how implementing CommandLineArgumentProvider helps improve build performance, read Caching Java projects. Disable the annotation processor error checkIf you have dependencies on the compile classpath that include annotation processors you don’t need, you can disable the error check by adding the following to your build.gradle file. Keep in mind, the annotation processors you add to the compile classpath are still not added to the processor classpath. GroovyKotlinIf you use Kotlin and kapt: GroovyKotlinIf you experience issues after migrating your project’s annotation processors to the processor classpath, you can allow annotation processors on the compile classpath by setting includeCompileClasspath to true . However, setting this property to true is not recommended, and the option to do so will be removed in a future update of the Android plugin. Exclude transitive dependenciesAs an app grows in scope, it can contain a number of dependencies including direct dependencies and transitive dependencies (libraries which your app’s imported libraries depend on). To exclude transitive dependencies that you no longer need, you can use the exclude keyword as given below: GroovyKotlinExclude transitive dependencies from test configurationsIf you need to exclude certain transitive dependencies from your tests, the code sample shown above might not work as expected. That’s because a test configuration (e.g., androidTestImplementation ) extends the module’s implementation configuration. That is, it always contains implementation dependencies when Gradle resolves the configuration. So, to exclude transitive dependencies from your tests, you must do so at execution time as shown below: GroovyKotlinNote: You can still use the exclude keyword in the dependencies block as shown in the original code sample from the Exclude transitive dependencies section to omit transitive dependencies that are specific to the test configuration and are not included in other configurations. Configure Wear OS app dependenciesConfiguring dependencies for a Wear OS module is similar to that of any other module; that is, Wear OS modules use the same dependency configurations, such as implementation and compileOnly . Wear modules also support variant-aware dependency management. As a result, if your base app module has a dependency on a Wear module, each variant of the base module consumes the matching variant from the Wear module. If you are building a simple app with a dependency on only one Wear module, where the module configures the same variants as your base module, you need to specify the wearApp configuration in your base module’s build.gradle file as shown below: GroovyKotlinIf you have multiple Wear modules and you want to specify a different Wear module per app flavor, you can do so using the flavor WearApp configuration, as follows (however, you can’t include other dependencies that use the wearApp configuration): GroovyKotlinRemote repositoriesWhen your dependency is something other than a local library or file tree, Gradle looks for the files in whichever online repositories are specified in the repositories block of your build.gradle file. The order in which you list each repository determines the order in which Gradle searches the repositories for each project dependency. For example, if a dependency is available from both repository A and B, and you list A first, Gradle downloads the dependency from repository A. By default, new Android Studio projects specifies Google’s Maven repository and JCenter as repository locations in the project’s top-level build.gradle file, as shown below: GroovyKotlinIf you want something from the Maven central repository, then add mavenCentral() , or for a local repository use mavenLocal() : GroovyKotlinOr you can declare specific Maven or Ivy repositories as follows: GroovyKotlinFor more information, see the Gradle Repositories guide. Google’s Maven repositoryThe most recent versions of the following Android libraries are available from Google’s Maven repository: You can see all available artifacts at Google’s Maven repository index (see below for programmatic access). To add one of these libraries to your build, include Google’s Maven repository in your top-level build.gradle file: GroovyKotlinThen add the desired library to your module’s dependencies block. For example,the appcompat library looks like this: GroovyKotlinHowever, if you’re trying to use an older version of the above libraries and your dependency fails, then it’s not available in the Maven repository and you must instead get the library from the offline repository. Programmatic accessFor programmatic access to Google’s Maven artifacts, you can get an XML list of artifact groups from maven.google.com/master-index.xml. Then, for any group, you can view its library names and versions at: maven.google.com/ group_path /group-index.xml For example, libraries in the android.arch.lifecycle group are listed at maven.google.com/android/arch/lifecycle/group-index.xml. You can also download the POM and JAR files at: maven.google.com/ group_path / library / version / library — version . ext Offline repository from SDK ManagerFor libraries not available from the Google Maven repository (usually older library versions), you must download the offline Google Repository package from the SDK Manager. Then you can add these libraries to your dependencies block as usual. The offline libraries are saved in android_sdk /extras/ . Native dependencies with the Android Gradle pluginAAR libraries can contain native dependencies that the Android Gradle Plugin can consume. AGP is also capable of producing AARs that expose native libraries to their consumers. Using native dependenciesStarting with Android Gradle plugin 4.0, C/C++ dependencies can be imported from AARs linked in your build.gradle file. Gradle will automatically make these available to the native build system, but your build system must be configured to make use of the imported libraries and headers. Since C/C++ dependencies are distributed as AARs, the following links about generic AARs may be helpful:
This document focuses on how to configure your native build system and assumes you’ve already added a C/C++ dependency AAR into your project’s Gradle build environment. Native dependencies in AARsAAR dependencies of your Gradle modules can expose native libraries for use by your application. Inside the AAR, the prefab directory contains a Prefab package, which includes the headers and libraries of the native dependency. Each dependency can expose at most one Prefab package, which comprises one or more modules. A Prefab module is a single library, which could be either a shared, static, or header only library. The package and module names need to be known to make use of the libraries. By convention the package name will match the Maven artifact name and the module name will match the C/C++ library name, but this is not required. Consult the dependency’s documentation to determine what names it uses. Build system configurationAndroid Gradle Plugin 4.0 Android Gradle Plugin 4.1+ The prefab feature must be enabled for your Android Gradle module. To do so, add the following to the android block of your module’s build.gradle file: GroovyKotlinDependencies imported from an AAR are exposed to CMake via CMAKE_FIND_ROOT_PATH. This value will be set automatically by Gradle when CMake is invoked, so if your build modifies this variable be sure to append rather than assign to it. Each dependency exposes a config-file package to your build. These are imported with the find_package command. This command searches for config-file packages matching the given package name and version and exposes the targets it defines to be used in your build. For example, if your application defines libapp.so and it uses cURL, your CMakeLists.txt should include the following: app.cpp is now able to #include «curl/curl.h» , libapp.so will be automatically linked against libcurl.so when building, and libcurl.so will be included with the app. Publishing native libraries in AARsThe ability to create native AARs was first added in AGP 4.1. To export your native libraries, add the following to the android block of your library project’s build.gradle file: GroovyKotlinIn this example, the mylibrary and myotherlibrary libraries from either your ndk-build or CMake external native build will be packaged in the AAR produced by your build, and each will export the headers from the specified directory to their dependents. Dependency orderThe order in which you list your dependencies indicates the priority for each: the first library is higher priority than the second, the second is higher priority than the third, and so on. This order is important in the event that resources are merged or manifest elements are merged into your app from the libraries. For example, if your project declares the following:
Then, the flat dependency order will be as follows: This ensures that both LIB_A and LIB_B can override LIB_C ; and LIB_D is still higher priority than LIB_B because LIB_A (which depends on it) has higher priority than LIB_B . For more information about how manifests from different project sources/dependencies are merged, see Merge multiple manifest files. View module dependenciesSome direct dependencies may have dependencies of their own. These are called transitive dependencies. Rather than requiring you to manually declare each transitive dependency, Gradle automatically gathers and adds them for you. The Android plugin for Gradle provides a task that displays a list of the dependencies Gradle resolves for a given module. For each module, the report also groups the dependencies based on build variant, testing source set, and classpath. The following is sample report for an app module’s runtime classpath of its debug build variant and compile classpath of its instrumented test source set. To run the task, proceed as follows:
For more information about managing dependencies in Gradle, see Dependency management basics in the Gradle User Guide. Fix dependency resolution errorsWhen you add multiple dependencies to your app project, those direct and transitive dependencies might conflict with one another. The Android Gradle plugin tries to resolve these conflicts gracefully, but some conflicts may lead to compile time or runtime errors. To help you investigate which dependencies are contributing to errors, inspect your app’s dependency tree and look for dependencies that appear more than once or with conflicting versions. If you can’t easily identify the duplicate dependency, try using Android Studio’s UI to search for dependencies that include the duplicate class as follows:
The following sections describe the different types of dependency resolution errors you may encounter and how to fix them. Fix duplicate class errorsIf a class appears more than once on the runtime classpath, you get an error similar to the following: This error typically occurs due to one of the following circumstances:
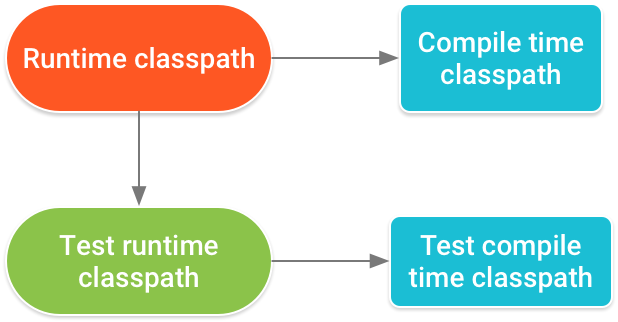
Fix conflicts between classpathsWhen Gradle resolves the compile classpath, it first resolves the runtime classpath and uses the result to determine what versions of dependencies should be added to the compile classpath. In other words, the runtime classpath determines the required version numbers for identical dependencies on downstream classpaths. Your app’s runtime classpath also determines the version numbers that Gradle requires for matching dependencies in the runtime classpath for the app’s test APK. The hierarchy of classpaths is described in figure 1. Figure 1. Version numbers of dependencies that appear across multiple classpaths must match according to this hierarchy. A conflict where different versions of the same dependency appears across multiple classpaths might occur when, for example, your app includes a version of a dependency using the implementation dependency configuration and a library module includes a different version of the dependency using the runtimeOnly configuration. When resolving dependencies on your runtime and compile time classpaths, Android Gradle plugin 3.3.0 and higher attempt to automatically fix certain downstream version conflicts. For example, if the runtime classpath includes Library A version 2.0 and the compile classpath includes Library A version 1.0, the plugin automatically updates the dependency on the compile classpath to Library A version 2.0 to avoid errors. However, if the runtime classpath includes Library A version 1.0 and the compile classpath includes Library A version 2.0, the plugin does not downgrade the dependency on the compile classpath to Library A version 1.0, and you still get an error similar to the following: To resolve this issue, do one of the following:
Apply custom build logicThis section describes advanced topics that are useful when you want to extend the Android Gradle plugin or write your own plugin. Publish variant dependencies to custom logicA library can have functionalities that other projects or sub-projects might want to use. Publishing a library is the process by which the library is made available to its consumers. Libraries can control which dependencies its consumers have access to at compile time and runtime. There are two separate configurations that hold the transitive dependencies of each classpath which must be used by consumers to consume the library as described below:
To learn more about the relationships between the different configurations, go to The Java Library plugin configurations. Custom dependency resolution strategiesA project may include a dependency on two different versions of the same library which can lead to dependency conflicts. For example, if your project depends on version 1 of module A and version 2 of module B, and module A transitively depends on version 3 of module B, there arises a dependency version conflict. To resolve this conflict, the Android Gradle plugin uses the following dependency resolution strategy: when the plugin detects that different versions of the same module are in the dependency graph, by default, it chooses the one with the highest version number. However, this strategy might not always work as you intend. To customize the dependency resolution strategy, use the following configurations to resolve specific dependencies of a variant that are needed for your task:
The Android Gradle plugin includes getters that you can use to access the configuration objects of each variant. Thus, you can use the variant API to query the dependency resolution as shown in the example below: GroovyKotlinDependency information for Play ConsoleWhen building your app using AGP 4.0.0 and higher, the plugin includes metadata that describes the library dependencies that are compiled into your app. When uploading your app, the Play Console inspects this metadata to provide alerts for known issues with SDKs and dependencies your app uses, and, in some cases, provide actionable feedback to resolve those issues. The data is compressed, encrypted by a Google Play signing key, and stored in the signing block of your release app. We recommend keeping this dependencies file for a safe and positive user experience. However, if you’d rather not share this information, you can opt out by including the following dependenciesInfo block in your module’s build.gradle file: For more information on our policies and potential issues with dependencies, see our support page on using third-party SDKs in your app. Content and code samples on this page are subject to the licenses described in the Content License. Java is a registered trademark of Oracle and/or its affiliates. Источник  Когда к мобильному устройству присоединены наушники  ОС Google Android развивается, и по всему видимому |