- Configuration
- In this document
- See also
- Update channels
- Proxy Settings
- Setting up the Android Studio Proxy
- Android Plugin for Gradle HTTP proxy settings
- SDK Manager HTTP Proxy Settings
- Андрей Алеев
- Настройка proxy в Android Studio
- Установка сертификатов
- Как настроить прокси android studio
- Установка сертификатов
- Set up Http Proxy in Android Studio
- Not the answer you’re looking for? Browse other questions tagged android proxy android-studio or ask your own question.
- Настройка Http Proxy в Android Studio
- AndroidStudio gradle proxy
Configuration
In this document
See also
During installation, Android Studio provides wizards and templates that verify your system requirements, such as the Java Development Kit (JDK) and available RAM, and configure default settings, such as an optimized default Android Virtual Device (AVD) emulation and updated system images. This document describes additional configuration settings you may want to use to customize your use of Android Studio.
For specific documentation about emulator and device setup and use, see Managing Virtual Devices, Using Hardware Devices, and OEM USB Drivers.
Update channels
Android Studio provides four update channels to keep Android Studio up-to-date based on your code-level preference:
- Canary channel: Canary builds provide bleeding edge releases, updated about weekly. While these builds do get tested, they are still subject to bugs, as we want people to see what’s new as soon as possible. This is not recommended for production.
- Dev channel: Dev builds are hand-picked older canary builds that survived the test of time. They are updated roughly bi-weekly or monthly.
- Beta channel: Beta builds are used for beta-quality releases before a production release.
- Stable channel: Used for stable, production-ready versions.
By default, Android Studio uses the Stable channel. Use File > Settings > Appearance & Behavior System Settings > Updates to change your channel setting.
Proxy Settings
Proxies serve as intermediary connection points between HTTP clients and web servers that add security and privacy to internet connections.
To support running Android Studio behind a firewall, set the proxy settings for the Android Studio IDE and the SDK Manager. Use the Android Studio IDE HTTP Proxy settings page to set the HTTP proxy settings for Android Studio. The SDK Manager has a separate HTTP Proxy settings page.
When running the Android Plugin for Gradle from the command line or on machines where Android Studio is not installed, such as continuous integration servers, set the proxy settings in the Gradle build file.
Note: After the initial installation of the Android Studio bundle, Android Studio can run with internet access or off-line. However, Android Studio requires an internet connection for Setup Wizard synchronization, 3rd-party library access, access to remote repositories, Gradle initialization and synchronization, and Android Studio version updates.
Setting up the Android Studio Proxy
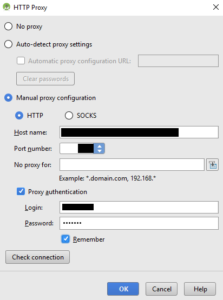
Android Studio supports HTTP proxy settings so you can run Android Studio behind a firewall or secure network. To set the HTTP proxy settings in Android Studio:
- From the main menu choose File > Settings > Appearance & Behavior — System Settings — HTTP Proxy.
- In Android Studio, open the IDE Settings dialog.
- On Windows and Linux, choose File > Settings > IDE Setting — HTTP Proxy.
- On Mac, choose Android Studio > Preferences > IDE Setting — HTTP Proxy.
The HTTP Proxy page appears.
- Select auto-detection to use an auto-configuration URL to configure the proxy settings or manual to enter each of the settings. For a detailed explanation of these settings, see HTTP Proxy.
- Click Apply to enable the proxy settings.
Android Plugin for Gradle HTTP proxy settings
For application-specific HTTP proxy settings, set the proxy settings in the build.gradle file as required for each application module.
For project-wide HTTP proxy settings, set the proxy settings in the gradle/gradle.properties file.
For information about using Gradle properties for proxy settings, see the Gradle User Guide.
Note: When using Android Studio, the settings in the Android Studio IDE HTTP proxy settings page override the HTTP proxy settings in the gradle.properties file.
SDK Manager HTTP Proxy Settings
SDK Manager proxy settings enable proxy internet access for Android package and library updates from SDK Manager packages.
To set the SDK Manager settings for proxy internet access, start the SDK Manager and open the SDK Manager page.
- On Windows, select Tools > Options from the menu bar.
- On Mac and Linux, choose Tools > Options from the system menu bar.
The Android SDK Manager page appears. Enter the settings and click Apply.
Источник
Андрей Алеев
Настройка proxy в Android Studio
На днях мне пришлось разворачивать Android Studio IDE на машине с корпоративным прокси. Тема не нова, и уже обсуждалась на stackoverflow и в блогах. Однако, эта задача не решается сходу — приходиться покопаться. Поэтому я решил создать пошаговую инструкцию по настройке IDE Android-разработчика в условиях прокси.
Все действия мы будем проводить на windows-машине. Для linux алгоритм будет аналогичный.
Итак, при первом запуске Android Studio предлагает настроить прокси

Жмем Setup Proxy, вводим адрес прокси-сервера и свои учетные данные:
Адрес прокси можно узнать с помощью команды (windows)
Протестируйте соединение с помощью кнопки Check connection на этом же окне. Если все ок, идем дальше.
Все ок, идем дальше. В появившемся после запуска IDE окне прокси нужно снова прописать параметры proxy для http и https:

Эти же настройки можно прописать в файле gradle.properties:
Однако, имейте ввиду, что настройки прокси IDE перезаписывают настройки проекта .
Если сейчас попытаться собрать проект, то, скорее всего, сборка закончится неуспешно с ошибкой
Gradle пытается достучаться до серверов репозиториев, не имея сертификатов. Нам необходимо добавить их в хранилища. Для этого сначала добавляем в gradle.properties следующие строчки:
Здесь мы указываем путь и пароль к хранилищу сертификатов. Пароль по умолчанию — changeit. Если вы не меняли его, он остался таким же.
Как же добавить сертификаты в хранилище?
Установка сертификатов
При запуске проекте IDE предлагает принять сертификаты. Их следует принять, однако это не поможет автоматически. Нам необходимо импортировать сертификаты в хранилище сертификатов cacerts IDE и JVM. Для этого необходимо выполнить следующие шаги:
- Скачать сертификат. Сделать это можно с помощью браузера или openssl
- Импортировать сертификат в в хранилища с помощью keytool
Чтобы импортировать загруженный на шаге 1 сертификат, на Windows-машине необходимо запустить командную строку от администратора и выполнить:
Также, необходимо добавить этот сертификат в другие хранилища cacerts (JVM и Android Studio):
альтернативно, вместо того, чтобы добавлять, можно копировать сертификаты между хранилищами с помощью команды:
После импорта сертификатов почистите кэш gradle в папке C:\Users\ \.gradle и перезагрузите систему. Если при попытке обратиться к хранилищу cacerts IDE выдает ошибку Access denied, запустите Android Studio от администратора.
Запускаем сборку… Проект успешно собирается!
В случае, если импорт сертификатов не помогает, можно заменить адрес загрузки репозиториев с секьюрного https на обычный http:
Помимо gradle, проблемы могут возникнуть и с системой контроля версий. В случае с git необходимо необходимо добавить в глобальные настройки git параметры proxy. Для этого выполнить команду:
Если при попытке при попытке pull/push из/в GitLab возникает ошибка
SSL certificate problem: self signed certificate in certificate chain
то следует выполнить следующую команду от администратора:
Для возможности push/pull через IDE Android Studio необходимо в настройках Settings->Version Control->Git в пункте SSH executable указать Native

На этом все, можно работать. Надеюсь, статья оказалась полезной для вас. Буду рад вашим мнениям и комментариям!
Источник
Как настроить прокси android studio
На днях мне пришлось разворачивать Android Studio IDE на машине с корпоративным прокси. Тема не нова, и уже обсуждалась на stackoverflow и в блогах. Однако, эта задача не решается сходу — приходиться покопаться. Поэтому я решил создать пошаговую инструкцию по настройке IDE Android-разработчика в условиях прокси.
Все действия мы будем проводить на windows-машине. Для linux алгоритм будет аналогичный.
Итак, при первом запуске Android Studio предлагает настроить прокси

Жмем Setup Proxy, вводим адрес прокси-сервера и свои учетные данные:

Адрес прокси можно узнать с помощью команды (windows)
ipconfig /all | find /i «Dns Suffix»
Протестируйте соединение с помощью кнопки Check connection на этом же окне. Если все ок, идем дальше.
Все ок, идем дальше. В появившемся после запуска IDE окне прокси нужно снова прописать параметры proxy для http и https:

Эти же настройки можно прописать в файле gradle.properties:
Однако, имейте ввиду, что настройки прокси IDE перезаписывают настройки проекта.
Если сейчас попытаться собрать проект, то, скорее всего, сборка закончится неуспешно с ошибкой
SSLHandshakeException: sun.security.validator.ValidatorException: PKIX fix
Gradle пытается достучаться до серверов репозиториев, не имея сертификатов. Нам необходимо добавить их в хранилища. Для этого сначала добавляем в gradle.properties следующие строчки:
Здесь мы указываем путь и пароль к хранилищу сертификатов. Пароль по умолчанию — changeit. Если вы не меняли его, он остался таким же.
Как же добавить сертификаты в хранилище?
Установка сертификатов
При запуске проекте IDE предлагает принять сертификаты. Их следует принять, однако это не поможет автоматически. Нам необходимо импортировать сертификаты в хранилище сертификатов cacerts IDE и JVM. Для этого необходимо выполнить следующие шаги:
- Скачать сертификат. Сделать это можно с помощью браузера или openssl
- Импортировать сертификат в в хранилища с помощью key
Чтобы импортировать загруженный на шаге 1 сертификат, на Windows-машине необходимо запустить командную строку от администратора и выполнить:
1AndroidAndroid Studio3.0jrejrelibsecuritycacerts -file
Также, необходимо добавить этот сертификат в другие хранилища cacerts (JVM и Android Studio):
key -import -alias -keystore
альтернативно, вместо того, чтобы добавлять, можно копировать сертификаты между хранилищами с помощью команды:
key -importkeystore -srckeystore
.AndroidStudio3.0systemtaskscacerts -destkeystore C:Progra
1Javajre_V.V.Vlibsecuritycacerts -v password changeit
После импорта сертификатов почистите кэш gradle в папке C:Users .gradle и перезагрузите систему. Если при попытке обратиться к хранилищу cacerts IDE выдает ошибку Access denied, запустите Android Studio от администратора.
Запускаем сборку… Проект успешно собирается!
В случае, если импорт сертификатов не помогает, можно заменить адрес загрузки репозиториев с секьюрного https на обычный http:
Помимо gradle, проблемы могут возникнуть и с системой контроля версий. В случае с git необходимо необходимо добавить в глобальные настройки git параметры proxy. Для этого выполнить команду:
git config —global http.proxy http[s]://userName:password@proxyaddress:port
Если при попытке при попытке pull/push из/в GitLab возникает ошибка
SSL certificate problem: self ed certificate in certificate chain
то следует выполнить следующую команду от администратора:
git config —system http.sslCAPath
Для возможности push/pull через IDE Android Studio необходимо в настройках Settings->Version Control->Git в пункте SSH executable указать Native

На этом все, можно работать. Надеюсь, статья оказалась полезной для вас. Буду рад вашим мнениям и комментариям!
Set up Http Proxy in Android Studio
I have read multiple similar questions and the documentation but I have not been able to solve my issue of getting by the corporate firewall my machine sits behind. The error I am getting is ‘Failed to refresh Gradle project’ Unknown host services.gradle.org. Everything I have read and understand lead me to believe this is a http proxy issue. I have tried setting the proxy properties in the gradle.properties file in my Project folder so my gradle.properties file looks like :
# Project-wide Gradle settings. # IDE (e.g. Android Studio) users: # Settings specified in this file will override any Gradle settings # configured through the IDE. # For more details on how to configure your build environment visit # https://www.gradle.org/docs/current/userguide/build_environment.html # Specifies the JVM arguments used for the daemon process. # The setting is particularly useful for tweaking memory settings. # Default value: -Xmx10248m -XX:MaxPermSize=256m # org.gradle.jvmargs=-Xmx2048m -XX:MaxPermSize=512m -XX:+HeapDumpOnOutOfMemoryError — Dfile.encoding=UTF-8 # When configured, Gradle will run in incubating parallel mode. # This option should only be used with decoupled projects. More details, visit # https://www.gradle.org/docs/current/userguide/multi_project_builds.html#sec:decoupled_projects # org.gradle.parallel=true systemProp.http.proxyHost=proxy.company.com systemProp.http.proxyPort=83 systemProp.http.proxyUser=username systemProp.http.proxyPassword=password systemProp.http.auth.ntlm.domain=domain systemProp.https.proxyHost=proxy.company.com systemProp.https.proxyPort=83 systemProp.https.proxyUser=username systemProp.https.proxyPassword=password systemProp.https.auth.ntlm.domain=domain
I have also tried setting the Global Gradle Settings by going File->Settings->Gradle and setting the Gradle VM Options using:
-Dhttp.proxyHost=proxy.company.com -Dhttp.proxyPort=83 -Dhttp.proxyUser=username -Dhttp.proxyPassword=password
I cannot see any documentation of where else to set this http proxy setting, please help if you can.
asked Jun 27 ’14 at 19:07
9111 gold badge22 silver badges55 bronze badges
try to add domain into gradle global settings
-Dhttp.proxyHost=proxy.company.com -Dhttp.proxyPort=83 -Dhttp.proxyUser=username -Dhttp.proxyPassword=password -Dhttp.auth.ntlm.domain=domain
It helps for me.
answered Jul 29 ’14 at 10:19
//gradle.properties systemProp.http.proxyHost=www.somehost.org systemProp.http.proxyPort=8080 systemProp.http.proxyUser=userid systemProp.http.proxyPassword=password systemProp.http.nonProxyHosts=*.nonproxyrepos.com|localhost
15.6k1414 gold badges5959 silver badges8080 bronze badges
answered Apr 23 ’15 at 7:16
2122 bronze badges
Had a similar issue getting android studio to open up behind a corporate firewall. It would crash after looking for SDK ups and failing. I used a freeware called «proxycap» and input the proxy settings for the corporation (available in the my computer’s internet settings). Now it works fine! There are other proxy freewares (proxify…), but I chose this is one of the programs with a program level proxy settings, where I could set up the proxy for android studio only.
answered Jan 2 ’15 at 14:44
I dont know if there was proxy option in previous version, but in v1.0.1 and above you can find it in File-> Settings -> IDE settings.
answered Jan 20 ’15 at 9:58
Shaji Thorn BlueShaji Thorn Blue
58822 gold badges99 silver badges1818 bronze badges
All you need to do is to go to Settings at File and choose Auto detect proxy and test connection for goole.com or your website domain.
answered Dec 9 ’20 at 4:06
2,15111 gold badge1414 silver badges1515 bronze badges
Not the answer you’re looking for? Browse other questions tagged android proxy android-studio or ask your own question.
Настройка Http Proxy в Android Studio
Я прочитал несколько похожих вопросов и документацию, но я не смог решить мою проблему с помощью корпоративного брандмауэра, на котором сидит моя машина. Ошибка, которую я получаю, — «Не удалось обновить проект Gradle» Неизвестный хост services.gradle.org. Все, что я прочитал и понял, заставляет меня поверить, что это проблема прокси-сервера. Я попытался установить свойства прокси в файле gradle.properties в моей папке Project, так что файл gradle.properties выглядит так:
# Project-wide Gradle settings. # IDE (eg Android Studio) users: # Settings specified in this file will override any Gradle settings # configured through the IDE. # For more details on how to configure your build environment visit # https://www.gradle.org/docs/current/userguide/build_environment.html # Specifies the JVM arguments used for the daemon process. # The setting is particularly useful for tweaking memory settings. # Default value: -Xmx10248m -XX:MaxPermSize=256m # org.gradle.jvmargs=-Xmx2048m -XX:MaxPermSize=512m -XX:+HeapDumpOnOutOfMemoryError — Dfile.encoding=UTF-8 # When configured, Gradle will run in incubating parallel mode. # This option should only be used with decoupled projects. More details, visit # https://www.gradle.org/docs/current/userguide/multi_project_builds.html#sec:decoupled_projects # org.gradle.parallel=true systemProp.http.proxyHost=proxy.company.com systemProp.http.proxyPort=83 systemProp.http.proxyUser=username systemProp.http.proxyPassword=password systemProp.http.auth.ntlm.domain=domain systemProp.https.proxyHost=proxy.company.com systemProp.https.proxyPort=83 systemProp.https.proxyUser=username systemProp.https.proxyPassword=password systemProp.https.auth.ntlm.domain=domain
Я также попытался установить глобальные настройки градиента, перейдя в «Файл-> Настройки->« Грейдл »и установив параметры« Грейд-ВМ », используя:
-Dhttp.proxyHost=proxy.company.com -Dhttp.proxyPort=83 -Dhttp.proxyUser=username -Dhttp.proxyPassword=password
Я не вижу никакой документации о том, где еще установить этот параметр http-прокси, пожалуйста, помогите, если сможете.
- Как пользователи / разработчики могут установить конфигурацию прокси-сервера Android для версий 2.x?
- Установите Android SDK за серверный прокси?
- Android, почему метод HttpPost возвращает два разных результата в Android v2.3 и Android v4.0.3?
- Android без прокси не работает?
- Передать позицию в ListView дочернему адаптеру RecyclerView
- Настройка прокси-сервера для класса DownloadManager для Android
- Используются ли настройки прокси-сервера Android для всех приложений на устройстве?
- Charles Proxy for Genymotion останавливает 10.0.3.2 localhost traffic
- XMPP FileTransfer — Почему протокол bytestreams не работает?
- Ручной прокси в Android через отражение
Попробуйте добавить домен в глобальные настройки градации
-Dhttp.proxyHost=proxy.company.com -Dhttp.proxyPort=83 -Dhttp.proxyUser=username -Dhttp.proxyPassword=password -Dhttp.auth.ntlm.domain=domain
Это помогает мне.
Имел аналогичную проблему, получив студию андроида, чтобы открыть корпоративный брандмауэр. После сбоев поиска SDK и сбоев он потерпит крах. Я использовал бесплатное программное обеспечение под названием «proxycap» и вводил настройки прокси для корпорации (доступные в настройках Интернета моего компьютера). Теперь все отлично! Есть другие proxy freewares (proxify …), но я выбрал это одна из программ с настройками прокси-уровня на уровне программы, где я мог бы настроить прокси-сервер для студии Android.
Я не знаю, была ли опция proxy в предыдущей версии, но в v1.0.1 и выше вы можете найти ее в настройках File-> Settings -> IDE.
//gradle.properties systemProp.http.proxyHost=www.somehost.org systemProp.http.proxyPort=8080 systemProp.http.proxyUser=userid systemProp.http.proxyPassword=password systemProp.http.nonProxyHosts=*.nonproxyrepos.com|localhost
Вот что я получаю, когда запускаю gradlew.bat с помощью -debug. Я настроил gradle.properties, чтобы указать на мой прокси-сервер вместе с моим идентификатором сети и паролем, и он все еще не работает при попытке получить из https: //jcenter.bintray.comn/kxml2/kxml2/2.3.0 /kxml2-2.3.0.jar (я удалил фактическое имя прокси-сервера и был заменен Xs). Может быть, корпоративный брандмауэр блокирует его, хотя я передаю правильные учетные данные для прокси-сервера?
Я все время вижу это:
[Org.apache.http.impl.client.SystemDefaultHttpClient] CONNECT отказался от прокси: HTTP / 1.1 407 Требуется прокси-аутентификация
Тем не менее, я все это правильно настроил в файле gradle.properties:
SystemProp.http.proxyHost = xxxxxxxxx.xxxxx.com systemProp.http.proxyPort = 8080 systemProp.http.proxyUser = systemProp.http.proxyPassword = systemProp.http.auth.ntlm.domain =
SystemProp.https.proxyHost = xxxxxxxxx.xxxxx.com systemProp.https.proxyPort = 8443 systemProp.https.proxyUser = systemProp.https.proxyPassword = systemProp.https.auth.ntlm.domain =
08:59:01.005 [DEBUG] [org.gradle.internal.resource.transport.http.HttpClientHelper] Performing HTTP : https://jcenter.bintray.com/kxml2/kxml2/2.3.0/kxml2-2.3.0.jar 08:59:01.217 [DEBUG] [org.apache.http.impl.conn.PoolingClientConnectionManager] Connection request: [route: ->https://jcenter.bintray.com][total kept alive: 0; route allocated: 0 of 5; total allocated: 0 of 10] 08:59:01.230 [DEBUG] [org.apache.http.impl.conn.PoolingClientConnectionManager] Connection leased: [id: 0][route: ->https://jcenter.bintray.com][total kept alive: 0; route allocated: 1 of 5; total allocated: 1 of 10] 08:59:01.809 [DEBUG] [org.apache.http.impl.conn.DefaultClientConnectionOperator] Connecting to jcenter.bintray.com:443 08:59:02.173 [DEBUG] [org.apache.http.client.protocol.RequestAddCookies] CookieSpec selected: best-match 08:59:02.192 [DEBUG] [org.apache.http.client.protocol.RequestAuthCache] Auth cache not set in the context 08:59:02.192 [DEBUG] [org.apache.http.client.protocol.RequestTargetAuthentication] Target auth e: UNCHALLENGED 08:59:02.193 [DEBUG] [org.apache.http.client.protocol.RequestProxyAuthentication] Proxy auth e: UNCHALLENGED 08:59:02.194 [DEBUG] [org.apache.http.impl.client.SystemDefaultHttpClient] Attempt 1 to execute request 08:59:02.195 [DEBUG] [org.apache.http.impl.conn.DefaultClientConnection] Sending request: /kxml2/kxml2/2.3.0/kxml2-2.3.0.jar HTTP/1.1 08:59:02.196 [DEBUG] [org.apache.http.ers] >> /kxml2/kxml2/2.3.0/kxml2-2.3.0.jar HTTP/1.1 08:59:02.197 [DEBUG] [org.apache.http.ers] >> Accept-Encoding: gzip,deflate 08:59:02.197 [DEBUG] [org.apache.http.ers] >> Host: jcenter.bintray.com 08:59:02.197 [DEBUG] [org.apache.http.ers] >> Connection: Keep-Alive 08:59:02.198 [DEBUG] [org.apache.http.ers] >> User-Agent: Gradle/2.1 (Windows 7;6.1;amd64) (Oracle Corporation;1.7.0_65;24.65-b04) 08:59:02.272 [DEBUG] [org.apache.http.impl.conn.DefaultClientConnection] Receiving response: HTTP/1.1 302 08:59:02.272 [DEBUG] [org.apache.http.ers] https://xxxxxxxxx.xxxxx.com:8080->https://repo.jfrog.org 08:59:02.281 [DEBUG] [org.apache.http.impl.conn.PoolingClientConnectionManager] Connection [id: 0][route: ->https://jcenter.bintray.com] can be kept alive indefinitely 08:59:02.281 [DEBUG] [org.apache.http.impl.conn.PoolingClientConnectionManager] Connection released: [id: 0][route: ->https://jcenter.bintray.com][total kept alive: 1; route allocated: 1 of 5; total allocated: 1 of 10] 08:59:02.282 [DEBUG] [org.apache.http.impl.conn.PoolingClientConnectionManager] Connection request: [route: <>->https://xxxxxxxxx.xxxxx.com:8080->https://repo.jfrog.org][total kept alive: 1; route allocated: 0 of 5; total allocated: 1 of 10] 08:59:02.282 [DEBUG] [org.apache.http.impl.conn.PoolingClientConnectionManager] Connection leased: [id: 1][route: <>->https://xxxxxxxxx.xxxxx.com:8080->https://repo.jfrog.org][total kept alive: 1; route allocated: 1 of 5; total allocated: 2 of 10] 08:59:02.292 [DEBUG] [org.apache.http.impl.conn.DefaultClientConnectionOperator] Connecting to xxxxxxxxx.xxxxx.com:8080 08:59:02.294 [DEBUG] [org.apache.http.client.protocol.RequestAddCookies] CookieSpec selected: best-match 08:59:02.294 [DEBUG] [org.apache.http.client.protocol.RequestAuthCache] Auth cache not set in the context 08:59:02.295 [DEBUG] [org.apache.http.client.protocol.RequestTargetAuthentication] Target auth e: UNCHALLENGED 08:59:02.295 [DEBUG] [org.apache.http.client.protocol.RequestProxyAuthentication] Proxy auth e: UNCHALLENGED
AndroidStudio gradle proxy
I’ve tried to run AndroidStudio
But It’s failing on boot with gradle error:
Failed to import Gradle project: Connection d out: connect
I found solution here
But I can’t find how to set this properties in Android Studio.
Setting them in graddle-wrapper.properties doesn’t help.
asked Aug 26 ’13 at 11:38
6,04555 gold badges4949 silver badges7676 bronze badges
Go to gradle.properties file (project root directory) and add these options.
systemProp.http.proxyHost=www.somehost.org systemProp.http.proxyPort=8080 systemProp.http.proxyUser=user systemProp.http.proxyPassword=password systemProp.http.nonProxyHosts=localhost systemProp.http.auth.ntlm.domain=domain systemProp.https.proxyHost=www.somehost.org systemProp.https.proxyPort=8080 systemProp.https.proxyUser=user systemProp.https.proxyPassword=password systemProp.https.nonProxyHosts=localhost systemProp.https.auth.ntlm.domain=domain
26.8k1010 gold badges7474 silver badges113113 bronze badges
answered Nov 10 ’14 at 9:14
Sumit SahooSumit Sahoo
2,3792222 silver badges3434 bronze badges
In Android Studio -> Preferences -> Gradle, pass the proxy details as VM options.
Gradle VM Options -Dhttp.proxyHost=www.somehost.org -Dhttp.proxyPort=8080 etc.
*In 0.8.6 Beta Gradle is under File->Settings (Ctrl+Alt+S, on Windows and Linux)
answered Aug 26 ’13 at 11:57
15.5k77 gold badges4343 silver badges9494 bronze badges
For Android Studio 3.2(Windows),you can edit the gradle.properties file under C:/Users/USERNAME/.gradle for current user.
answered Jun 18 ’18 at 2:14
18111 silver badge66 bronze badges
For an NTLM Authentication Proxy:
File -> Settings -> Project Settings -> Gradle -> Global Gradle Settings -> Gradle VM Options
-Dhttp.proxyHost=myProxyAddr -Dhttp.proxyPort=myProxyPort -Dhttp.proxyUser=myUsername -Dhttp.proxyPassword=myPasswd -Dhttp.auth.ntlm.domain=myDomainName
answered Oct 9 ’14 at 10:19
Nirmal PatelNirmal Patel
5,01888 gold badges3838 silver badges5252 bronze badges
in gradle.properties file (project root directory)
You must set proxy for http and https
systemProp.http.proxyHost=www.somehost.org systemProp.http.proxyPort=8080 systemProp.http.proxyUser=user systemProp.http.proxyPassword=password systemProp.http.nonProxyHosts=localhost systemProp.http.auth.ntlm.domain=domain systemProp.https.proxyHost=www.somehost.org systemProp.https.proxyPort=8080 systemProp.https.proxyUser=user systemProp.https.proxyPassword=password systemProp.https.nonProxyHosts=localhost systemProp.https.auth.ntlm.domain=domain
if you set proxy from File -> Settings ->HTTP Proxy(Under IDE Settings) it only define http proxy and does not set https proxy
answered Sep 9 ’16 at 15:27
4,83666 gold badges4747 silver badges7272 bronze badges
Rajesh’s suggestion did not work for me. What I did was go to
File -> Settings ->HTTP Proxy(Under IDE Settings) ->Manual proxy configuration
I still left the proxy rmation in Project Settings under Gradle, like Rajesh suggested. But I’m not entirely sure if it’s necessary.
I am using 0.8.6 Beta
answered Oct 6 ’14 at 20:42
34011 gold badge44 silver badges1515 bronze badges
In my case I am behind a proxy with dynamic settings.
I had to download the settings script by picking the script address from internet settings at
Chrome > Settings > Show Advanced Settings > Change proxy Settings > Internet Properties > Connections > LAN Settings > Use automatic configuration script > Address
Opening this URL in a browser downloads a PAC file which I opened in a text editor
- Look for a PROXY string, it should contain a hostname and port
- Copy values into gradle.properties
- I didn’t have to specify a user not password.
answered Jun 22 ’16 at 1:28
10.2k99 gold badges6565 silver badges9898 bronze badges
For Android Studio 1.4, I had to do the following …
In the project explorer window, open the «Gradle Scripts» folder.
Edit the gradle.properties file.
Append the following to the , replacing the below values with your own where appropriate …
systemProp.http.proxyHost=. systemProp.http.proxyPort=8080 # Next line in form DOMAIN/USERNAME for NTLM or just USERNAME for non-NTLM systemProp.http.proxyUser=DOMAIN/USERNAME systemProp.http.proxyPassword=PASSWORD systemProp.http.nonProxyHosts=localhost # Next line is required for NTLM auth only systemProp.http.auth.ntlm.domain=DOMAIN systemProp.https.proxyHost=. systemProp.https.proxyPort=8080 # Next line in form DOMAIN/USERNAME for NTLM or just USERNAME for non-NTLM systemProp.https.proxyUser=DOMAIN/USERNAME systemProp.https.proxyPassword=PASSWORD systemProp.https.nonProxyHosts=localhost # Next line is required for NTLM auth only systemProp.https.auth.ntlm.domain=DOMAIN
Details of what gradle properties you can set are here… https://docs.gradle.org/current/userguide/userguide_.html#sec%3aaccessing_the_web_via_a_proxy
answered Oct 22 ’15 at 6:29
11.8k1010 gold badges4949 silver badges6464 bronze badges
The following works for me . File -> Settings -> Appearance & Behavior -> System Settings -> HTTP Proxy Put in your proxy setting in Manual proxy configuration
Restart android studio, a prompt pops up and asks you to add the proxy setting to gradle, click yes.
answered Mar 25 ’19 at 15:22
For the new android studio 1.2 you find the gradle vm args under:
File — Settings — Build, Execution, Deployment — Build Tools — Gradle
answered Apr 15 ’15 at 14:02
15.2k1515 gold badges9999 silver badges208208 bronze badges
If build failed due to gradle proxy setting then simply putting my proxy IP address and port number will solve. It worked for me. File -> setting -> http proxy -> manual configuration -> Host name: your proxy IP, port number: your proxy port number.
Источник


