- How to Create Android App Icons using Image Asset Studio
- Run Image Asset Studio
- Custom Image
- Clip Art
- Text String
- Creating Launcher Icon
- Adaptive and legacy launcher icon
- Legacy launcher icon only
- Creating ActionBar Icons and Tab Icons
- Creating Notification icons
- How to Delete an App Icon from a project
- Топ-17 плагинов для Android Studio
- 1. String Manipulation
- 2. Codota
- 3. Индикатор использования CPU
- 4. Rainbow Brackets
- 5. Project Lombok
- 6. Android Drawable Importer
- 7. Vector Drawable Thumbnails
- 8. Android Drawable Preview Plugin
- 9. Name That Color
- 10. bundletool
- 11. Butterknife Zelezny
- 12. Android Input
- 13. ADB Idea
- 14. adb-enhanced
- 15. ADB WIFI
- 16. Here there be dragons
- 17. Power Mode 2
- И напоследок
How to Create Android App Icons using Image Asset Studio
Creating an application interface that the user will like and will be unlikely to forget can be intimidating. But creating an attractive launcher icon for your app, that the user will first come across while looking at your app, anyway needs more brainstorming. For Android, you need to create these graphics that have to be compatible and supporting to all devices running Android, sizes varying from a smartphone to TV. The introduction of Android Image Asset Studio in Android Studio has made it easy. In this article, you will see how you can easily create your application icon in one go.
Image Asset Studio is a tool introduced in Android Studio 3. It can be used to generate app icons for all the screen densities in one go, using custom images, material design icons as well as text strings. Application icon in Android includes the following,
- Launcher Icon: represents your app and the first thing that user sees
- ActionBar Icon & Tab Icon: representing actions in the ActionBar and Tabs of the app
- Notification Icon: represents your app notification when a user is outside your app

Here is a list of icon/image sizes that you need to create for different screen densities, for each image that you use in your application. No matter if you are a good designer, creating each of these is tedious!

Image Asset Studio helps to create all these icons for all screen densities and stores them in respective density folders. It provides a preview of all the icons that will be created, in different shapes, with options to edit them. Let’s see how to create each one of them.
Run Image Asset Studio
- In the Project Window, select the project hierarchy.
- Right-click on the res folder and choose New -> Image Asset.

3. Create the icon for your app i.e.
- Launcher icon which may be Adaptive and Legacy Launcher Icon (if your app supports Android 8.0 or above) or just the Legacy Launcher Icon(for Android version less than or equal to 7.1)
- ActionBar Icons and Tab Icons
- notification icon as per your requirement.
4. You can select the following Asset Type. The icon appears on the right side, in the preview panel.
Custom Image
You can use custom images of PNG (recommended), JPG or GIF (avert) format and adjust it to create icons. Set the path of your custom image if you select this.
Clip Art
You can select the icons from the list of Google Material Design Icons provided in the dialog. Click on the clip art icon to get the dialog with icon set.
Text String
You can use the fonts installed on your computer to generate the icons out of the text strings. It will create these text-based icons in PNG format in respective drawable-density folders. Set the string and select the font to use it.
If you are comfortable learning from video, you can refer to this for Launcher Icons and App Bar Icons:
Creating Launcher Icon
Launcher Icons represent our app in the device home screen, on the app list screen, in the Google Play Store and everywhere else. Android 8.0 (Oreo) and above supports Adaptive Icons and can be displayed in different shapes across various platforms. Image Asset Studio provides the option to create these adaptive icons as well as the legacy icons for Android 8.0 below. It also creates web icons(512 x 512 px) that represents our app on the Google Play Store.
The Launcher Icons are stored in the res/mipmap-density folder.
Adaptive and legacy launcher icon
If your app doesn’t support android version 8.0 or above, create legacy icon only for your app.
After opening Image Asset Studio, follow the steps below to create the legacy icons for your android app.
- For Icon Type field, select Launcher Icons (Adaptive & Legacy).
- For Foreground Layer tab, select the Asset type to be an image, clip art or text.
- Then for the Background Layer tab, select a Color or set the Image path for the Asset type to set the background.
- Then the Legacy tab, check the default settings. You can choose whether you want to generate the legacy icon, round icon and the icon for the web(Google Play Store Icon).
- Optionally
- Name: Change the name of the foreground and background layer. If the resource with the specified name exists, it will be indicated by an error message. The name can contain lowercase characters, digits and underscore only.
- Trim: Chose yes to adjust the margin between the foreground icon graphic and the background, else select no to keep the source asset as it is.
- Color: Set the color for the clip art or the text asset. Click the field, select the color, click chose and preview your icon.
- Resize: Use the slider to resize your icon. It is disabled for background layer where Color is the asset type.
7. Chose the resource directory for your image asset.
- main/res: For all source set including debug and release
- debug/res: For debugging only
- release/res: For only one version of build, overrides main source set
- custom source set: To define a new source set File -> Project structure -> app -> Build Types. Refer to Configure Build Variants for details
Output Directories shows the list of folders in which the icons will be created in the Project view in Project Window.
Check the mipmap folders for the Launcher Icons.
Legacy launcher icon only
If your app supports android version 8.0 or above, create adaptive and legacy launcher icon for your app.
After opening Image Asset Studio, follow the steps below to create adaptive and legacy icons for your android app.
- For Icon Type field, select Launcher Icons (Legacy Only).
- Select the Asset type to be an image, clip art or text.
- Optionally
- Name: Change the name of the icon if you don’t want to use the default name. If the resource with the specified name exists, an error message will indicate it. The name can contain lowercase characters, digits and underscore only.
- Trim: Chose yes to adjust the margin between the foreground icon graphic and the background, else select no to keep the source asset as it is.
- Padding: Adjust the source set padding for all four sides. You will have the review on the right side.
- Foreground: Set the color for the clip art or the text asset. Click the field, select the color, click chose and preview your icon.
- Background: Set the color for the background. Click the field, select the color, click chose and preview your icon.
- Scaling: Select crop or S hrink to fit to fit the icon size
- Shape: Select the shape to set a backdrop for the icon. For transparent, select none.
- Effect: Select dogear if you want the dogear effect for your icon, else select none.
5. Chose the resource directory for your image asset.
- main/res: For all source set including debug and release
- debug/res: For debugging only
- release/res: For only one version of the build, overrides main source set
- custom source set: To define a new source set File -> Project structure -> app -> Build Types. Refer to Configure Build Variants for details
Check the mipmap folders for the Launcher Icons.
Creating ActionBar Icons and Tab Icons
ActionBar icons are the ones present on the ActionBar that represents individual action. Whereas, the tab icons are used in the apps having multiple tabs. Using material icons for this category is recommended.
The ActionBar and Tab Icons are stored in the res/drawable-density folder.
You can also use Vector Asset Studio to have XML vectors for these categories of icons. It will reduce the size of your APK considerably.
After opening Image Asset Studio, follow the steps below to create action bar and tab icons for your android app.
- For Icon Type field, select Action Bar and Tab Icons.
- Select the Asset type to be an image, clip art or text.
- Optionally
- Name: Change the name of the icon if you don’t want to use the default name. If the resource with the specified name exists, an error message will indicate it. The name can contain lowercase characters, digits and underscore only.
- Trim: Chose yes to adjust the margin between the foreground icon graphic and the background, else select no to keep the source asset as it is.
- Padding: Adjust the source set padding for all four sides. You will have the review on the right side.
- Theme: Select holo_light or holo_dark as per your app theme. Select custom to set a custom color for the icon.
5. Chose the resource directory for your image asset.
- main/res: For all source set including debug and release
- debug/res: For debugging only
- release/res: For only one version of build, overrides main source set
- custom source set: To define a new source set File -> Project structure -> app -> Build Types. Refer to Configure Build Variants for details
Check the drawable folders for the Icons created.
Creating Notification icons
To learn from the video:
The user sees the notification when he is outside your app. Notification icons come up with these notifications.
The Notification Icons are stored in the res/drawable-density folder. There are a few other folders created too.
- for Android 2.2 (API 8) or lower — icons stored in res/drawable-density
- for Android 2.3 to 2.3.7 (API 9 & 10) — icons stored in res/drawable-density-v9. Gray version of the icon is created
- Android 3 (API 11) or higher — icons stored in res/drawable-density-v11. A white version of the icon is created.
After opening Image Asset Studio, follow the steps below to create notification icons for your android app.
- For Icon Type field, select Notification Icons.
- Select the Asset type to be an image, clip art or text.
- Optionally
- Name: Change the name of the icon if you don’t want to use the default name. If the resource with the specified name exists, an error message will indicate it. The name can contain lowercase characters, digits and underscore only.
- Trim: Chose yes to adjust the margin between the foreground icon graphic and the background, else select no to keep the source asset as it is.
- Padding: Adjust the source set padding for all four side. You will have the review on the right side.
5. Chose the resource directory for your image asset.
- main/res: For all source set including debug and release
- debug/res: For debugging only
- release/res: For only one version of build, overrides main source set
- custom source set: To define a new source set File -> Project structure -> app -> Build Types. Refer to Configure Build Variants for details
Check the drawable folders for the Icons created.
How to Delete an App Icon from a project
To delete the app icon,
- Select Android View in Project Window
- Expand the mipmap and drawable folder for the launcher and other icons respectively.
- Select the sub-folder that matched the name of your icon. It contains the icons of all densities that you created.
- Right-click on the sub-folder and hit delete.
Dialog for Safe Delete appears. - If you want, select options to find the places where the icon is used and hit OK.
If you chose to search for usage and the icon has any use in the project, you can view it and then confirm delete. You should delete or replace this reference to successfully compile the project. Android Studio then deletes the file from the project and the drive. - Chose Build -> Clean Project.
Источник
Топ-17 плагинов для Android Studio

Существуют сотни плагинов для Android Studio, и их число растёт с каждым днём. Это в основном происходит по двум причинам. Во-первых, Android Studio — это официальная интегрированная среда разработки для создания Android-приложений. Во-вторых — Intellij IDEA, платформа, на которой основана Android Studio, позволяет разрабатывать и легко устанавливать полезные плагины, совместимые с обеими IDE. Какие плагины устанавливаете вы?
Конечно, вы можете программировать в «голой» Android Studio, просто установив необходимые библиотеки и не добавив ни одного плагина. Но зачем? Плагины для Android Studio могут сделать вашу работу более эффективной и увлекательной. Сейчас мы расскажем вам про топ плагинов Android Studio, которые смогут утроить (как минимум) вашу производительность.
В список лучших плагинов для Android Studio мы включили некоторые базовые инструменты, проверенные временем, а также ряд малоизвестных жемчужин, рекомендованных опытными разработчиками Android-приложений. Итак, вот наши любимые плагины Android Studio:
1. String Manipulation

Как следует из названия, этот плагин поможет сэкономить часы утомительной ручной работы со строками. Он позволяет изменять стиль текста (camelCase, kebab-lowercase, KEBAB-UPPERCASE, snake_case, SCREAMING_SNAKE_CASE, dot.case, нижний регистр, Заглавные Буквы, PascalCase), кодировать / декодировать, увеличивать / уменьшать, сортировать, фильтровать и выравнивать.
2. Codota
Вы только посмотрите, на что способен следующий плагин. Плагин Codota использует машинное обучение для автодополнения вашего кода. Плагин учится на примерах кода из миллионов Java-программ вместе с вашим собственным уникальным контекстом. Используемый как начинающими, так и опытными Java-разработчиками, Codota ускоряет разработку и помогает устранить те раздражающие ошибки, которые появляются в вашем коде.
В дополнение к плагину, Codota также предлагает обширную библиотеку часто используемых фрагментов Java-кода для копирования и вставки в нужное место.
3. Индикатор использования CPU
Этот простой плагин намного полезнее, чем можно подумать на первый взгляд. Поскольку ваш код и приложение становятся более сложными для компиляции и запуска, это будет сказываться на вашем процессоре. Одна из наиболее полезных функций индикатора использования процессора — это возможность генерировать дамп потока, чтобы показать, что засоряет процессор в фоновом потоке.
4. Rainbow Brackets
Скобки всегда были источником головной боли для программистов. Сколько часов было потрачено на поиск этой недостающей скобки? Хватит это терпеть!
Вместо того, чтобы сидеть и пытаться понять, какую скобку вы уже закрыли, а какую ещё нет, разукрасьте скобки с помощью плагина Rainbow Brackets.
Он поддерживает Java, Scala, Clojure, Kotlin, Python, Haskell, Agda, Rust, JavaScript, TypeScript, Erlang, Go, Groovy, Ruby, Elixir, ObjectiveC, PHP, HTML, XML, SQL, Apex, C #, Dart и другие языки.
5. Project Lombok
Сложный Java-код для Android-приложений часто может содержать много шаблонного кода (конструкторы, геттеры, сеттеры). Это может быть утомительно и трудно с точки зрения читабельности и поддержки кода. Project Lombok — это Java-библиотека, которая подключается к вашей IDE и генерирует этот шаблонный код за вас, сохраняя ваш код лаконичным и читабельным. Разница кода до и после может быть довольно ошеломляющей.
Стоит отметить, что Lombok, будучи библиотекой времени компиляции, не сделает ваше приложение более тяжеловесным. Кроме того, разработчики плагина на своём сайте предлагают много полезных ресурсов для пользователей и разработчиков плагинов.
6. Android Drawable Importer
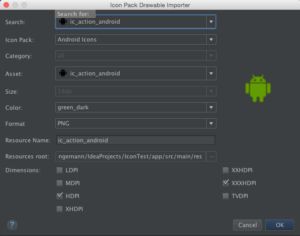
Если вы собираетесь работать с drawable при разработке Android-приложения, то это именно тот плагин, о существовании которого вам следует знать.
Чтобы адаптировать ресурсы ко всем размерам и разрешениям экрана Android-устройств, в каждом Android-проекте есть папка drawable. Если вы были благословлены дизайнером из Рая, который предоставляет ресурсы, уже находящиеся в нужных папках с правильными именами, мы искренне завидуем вам. Но скорее всего, вам вряд ли так повезло, и вы сами переименовываете и перемещаете PNG-файлы в нужные папки.
Android Drawable Importer — это плагин, который сэкономит вам массу времени. Он позволяет импортировать отдельные ресурсы для регулирования под необходимые размеры и разрешения, целые zip-файлы для автоматического размещения в необходимые папки.
7. Vector Drawable Thumbnails
Для предварительного просмотра векторного XML-файла нужно запускать приложение. Vector Drawable Thumbnails поможет вам избавиться от этого и отобразит векторные рисунки по одному щелчку мыши.
8. Android Drawable Preview Plugin
Когда в вашем проекте много drawable-компонентов, ориентироваться в них бывает очень сложно. Было бы неплохо, если бы в IDE был быстрый предварительный просмотр изображений, да? С Android Drawable Preview Plugin это возможно.
Этот плагин для Android Studio заменяет иконки по умолчанию в дереве файлов проекта предварительными просмотрами элементов. Но не забывайте использовать адекватные имена для drawable, это всё равно важно.
9. Name That Color
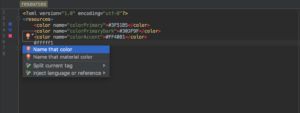
Позвольте мне начать с разрушения мифа. Не все женщины могут отличить бирюзу от цвета морской волны или цвет баклажана от цвета сливы. И для этого не обязательно быть дальтоником.
Наличие и популярность этого плагина говорит о том, что большинство разработчиков также не имеют этого волшебного навыка распознавания цветов.
Плагин Name That Color назовёт цвет, который у вас есть в буфере обмена, прямо в файле ресурсов в Android Studio, и даст название наиболее близкого соответствующего цвета. Эпоха «lighter_light_pink» в ваших xml-файлах подходит к концу.
10. bundletool
bundletool — это базовый инструмент, который Gradle, Android Studio и Google Play используют для создания Android App Bundle или преобразования app bundle в различные APK, развёртываемые на устройствах. Этот инструмент от Google необходим для более эффективной работы с APK-пакетами.
11. Butterknife Zelezny
Android ButterKnife — это библиотека для внедрения зависимостей. Как правило, это улучшает читабельность кода, позволяя сосредоточиться на логике, а не смешивать в кучу код для поиска View-компонентов или добавления слушателей.
Android ButterKnife Zelezny — плагин для Android Studio для создания инъекций ButterKnife из выбранных XML-макетов в Activity, фрагментах или адаптерах. Большинство руководств по ButterKnife, которые вы найдёте, будут рекомендовать вам установить Zelezny.
12. Android Input
Android Input — это довольно простой, но полезный плагин для Android Studio, который позволяет легко вводить текст прямо на ваше Android-устройство или эмулятор. Он запоминает последнее использованное устройство и последний введённый текст.
13. ADB Idea
Этот плагин как для Intellij IDEA, так и для Android Studio добавляет ряд полезных сочетаний клавиш для различных команд ADB-инструментов прямо в вашей IDE. Хотя это кажется излишним дополнением, разработчики говорят, что ADB Idea действительно может ускорить разработку и отладку Android-приложений.
14. adb-enhanced
Называя себя «швейцарским ножом для тестирования и разработки под Android», adb-extended — интерфейс командной строки для запуска различных сценариев. Это позволяет вам протестировать многие потенциально ошибочные поведения приложений, такие как поворот экрана, режим экономии заряда аккумулятора, режим сохранения данных, режим ожидания и предоставление или отзыв разрешений.
15. ADB WIFI
Этот плагин упрощает подключение устройства к ADB через WiFi для отладки. Как и многие другие небольшие, но удобные плагины, этот — это просто обёртка для серии команд, которые вы можете выполнить в командной строке. Но почему бы не сделать этот процесс комфортнее?
16. Here there be dragons
Here there be dragons — это плагин Intellij и Android Studio, который позволяет аннотировать ваши «нечистые» Java-методы аннотацией @SideEffect. При вызове такого метода плагин отображает маленький значок дракона.
Да и к тому же этот плагин слишком симпатичный, чтобы не включать его в наш список. Это же драконы!
17. Power Mode 2
Вы знаете, ваш код просто эпичен. Когда вы ночи напролёт кодите, а в вашей крови высокое содержание кофеина, то можно почувствовать, как ваши пальцы изрыгают огонь и сотрясают мир. Вы — Бог. И вы заслуживаете того, чтобы программировать, как Бог.
И напоследок
Прежде чем приступить к установке всех плагинов из списка, вы должны помнить, что большое количество плагинов обычно замедляет работу IDE. Подумайте о своих привычках во время написания кода и посмотрите, какие плагины будут экономить ваше время, не добавляя лишнего веса в Android Studio.
Источник


