- Интерфейсы
- Jetpack Compose — как легко построить UI на Android
- Преимущества Jetpack Compose
- Подключение к проекту
- How to Create Interfaces in Android Studio?
- Creating Java Interface in Android Studio
- Step by Step Implementation
- Creating Kotlin Interface in Android Studio
- Step by Step Implementation
- Интерфейсы
- Реализация интерфейсов
- Свойства в интерфейсах
- Устранение противоречий при переопределении
- Kotlin Interface with Examples
- Interfaces Inheritance
- Kotlin Interface Example
- Kotlin Interface Conflict
- Interface Super Call
Интерфейсы
Интерфейсы в Kotlin ближе к Java 8 и имеют свои особенности. Например, интерфейсы могут содержать объявления свойств.
Класс интерфейса может содержать абстрактные и конкретные функции. Если функция не содержит тела, то она является абстрактной и помечать её как abstract нет необходимости. Интерфейсы могут предоставлять те же преимущества, что и абстрактные классы, но обладают большей гибкостью. Если функция конкретная, то как обычно добавляем тело после фигурных скобок.
Интерфейс не может наследоваться от суперкласса, но может реализовать другие интерфейсы.
Объявим интерфейс с одним абстрактным методом.
Реализация интерфейса в классе.
Двоеточие после имени класса заменяет ключевые слова implements и extends. В отличие от объявления о наследовании от суперкласса, после имени интерфейса не нужно ставить круглые скобки. Круглые скобки необходимы только для вызова конструктора суперкласса, а у интерфейсов нет конструкторов.
Класс может реализовать несколько интерфейсов, но наследуется только от одного непосредственного суперкласса. Весь этот набор перечисляется через запятую.
Ключевое слово override используется вместо аннотации @Override и является обязательным, что снижает количество потенциальных ошибок при неправильном использовании.
У интерфейса можно задать значения по умолчанию. Если в Java 8 для этих целей используется ключевое слово default, то в Kotlin просто указываете тело метода. Добавим в интерфейс ещё один метод, использующий значение по умолчанию.
Если вас устраивает значение по умолчанию, то реализовывать его в классе не нужно. Либо вы можете изменить поведение метода вместе с click().
Возможна ситуация, когда два разных интерфейса используют одно и то же имя для метода. В этом случае вам придётся их явно реализовывать, даже если их значения по умолчанию вас устраивают.
Добавим ещё один интерфейс.
Если нужно вызвать только одну унаследованную реализацию, то можете поступить следующим образом.
Мы вызвали метод meow() один раз, но отработало два раза, так как такой метод встречается в двух интерфейсах.
Можно добавлять в интерфейс абстрактные свойства без указания abstract. Свойствам нельзя присвоить значение и инициализировать.
Можем задать геттер, но его можно переопределить в классе, который будет использовать интерфейс.
Источник
Jetpack Compose — как легко построить UI на Android

В июле этого года вместе с Android Studio Arctic Fox вышла одна из долгожданных библиотек — Jetpack Compose. Она позволяет создавать пользовательский интерфейс в декларативном стиле и обещает быть революцией в построении UI.
Разбираемся, так ли это на самом деле, какие у библиотеки преимущества и недостатки. Подробности — в статье.
Преимущества Jetpack Compose
Jetpack Compose — это набор инструментов для разработки UI в Android-приложении. Он призван ускорить и упростить разработку пользовательского интерфейса, избавить от лишнего кода и соединить модель реактивного программирования с лаконичностью Kotlin.
Сразу с места в карьер — какие есть преимущества у библиотеки:
1. Меньше кода. Jetpack Compose позволяет писать меньше кода, а значит разработчик может больше фокусироваться на проблеме, с меньшим количеством тестов и дебага, а значит и багов.
2. Интуитивно понятный. Compose использует декларативный API — разработчику нужно лишь сказать, что сделать, а все остальное ляжет на плечи библиотеки.
3. Удобство внедрения. Compose совместим с любым существующим кодом. Например, можно вызвать Compose-код из вьюх (view) и, наоборот, вьюхи из Compose. Многие библиотеки вроде Jetpack Navigation, ViewModel и Coroutines уже адаптированы под Compose, что позволяет сравнительно быстро внедрить его в свой код. Кроме того, Android Studio Arctic Fox поддерживает превью создаваемых вьюх.
4. Имеет обширный инструментарий. Jetpack Compose позволяет создавать красивые приложения с прямым доступом к Android Platform API и build-in поддержкой Material Design, тёмной темы, анимаций и других крутых штук.
Далее пройдёмся по основным аспектам библиотеки и посмотрим, как сильно повышается производительность приложения.
Подключение к проекту
Чтобы подключить Jetpack Compose к проекту, необходимо указать некоторые строки кода в своем build.gradle.
В рутовом объявим переменную с версией Compose:
Здесь мы указываем, что в проекте будем использовать Jetpack Compose и объявляем необходимые зависимости (подробнее про зависимости можно почитать в официальном гайде).
Дальше всё просто. В активити (activity) объявлем Composable-функцию, строим иерархию вьюх с указанием необходимых атрибутов и смотрим результат.
Пройдемся по коду. Я написал две реализации вёрсток различной сложности:
1. Простая реализация
Добавляет TextView в вёрстку с текстом с конкатенацией Hello и аргумента, переданного в Greeting.
Важно отметить, что имена Composable-функций начинаются с заглавной буквы. Это соглашение по наименованию функций, поэтому если писать со строчной, то студия будет подсвечивать неверный нейминг.
2. Более сложная реализация
Этот вариант представляет собой скролящийся экран, который содержит изображение, текст и кнопку. Рассмотрим некоторые особенности:
Необходимо объявить Scroll State. Только не обычный, а тот, который позволяет сохранять состояние скролла сквозь рекомпозицию — rememberScrollState().
Column представляет собой ViewGroup с вертикальным расположением элементов.
Modifier позволяет управлять атрибутами, добавлять декорации и поведение к вьюхам.
Остальное интуитивно понятно. И это как раз одна из ключевых особенностей Jetpack Compose — даже если вы не использовали библиотеку ранее, то всё равно с ней разберётесь.
Добавить вьюхи в активити можно через extension setContent <>, например:
В общем-то, создание UI выглядит действительно просто. Теперь определим, насколько сильно оптимизируется приложение и как быстро пользователь увидит окончательный экран.
Для тестирования воспользуемся библиотекой Jetpack Benchmark, о которой, кстати, тоже рассказывали в отдельной статье. Код теста выглядит так:
Протестируем три версии установки вьюхи в активити:
При передаче ресурса в setContentView.
При передаче вьюхи в setContentView.
Итоги тестирования можно посмотреть в таблице: левый столбец — название теста, правый — время на выполнение:
Источник
How to Create Interfaces in Android Studio?
Interfaces are a collection of constants, methods(abstract, static, and default), and nested types. All the methods of the interface need to be defined in the class. The interface is like a Class. The interface keyword is used to declare an interface.
public interface AdapterCallBackListener <
void onRowClick(String searchText);
public interface OnFragmentInteractionListener <
So basically in android , there are two types of interfaces we can create and we use frequently .
- Creating Java Interface
- Creating Kotlin Interface
So in this article, we are going to create both Java and Kotlin Interface in Android studio.
Creating Java Interface in Android Studio
Like a class, a Interface can have methods and variables, but the methods declared in an interface are by default abstract (only method signature, no body).
- Interfaces specify what a class must do and not how. It is the blueprint of the class.
- An Interface is about capabilities like a Player may be an interface and any class implementing Player must be able to (or must implement) move(). So it specifies a set of methods that the class has to implement.
- If a class implements an interface and does not provide method bodies for all functions specified in the interface, then the class must be declared abstract.
- A Java library example is Comparator Interface. If a class implements this interface, then it can be used to sort a collection.
// declare constant fields
// declare methods that abstract
To declare an interface, use the interface keyword. It is used to provide total abstraction. That means all the methods in an interface are declared with an empty body and are public and all fields are public, static , and final by default. A class that implements an interface must implement all the methods declared in the interface. To implement interface use implements keyword.
Step by Step Implementation
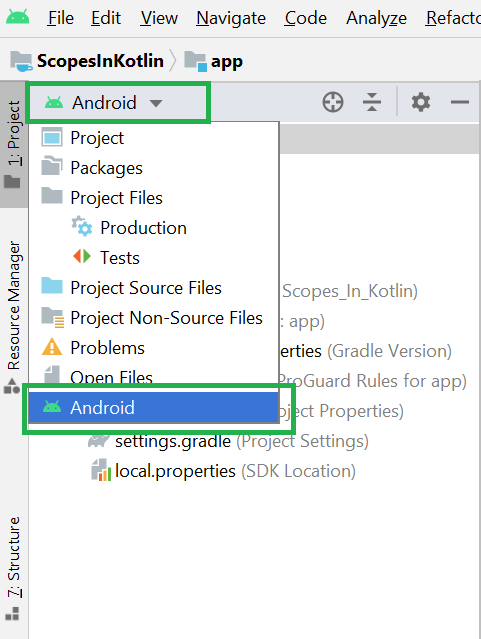
Step 1: Go to Android Studio and open the project in Android mode as shown in the below image.
Step 2: Now go to the app > java > your package name > right-click > New > Java Class as shown in the below image.

Step 3: After completing step 2 a pop-up screen will arise like below. Here enter your interface name and choose the Interface and click the Enter button.

After completing the above steps successfully you can find your Java interface here. Go to the app > java > your package name > GeeksforGeeks.java. And you can write your own Java code here.

Creating Kotlin Interface in Android Studio
Interfaces are custom types provided by Kotlin that cannot be instantiated directly. Instead, these define a form of behavior that the implementing types have to follow. With the interface, you can define a set of properties and methods, that the concrete types must follow and implement. The interface definition in Kotlin begins with the interface keyword followed by the name of the interface, followed by the curly braces within which the members of the interface reside. The difference is that the members will have no definition of their own. These definitions will be provided by the conforming types.
Step by Step Implementation
Step 1: Go to Android Studio and open the project in Android mode as shown in the below image.
Step 2: Now go to the app > java > your package name > right-click > New > Kotlin File/Class as shown in the below image.

Step 3: After completing step 2 a pop-up screen will arise like below. Here enter your class name and choose the Interface and click the Enter button.
Источник
Интерфейсы
Интерфейсы в Kotlin очень похожи на интерфейсы в Java 8. Они могут содержать абстрактные методы, методы с реализацией. Главное отличие интерфейсов от абстрактных классов заключается в невозможности хранения переменных экземпляров. Они могут иметь свойства, но те должны быть либо абстрактными, либо предоставлять реализацию методов доступа.
Интерфейс определяется ключевым словом interface:
Реализация интерфейсов
Класс или объект могут реализовать любое количество интерфейсов:
Свойства в интерфейсах
Вы можете объявлять свойства в интерфейсах. Свойство, объявленное в интерфейсе, может быть либо абстрактным, либо иметь свою реализацию методов доступа. Свойства в интерфейсах не могут иметь теневых полей, соответственно, методы доступа к таким свойствам не могут обращаться к теневым полям.
Устранение противоречий при переопределении
Когда мы объявлем большое количество типов в списке нашего супертипа, может так выйти, что мы допустим более одной реализации одного и того же метода. Например:
Оба интерфейса A и B объявляют функции foo() и bar(). Оба реализуют foo(), но только B содержит реализацию bar() (bar() не отмечен как абстрактный метод в интерфейсе A, потому что в интерфейсах это подразумевается по умолчанию, если у функции нет тела). Теперь, если мы унаследуемся каким-нибудь классом C от интерфейса A, нам, очевидно, придётся переопределять метод bar(), обеспечивая его реализацию.
Однако, если мы унаследуемся классом D от интерфейсов A и B, нам надо будет переопределять все методы, которые мы унаследовали от этих интерфейсов. Это правило касается как тех методов, у которых имеется только одна реализация (bar()), так и тех, у которых есть несколько реализаций (foo()).
Источник
Kotlin Interface with Examples
In this tutorial, we are going to learn about Kotlin interface with examples. The interface is not a class. An interface is like a listener and you can trigger this listener in a certain situation.
An interface in Kotlin has certain properties.
- Interface is not a class.
- You cannot create an instance of an Interface.
- An interface contains both normal methods and abstracts methods.
- By default methods and properties are abstract and open in nature.
- In interface nothing is final.
Whenever we want temporary services we use Interfaces. Like we want a listener on Button touch or button click we can trigger an interface.
In Android apps development we will use interfaces a lot. It is recommended to learn about Kotlin inheritance and Kotlin abstracts classes.
The syntax of Koltin interface. Just use the keyword interface .
An interface in Kotlin can have abstract method,normal methods. Similararly abstract and normal properties as well.
In FirstInterface we have a property and two methods.
- name: properties in interface are abstract.
- onTouch: It’s an abstract method.
- onClick(): If we define a function body buy using the curly brackets inside the interface then its a normal function. In the interface, a normal method is public in nature and not FINAL. As they are final in Abstract and Inheritance.
To implement an interface just write the class name then a colon (:) and interface name. To expand this example let’s create a class that will implement FirstInterface . The class name is Button.
Interfaces Inheritance
As soon as we implements the FirstInterface . The compiler is showing us an error.
Kotlin: Class ‘Button’ is not abstract and does not implement abstract member public abstract var name: String defined in FirstInterface.
To resolve this error we have to implement the abstract method and the abstract property.
Now the errors are gone. Regarding the onClick() method it is normal function and its up to us if we want to override it or not. If you want to override then here is the code.
Kotlin Interface Example
We already know an interface is not a class so we cannot instantiate it. But Button is a class and we can instantiate the Button class object inside the main function.
button.onTouch() is calling the Button class onTouch method and button.onClick() calling Button class onClick method.
What if you want to call the Interface onClick method as well. We just have to call the superclass onClick function and it is easy to do. Inside the Button’s onClick method call super.OnClick.
Print a line inside the interface method and run the code. Here is the output.
Just a quick suggestion if you want to inherit a class and an interface. First, inherit the class and then the interface. Suppose we have a Person class and we want to inherit it alongside the interface.
Kotlin Interface Conflict
Now, this is a very interesting part of this lecture. First of all, we have to understand what is interface conflict. Well, while developing the projects we have to implement multiple interfaces. Sometimes these interfaces have a method with the same name and compiler get confused which super method should get called.
To understand this concept and some other related stuff, let’s create a second interface.
In the SecondInterface onTouch is a normal function but inside the FirstInterface it is an abstract function.
Now let’s implement both the interfaces in the Button class and also override the abstract method.
As per the rules everything should be fine but we are getting an error.
Kotlin: Class ‘Button’ must override public open fun onClick(): Unit defined in FirstInterface because it inherits multiple interface methods of it
The trick is when we implement multiple interfaces and they have a function with the same name. It is necessary to override that common function.
The compiler is happy now.
Interface Super Call
What if we want to call superclass onTouch function. Well, both the interfaces have an onTouch method. But in the FirstInterface its an abstract method and it has no body and it won’t get called. In the SecondInterface it is a normal function so it will receive the call.
So far so good. What about the onClick function. It is a normal function in both the interfaces. Which means both of them can receive the call. In the Button class onClick method If we simply write super.onClick the compiler will get confused. The compiler won’t be able to understand which onClick method should get called. We will get this kind of error.
Kotlin: Many supertypes available, please specify the one you mean in angle brackets, e.g. ‘super’
To resolve this error we can specify the interface name with super keyword. It will solve the error. Let me show you what i meant by all this talk.
Please focus on super .onClick() . The output.
That is all from Kotlin interface with example. If you want to learn more check the Kotlinlang website. And please do share your thoughts.
Источник


