- Android Studio для NDK под Windows
- Установка и настройка Android Studio
- Урок 2. Установка и настройка Android Studio. Установка JDK. Настройка Android SDK
- Download Java JDK & Set JAVA_HOME Environment Variable in Windows 10
- How to Install & Configure JDK?
- What is JDK?
- How to Download JDK?
- How to InstallJDK?
- Setting the Environment Variable for Java
- What are Environment Variables and why do we need them?
- Why do you need to set JAVA_HOME?
- How to Set JAVA_HOME variable in Windows?
- How to Set Java SDK Path in Android Studio?
- How to Fix the Java SDK Path?
- Method #1: For Android Studio Version 4.2 and Above
- Method #2: For Android Studio Version Below 4.2
- Method #3: Adding a new SDK to Your Android Studio
- Method #4: For the Command Line Enthusiasts
- Method #5: Using the Embedded SDK
- Method #6: Setting and Viewing SDK using the Studio Project Structure
Android Studio для NDK под Windows

На днях я обнаружил, что версия Android Studio неуклонно стремится к единице, в связи с чем задумался об изучении этого инструмента. Чтобы не было скучно, я решил поделиться своим опытом и собранными граблями в виде статьи-туториала.
Сразу хочу оговориться, что я не являюсь гуру Android-разработки, поэтому каких-либо откровений в тексте вы не найдете. Зато тут есть пошаговая инструкция по установке и настройке Android Studio под Windows и созданию простейшего проекта с использованием Android NDK.
Также заранее предупреждаю: статья получилась большой и очень подробной (честно, сам не ожидал), даже несмотря на то, что я почти все скриншоты и некоторые листинги кода спрятал под спойлеры.
На момент написания последней версией Android Studio была 0.8.1, для последующих версий необходимые действия могут отличаться от нижеописанных (очень надеюсь, что в лучшую сторону).
Установка и настройка Android Studio
1. Необходимо установить JDK (Java Development Kit) и JRE (Java Runtime Environment).
Раньше Android SDK поддерживал только JDK версии 6, но теперь это в прошлом. Поддерживается 7 и даже 8 (по крайней мере, именно 8-ю версию я указал в качестве JAVA_HOME и в настройках Android Studio, и никаких проблем не испытал).
JRE же нужен для запуска самой студии. У меня она использует версию 7.
Скачать JDK и JRE версий больше 6 можно с сайта Oracle.
Переменную JAVA_HOME теперь, вроде бы, можно не устанавливать, так как в Android Studio мы будем в настройках прописывать путь к JDK. Но я ее установил. Для этого нужно:
- Зайти в Панель управления\Система и безопасность\Система, выбрать слева Дополнительные параметры системы, в открывшемся диалоге найти кнопку Переменные среды.
- Создать системную или пользовательскую переменную JAVA_HOME и указать для нее путь к JDK. У меня указан вот такой путь: C:\Program Files\Java\jdk1.8.0_05.
2. Если у вас установлен Android SDK.
В комплекте с Android Studio идет свой Android SDK. И, если вы хотите использовать именно его, то в некоторых случаях может случиться странное. Например, у меня при обновлении SDK через SDK Manager часть файлов записывалась в старую папку, и возникли проблемы, когда я эту папку удалил. Скорее всего это произошло из-за того, что в реестре хранился ключ с путем к старой папке. Поэтому имеет смысл почистить реестр. Для этого нужно запустить regedit.exe и найти HKEY_LOCAL_MACHINE\Software\Android SDK Tools для 32-битных машин либо HKEY_LOCAL_MACHINE\Software\Wow6432Node\Android SDK Tools для 64-битных машин и удалить Android SDK Tools. Если в реестре вашей системы таких ключей нет, то все в порядке.
Если у вас установлена переменная среды ANDROID_SDK_HOME и вы хотите, чтобы она указывала на старую установку, то, по идее, это не должно стать проблемой, так как при настройке Android Studio мы укажем ей путь к SDK. Проблемы могут возникнуть, если эту переменную использует какое-либо из приложений, входящих в состав Android SDK.
3. Теперь переходим к установке Android Studio.
Нужно скачать Android Studio для вашей системы с официальной страницы и установить ее. По умолчанию, если выбрать «Установить только для меня» ставится в \Users\ \AppData\Local\Android\android-studio\, иначе ставится в \Program FIles (x86)\Android\android-studio\. Можно выбрать и другую папку.
После установки запускаем Android Studio.
Источник
Урок 2. Установка и настройка Android Studio. Установка JDK. Настройка Android SDK
Как создают приложения для android? Какие инструменты нужны для разработки андроид-приложений? В этом уроке вы узнаете, как установить среду разработки мобильных приложений Android Studio и как настроить все необходимые для андроид-разработчика инструменты, такие как JDK (Java Development Kit) и Android SDK tools.
Скачать JDK (Java Development Kit) можно здесь
Скачать Android Studio и SDK tools можно здесь
#android #AndroidStudio #startandroid


Нкдавно начало выдавать в логах вот это: Gradle sync failed: C:\Users\admin\.gradle\caches\3.3\scripts-remapped\ijinit_6k62mi942oki7vsduv5w047ih\4ut6sil9ssn94pl2jxyri0vh2\init0a81367d9b026a15ebd85a3a1f50120f\cache.properties (Не удается найти указанный файл).
Подскажите, как решить проблему? Переустановка AS и JDK не помогает.
Привет, обращаюсь уже ни в первый раз, не получается скачать Android Studio, в чем может быть причина? Все оплачено, ни один из вариантов загрузки не грузит!
День добрый, не могу скачать Андроид Студио, не подскажете в чем может быть причина? Win 7/32 bit? не один из вариантов на сайте не качает, качаю по сылке https://developer.android.com/intl/ru/sdk/index.html#Other
При первом запуске андроид студии
Error launching Android Studio
The environment variable JAVA_HOME (with the value of C:\ProgramFiles\Java\jdk1.8.0_77) does not point to valid JVM installation.
Подскажите, что делать если при запуске эмулятора выскакивает это сообщение:
Cannot launch AVD in emulator.
Output:
emulator: ERROR: x86 emulation currently requires hardware acceleration!
Please ensure Intel HAXM is properly installed and usable.
CPU acceleration status: HAX kernel module is not installed!
Компьютер 32 ядерный, Java установила x86. Что еще не так??
Пожалуйста помогите, третий день мучаюсь.
Здравствуйте.
помогите при создании нового проекта в Android studio выдает ошибку
Error:C:\Users\Чеслав\.gradle\caches\2.8\scripts\asLocalRepo6_6sv5w2d3lgnmhlg42gale6i9k\init\cache.properties (Не удается найти указанный файл)
при этом по указанному адресу такой файл существует с расширением lock . пробовал переустановить Android studio и jdk не помогает. Что не так?
У вас кириллица в пути — это источник проблемы
Здравствуйте!
В Android studio при попытке создания нового проекта открывается пустое окно. Что можно сделать?
Cannot launch AVD in emulator.
Output:
emulator: ERROR: x86 emulation currently requires hardware acceleration!
Please ensure Intel HAXM is properly installed and usable.
CPU acceleration status: HAX kernel module is not installed!
Источник
Download Java JDK & Set JAVA_HOME Environment Variable in Windows 10
How to Install & Configure JDK?
What is JDK?
The JDK (Java Development Kit) is a software development kit which consists of libraries and tools for developing apps and running them. This comes along with the following –
- Java Runtime Environment (JRE)
- Java Virtual Machine (JVM)
- An interpreter
- A Java compiler (javac)
- An archiver (jar)
- Javadoc, a documentation generation tool
How to Download JDK?
Here’s how you can download JDK –
- Search for “Java JDK” on Google
.jpg)
- Then, download it from the official website of Oracle
https://www.oracle.com/in/java/technologies/javase-downloads.html
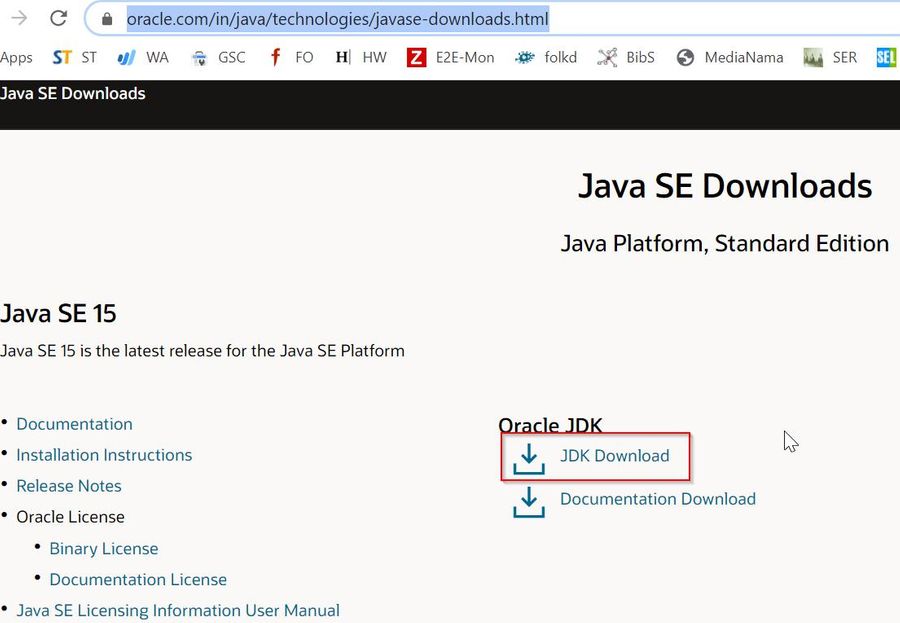
- Click on the JDK Download link as shown in the image
- In the next screen, click on “jdk-15_windows-x64_bin.exe”to download JAVA SDK for a 64-bit operating system
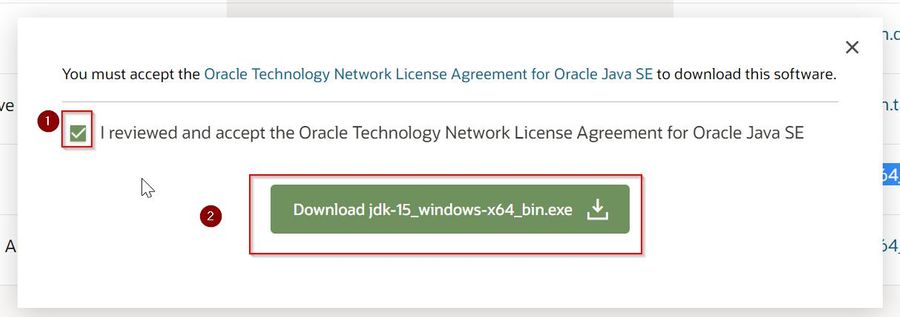
- In the next screen, click on the “I reviewed and accept” check box and click on download “jdk-15_windows-x64_bin.exe”button to download it
How to Install JDK?
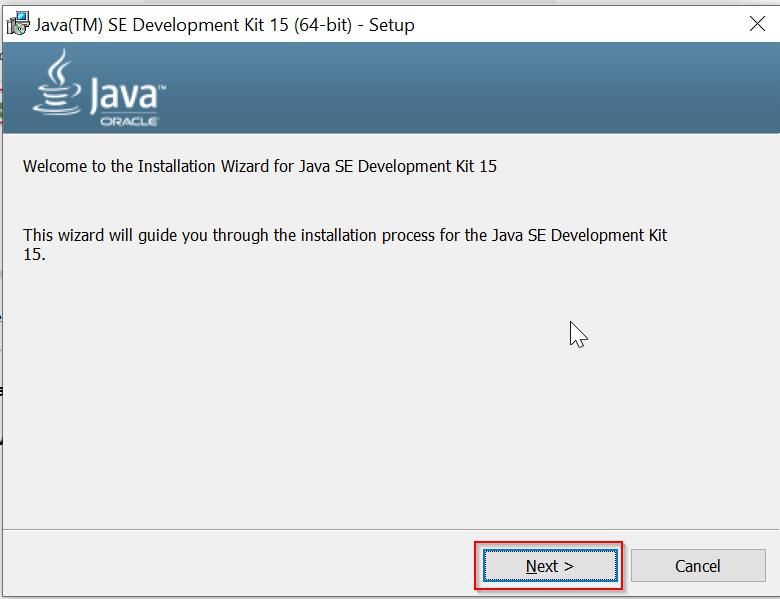
- After the JDK is downloaded, double click on the setup file to start the installation process
- Click on Next
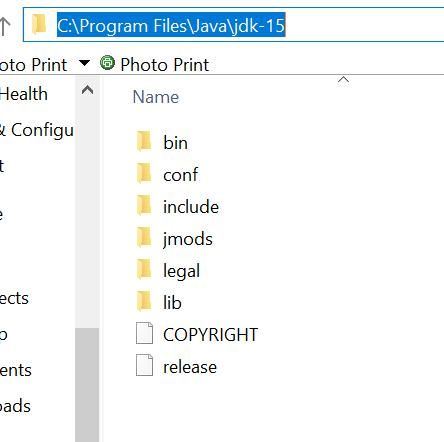
- In the next step, you will be asked for the installation directory. The default drive is C
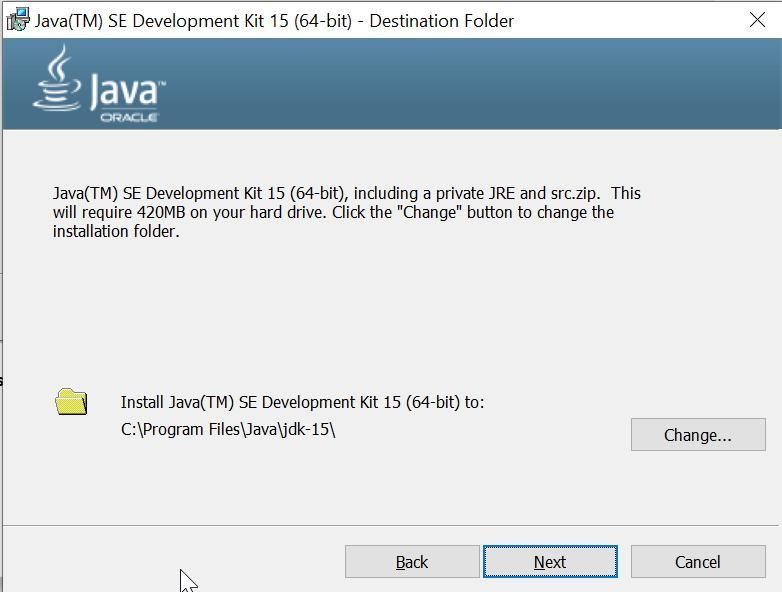
- If you don’t change it, JDK will be installed on the C Drive
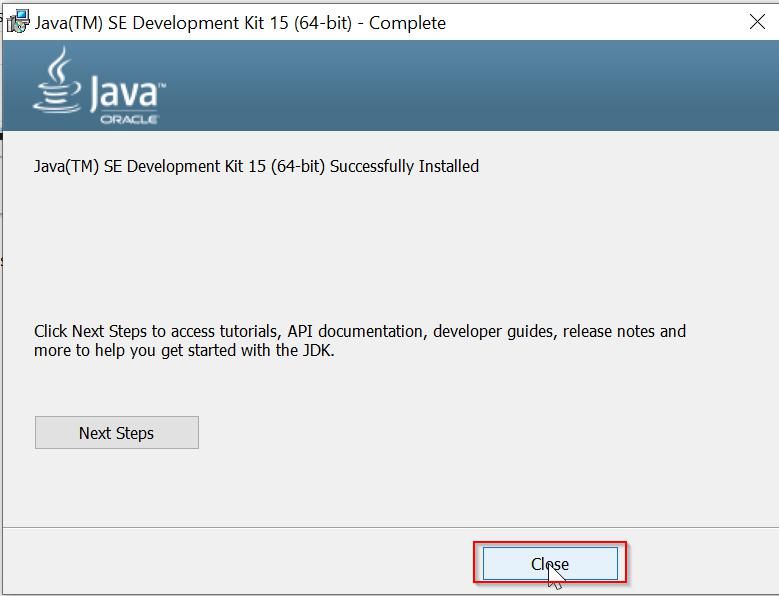
- Wait for a few minutes until the installation is over
- After that, just click on the Close button
Setting the Environment Variable for Java
What are Environment Variables and why do we need them?
Environment variables are basically system variables that are used for exchanging configuration information with other applications. They are key-value pairs used by operating systems such as Windows and Linux.
Why do you need to set JAVA_HOME?
JAVA_HOME is Java’s environment variable that can be set after the JDK installation. It has to be set as it determines the file location where the JDK resides. JAVA_HOME must be set to the JDK location so the javac compiler can be accessed.
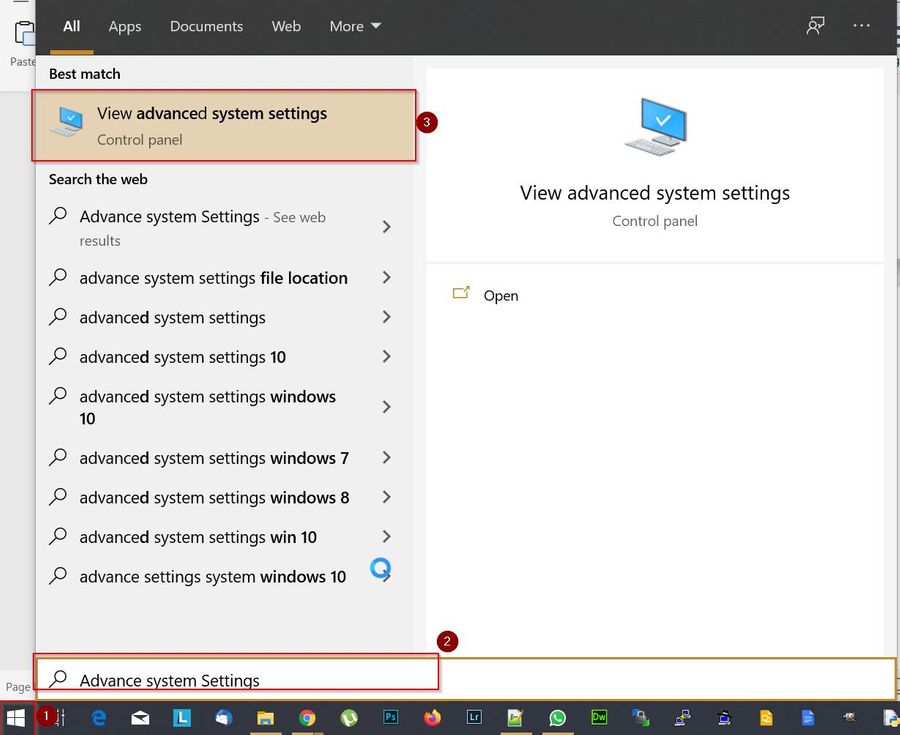
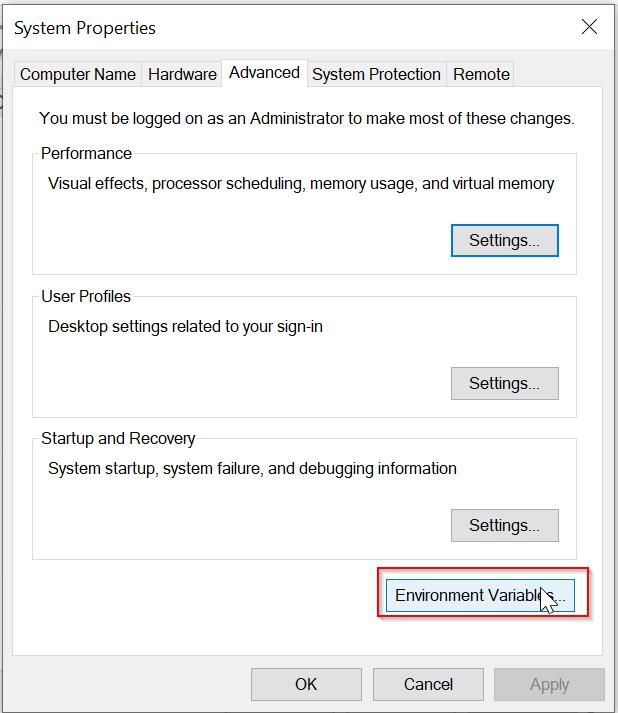
How to Set JAVA_HOME variable in Windows?
Here are the steps –
- In Windows 10, press the Windows Key. Search for “Advance Windows Settings”
- Click on the “Advance Windows Settings Button” as shown in the image
- Under the “System Property” window, click on “Environment Variables” button
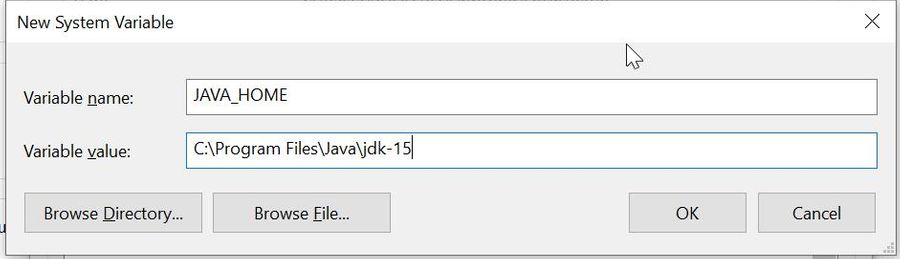
- In the “Environment Variables” window, in the “System Variables” section, click on the “New” button
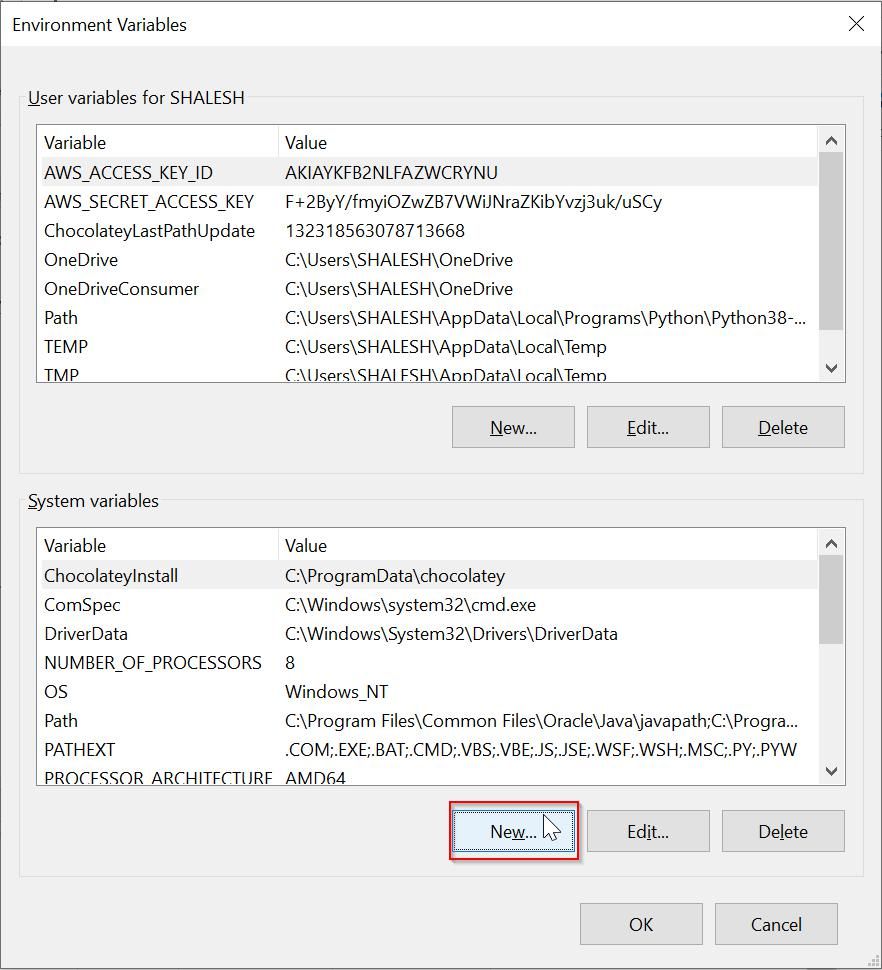
- In the “New System Variable” window, enter the following values
Now you have to update the System Path to run Java successfully.
Follow the steps below –
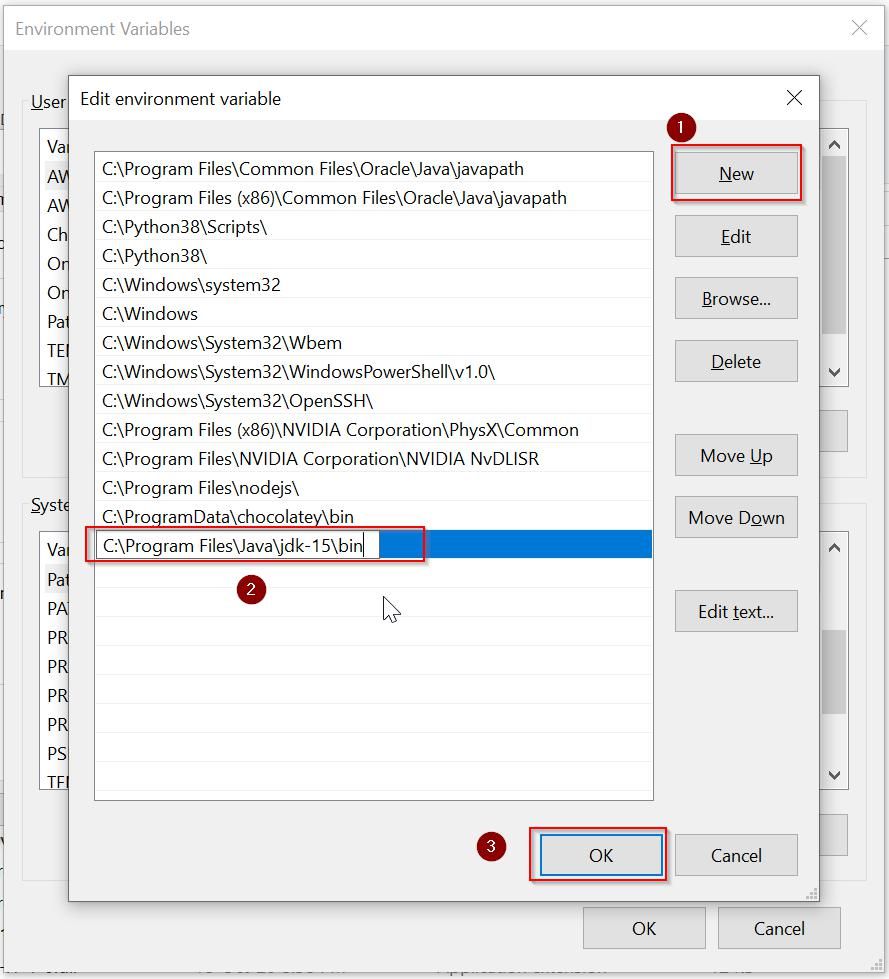
- In the “Environment Variable” box under “System Variable”, select the “Path” variable and click on the “Edit” button

- Under the “Edit Environment Variable” window, click on “New”button and give “Java” path “C:\Program Files\Java\jdk-15\bin”
- Click on the OKbutton
Now you can test your Java configuration with the following steps —
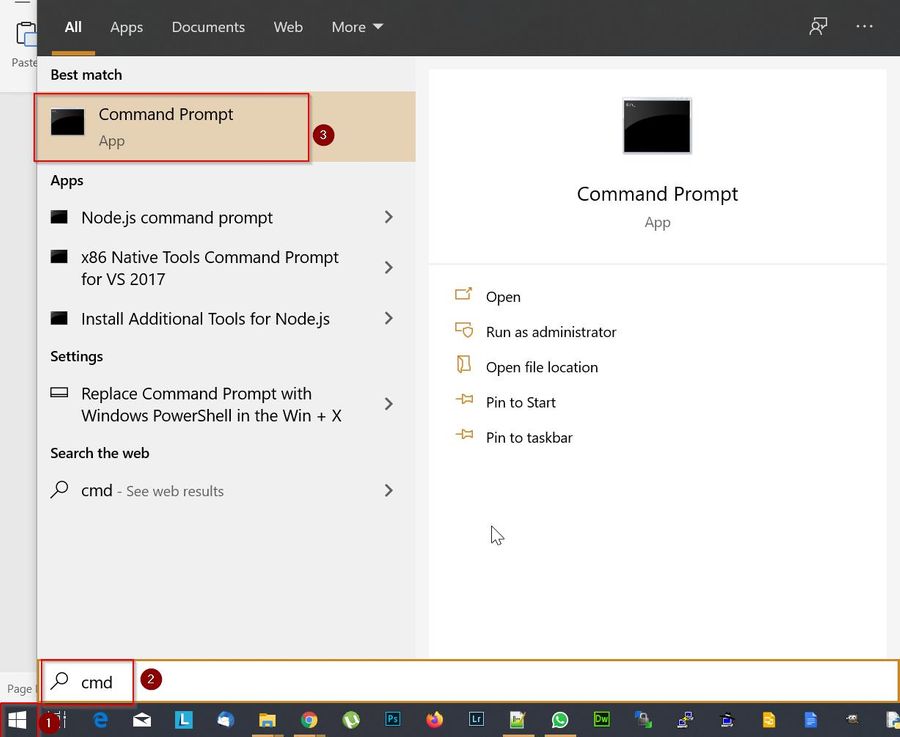
- Press the Windows key. Search for CMD
- Click on Command Prompt
- In the Command Prompt box, type the following:
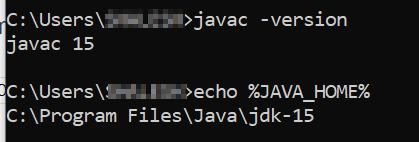
- This will be displayed only of the variable path is set correctly
Источник
How to Set Java SDK Path in Android Studio?
The Java SDK for Android is a sophisticated suite of tools for managing, monitoring, profiling, and debugging Java code written in Android Studio. But sometimes as software is unpredictable you might be caught in an error that Android Studio stopped compiling projects and says that it can’t locate the 1.7.0_21 folder. Well, this is exactly what is referred to as a missing Java SDK Path.
How to Fix the Java SDK Path?
There are several methods that can help you resolve this issue, the ones which have the highest score in fixing this problem are mentioned below:
Method #1: For Android Studio Version 4.2 and Above
Navigate to File > Project Structure > SDK Location. Upon navigating there you will find that a tab named “JDK Location”, select that and then you can set the JDK path for the current project on which you’re working.
Image I. Setting Project SDK location in 4.2 & +
Method #2: For Android Studio Version Below 4.2
Chances are that you might be rocking an older version of Android Studio, if yes then
Navigate to File > Project Structure > [Platform Settings] > SDKs
You’ll then need to either update your current SDK setup to make use of the new directory or create a new directory and then adjust the settings in your project to make use of the new directory. This will make it applicable to the present project.
Method #3: Adding a new SDK to Your Android Studio
Sometimes only updating your SDKs won’t allow you to compile projects just because the SDK has lived its life and requires an update to itself. In that scenario, you’ll need to recreate the configurations from 0.
- Navigate to Project Structure > Platform Settings > SDKs and click the “+” button.
- Go to your Android SDK folder and select “Choose” on the pop-up.
- A new pop-up window will open, asking which SDK and JDK you’d want to use. Select any Android SDK and the JDK 1.7.
Note: Change your Project SDK to the one you just established under Project Structure > Project Settings > Project. The name of the SDK should now include the new Java version that you installed.
Method #4: For the Command Line Enthusiasts
If you want to be a Geek and the above methods are just too much GUI for you, you might want to handle the SDK path using the terminal. In order to achieve that using the command line, follow the below commands in the Android Studio’s Terminal
and just like that, you’ve achieved the desired result
Note: the ‘oldjre‘ here refers to your old JRE path
Method #5: Using the Embedded SDK
If you are on Android Version 3.2 or older then you’ll be having the option of using the embedded JDK & SDK for your project and that is one of the optimal ways you can fix this issue as Android Studio will handle the management of the services in the Backend!
Navigate to File > Project Structure > JDK Location and Checkmark the box saying “Use embedded JDK (recommended)”.
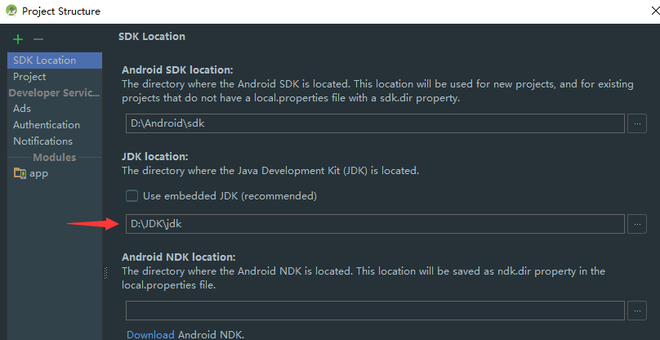
Image II. Checking the Recommended JDK Location
Method #6: Setting and Viewing SDK using the Studio Project Structure
If all the above-mentioned ways didn’t work out for you, the best you can do is to get the SDK path of another Android Studio Project and then providing that path to your particular project (as in Method #1)
Press Ctrl (Command on Mac) + Alt + Shift + S
Then in the SDK Location tab, you will find your SDK Location, just copy it and paste it in the SDK Location as mentioned in Method #1.
Источник


