- Android SQLite Database in Kotlin
- What are we going to build in this article?
- Step By Step Implementation
- Kotlin Android SQLite – Example Application
- Kotlin Android SQLite Tutorial
- Example – Kotlin Android SQLite
- Conclusion
- Android[Kotlin] Login and Register with SQLite Database Tutorial
- What is SQLite?
- Let’s Get it Working
- Step 1) Update build.gradle file.
- Step 2) Update strings.xml.
- Step 3) Update colors.xml.
- Step 4) Update styles.xml.
- Step 5) Add Logo Image.
- Step 6) Create User data class.
- Step 7) Create DatabaseHelper class.
- Step 8) Create activity_login.xml.
- Step 8) Create InputValidation class.
- Step 9) Create LoginActivity class.
- Step 10) Create activity_register.xml.
- Step 11) Create RegisterActivity class.
- Step 12) Create activity_users_list.xml.
- Step 13) Writing the Adapter Class.
- Step 14) Create UsersListActivity class.
- Step 15) Update AndroidManifest.xml.
- Kotlin SQLite Database Android Tutorial With Example
- Step 1. New Project For SQLite
- Step 2. SQLite Database Creation
- Step 3. Making Main Activity
- Deep Main Activity
Android SQLite Database in Kotlin
Android comes with an inbuilt implementation of a database package, which is SQLite, an open-source SQL database that stores data in form of text in devices. In this article, we will look at the implementation of Android SQLite in Kotlin.
SQLite is a self-contained, high-reliability, embedded, full-featured, public-domain, SQL database engine. It is the most used database engine in the world. It is an in-process library and its code is publicly available. It is free for use for any purpose, commercial or private. It is basically an embedded SQL database engine. Ordinary disk files can be easily read and write by SQLite because it does not have any separate server like SQL. The SQLite database file format is cross-platform so that anyone can easily copy a database between 32-bit and 64-bit systems. Due to all these features, it is a popular choice as an Application File Format.
What are we going to build in this article?
We will be building a simple application that will be storing data using SQLite and we will also implement methods to retrieve the data. Below is a sample video to show what we will be doing.
Step By Step Implementation
Step 1: Create a New Project
To create a new project in Android Studio please refer to How to Create/Start a New Project in Android Studio. Note that select Kotlin as the programming language.
Источник
Kotlin Android SQLite – Example Application
Kotlin Android SQLite Tutorial
Kotlin Android SQLite – SQLite is an open source database based on SQL language. Android has SQLite database implementation by default.
In this tutorial, we will learn how to do basic SQLite operations like inserting a row into table, reading rows from table, updating rows in table and deleting rows.

Example – Kotlin Android SQLite
Koltin Android SQLite Example Application : In this Android Tutorial, we shall learn how to use SQLite database in your Android Application with an example using Kotlin Programming language.
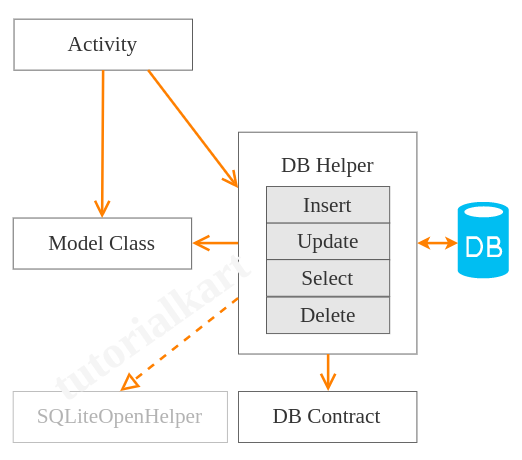
We shall look into typical classes that we use for using SQLite database.
| DB Contract Class | Contains schema (table name and column names) for program understandability. |
| DB Helper Class | This class contains methods that do database operations like insert, select, update, delete, etc. |
| Model Data Class | Used to carry objects (rows of DB table) |
| Activity Class | This is class file of your Activity from which you call DB Helper’s methods for database activities |
Following are the details of the Android Application we created for this example.
| Application Name | SQLiteTutorial |
| Company name | tutorialkart.com |
| Minimum SDK | API 21: Android 5.0 (Lollipop) |
| Activity | Empty Activity |
You may keep rest of the values as default and create Android Application with Kotlin Support.
activity_main.xml
UserModel.kt
DBContract.kt
UsersDBHelper.kt
MainActivity.kt
Conclusion
In this Kotlin Android Tutorial – Kotlin Android SQLite, we have learnt how to use SQLite database (CRUD Operations) in Android Application, and necessary classes for maintenance, with an Example Android Application
Источник
Android[Kotlin] Login and Register with SQLite Database Tutorial
In software applications, it is mostly required to store users and app data locally. Android SDK provides several API’s for developers to save user and app data, So SQLite is one of the ways of storing data. For many applications, SQLite is the app’s backbone whether it’s used directly or via some third-party wrapper. In this tutorial, we will write code in Kotlin and also see how to use SQLite in our app directly.
What is SQLite?
SQLite is a lightweight database which comes with android. It is an Open-Source embedded SQL database engine. This provides relational database management structure for storing user-defined records in the form of tables.
Key point to understand regarding SQLite :-
– SQLite is RDBMS (Relational Database Management System)
– SQLite is written in C programming language
– SQLite is embedded within the Android Operating System, so you don’t need anything external on Android to use SQLite
– To manipulate data (insert, update, delete) in SQLite database – we’ll use SQL (Structured Query Language)
Let’s Get it Working
In this tutorial, we are going to learn how to use SQLite. To really understand the usage of SQLite we will create an app using Kotlin. The App contains simple Login form, Registration form, and a listing of a registered user. This app shows how SQLite database operations are performed. I assume that you have created a new android project. Source Code is available on GitHub.


Step 1) Update build.gradle file.
Before you can use Material Design in your projects you need to add the following compile line to your Gradle dependencies block in your build.gradle file and rebuilt the project .
Step 2) Update strings.xml.
Add the below string values to the string.xml located in res ⇒ values ⇒ strings.xml.
Step 3) Update colors.xml.
Add the below color values to the colors.xml located in res ⇒ values ⇒ colors.xml.
Step 4) Update styles.xml.
Add the below style values to the styles.xml located in res ⇒ values ⇒ styles.xml.
Step 5) Add Logo Image.
Download the below logo image and add it to the drawable folder located in res ⇒ drawable.
Android Tutorials Hub Logo
Step 6) Create User data class.
Create a new package named modal and create a Kotlin file/class named User to maintain single contact as an object.
Step 7) Create DatabaseHelper class.
Create a new package named sql and create Kotlin class named DatabaseHelper. Extend this class with SQLiteOpenHelper to manage database creation and version management. I have also written some method to manipulate data in database.
Methods and functionality
– addUser :- add user to database.
– getAllUser :- fetch users data from database.
– updateUser :- update user in database on the basis of user id.
– deleteUser :- delete user from database on the basis of user id.
– checkUser :- check whether user exists in database.
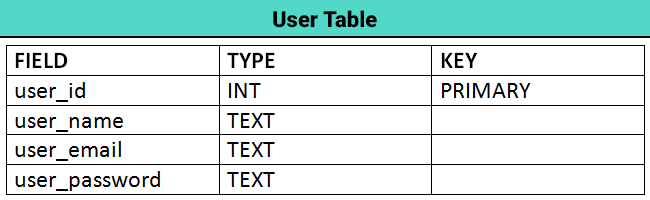
User Table Schema
Step 8) Create activity_login.xml.
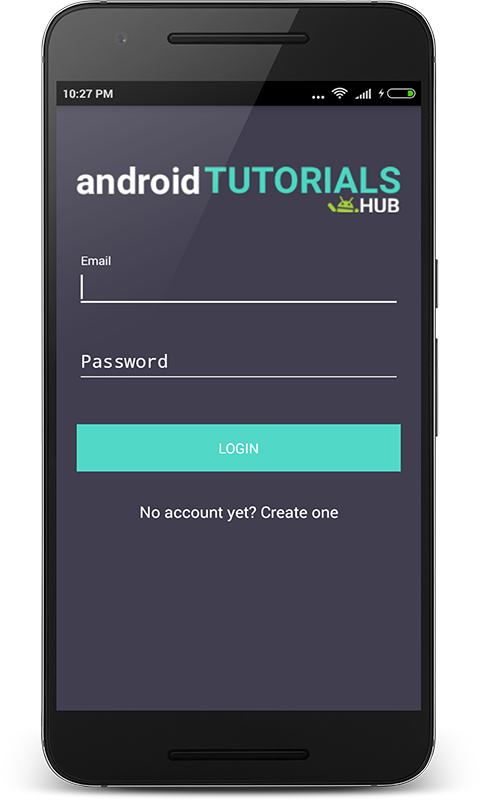
Now create a layout file for the LoginActivity.kt i.e activity_login.xml and add the below code in your layout file. The code will create a simple login form containing a logo on the top, 2 input fields email and password, login button, and registration screen navigation link.
activity_login.xml would result a screen like this:
Step 8) Create InputValidation class.
Create a package named helpers and create a Kotlin class in it named InputValidation.kt and add below code in it. The code will create validation methods for input field. Validation like empty input, valid email and etc.
Step 9) Create LoginActivity class.
Now create a package named activities and create a kotlin class named LoginActivity and add below code. Here i have written the code to validate the input fields Email and Password using the InputValidation class which i described above. Also code for navigation to registration screen on the click of registration link and to user list screen after click on login button if credentials are valid.
The Screen below shows the login form with input validation display the error message if values entered in input fields are not valid.
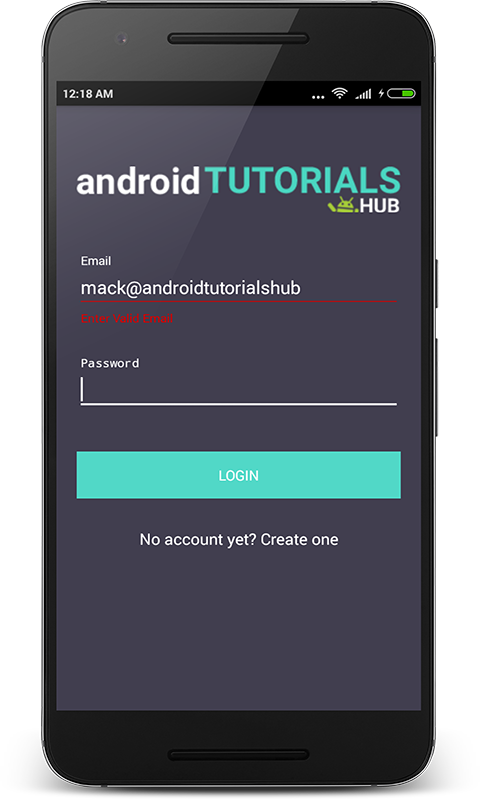
Login Screen with Input Validation
The Screen below shows the login form with input validation display the snack bar with message if values entered in input fields are not validated from SQLite database.
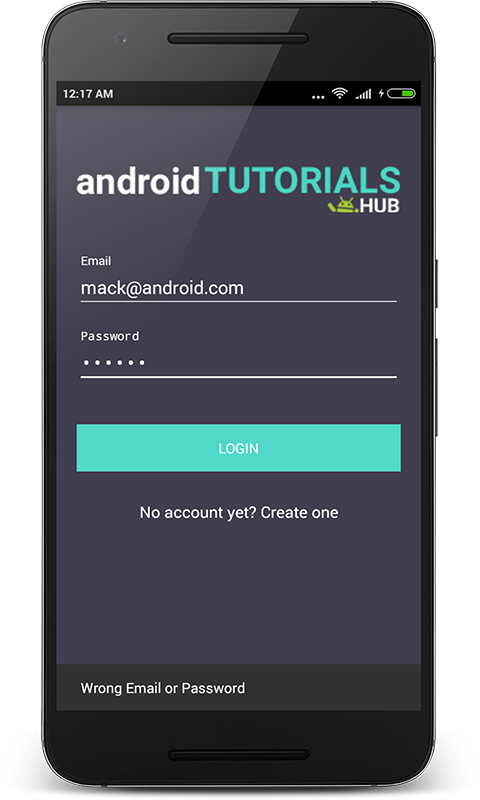
Login Screen With SQLite Validation
Step 10) Create activity_register.xml.
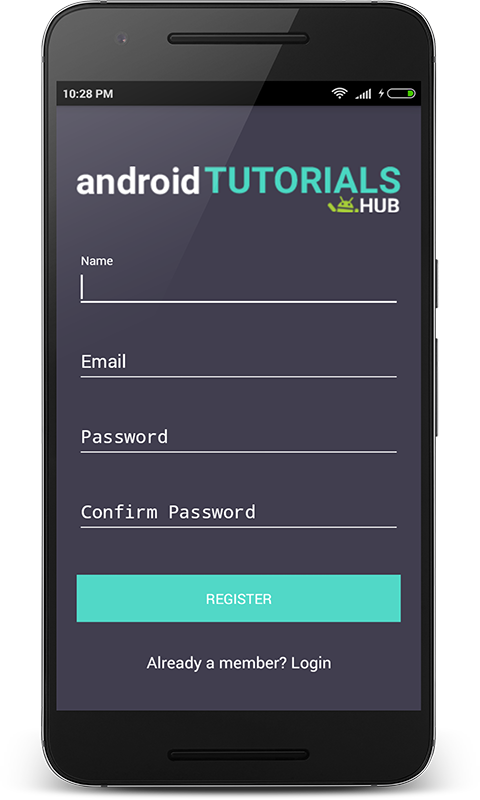
Now create a layout file for the RegisterActivity.kt i.e activity_register.xml and add the below code in your layout file. The code will create a simple registration form containing a logo on the top, 4 input fields name, email, password, and confirm password, register button, and login screen navigation link.
activity_register.xml would result a screen like this:
Step 11) Create RegisterActivity class.
Now create a package named activities and create a kotlin class named RegisterActivity and add below code. Here I have written the code to validate the input fields Name, Email, Password, and Confirm Password using the InputValidation class which I described above. Also, code for navigation to the login screen on the click of the login link and shows a snack bar with a success message for registration.
The Screen below shows the register form with input validation display the error message if values entered in input fields are not valid.
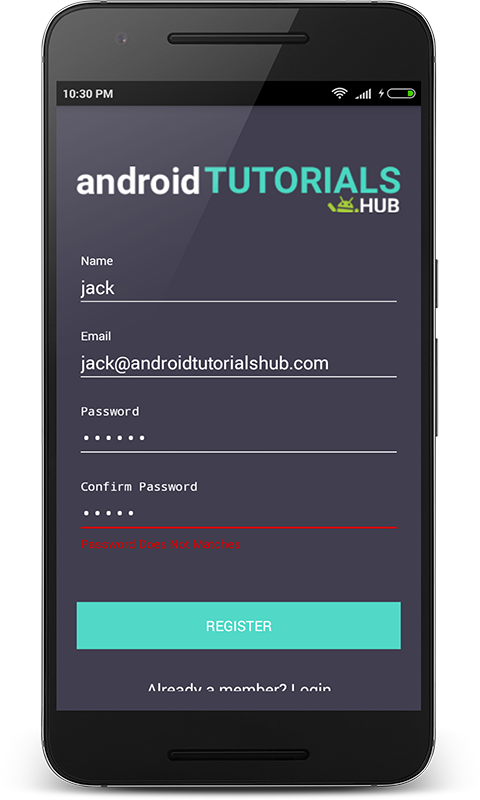
Register Screen with Input Validation
The Screen below shows the filled register form with valid values.
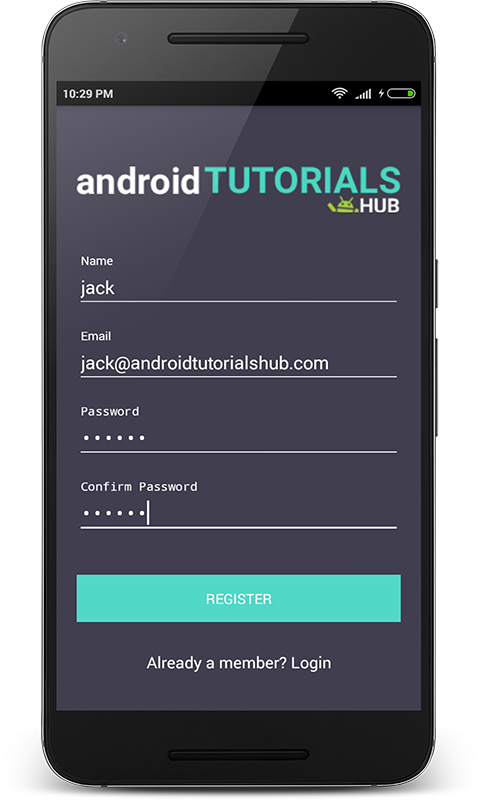
Register Screen with filled input fields
The Screen below shows the register form display the snackbar with registration success message.
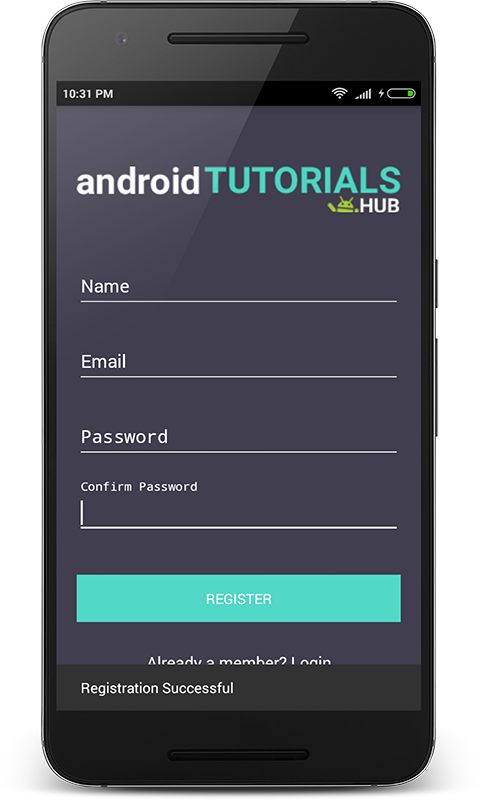
Register Screen with Registration Success Message
Step 12) Create activity_users_list.xml.
Now create a layout file for the UsersListActivity.kt i.e activity_users_list.xml and add the below code in your layout file. The code will create a simple view containing two views one view i.e LinearLayout shows the welcome message with email id of the logged-in user and other views i.e RecyclerView shows the list of registered users in the app.
activity_users_list.xml would result a screen like this:
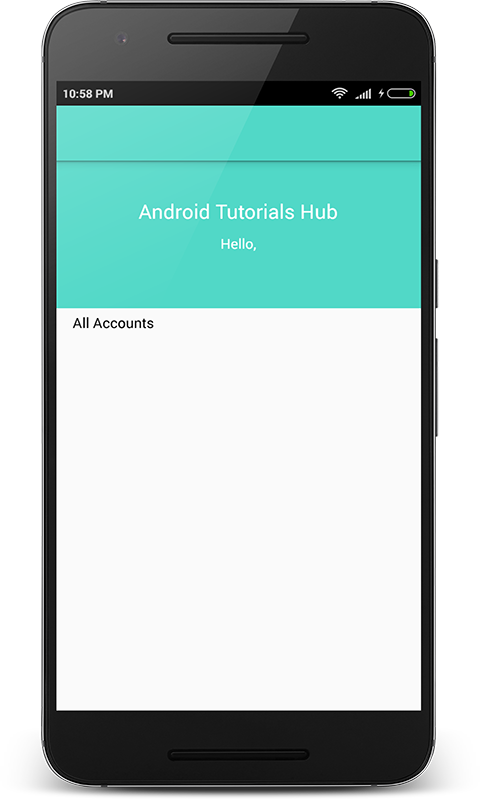
User List Screen
Step 13) Writing the Adapter Class.
Now create a package named adapters and create a kotlin class named UsersRecyclerAdapter and add below code. Here onCreateViewHolder() method inflates item_user_recycler.xml. In onBindViewHolder() method the appropriate User data (name,email and password) set to each row.
item_user_recycler.xml
Step 14) Create UsersListActivity class.
Now create a package named activities and create a kotlin class named UsersListActivity and add below code. Here I have written the code to show the email id of the logged in user and the list of registered users.
The Screen below after user login shows the brand name, email id of logged in user and registered users list.
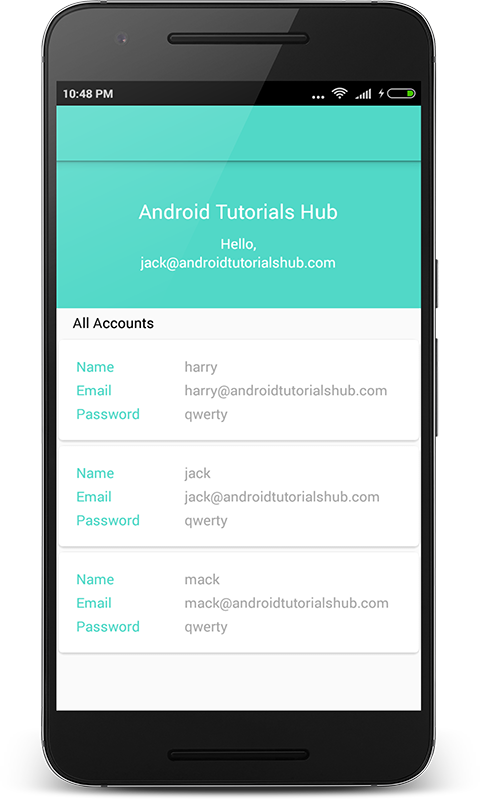
User List Screen After Login
Step 15) Update AndroidManifest.xml.
Please feel free to comment as well as ask questions. And, yeah! If this post helps you please do share!
Enjoy Coding and Share Knowledge
Источник
Kotlin SQLite Database Android Tutorial With Example

This post is about Kotlin SQLite Database Android Tutorial With Example.
You will learn how to use SQLite database to save data in android device using kotlin.
Sometimes you want to give user an offline features, hence you need to store information in the SQLite Database.
We will cover simple operations like adding and deleting records in sqlite database using Kotlin.
If you wish to do operations like insert, update, retrieve and delete records then read Kotlin SQLite CRUD Android Example Tutorial.
You will learn how to insert and retrieve data from sqlite database in android using Kotlin in this tutorial.
First of all, check the below output video.
Step 1. New Project For SQLite
Your first task is to make a fresh new android studio project.
In this process, you need to be sure that you have selected empty activity as a default activity. Another thing that you need to select Kotlin as the primary language for the project.
Step 2. SQLite Database Creation
Make a new kotlin class and give it a name like DatabaseHelper.kt
Write down the following source lines in DatabaseHelper.kt
Now let us see what above lines is saying to the compiler.
First of all, checkout the following
First line is defining the variable DATABASE_NAME. This variable contains the name of the sqlite table.
Second line is for DATABASE_VERSION variable. This variable defines the current version of the database.
Then three variables TABLE_STUDENTS, KEY_ID, KEY_FIRSTNAME are defining the names of the columns of the sqlite table.
A variable CREATE_TABLE_STUDENTS is making an sqlite query to make a new table with three columns.
Inside onCreate() method, compiler will execute the query to construct a table.
Below is the code block for onCreate() method.
In this example, we are dealing with just one table, that’s why there is only line in the onCreate() method.
If you want to create more than one table then you need to add multiple lines.
Now see the following snippet of onUpgrade() method.
When compiler execute the above code, it will drop all the tables from database first and then it will recreate all the tables.
onCreate() method is called within onUpgrade() method to create tables.
In following scenarios, you need to upgrade DATABASE_VERSION number in increment order.
- When you add, update or delete any column of any table in the whole database.
- If you update any column name of any table.
- After you add, update or delete any table.
- Update the table name and increase DATABASE_VERSION.
- onUpgrade() method is called every time When you update the DATABASE_VERSION in the increment order.
Now read the below code lines
Above code will fetch all the rows from the table.
It will save all these rows into an arraylist whose name is allStudentsList.
Now focus on the below code
This function is getting the string variable into the parameter. This parameter is the name of the student.
Compiler will use this string parameter and it will insert it into the database table.
Step 3. Making Main Activity
Open up your activity_main.xml and add the following in it
There are two text views, two buttons and one edit text is there.
In the edit text, user will enter the name of the student.
There are two buttons : Store and Get All Names from SQLite. When the user clicks store button, compiler will add the name of the students into the SQLite database.
On the click of Get All Names from SQLite button, system will fetch all the names from the database and it will print them in one text view.
Now in your MainActivity.kt file, add the following lines
Deep Main Activity
Let us see the work flow of main activity.
First of all, focus on the below
First two lines are making the objects of a button class.
Third line is for edit text object. Fourth line is giving us the object of the database helper class.
Fifth line is for text view object and last line is the arraylist with the string variables.
Compiler will execute the below lines when the user clicks the Store button.
Compiler call the addStudentDetail() method using the database helper object. Here, it has the string parameter.
For this string parameter, compiler will get the text from the edit text. User have entered name in this edit text thus, compiler will fetch the name and will send it in the parameter.
addStudentDetail() method will add this name in to the SQLite database.
Now, follow the following code snippet
Compiler will go through the above code when the user clicks Get All Names from SQLite button.
It will simply call allStudentsList() method from the Database Helper class. This method will return the string arraylist which will be stored in the variable named arraylist.
Then compiler will execute one for loop. During the every iteration of for loop, it will fetch the one name from the arraylist and it will print it on the text view.
Thus, after the execution of the for loop, all the names stored in the database will be printed on the text view.
Источник


