- Layouts in different folders in Android App
- Your ‘res\layout’ folder is too big? Try making sub-folders.
- THERE IS A MAGIC !
- Split layouts into subfolders in Android Studio
- Step 1: create layouts container
- Step 2: create feature Res Folders
- Step 3: Add resources to each subfolder
- Step 4: Resync
- Access the resources
- Other solutions?
- In Conclusion
- How to Create Landscape Layout in Android Studio?
- Method 1:
- Method 2
- How to Add/Create Landscape Layout in Android Studio
- How to Add / Create Landscape Layout in Android Studio
Layouts in different folders in Android App
Your ‘res\layout’ folder is too big? Try making sub-folders.

Normally we store every xml layout file inside the res/layout folder. It is feasible and simple to manage small projects. But in a large and heavy project, it is very common that the resources folder grows and grows and if your project have more then 35 layouts it’s a problem to find a required layout. As solution of this problem we can store your layouts in different folders. As example you can separate your layouts to “activity layouts”, “fragment layouts”, “adapter layouts”, etc. You can separate layout like this:

Configure Multiple Layout Folder
- Switch to Project view;
- Copy all of the XML files out of your layout directory, and put them into a directory on the desktop or something for backup. (present under android/app/src/main/res/layout);
- Delete the entire ‘ layout’ directory (Make sure you backed everything up from step 1. );
- Right click the ‘res’ directory and select new > directory to create Directory in folder res which called “layouts” (I prefer calling it ‘layouts’ but this can be whatever you want, but it will not be a ‘fragment’ directory or ‘activity’ directory, that comes later).;
- Right click the new “layouts” directory and select new > directory. (This will be the name of the type of XML files you will have in it, for example, ‘fragments’, ‘activities’ or ‘adapters’ etc.);
- Right click the ‘activities’ directory and select new > directory once again and name this directory “layout”. (Note: This MUST be named ‘layout’ . very important);
- Do the same for fragment and adapter folders;
- Put the XML files you want inside the new ‘layout’ directory from the backup you made on your desktop;
- Now go into your modules gradle.build file and create a sourceSets definition like this…(Make sure ‘src/main/res/layouts’ & ‘src/main/res’ are always the bottom two. Like I am showing below).[ If you make another directory like ‘activities’ or ‘fragments’ you must add them here in res.srcDirs manually];
7. Sync your project and everything will work correctly;
If you want to use different layout mode like portrait mode, landscape mode, etc. You have to create folder like this:

Unfortunately this solution works only for “ Project” view;
- Change the name of feature directory (‘activities’, ‘fragmetns’) as per your project.
- Add all feature directory path in sourceSets in build.gradle in the same way.
- src/main/res/layouts MUST be second last and src/main/res MUST be the last path.
THERE IS A MAGIC !
If you want to improve it on a bit, then just change the sourceSets in gradle setting like this:
Now if you add more folders and layouts, you don’t need to append a long list of source folders here, gradle will get all the folders for you .
Congratulations ! You have successfully created subdirectories in your layouts folder. Be sure to give claps if you find this article to be helpful. Thanks for reading.
Do you know it is very easy to decompile an Android App and get the API you used in your project. To secure your API Keys you can see this article Securing API Keys in Android App
Always try to use PROGUARD in your Android app to keep your codes secured. If you have no idea on Proguard then you can see this article Secure Your Codes by Enabling PROGUARD in you Anroid App.
Источник
Split layouts into subfolders in Android Studio

TL;DR: You can manage your resources XML files (layout, drawable. ) better, by grouping them into separate subfolders corresponding to app’s features.
Today when optimizing the codebase of my school project, I saw this:
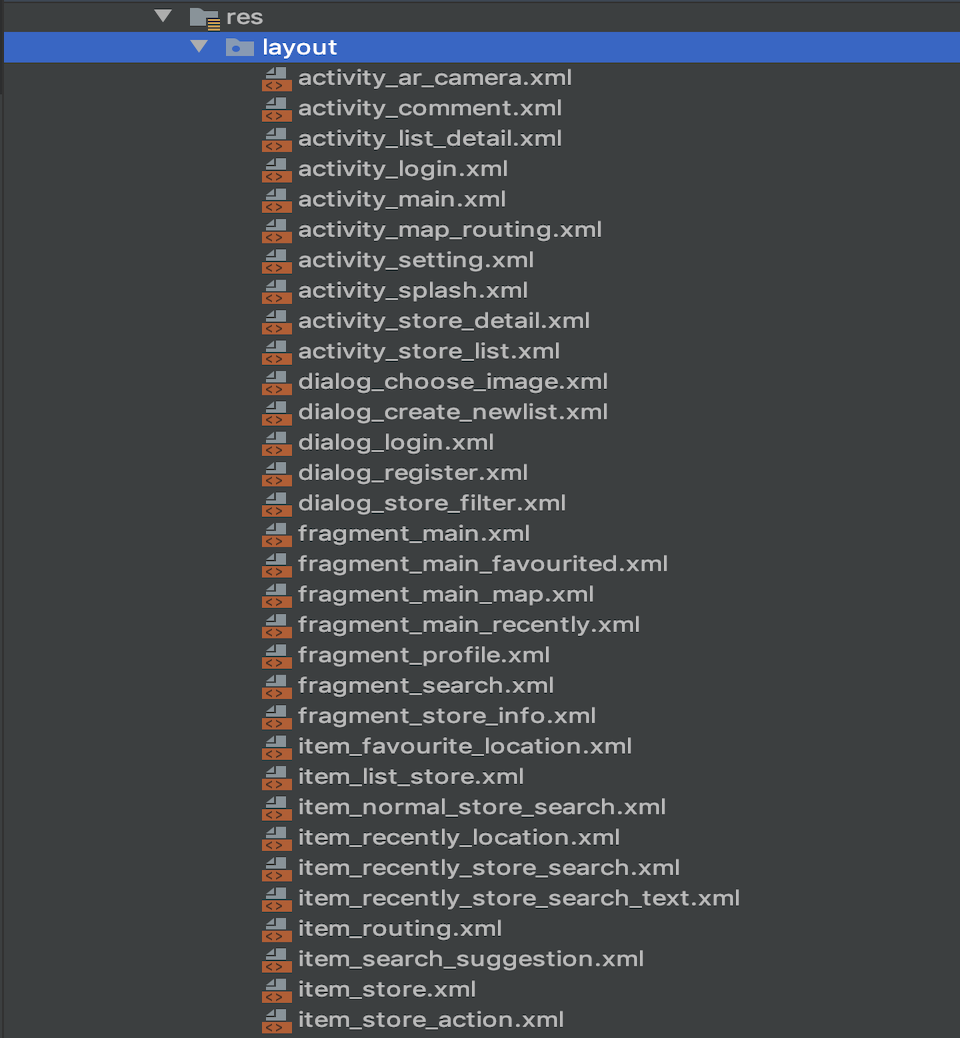
Look at the list of XML files inside my res/layout folder.
Now, look at yours. Is your res/layout too big, hard to control? Your project has too many features, too many screens? Let imagine while confusing running for the deadline, and you can’t find the XML layout that needs to be fixed just because you cannot remember the file name!
Wandering search online, I find out that many developers have the same problem. So I decided to write an article to share some tips about how to manage the resources folder in Android Studio.

Step 1: create layouts container
Create a parent folder that contains all the layouts of our project.
Switch project tree explorer to Project view. Right-click in res , select New → Directory, type layouts (remember the ‘s’ or it will be duplicated).

This step is a must-have at the moment. When changing the project tree to Android view, you cannot see the separated subfolders. They are actually NOT merged into one, but Android Studio shows them in the same folder.
Step 2: create feature Res Folders
Select layouts , right-click and select New → Folder → Res Folder. This resource folder will represent a “feature category” that you want.

If you have N vertical features, you need to create N folders. For example, you are developing a Chat app that has 3 categories “home”, “profile” and “chat” corresponding to vertical groups of features.
First, I will add chat as new Res Folder, wait a while for Gradle syncing to re-structure the codebase. After that, you will see a yellow chat folder in the res but not inside the layouts . Actually it’s still in layouts , however, because we’ve just added only one folder chat so it only shows chat . Continue to create two more Res Folder for home & profile . Then the project tree will appear exactly as what you expect:

At this point, you’ve successfully divided the layouts into 3 separate categories.
Step 3: Add resources to each subfolder
Add a layout folder (without ‘s’) to each subfolder corresponding to each category — like the traditional res/layout . Now you can add any XML layout file that belongs to the current feature into that layout folder.
You can also add other types of resources: menu , drawable , anim .
Step 4: Resync
Try re-sync Gradle and rebuild the project, you will see the following code was added inside the android tag of app/build.gradle file.
This code corresponds to adding 3 categories: 3 resource folder chat , home & profile . If it does not exist, you can add it manually.
Access the resources
After resync, you can access these resources normally in Java/Kotlin code using R.layout.chat_activity.xml , R.drawable.chat_send_button.xml ,… Whenever you need to find any XML file, just go to the subfolder of that feature to look for it!
Other solutions?
Another way is to modularize your project: moving code and resources into a separate feature module. It’s much cleaner and follows SRP principle.
In Conclusion
You can organize your resources XML files (layout, drawable. ) into separate subfolders corresponding to the app’s features.
I hope these tips above will help you manage your project better, saving your precious time — especially when you need to maintain a huge codebase with many vertical groups of features.
Programming is a process of creating products with the team, so code style & project organization are very important. And such things are usually not taught in school.
Источник
How to Create Landscape Layout in Android Studio?
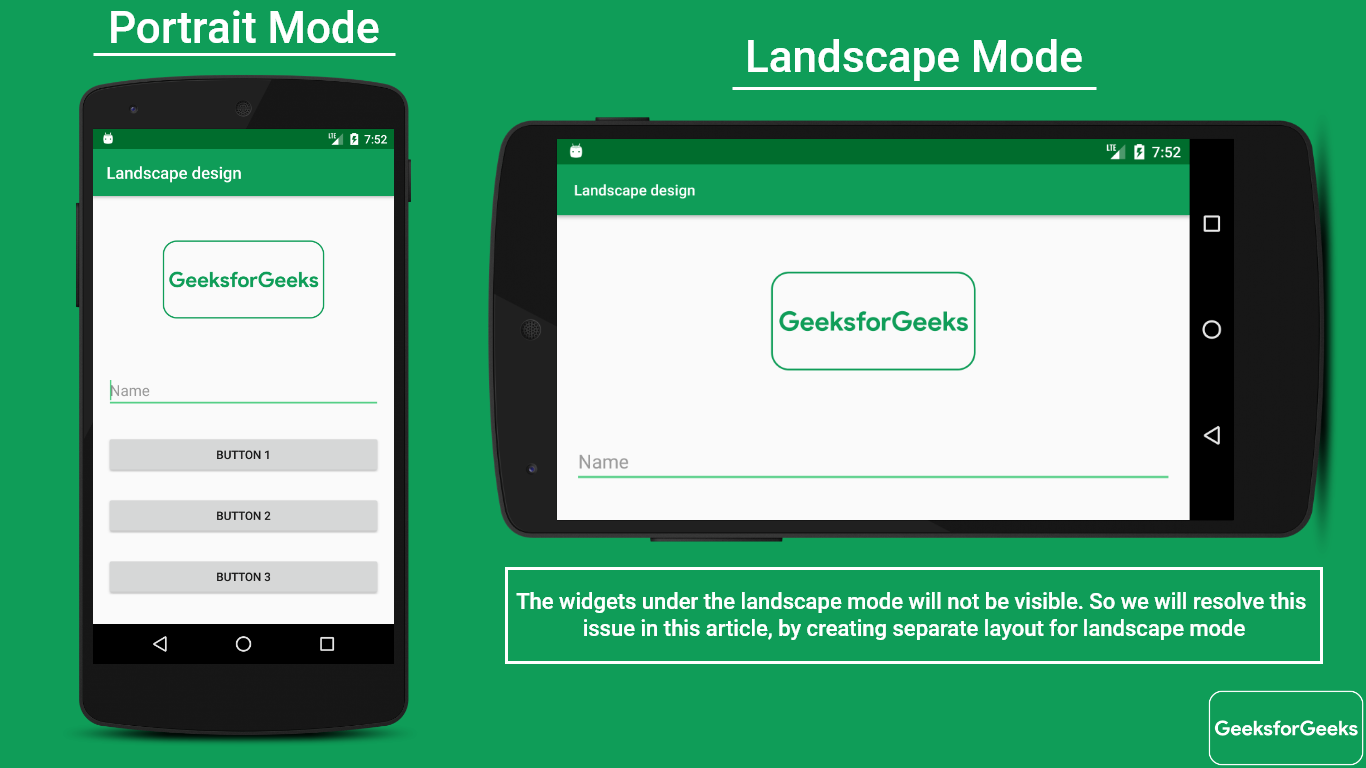
In Android, whenever the user switches to landscape mode an issue is encountered in which some of the widgets become invisible (as you can see in the below image) and so in this scenario , there is a need to design a separate layout for the landscape mode. So i n android, every application is designed in almost both the orientations i.e Portrait and Landscape. But by default Android Studio gives the option to design the application in Portrait mode but for Landscape mode, we need to create a Landscape Layout folder under the res folder. As per Android developer website guidelines, the name of this folder should be “layout-land”.
We are going to discuss two methods to create a landscape layout in android studio.
Method 1:
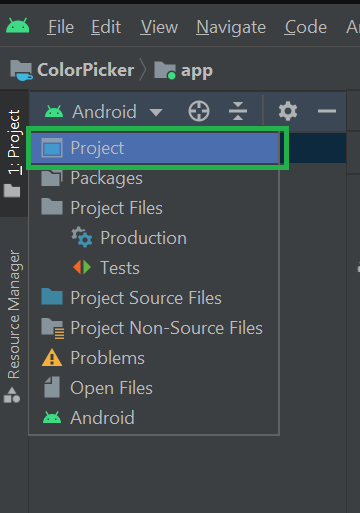
Step 1: If the project is already opened in the “Android” mode then change the project to “Project” mode as shown in the below image.
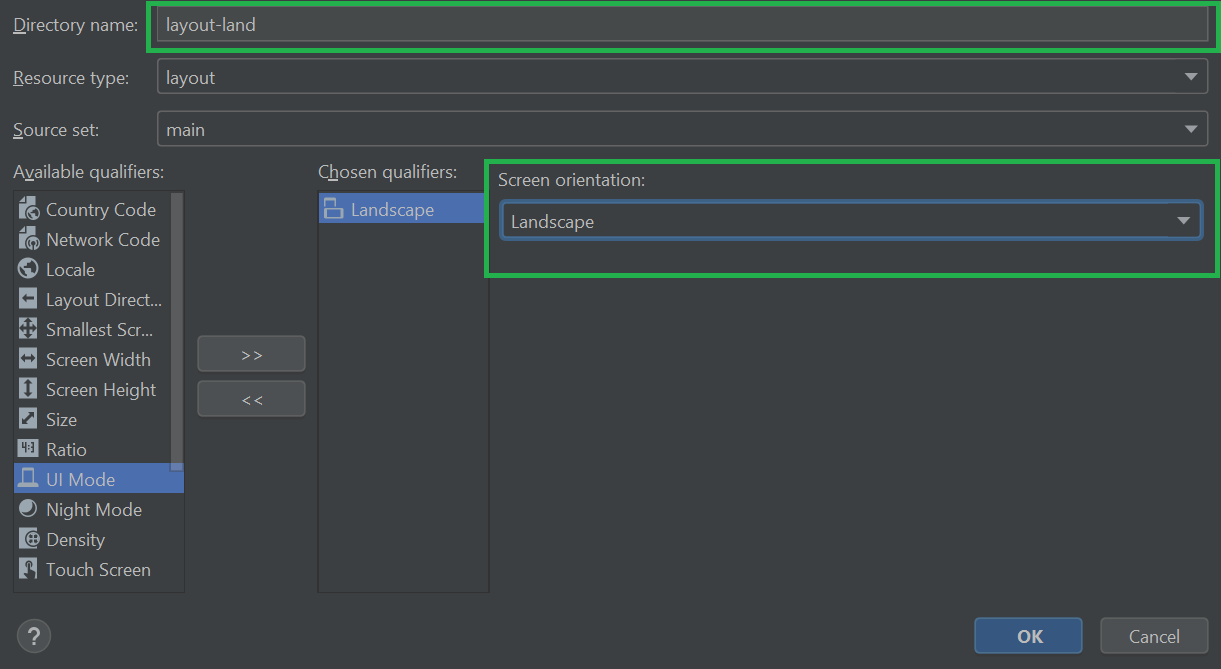
Step 2: Go to app > src > main > res > right-click > New > Android Resource Directory and one pop up will be prompted as shown below. Select Resource type as layout then go to Orientation and then click on the >> icon.
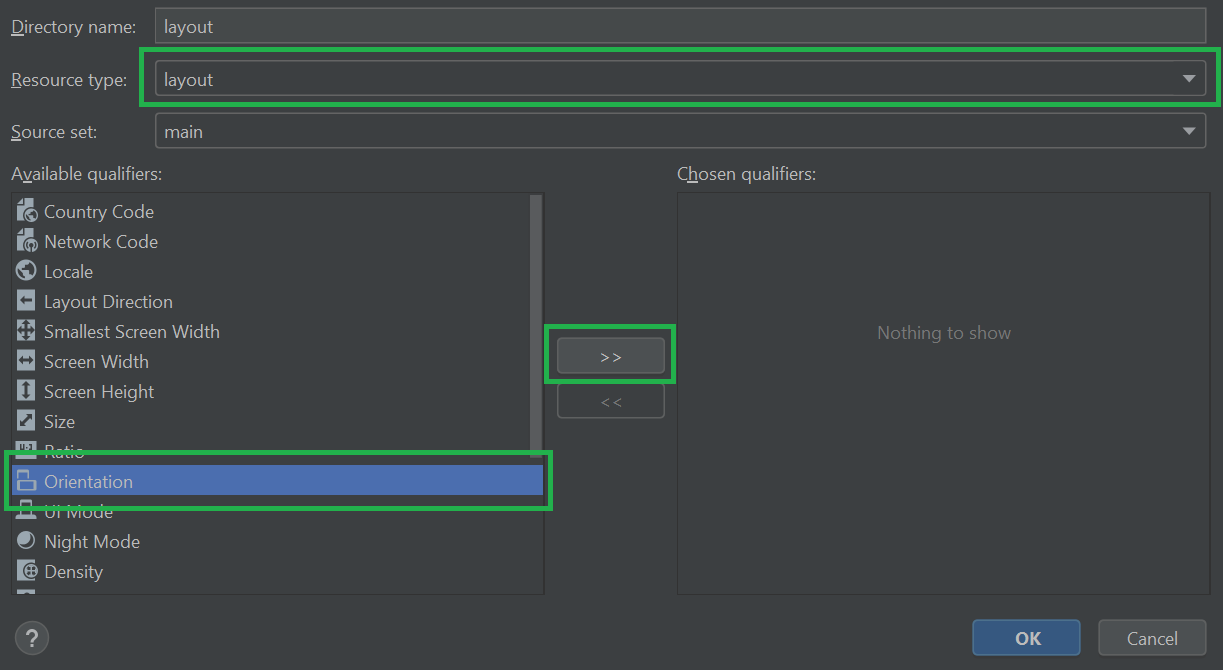
Step 3: Now in the Screen orientation select Landscape and the directory name automatically change to layout-land and let the Directory name as layout-land and don’t change it .
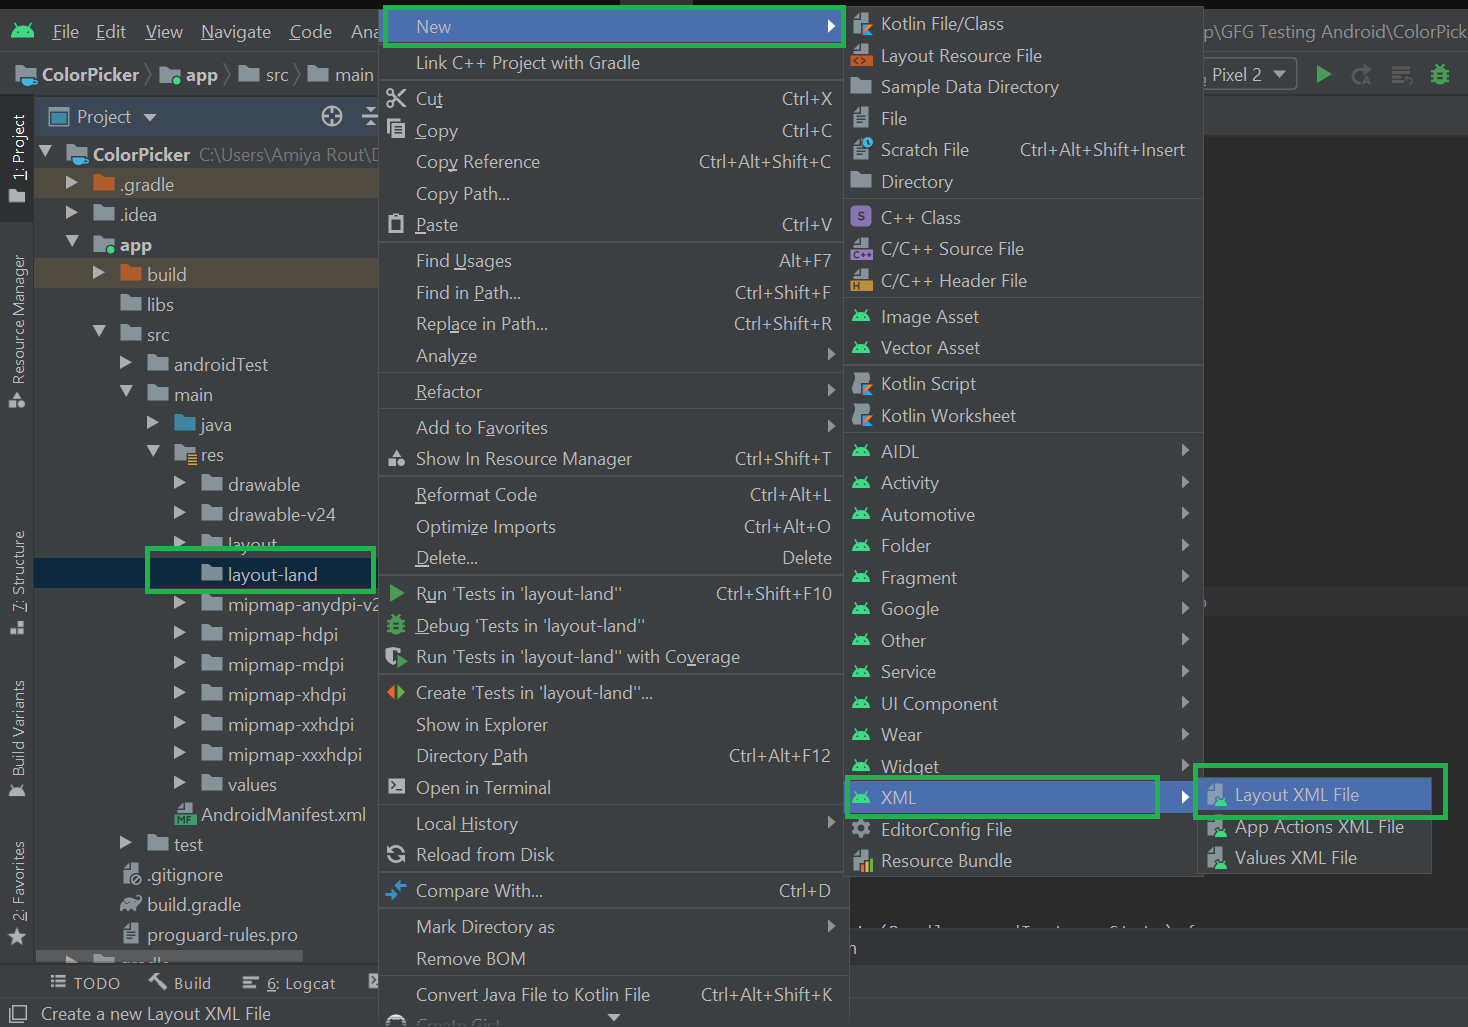
Step 4: Go to the layout-land > right-click > New > XML > Layout XML File and name the file.
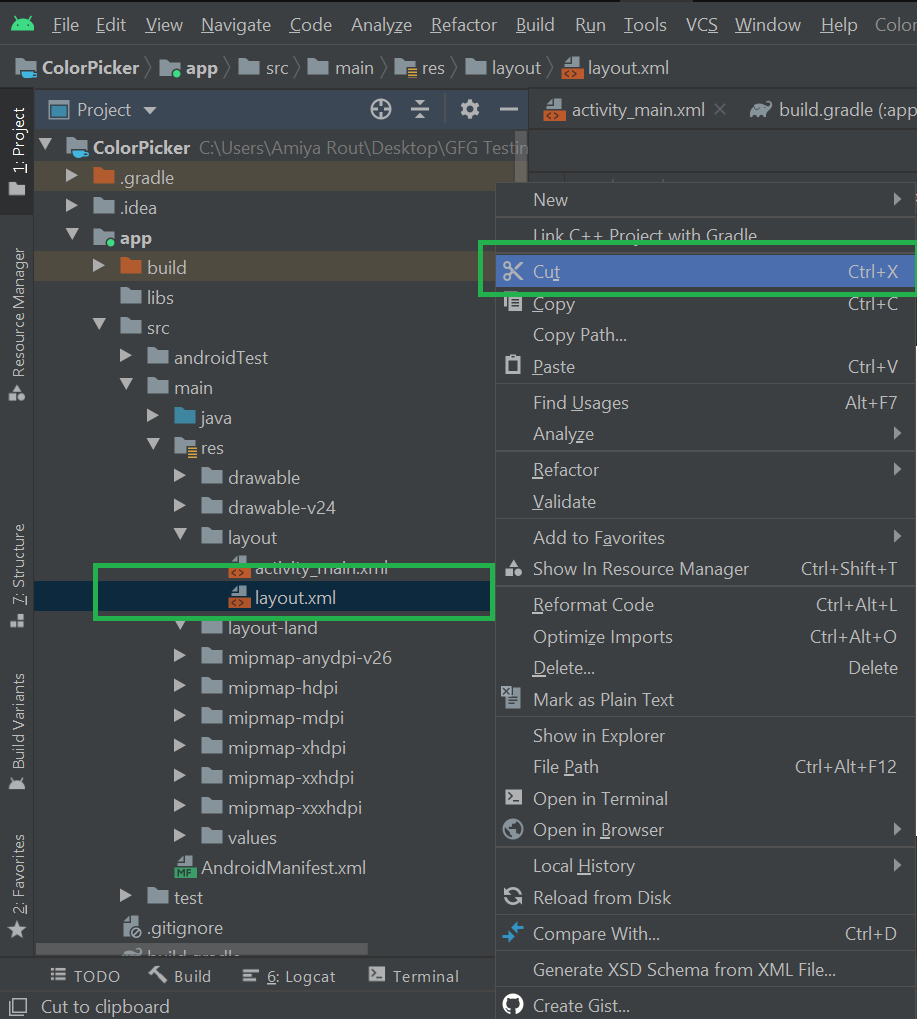
Step 5: Now cut the layout.xml file and paste it under the layout-land folder. Open the XML file and you will get the Landscape mode.
If you want to redesign the activity_main.xml in Landscape mode then copy the activity_main.xml file from the layout folder to the layout-land folder. Please refer to this article to Design the Landscape and Portrait Mode of Application in Android . Refer to the following video to get the whole steps:
Method 2
Method 2 is very easy to implement. In fact In Android Studio 3.x.x, there is no need to create an extra layout folder. There are only two steps to implement the method.
Step 1: Open the base UI layout in DESIGN mode so that you see the actual GUI, such as Buttons, icons, etc.

Step 2: Click the icon marked in the below screenshot and, from the menu, select Create Landscape Variation. Then the corresponding Landscape file will be created automatically named as land\xml file name.
Источник
How to Add/Create Landscape Layout in Android Studio
In android, every application is designed in almost both the orientations i.e Portrait and Landscape. By default Android Studio gives you the option to design your application in Portrait mode but for Landscape we need to make some extra settings or more specifically, we need to add/create a Landscape Layout folder under res folder. As per Android developer website guide lines the name of this folder should be “layout-land”.
How to Add / Create Landscape Layout in Android Studio
Lets see how to create layout-land inside your project:
Step 1: Open your Android Studio and if your project is opened in “Android” perspective then change it to “Project” Perspective(Option is available on the Left side of your android studio)

Step 2: Open App folder inside your project folder
Step 3: Then open src > main >res. Here you have all the folder which help in creating UI for your app.
Step 4: Right click on res folder click New>Directory. Android studio will open a dialog box.
Step 5: Inside Dialog box you have to give a directory name or you can say name of our new folder. So it would be “layout-land”. Click Ok.
Step 6: Now you have “layout-land” folder in your project. Right click on it New>XML>Layout XML file. This file will be create inside layout folder(portrait)
Step 7: Cut layout xml file
Step 8: Paste it under your “layout-land” folder and click ok. Now open your xml file. You will get the Landscape mode.
Источник


