- 10 steps to create a custom LayoutManager
- Let’s start implementing our LayoutManager.
- Layouting the views.
- Handle scrolling
- And that’s it
- Реализация списка с заголовком, футером и пагинацией в Андроид
- RecyclerView
- Настройка Gradle
- Добавление RecyclerView в XML представление
- Привязка XML с классом JAVA
- RecyclerView ItemDecoration
- RecyclerView Adapter
- Пагинация
- Android — What is Layout Manager?
- 3 Answers 3
10 steps to create a custom LayoutManager

This article is based on my github project LondonEyeLayoutManager, recently published in Android Weekly. For the sake of simplicity code snippets here might be different from the code in repository.
What we normally do in order to have this kind of functionality that ListView provides? We have to:
- Know how to lay out views on the screen.
- Handle touch events, measure scroll velocity and direction.
- Move views on the screen when scroll is happening.
- Implement views recycling.
With a new RecyclerView & LayoutManager few of these point are handled for us:
1. We don’t have to handle touch events, measure scroll velocity and direction.
LayoutManager provides very convenient API for that:
This API has a drawback : we only get vertical or horizontal scroll. If we need to know if user, for example scrolls diagonally we should calculate it by ourselves. These methods gives us a value by which we should move views on the screen. We should return the actual distance (in pixels) by which we moved our views.
scrollVerticallyBy(dy, recycler, state) was called with dy = 25;
But to the end of a screen we have left 20 pixels. So we move a views by -20px and return -20. You should notice that we are returning a value with an opposite sign.
LayoutManger will “understand” that if we returned less than was scrolled, it should stop sending us these scroll events, we already reached the end. Demo:
It also means that if we return “0” the list will not be scrolled at all.
2. We don’t have to handle recycling.
If we need a view on position we just call the appropriate method from the Recycler.
This is what we have to implement:
- Layout views on the screen.
- Move views on the screen when scroll is happening.
Let’s start implementing our LayoutManager.
Goal: Create a LayoutManager that will layout our views on the circular trajectory.
- Layout in first quadrant. (Y axis in Android is points to the opposite direction than in Cartesian coordinate system).
- Views center should keep it’s center on the circle.

Here is how we are going to do that :
10 steps to implement a LayoutManager.
As I mentioned earlier there is two things that we need to handle: layout views and handle scrolling.
5 steps to handle layout of views:
- Get view by position.
- Add view to the RecyclerView.
- Get view location on the screen.
- Layout this view.
- Increment view position.
Run it in the loop until we layout a view that will be partially visible. It will be indicator that we’re done.
5 steps to handle scrolling:
- Calculate views offset by received scroll value (dx, dy).
- Calculate new position of a view using received offset.
- Change view location.
- Recycle views that become invisible when they were moved.
- Add views to empty space created by moved views if needed.
Perform these operation on each call of scrollVerticallyBy.
And of course these 10 operation are very abstract. We have to do a lot of additional job in order to make it work 🙂 Sorry
Creating the circle
In order to lay out and move views on the circular trajectory we have to create a set of predefined points which will be the center of views. Having this will give us very useful functionality:
When scroll is happening we don’t have to calculate the point on the circle to which we need move the view. We just get index of point that is center of view and increase this index by received scroll offset, a point on the position of increased index will be new center of view.
Points should be located with pixel-pixel precision, that’s why we cannot use “the circle equation” nor the sine/cosine to create points. We will use Mid point circle algorithm to create points but modified a bit. (From now on I will describe the implementation assuming that reader knows how Mid point algorithm works)
Here is an original algorithm copy-pasted from Wikipedia:
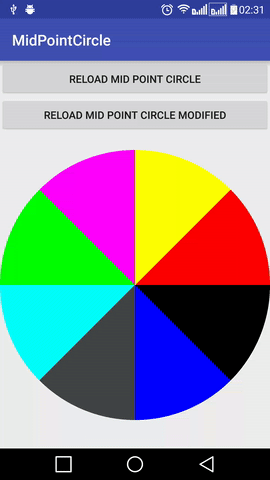
This algorithm is creating all 8 octants in parallel. It means that created views in the list will be in following order:
(x1, y1) — 1st Octant (Black)
(x2, y2) — 2nd Octant (Blue)
(x3, y3) — 3rd Octant (Dark Grey)
(x4, y4) — 4th Octant (Cyan)
(x5, y5) — 5th Octant (Green)
(x6, y6) — 6th Octant (Pink)
(x7, y7) — 7th Octant (Yellow)
(x8, y8) — 8th Octant (Red)
And here is the problem: if the center of a view is on first point (x1, y1) and received offset from scrollVerticallyBy(int dy, Recycler recycler) is dy=3 we should move our view by 3 points which means move to point (x4, y4). And point (x4, y4) is in 4th octant. But it should be just moved by few pixels.
To have the list in consecutive order to easily get next or previous point on the circle. So the algorithm has to be modified:
- Create first octant points using Mid point algorithm.
- Mirror points on 2nd octant using points from 1st octant. (after this action we have a points of 1st quadrant).
- MIrror points on the 2nd quadrant using points from 1st quadrant(after this action we have a points of 1st semicircle).
- Mirror points on the 2nd semicircle using points from 1st semicircle.
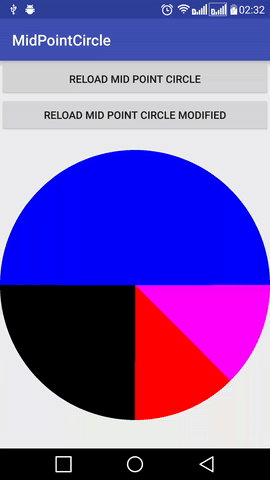
And right now the points are created consecutively:
(x1, y1) — 1st Octant (Pink)
(x2, y2) — 2nd Octant (Pink)
(x3, y3) — 3rd Octant (Pink)
(x4, y4) — 4th Octant (Pink)
(x5, y5) — 5th Octant (Pink)
(x6, y6) — 6th Octant (Pink)
(x7, y7) — 7th Octant (Pink)
(x8, y8) — 8th Octant (Pink)
And if while scrolling we get dy=3 then our view will be moved correctly.
The same code is used in LondonEyeLayoutManager. We have an abstraction called CircleMirrorHelper that gives the API to perform points mirroring.
And there is a concrete implementation FirstQuadrantCircleMirrorHelper that “knows” how to mirror points in our “concrete” first quadrant.
You may notice a strange signature of methods. Points are added into two maps. It is done to easily perform following operation:
When scroll is happening we get the center point of a view and use it as a key to get an index of this point. We increase(or decrease, depends on the scroll direction) the index by the received value from scrollVerticallyBy(dy, recycler, state) and use this index as a key to get a new point that will be center of a view.
It would look a lot simpler if it would be List
but it was done for the sake of performance. It is faster to get “index by point” when we have a Map of them.
Layouting the views.
To get quadrant specific stuff there is an abstraction called QuadrantHelper.
And there is a concrete implementation FirstQuadrantHelper.
LayoutManager forces us to implement only one method
But we need to override a few more, the most important is onLayoutChildren:
Layouter used in this code snippet is an entity that uses QuadrantHelper to get some information about the views location in concrete quadrant ( FirstQuadrantHelper in our case) and provide following API to LayoutManager:
Let’s explain layoutNextView.
layoutNextView takes previousViewData as a parameter. On the first start previousViewData is:
After we implement onLayoutChildren we have views layouted on the screen, but without scrolling, recycling and other stuff for which we need RecyclerView.
Handle scrolling
To do this we have to override scrollVerticallyBy and/or scrollHorizontallyBy and also return “true” from canScrollVertically and/or canScrollHorizontally.
In our case we only handle vertical scroll.
We have generic interface IScrollHandler and two implementations : PixelPerfectScrollHandler and NaturalScrollHandler. Each of these has their advantages and drawbacks.
Scroll handler also uses QuadrantHelper to get data specific for concrete quadrant.
On the first look scrolling looks pretty simple : you just get the dy and move every view by this value, but this is not the case.
Why “Natural” ? Because when views are scroller it looks very natural. Distance between center of views is kept.
Using this scroll handler views each view will be moved by the same distance ( dy) on the circle which looks great when views has distance between them and they are square shaped:

But when there are no gaps between views they will overlap each other or visual distance between them will be getting bigger.

Here is the code:
In this scroller we can omit first point : Calculate views offset by received scroll value (dx, dy), because our offset is dy.
Method performRecycling is also responsible for filling the gap created by moved views.
Because of inability of NaturalScrollHandler to be used with non-square views I’ve decided to implement another one.
PixelPerfectScrollHandler was designed to follow two rules while scrolling.
This scroll handler keeps view in touch when scrolling. 1. Views center is on the circle 2. Views edges are always in touch with each other. Sometimes these requirements are making views “jump” when scroll: If “view B” is below “view A” and views are scrolled down we can reach a point in which “view B” cannot longer stay below “view A” and keep it’s center on the circle so, in this case “view B” jumps to the side in order to stay in touch with “view A” side by side and keep it’s center on the circle. The logic: 1. Scroll first view by received offset. 2. Calculate position of other views relatively to first view.
Here is a demo of how the “jump” looks like.

After we done moving views we have to recycle views that were hidden and fill a gap that was created by moved views. We call performRecycling, exatly like in the NaturalScrollHandler.
And that’s it
Of course there is a lot of thing to do :
- Animations support.
- Handle inPrelayout
- Save/Restore instance state
- Handle data set changes
And also there are bugs in the project. This is basically a PoC and not a full tested and polished library. So everyone are welcome to contribute.
I really understand that showing some snippets of code probably isn’t enough to fully explain of how to implement custom LayoutManager, but I hope it’s helps someone if they would like (or need) to implement something similar.
Источник
Реализация списка с заголовком, футером и пагинацией в Андроид
RecyclerView
RecyclerView — это расширенная версия ListView с некоторыми улучшениями в производительности и с новыми функциями. Как следует из названия, RecyclerView перерабатывает или повторно использует представления элементов при прокрутке. В RecyclerView гораздо проще добавлять анимации по сравнению с ListView. В этом уроке мы разберем, как создать RecyclerView с заголовком, футером, разбиением на страницы и анимацией.
Настройка Gradle
Добавьте следующую зависимость в файл build.gradle:
Добавление RecyclerView в XML представление
После того, как проект будет синхронизирован, добавьте компонент RecyclerView в ваш макет:
Привязка XML с классом JAVA
Теперь в методе onCreate вашей активности добавьте следующий код:
Прежде чем идти дальше, давайте подробно рассмотрим приведенный выше код
- Layout Manager — Простыми словами, Layout Manager помогает нам определить структуру нашего RecyclerView. Есть три встроенных Layout Managers. Помимо этого, мы можем создать собственный пользовательский Layout Manager, чтобы удовлетворить наши требования.
- LinearLayoutManager показывает элементы в списке с вертикальной или горизонтальной прокруткой.
- GridLayoutManager показывает элементы в сетке.
- StaggeredGridLayoutManager показывает элементы в шахматной сетке.
RecyclerView ItemDecoration
ItemDecoration позволяет приложению добавлять специальный полосы и смещения к определенным представлениям элементов из набора данных адаптера. Это может быть полезно для рисования разделителей между элементами, выделениями, границами визуальной группировки и т. д. – developer.android.com
В этом примере мы будем использовать ItemDecoration для добавления отступов к каждому элементу.
В вышеприведенном классе мы устанавливаем отступы к нулевому элементу.
RecyclerView Adapter
Теперь давайте настроим адаптер ReeyclerView с заголовком и футером.
Пагинация
Теперь, когда адаптер готов, давайте посмотрим, как добавить пагинацию в список RecyclerView. Это довольно легко сделать и должно быть добавлено в onCreate после установки Adapter to Recycler-View.
Всякий раз, когда данные изменяются в mList, вызывайте функцию ниже, чтобы обновить адаптер RecyclerView и показать новые данные.
Надеюсь, что этот пост поможет вам получить общее представление о настройке RecyclerView с заголовком, подвалом и пагинацией.
Источник
Android — What is Layout Manager?
I have seen many types of layout managers like:
- LineraLayoutManager
- RecyclerView.LayoutManager
- ListViewLayoutManager
- etc
What actually LayoutManager is and why it is used and what are the different types of LayoutManager s? Do in android all UI components like Button , TextView , EditText etc has their own LayoutManagers ?

3 Answers 3
Adapters are only responsible for creating and managing views for items (called ViewHolder), these classes do not decide how these views are arranged when displaying them. Instead, they rely on a separate class called LayoutManager.
LayoutManager is a class that tells Adapters how to arrange those items. For example, you might want those items in a single row top to bottom or you may want them arranged in Grids like Gallery. Instead of writing this logic in your adapter, you write it in LayoutManager and pass that LayoutManager to View (RecyclerView).
A beginner might ask, Why does it work like that?
Answer: Flexibility. By using this pattern, whenever you want to change the arrangement of items, you don’t have to modify Adapters or RecyclerView. Moreover, without this approach, you would be limited to the functionality provided by the pre-built class. You can build your own LayoutManager by extending the LayoutManager class.
There are also some commonly used LayoutManagers included for you to use, I’ll list two of them
- LinearLayoutManager Arranges items in 1 column or 1 row based on orientation. For example, a horizontal LinearLayoutManager will place items from left to right in 1 row.
- GridLayoutManager Arranges items in a provided number of rows and columns, much like images in the gallery.
Источник


