Different Ways to Fix “Android Studio Does not Show Layout Preview”
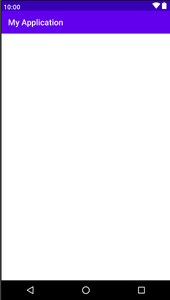
Have you ever faced the problem in the android studio that it is not showing the layout preview while you are constructing a layout for your project? If yes, then this article will help you to solve this problem. Below is the screenshot of the empty layout which is the problem that we have solved:
Methods to Solve the Problem
There are some methods that can help you solve this problem. Just try a method if that doesn’t work skip to the next method. Let’s see what are those methods:
Method 1. Force Refresh Layout
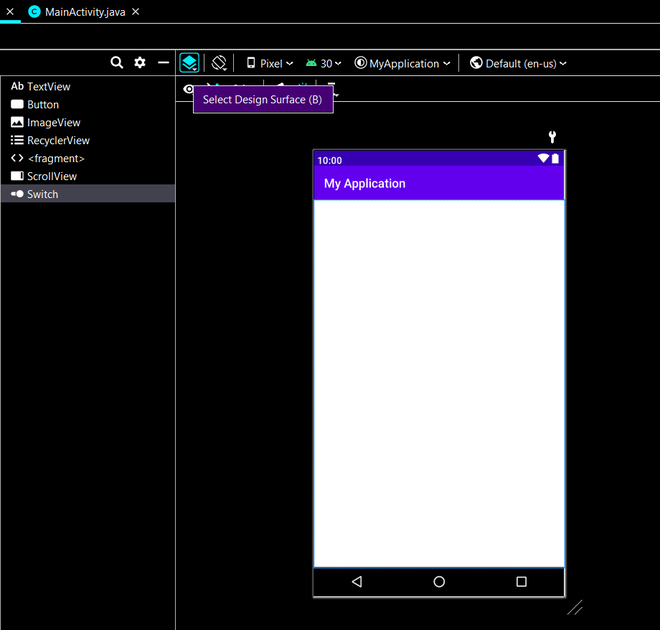
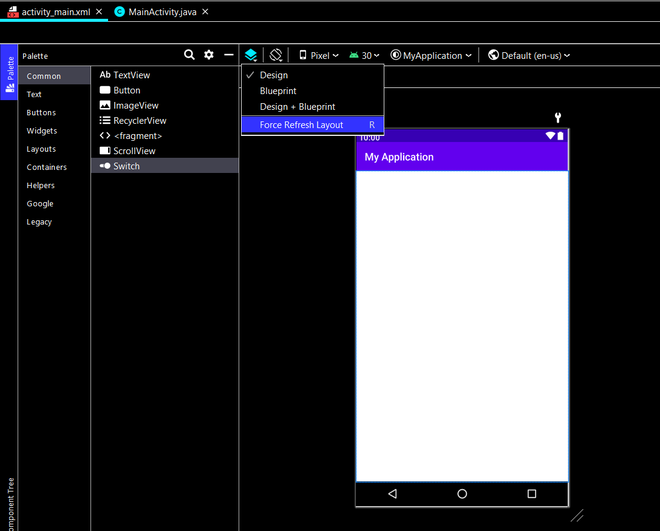
To start with this method, click on the “Select Design Surface(B)” which is located just above the eye icon. After clicking on the option, select “Force Refresh Layout” from the dropdown. The alternative shortcut key to Force Refresh Layout is the “R” key. It would force the layout to make a refresh and will refresh the screen. Below is the screenshot to demonstrate the path:
Method 2. Invalidate caches/ Restart
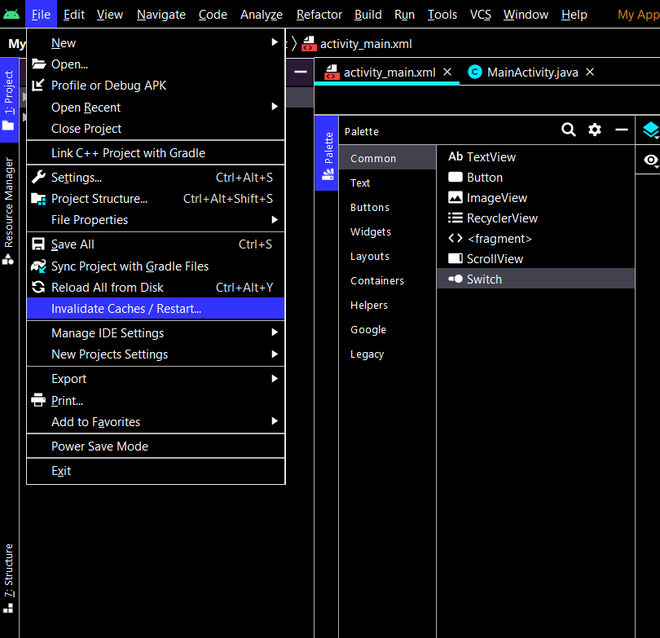
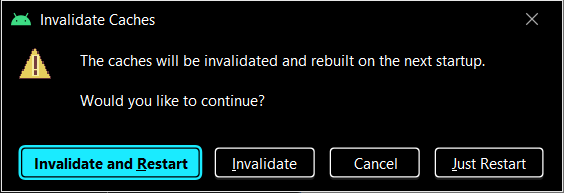
Android Studio makes a lot of files like caches and does not delete them. This can cause a problem when there is a need to make new files, so clearing caches will clear the old cache and make Android Studio faster. So to Invalidate caches/ Restart, go to the file which is present in the top menu bar in Android Studio and then click on the option “Invalidate Caches/Restart…” present in the Dropdown. After that it will ask you that “Would you like to continue?”, click on Invalidate and Restart button. Below are the screenshots to show you the process:
Method 3. Disable and then Enable android apk support
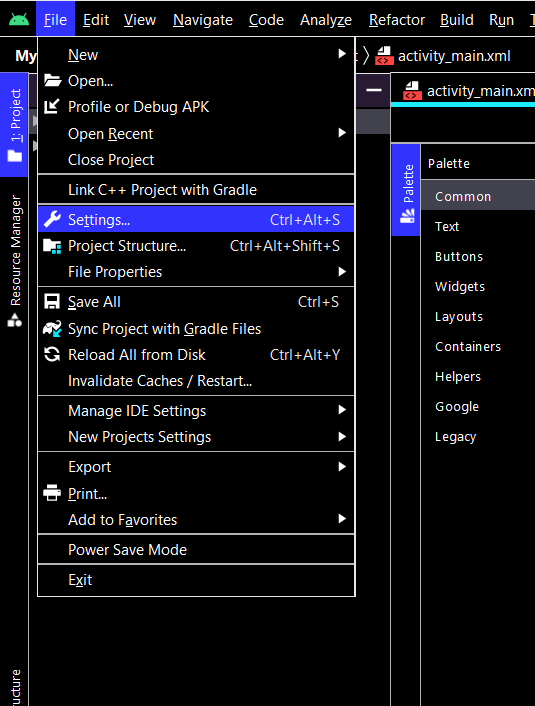
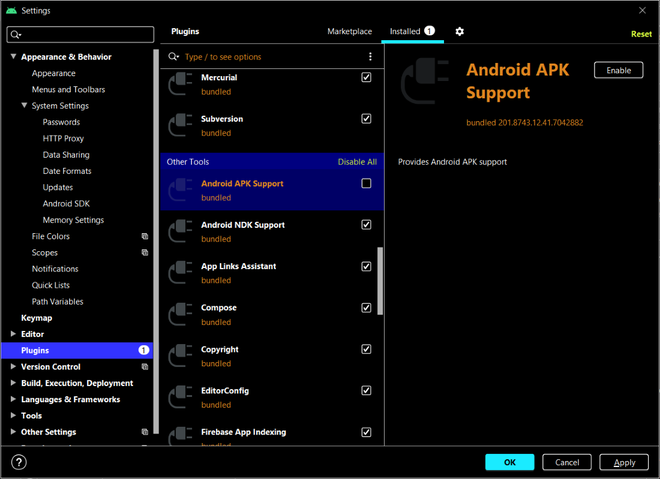
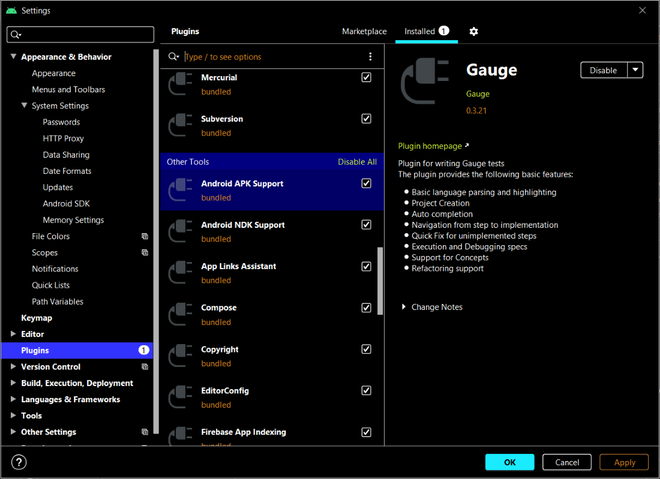
Sometimes the android apk support is not working properly in Android Studio. In order to fix that we have to apply a hack. To start with it, firstly we have to go settings that are present in the file or you can also use a shortcut of Ctrl+Alt+S. After clicking on settings, a new window will appear showing you all the settings that you can change. On the left side of the settings, find an option named plugin, click on the plugin and go to Installed which will show you the installed plugins. Scroll down and check for Android APK Support and disable the option. After disabling, click on Apply button and then ok. It would disable the use of Android APK Support in Android Studio. Now go back to the same settings and Check/Enable the same option which you disabled earlier. After doing that click on Apply and then the OK button. Now, try to check the layout Preview. Below are some screenshots to show the demonstration:
After trying all the methods, and still not able to see the Layout Preview, try to rebuild your project.
Источник
Где находится Android Studio layout preview?
Я установил Android Studio, но когда я редактирую свои файлы макета, я не могу найти live preview! Я просто вижу XML-файл. Как я могу увидеть свой макет в графическом представлении?
обновление: Вот как это выглядит в моем случае:

17 ответов:
вы должны иметь Design кнопка рядом с Text кнопка в текстовом редакторе xml:

или вы можете использовать Preview кнопка в правом верхнем углу, чтобы добавить окно предварительного просмотра рядом с XML-кодом:

обновление:
если у вас его нет, то сделайте так: View -> Tool Windows -> Preview

несколько человек, кажется, имеют ту же проблему. Проблема в том, что IDE отображает предварительный просмотр только при редактировании файла макета в res/layout* каталог проекта Android.
в частности, он не будет показывать, если редактирование файла в build/res/layout* так как это не источник но выход. В вашем случае, вы редактируете файл в
в случае, если это кому-то поможет, у меня была та же проблема сегодня, когда вкладки «дизайн / текст» отсутствовали. Я переключился на темную тему и подумал, что, возможно, это проблема, поэтому вернулся к настройкам / внешнему виду (в настройках IDE) переключился на тему по умолчанию, и это сбросило все правильно для меня. Я также мог бы снова переключиться на тему Darcula, и вкладки все еще были там, поэтому кажется, что переключение тем-это способ сбросить окна/вкладки IDE.
Выберите MainActivity.java-файл из левой панели, как показано в прямоугольнике красного цвета.
щелкните левой кнопкой мыши значок XML-тега, как показано в красном круге.
выберите «activity_main.xml (макет) » опция, показанная на рисунке ниже.

-> отключить плагин поддержки android
-> вам будет предложено перезапустить
-> после перезапуска повторно включите плагин и другие плагины зависимостей, которые могли быть отключены в процессе
-> вам будет предложено перезапустить еще раз. Надеюсь, когда android studio перезапустит второй раз предварительный просмотр должны оказывать.
Я нашел 2 быстрых варианта, чтобы исправить это:
- просто введите в поиске «предварительный просмотр», и он покажет вам один результат. Просто нажмите на него и предварительный просмотр появится снова:)
- потяните правую линию и появится окно. Это своего рода изменение размера.

удачи в кодировании!
перейти к файлу — > аннулировать кэш / перезапуск.
получил ту же проблему после импорта моего проекта Eclipse ADT в Android Studio. Текстовые и Десинг вкладки, где отсутствует.
нашли мой журнал событий Windows читает «Фреймворки обнаружены: фреймворк Android обнаружен в проекте Configure»
Я нажимаю на предоставленную гиперссылку, и все было исправлено, вкладки Text и Desing стали видимыми и функциональными
Выберите файл -> структура проекта -> модули -> нажмите на зеленую кнопку Плюс, чтобы добавить модуль.
выберите новый модуль — > выберите модуль приложения в опции Android — > дайте имя модуля — > Далее — > Далее — > Готово
выберите проект, который должен быть включен в модуль — > нажмите кнопку Применить — > OK
теперь вы сможете увидеть полную структуру проекта; затем откройте окно проекта формы модуля (левая панель), выберите res затем выберите layout — > your layout имя.(XML.)
теперь вы сможете увидеть дизайн и текстовый вид.
Как сказал Этьен, убедитесь, что XML-файл, на который вы смотрите, находится в src/main/res/layout
у меня была та же проблема. Если вы находитесь в файле макета в build каталог, вы не увидите предварительный просмотр, и вы не будете иметь его в качестве опции для включения. Я бы хотел, чтобы у Google было небольшое предупреждение.
Если вы хотите увидеть предварительный просмотр, в правой части экрана у вас должна быть кнопка вызова предварительный просмотр что показать/скрыть предварительный просмотр.
Если вы хотите использовать режим редактора WYSISYG, в нижней части редактора есть вкладка, которая переключается между XML режим и WYSISYG режим.
Это работает одинаково как в IntelliJ, так и в Android Studio.
У меня была та же проблема и решена путем редактирования файла t в src>main>res>layout. Вы можете выбрать между тестом и режимом разработки в нижней части редактора.
довольно просто, если мы знаем, где искать . потратьте несколько часов, выясняя это.
File> > setting> > Compiler> > JavaCompiler в «Project bytecode version (оставьте пустым для JDK по умолчанию):» выберите свой jdk.

У меня была эта проблема пару часов назад, когда я экспортировал свои проекты из Eclipse в Android Studio. К сожалению, лучшие ответы здесь не работали для меня.
в любом случае, создание нового проекта вместо открытия старого сделало трюк для меня, как то, что Томас Калиакос упомянул в своем комментарии здесь
мне пришлось возиться с проектом..и в какой-то момент это сработало. Я не знаю, как будто знаю. Я бы предположил, что создание нового проекта и добавление исходного кода будет работать каждый раз. Извините, что не очень ясно, но, честно говоря, я был удивлен даже сам, что это сработало. – Томас Калиакос окт 15 ‘ 13 в 4: 08
в случае, если вы хотите закрепленный режим, (он все еще виден при редактировании xml-файла), и вы по ошибке нажали и немаркированный закрепленный режим. Чтобы вернуть его, вы должны сосредоточиться на предварительном просмотре и нажать Window > Active Tool Window > Docked Mode .
Если вы видите сообщение внизу, говорящее что-то вроде: «Android Framework detected. Нажмите, чтобы настроить», сделайте это.
после этого появились мои нижние вкладки текста и дизайна.
прежде всего после создания нового приложения
перейти к java — >MainActivity
и открыть новую вкладку для него
в коде java нажмите на индекс нумерации, где вы можете увидеть логотип кода
как красный кружок на картинке
щелкните левой кнопкой мыши на нем, и вы увидите два варианта, как показано на рисунке ниже
нажмите на первый вариант, чтобы вы могли просмотреть свое приложение в android studio
Источник
Android Studio: Layout preview

One of my major goals for the next months is to become a more productive Android Developer. To achieve that, nothing better than knowing the tools that the Android Platform offers. In this series of posts, I will talk shortly about some tips for Android Studio that can make the development easier. For the start, the layout preview.
All the features presented in this post where tested in the Android Studio 2.0, Preview 6. They should work in different versions, but some differences may happen.
There are many improvements been included in screen layout preview from the Android Studio. Since the initial versions, there are options for visualizing how the screens are going to be displayed in different devices and system versions. But, sometimes, just adding components to the screen is not enough. To better understand, let’s start adding a RecyclerView to a layout.

We don’t know for sure how this screen will behave in a device. Let’s improve this, starting with a step back: let’s create the layout used in the rows of this list. Each line will be compound by a TextView inside a CardView. We don’t know for sure how this row will behave at a device, again.

Let’s improve this adding some attributes. We want that these attributes support our layout preview, but they also should not have any effect at runtime. For that reason, instead of adding attributes with the android namespace, we will add attributes with the namespace tools. These attributes will be analyzed by the Android Studio layout preview, but ignored in runtime. Let’s start adding some text and image to our TextView, using the attributes tools:text=”Line number” and tools:drawableLeft=”@mipmap/ic_launcher”. Typing tools will make the editor suggest the inclusion of the namespace.

As we can see, the attributes available at tools are the same available at android, but their effect occurs in the preview time only. That makes possible apply many attributes to preview how the screens will behave at runtime.
Back to our RecyclerView, now we can apply our line adding the attribute tools:listitem=”@layout/row_person”. We can go further, indicating the layout manager to be used and the orientating, adding app:layoutManager=”LinearLayoutManager” and android:orientation=”vertical”. This will avoid the need to define the layout manager in the Java code, simplifying our classes.

Now it is much easier to see how the list will be displayed in different device configurations. We just need to switch between the available device configurations by choosing in the options above the preview.

We can also create a broad preview from multiple devices at the same time, selecting the option Preview all screen sizes.

Now that we just explored some basic attributes from tools, we can expand it’s use for multiple situations. Do you have an ImageView with an image loaded in run time by a library? Add the attribute tools:src and check how it will be displayed. Do you have a component with dynamic colors? Add the attribute tools:tint and check how it will behave.
Do you want to see the code from these samples, check it out at GitHub.
Soon I will post more tips about the Android Studio and other tools to support the application’s development.
Источник


