- Android: выдвигающийся экран снизу
- Зависимости
- Создание макетов
- Container view
- Динамическое управление
- Прикрепление элементов к нижнему экрану
- Скрытие плавающей кнопки при скроле
- Как кодировать нижнюю панель навигации для приложения для Android
- Предпосылки
- 1. Создайте проект Android Studio
- 2. Добавление BottomNavigationView
- 3. Инициализация компонентов
- 4. Тестирование приложения
- 5. Настройка событий клика
- 6. Создание фрагментов (страниц)
- 7. Запуск фрагментов
- 8. Бонус: использование шаблонов Android Studio
- Вывод
- How to Code a Bottom Navigation Bar for an Android App
- Getting Started
- Add Project Dependencies
- Create a Navigation Graph
- Add Destinations to the Navigation Graph
- Add a Nav Host Fragment and Bottom Navigation View
- Add Menu Items
- Add Vector Assets to Menu Items
- Add Menu Item to Bottom Navigation View
- About the Nav Controller
- Final App
- Bonus: Using Android Studio Templates
- Top Android App Templates From CodeCanyon
- 1. Android App Builder: WooCommerce, WebView, WordPress and Much More
- 2. RocketWeb: Configurable Android WebView App Template
- 3. Dating App for Web, iOS and Android
- 4. AdForest: Classified Native Android App
- 5. MaterialX: Android Material Design UI Components
- Find More Android App Templates From Envato Tuts+
- Conclusion
Android: выдвигающийся экран снизу
Данная статья является переводом статьи Emrullah Luleci, а также её продолжения.
Нижний экран (Здесь и далее под «нижним экраном/слоем» будет подразумеваться элемент bottom sheet — прим. пер.) — компонент, выезжающий снизу экрана, который используется для отображения дополнительного контента. Подробнее об этом элементе можно узнать на официальной сайте посвященном материальному дизайну.

Зависимости
Для использования этого элемента, добавьте последние версии библиотек поддержки в свой проект:
Создайте класс наследник от AppCompatActivity:
Создание макетов
Содержимое нижнего экрана
Для удобства воспользуемся макетами. Назовем файл с нижним слоем bottom_sheet.xml.
behavior_peekHeight: Определяет высоту видимой части.
behavior_hideable: Определяет, может ли нижний экран скрываться свайпом вниз.
Container view
Создайте CoordinatorLayout в качестве корневого вью. Добавьте в него прямым наследником bottom_sheet.xml. Элементы app_bar и activity_bottom_sheet_content не имеют прямого отношения к нижнему экрану, поэтому их можно заменить или удалить.
На данном этапе нижний экран должен работать примерно так:
Динамическое управление
Поведением и свойствами нижнего экрана можно также управлять динамически с помощью Java.
Прикрепление элементов к нижнему экрану
Также можно прикрепить вью к нижнему экрану, чтобы прикрепленный элемент перемещался одновременно с нижним слоем.
Добавим Floating Action Button в макет созданный выше. Новый компонент должен являться непосредственным наследником CoordinatorLayout также как и bottom_sheet. Для прикрепления элемента к нижнему экрану необходимо добавить app:layout_anchor с id вью нижнего экрана, а также app:layout_anchorGravity со значением top|end.
Теперь плавающая кнопка закреплена в верхнем углу нашего нижнего экрана и перемещается вместе с ним.
Скрытие плавающей кнопки при скроле
Для скрытия кнопки при скроле необходимо добавить слушатель к нижнему экрану и отображать/скрывать кнопку. Для начала найдем необходимые вью:
Для скрытия кнопки в момент начала скрола и отображения после полного сворачивания нижнего экрана, используйте следующее:
Результат обоих вариантов можно увидеть ниже:
Источник
Как кодировать нижнюю панель навигации для приложения для Android
Команда разработчиков материалов в Google определяет функциональность нижних панелей навигации в Android следующим образом:
Нижние панели навигации позволяют легко просматривать и переключаться между представлениями верхнего уровня одним нажатием.
Прикосновение к нижнему значку навигации приводит вас непосредственно к связанному виду или обновляет текущий активный вид.
В соответствии с официальными рекомендациями по дизайну материала для нижней панели навигации, его следует использовать, когда в вашем приложении есть:
- от трех до пяти пунктов назначения на высшем уровне
- места назначения, требующие прямого доступа
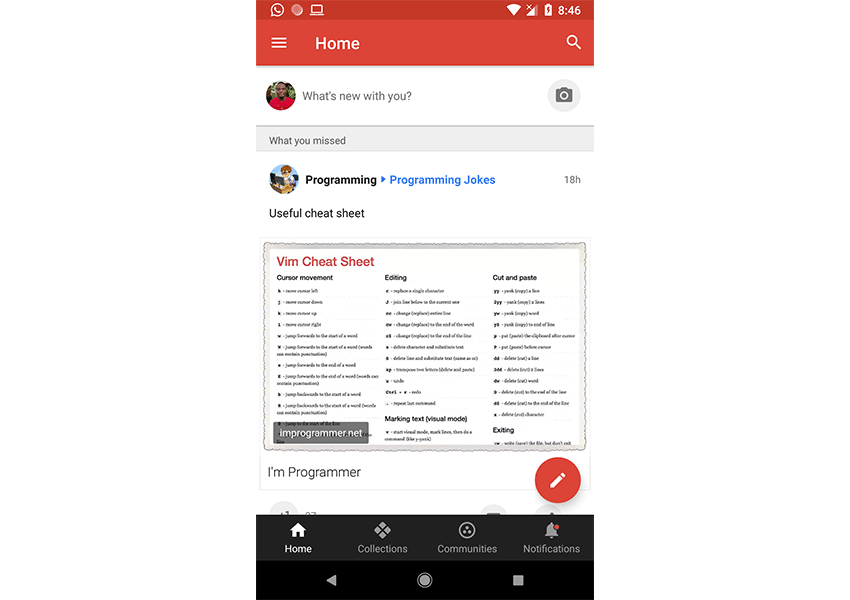
Примером популярного приложения, которое реализует нижнюю панель навигации, является приложение Google Android от Google, которое использует его для перехода к различным пунктам назначения приложения. Вы можете сами убедиться в этом, загрузив приложение Google+ из магазина Google Play (если оно еще не установлено на вашем устройстве). Следующий снимок экрана — из приложения Google+, отображающего нижнюю панель навигации.
В этом посте вы узнаете, как отображать элементы меню в нижней панели навигации в Android. Мы будем использовать API BottomNavigationView для выполнения этой задачи. В качестве дополнительного бонуса вы также узнаете, как использовать функцию шаблонов Android Studio для быстрой загрузки проекта с помощью нижней панели навигации.
Пример проекта (на Kotlin) для этого учебного руководства можно найти в нашем репозитории GitHub, чтобы вы могли легко следить за ним.
Предпосылки
Чтобы следовать этому руководству, вам понадобится:
1. Создайте проект Android Studio
BottomNavigationDemo Android Studio и создайте новый проект (вы можете назвать его BottomNavigationDemo ) с пустым действием MainActivity . Не забудьте также установить флажок Включить поддержку Kotlin .
2. Добавление BottomNavigationView
Чтобы начать использовать BottomNavigationView в своем проекте, убедитесь, что вы импортируете поддержку проектирования, а также артефакт поддержки Android. Добавьте их в файл build.gradle вашего модуля, чтобы импортировать их.
Кроме того, посетите файл res / layout / activlty_main.xml, чтобы включить виджет BottomNavigationView . Этот файл макета также включает в себя ConstraintLayout и FrameLayout . Обратите внимание, что FrameLayout будет служить контейнером или заполнителем для различных фрагментов, которые будут помещаться в него каждый раз, когда на нижнем навигационном элементе щелкает элемент меню. (Мы вернемся к этому в ближайшее время.)
Здесь мы создали виджет BottomNavigationView с идентификатором navigationView . Официальная документация гласит, что:
BottomNavigationView представляет собой стандартную нижнюю панель навигации для приложения. Это реализация дизайна материала нижней навигации .
Нижние панели навигации позволяют пользователям легко просматривать и переключаться между представлениями верхнего уровня одним нажатием. Его следует использовать, когда приложение имеет от трех до пяти пунктов назначения верхнего уровня.
Важные атрибуты, которые вы должны принять к сведению, были добавлены в наш BottomNavigationView :
- app:itemBackground : этот атрибут устанавливает фон пунктов нашего меню для данного ресурса. В нашем случае мы просто дали ему цвет фона.
- app:itemIconTint : устанавливает оттенок, который применяется к значкам пунктов нашего меню.
- app:itemTextColor : задает цвета, которые будут использоваться для различных состояний (нормальное, выделенное, сфокусированное и т. д.) текста пункта меню.
Чтобы включить пункты меню для нижней панели навигации, мы можем использовать атрибут app:menu со значением, которое указывает на файл ресурсов меню.
Вот файл ресурсов меню res / menu / navigation.xml :
Здесь мы определили Menu используя который служит контейнером для пунктов меню. создает MenuItem , который представляет отдельный элемент в меню. Как видите, у каждого есть идентификатор, значок и заголовок.
3. Инициализация компонентов
Далее мы собираемся инициализировать экземпляр BottomNavigationView . Инициализация будет происходить внутри onCreate() в MainActivity.kt .
4. Тестирование приложения
Теперь мы можем запустить приложение!
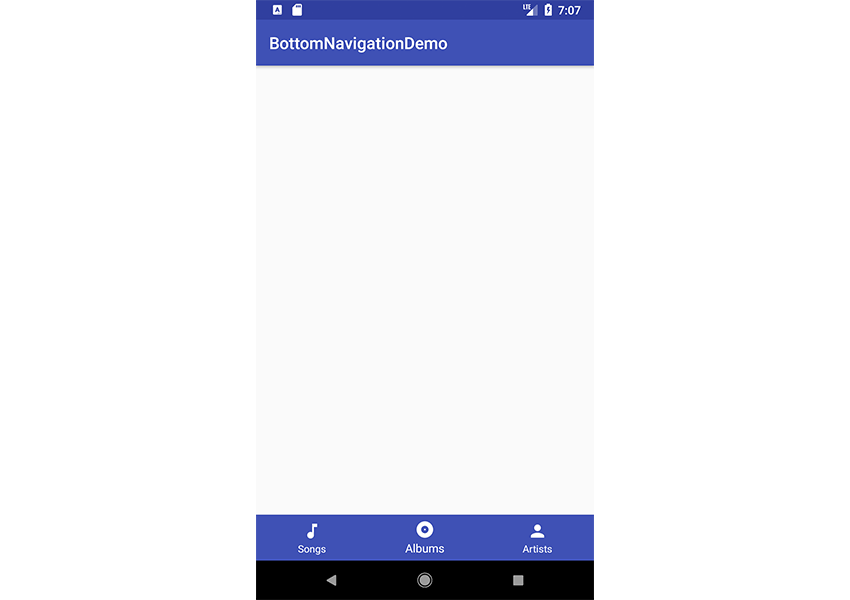
Как видите, наша нижняя панель навигации отображается в нижней части экрана приложения. Ничего не произойдет, если вы нажмете на любой из элементов навигации там — мы рассмотрим эту часть в следующем разделе.
5. Настройка событий клика
Теперь давайте посмотрим, как настроить события нажатия для каждого из элементов в нижней панели навигации. Помните, что нажатие на любой элемент там должно привести пользователя к новому назначению в приложении.
Здесь мы вызвали метод setOnNavigationItemSelectedListener . Вот что он делает в соответствии с официальной документацией:
Установите слушателя, который будет уведомлен, когда выбран нижний элемент навигации.
Мы использовали выражение when для выполнения различных действий в зависимости от пункта меню, по которому щелкнули — идентификаторы пункта меню служат константами для выражения when . В конце каждого ветвления мы возвращаем true .
Затем мы передаем наш слушатель setOnNavigationItemSelectedListener() в качестве аргумента.
Имейте в setOnNavigationItemReselectedListener , что существует другой подобный метод, называемый setOnNavigationItemReselectedListener , который будет уведомлен, когда будет выбран выбранный в данный момент нижний элемент навигации.
Далее мы собираемся создать разные страницы (или фрагменты) для каждого из пунктов меню в навигационном блоке, чтобы при щелчке или нажатии элемента меню отображался другой фрагмент или страница Android.
6. Создание фрагментов (страниц)
Мы начнем с класса SongsFragment.kt , и вы должны выполнить аналогичный процесс для оставшихся двух классов фрагментов — AlbumsFragment.kt и ArtistsFragment.kt .
Вот мой SongsFragment .kt :
Кроме того, вот мой R.layout.fragment_songs :
7. Запуск фрагментов
При щелчке по любому из пунктов меню мы открываем соответствующий фрагмент, а также меняем заголовок панели действий.
Здесь мы используем метод openFragment() который просто использует FragmentTransaction для добавления нашего фрагмента в пользовательский интерфейс.
Теперь запустите проект еще раз, чтобы увидеть, как все это работает!
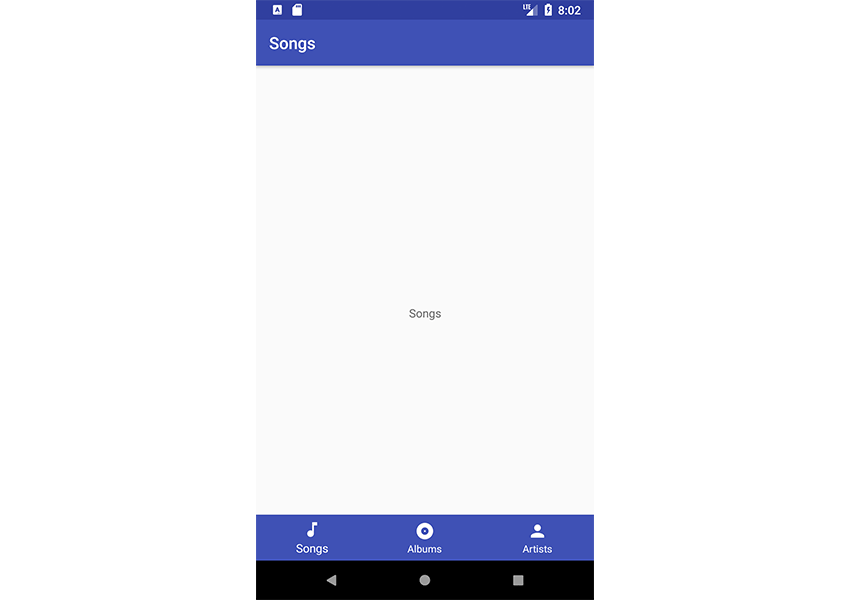
Каждый раз, когда вы нажимаете на любой пункт меню, он переносит пользователя в новый фрагмент.
Обратите внимание, что когда у нас более четырех пунктов меню в нижней панели навигации — то есть в BottomNavigationView тогда система Android автоматически включает режим сдвига. В этом режиме при нажатии любого из пунктов меню другие элементы справа или слева от выбранного элемента сдвигаются.

8. Бонус: использование шаблонов Android Studio
Теперь, когда вы узнали об API, которые используются для создания нижней панели навигации с нуля в Android, я покажу вам ярлык, который сделает его быстрее в следующий раз. Вы можете просто использовать шаблон вместо того, чтобы кодировать панель навигации с нуля.
Android Studio предоставляет шаблоны кода, которые соответствуют рекомендациям по проектированию и разработке Android. Эти существующие шаблоны кода (доступные на Java и Kotlin) могут помочь вам быстро запустить ваш проект. Один такой шаблон можно использовать для создания нижней панели навигации.
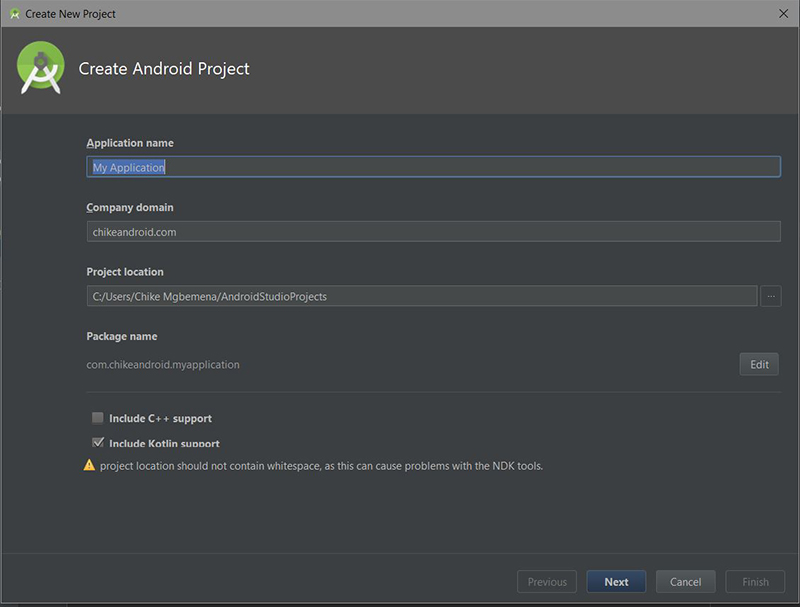
Чтобы использовать эту удобную функцию для нового проекта, сначала запустите Android Studio.
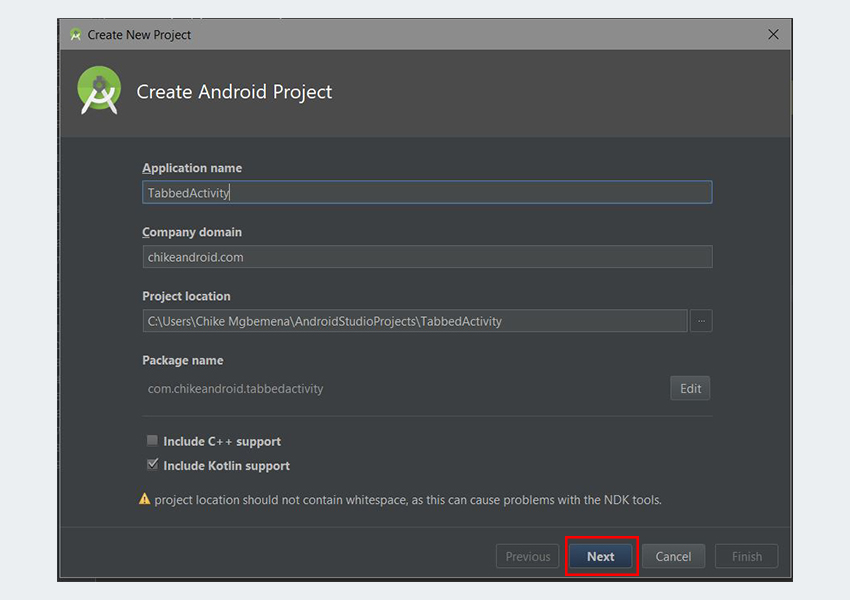
Введите имя приложения и нажмите кнопку « Далее» . Вы можете оставить настройки по умолчанию такими, как они есть в диалоговом окне « Целевые устройства Android ».
Нажмите кнопку Далее еще раз.

В диалоговом окне « Добавить действие на мобильный » выберите « Нижняя навигация». После этого снова нажмите кнопку « Далее» .
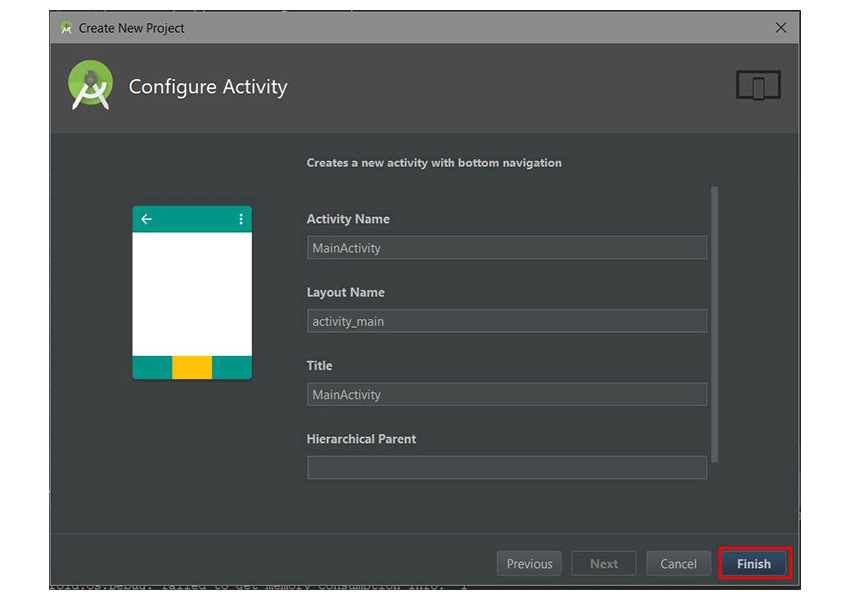
В последнем диалоговом окне вы можете переименовать действие или изменить имя или заголовок макета, если хотите. Наконец, нажмите кнопку Готово , чтобы принять все конфигурации.
Android Studio теперь помогла нам создать проект с нижней навигационной активностью. Очень круто!
Вам настоятельно рекомендуется изучить сгенерированный код.
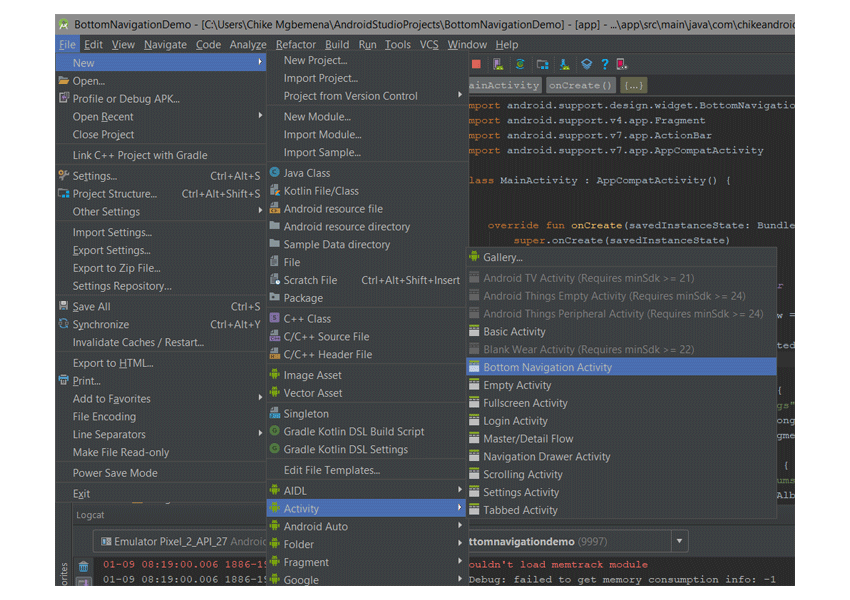
В существующем проекте Android Studio, чтобы использовать этот шаблон, просто выберите «Файл»> «Создать»> «Активность»> «Активность в нижней части навигации» .
Обратите внимание, что шаблоны, поставляемые с Android Studio, хороши для простых макетов и создания базовых приложений, но если вы хотите действительно запустить свое приложение, вы можете рассмотреть некоторые шаблоны приложений, доступные на Envato Market .
Они значительно экономят время опытных разработчиков, помогая им сократить время создания приложения с нуля и сосредоточить свои таланты вместо этого на уникальных и настраиваемых частях создания нового приложения.
Вывод
Из этого руководства вы узнали, как создать нижнюю панель навигации в Android с BottomNavigationView API BottomNavigationView с нуля. Мы также узнали, как легко и быстро использовать шаблоны Android Studio для создания нижней навигационной активности.
Я настоятельно рекомендую ознакомиться с официальными рекомендациями по дизайну материалов для нижней панели навигации, чтобы узнать больше о том, как правильно проектировать и использовать нижнюю панель навигации в Android.
Чтобы узнать больше о кодировании для Android, ознакомьтесь с другими нашими курсами и учебными пособиями здесь, на Envato Tuts +!
Источник
How to Code a Bottom Navigation Bar for an Android App
The material design team at Google defines the functionality of bottom navigation bars in Android as follows:
Bottom navigation bars make it easy to explore and switch between top-level views in a single tap.
Tapping on a bottom navigation icon takes you directly to the associated view or refreshes the currently active view.
According to the official Material Design guidelines for the Android bottom navigation bar, it should be used when your app has:
- three to five top-level destinations
- destinations requiring direct access
An example of a popular app that implements the bottom navigation bar is the Google Discover Android app from Google, which uses it to navigate to different destinations of the app. You can see this yourself by downloading the Google Discover app from the Google Play Store (if you don’t already have it on your device). The following screenshot is from the Google Discover app displaying an Android bottom navigation bar.


In this post, you’ll learn how to display menu items inside a bottom navigation bar in Android. You will use AndroidX navigation, which is part of the Jetpack suite of libraries. Jetpack is a suite of libraries to help developers write code that works consistently across Android versions and devices. As a bonus, you’ll also learn how to use Android Studio templates to bootstrap your project with a bottom navigation bar quickly.
Getting Started
Open Android Studio, create a new project, and select a Blank Activity template, as shown below. Select the Kotlin language from the drop-down menu and click Finish. Wait for Android Studio to finish creating the project resources.


Add Project Dependencies
The first thing before we get started is to add the project dependencies. Open the app’s build.gradle file and add the following dependencies.
Create a Navigation Graph
A navigation graph is an XML resource file that contains all of your application destinations and actions. Right-click on the res directory and select New > Android Resource File. Provide a name and select Navigation as the resource type, and click OK. The navigation graph gets placed in the navigation folder, as shown in the structure below.


Add Destinations to the Navigation Graph
The navigation file will contain all the destinations of our application. To add a destination, click on the plus (+) sign at the top of the design tab or choose an existing destination if you have already created the fragments.


Our application will have three screens, namely:
- Home page
- Profile page
- Settings page
Therefore, we will add three destinations to the navigation XML file. To add a new destination, click the plus (+) sign and select the Create new destination option. On the next screen, select a blank fragment and provide the details as shown below.


Repeat the same steps and create two additional fragments for the Profile and Settings screens. The final navigation graph XML now looks like this.


Each fragment has its layout, which you can customize as you wish. Below is how each fragment looks after adding a text view at the center of each fragment.


Add a Nav Host Fragment and Bottom Navigation View
Next, define a host fragment in the main layout (main_activity.xml). A nav host fragment is an empty container where destinations are swapped in and out as a user navigates through your app. We will also add the BottomNavigationView in the main layout, as shown below.
Add Menu Items
The next step is to add menu items for the bottom navigation view. Right-click on the res directory, select New > Android Resource File and select menu, provide a name and click OK.


Open the menu XML file and add three menu items, as shown below.
Add Vector Assets to Menu Items
A vector asset is an XML file that defines a virtual image in its file. Vector assets guarantee sharp images which can be resized to any screen size without losing their quality. To add a vector asset, right-click on Drawable > New > Create Vector Asset and choose a home icon for the home menu as shown below.


Repeat the same steps and create vector assets for the rest of the menu items. Add the vector assets to the respective menu items as shown below.
The next step is to add id attributes to each menu item. The menu item’s id should be the same as the id of the navigation graph destinations in order to allow navigation throughout the fragments.
Add Menu Item to Bottom Navigation View
The last step is to add the menu to the bottom navigation view. Open main_activity.xml and add the app:menu=»@menu/bottom_nav» attribute to the BottomNvigationView .
About the Nav Controller
The NavController is an object that manages app navigation within a NavHost . It coordinates the swapping of fragments as users move through your app. In the main activity class, call setupWithNavController() from your main activity’s onCreate() method, as shown below.
Final App
The final app should now look like this:


Bonus: Using Android Studio Templates
Now that you’ve learnt about the APIs involved to create a bottom navigation bar from scratch in Android, I’ll show you a shortcut that will make it faster next time. You can simply use a template instead of coding a navigation bar from scratch.
Android Studio provides code templates that follow the Android design and development best practices. These existing code templates (available in Java and Kotlin) can help you quickly kick-start your project. One such template can be used to create a bottom navigation bar.
To use this handy feature for a new project, first fire up Android Studio.


Enter the application name and click the Next button. You can leave the defaults as they are in the Target Android Devices dialog.
Click the Next button again.
In the Add an Activity to Mobile dialog, select Bottom Navigation Activity. Click the Next button again after that.


In the last dialog, you can rename the Activity, or change its layout name or title if you want. Finally, click the Finish button to accept all configurations.
Android Studio has now helped us to create a project with a bottom navigation activity. Really cool! You’re strongly advised to explore the code generated.
In an existing Android Studio project, to use this template, simply go to File > New > Activity > Bottom Navigation Activity.


Top Android App Templates From CodeCanyon
Note that the templates that come included with Android Studio are good for simple layouts and making basic apps, but if you want to really kick-start your app, you might consider some of the app templates available from Envato Market.
They’re a huge time-saver for experienced developers, helping them to cut through the slog of creating an app from scratch and focus their talents instead on the unique and customised parts of creating a new app.
Let’s look at a few cool templates that will let you put your new Android bottom navigation bar coding skills to good use.
1. Android App Builder: WooCommerce, WebView, WordPress and Much More
Creating native Android apps couldn’t get simpler. The Android App builder template lets you turn your online presence into easy-to-use mobile experiences. Turn your WooCommerce shop, WordPress blog, or HTML5 website into an app, with no coding experience necessary. Use the included tutorial to learn how to complete your app project.
2. RocketWeb: Configurable Android WebView App Template
Looking to create a stylish Android WebView app? Save yourself some time and hassle by using the RocketWeb template. You won’t need any programming skills to get the most from this download. Just open it in Android Studio and start customising. Tweak the Kotlin bottom navigation bar for Android, the colours, and a whole lot more with RocketWeb.


3. Dating App for Web, iOS and Android
Connections are in the air with the Dating App template. It was built in Android Studio and Xcode with Swift, so you can have both an Android and an iOS app. On top of the modern bottom navigation bar for Android and iOS, Dating App also features:
- simple image gallery
- Facebook signup
- upgrades, AdMob banner, and in-app purchases
- messaging and friends system
4. AdForest: Classified Native Android App
Let users take the classified section on the go with AdForest. Users will be able to quickly sign up and verify their accounts with their mobile numbers. Once in, they can search for products, find nearby listings, message vendors for more information, and a whole lot more. It’s as easy to set up as it is to navigate.


5. MaterialX: Android Material Design UI Components
This Android app template is the perfect bundle for developers. It features all types of useful UI design elements to complete your projects. There are more than 315 unique layouts that come in more than 31 categories. Some of the included components are:
- Android bottom navigation bars
- buttons, chips, and cards
- dialog boxes
- grids and lists
- navigation drawer menus


Find More Android App Templates From Envato Tuts+
The above templates are great premium options in their own right. But they’re far from the only ones available to you! Our instructors have rounded up some of the best Android app templates from CodeCanyon that you should check out. No matter the niche, you can find a nice Android template that suits your needs from Envato Tuts+:


Conclusion
In this tutorial, you learned how to create a bottom navigation bar in Android from scratch, using Jetpack navigation. We also explored how to easily and quickly use the Android Studio templates to create a bottom navigation activity.
I highly recommend checking out the official material design guidelines for bottom navigation bars to learn more about how to properly design and use the bottom navigation bar in Android.
To learn more about coding for Android, check out some of our other courses and tutorials here on Envato Tuts+!
This post has been updated with contributions from Nathan Umoh and Esther Vaati. Nathan is a staff writer for Envato Tuts+. Esther is a software developer and writer for Envato Tuts+.
Источник


