- Android и modbus
- Android studio modbus tcp
- Android studio modbus tcp
- Using the Modbus protocol in Android
- Introduction
- Modbus protocol
- Modbus RTU
- Modbus TCP/IP
- Modbus libraries for Android
- jamod
- jLibModbus
- Serial libraries for Modbus RTU in Android
- jSerialComm
- Android studio modbus tcp
- Introduction
- Ltouch F touch panel
- Architecture
- Final considerations
Android и modbus
Откуда берутся атрибуты android:layout_width и android:layout_height в элементе LinearLayout?
Недавно начал изучать Android API, а сегодня более менее разобрал основы синтакиса XML. Затем стал.
Работа с файлами android которые находятся не в папке проекта Android Studio
Всех приветствую, начал разработку приложения под Android и не могу разобраться как работать с.
Не предлагается установка Android SDK при установке Android Studio
на сайте https://developer.android.com/studio/. скачал exeшник для установки Android Studio.
Android Studio не находит функцию TextView в пакете Android.Widget
Я создал новый проект в Android Studio. Android Studio не находит функцию TextView в пакете.
Я так понял это библиотека modbus. Все таки хочется увидеть как выглядит обработчик (код полной команды) задачи выше что бы понять суть
Добавлено через 2 часа 14 минут
Мне нужно разработать по для андроид для обмена данными с контроллера modbus. Примерно понятно как это делается детально нет времени и достаточных знаний этим заниматься. Может кто поможет написать программу за мат. Вознаграждение. Свои координаты оставляйте мне в личку. Спасибо!
Вы абсолютно неверно поняли. Библиотека ни причем, тем более что по представленным ссылкам примеры по сылок в явном виде (либы с открытым исходным кодом), даже протокол не нужен.
Если вы настолько ленивы, что не в состоянии найти Modbus TCP, вот вам прямая ссылка на протокол Modbus TCP http://raxp.radioliga.com/cnt/s.php?p=m5.zip, в котором расписан формат обмена.
Если вы не понимаете разницу между сериал-протоколами Modbus ASC, Modbus RTU и сетевым Modbus TCP — вот вам для изучения RS-485. Работа с Modbus протоколом. . Среди прочего нужно понимать, что Modbus реализуется каждым производителем на свой манер и наилучшим вариантом является описание протокола обмена от производителя вашего контроллера, который вы не указали, ни модели, ни названия.
Источник
Android studio modbus tcp
Mobile Modbus is an Android Modbus polling client using modern android UI design guidelines and design patterns such as the Action bar for navigation, a slide-in menu for settings, and appropriately scaled data-display for the device you are working on (i.e. list views on a phone, and a grid on a tablet). And as I love all the new hottness, it also is built in Android Studio using the new gradle-based build system, so you will need to download that to work on this project.
More info to come as this project develops. Until then feel free to follow along with my blog for information, or follow me on twitter.
Contributing / Reporting Issues
Eventually I’ll put some basic stuff here to know how to contribute more easily — but basically for now, fork the project on github, and submit a pull request and I’ll evaluate it and add it if it is in line with the goals of the project.
If you see anything wrong with it in any way or just want to add something to the project, file a ticket or submit a pull request.
This project relies on two android support libraries, and one 3rd party library:
- Modbus4J — a Java Modbus library that is pretty extensible and full-featured with some nice batching functions that we (are going to) make use of. Just download and copy (or CVS-checkout) it into the top-level «Libraries/Modbus4J» folder (whole project). There should already be an appropriate build.gradle in that folder, all ready to build the library.
This project is Apache 2.0, which should be GPL 3.0 compatible, which I/you have to care about because Modbus4J is GPL3.
I’ll add the preamble here sometime soon, and get the class header comments all in line as well.
Last edited by Ben Catlin on July 29, 2013
Источник
Android studio modbus tcp
This is a Modbus library for Android.
1.Add the library to your project
Copy the jar to the lib directory of your project and add the config to build.gradle.
2.Create and init ModbusReq instance
Init ModbusReq instance through setting the modbus param.


6.Read InputRegisters(Child Thread)


10.Destroy Modbus Instance
if you use RTU Mode with SerialPort,you should do :
-
- Create a class to implement SerialPortWrapper interface.
-
- Create a ModbusMaster instance with createRtuMaster mothod of ModbusFactory class.
Источник
Using the Modbus protocol in Android
Edited by Marta Todeschini and Diego Rondini.
Introduction
This technical note aims to explain how to use the Modbus protocol in Android. The first section describes the main functions of the protocol: the purpose of its use, the structure of the packages and the architectural context in which the protocol is typically implemented. The part of the technical note is focused on the description of the different options through which to use Modbus in Android.
Modbus protocol
Modbus is an application layer messaging protocol for communication between devices based on the client/server paradigm. It is used in the field of automation and allows devices to exchange messages. Modbus is typically used to transmit signals from instrumentation and control devices to a main controller or a data gathering. The specifications for the latest version of the protocol, 1.1b3, are available in the official Modbus Organization website.
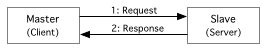
The following figure shows the client/server structure of Modbus, where the client acts as the Master and the server is the Slave. Communication is based on transactions, which consist of a request issued by the client to the server and a response issued by the server to the client.
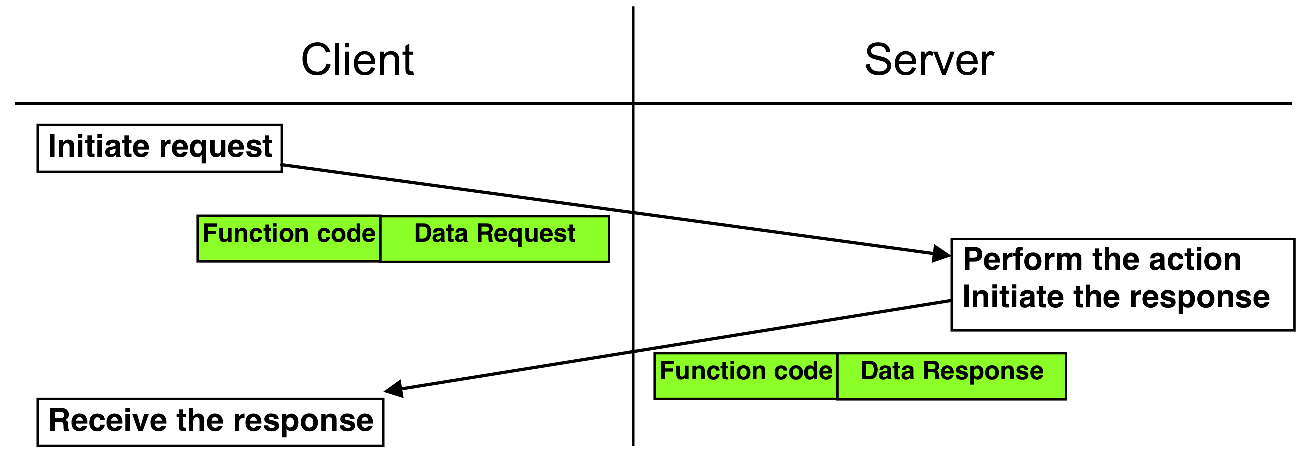
The communication is based on a simple Protocol Data Unit (PDU) defined by Modbus, which is independent of the underlying communication layers. The PDU is composed by a function code and the data. The mapping of Modbus on specific buses or network can introduce some additional fields on the Application Data Unit (ADU), as you can see in the following figure.

The protocol specification defines three types of PDU’s:
- Request PDU: a code specifying a function (Function Code, 1 byte) and function specific data (Function Data, varying number of bytes)
- Response PDU: the function code corresponding to the request (Function Code, 1 byte) and response specific data (Response Data, varying number of bytes)
- Exception Response PDU: the function code corresponding to the request + 0x80 (128), (Error Code, 1 byte) and a code specifying the exception (Exception Code, 1 byte)
There are two versions of Modbus protocol:
- Modbus RTU and Modbus ASCII for serial lines communication
- Modbus TCP for Ethernet communication
Information is stored in the Slave device in four different tables: two for coils and two for registers. Each table has 9999 possible addresses. Coils are discrete values (1 bit each) and registers are numerical values (each 1 word = 16 bits = 2 bytes). The following table contains the basic Modbus data types defined by the specification.
| Coil/Register Numbers | Data Addresses | Type | Table Name |
|---|---|---|---|
| 1-9999 | 0000 to 270E | Read-Write | Discrete Output Coils |
| 10001-19999 | 0000 to 270E | Read-Only | Discrete Input Contacts |
| 30001-39999 | 0000 to 270E | Read-Only | Analog Input Registers |
| 40001-49999 | 0000 to 270E | Read-Write | Analog Output Holding Registers |
Modbus RTU
Modbus RTU (Remote Terminal Unit) is used to connect a supervisory computer with a RTU in supervisor control and data acquisition systems.
This packet is composed by four parts:
- Slave ID: the unique address from 1 to 247 (maximum number of Slaves for each master)
- Function Code: the table to access and whether to read or write
- Data
- Error check: typically CRC (Cyclic Redundancy Check) is used
Modbus TCP/IP
TCP is a connection-based protocol so a connection must be established before transferring data.
Modbus TCP simply takes a Modbus RTU message, transmits it with a TCP/IP wrapper and sends it over network instead of serial lines.
The packet is composed by six parts:
- Transition ID: 2 bytes set by the client to uniquely identify each request
- Protocol ID: 2 bytes set by the client, always 0000
- Length: 2 bytes for number of bytes in the message to follow
- Unit ID: 1 byte set by the client and echoed by the server
- Function Code: the table to access and whether to read or write
- Data
Modbus libraries for Android
The are several Java libraries that implement the Modbus protocol, the most used are:
Let’s have a look at the first two.
jamod
jamod (Java Modbus Library) is a pure Java library that can be used to implement Modbus Master and Slave both in IP and serial transport flavours. The library is well documented as it provides both complete API documentation and guidelines on how to use jamod.
The Master is the client, which establishes a connection with the Slave (i.e. the server) and uses this connection for sending a Request to the Slave, from which a Response will be received. There can be only one Master requiring data from a source (data acquisition) or writing data to a sink (device control). The relevant Java classes to implement a Master are:
- SerialConnection for the creation of a serial connection
- ModbusSerialTransaction for the transaction which is composed by Request and Response
- SerialParameters the parameters to be used
The Slave is a server which has a listener for receiving an incoming request from the Master which are served providing a corresponding response. The relevant Java classes to implement a Slave are:
- ModbusSerialListener the listener for a request from a Master
- DigitalIn , DigitalOut , InputRegister , Register the Modbus data types
- SerialParameters the parameters to be used
j2mod is a fork of the jamod 1.2 codebase and has numerous bug fixes and additional features with respect to the original project. This is likely the best choice for jamod users looking to migrate to an up-to-date library.
- Easy to use
- Fully documented
- Several usage examples available
- Modbus RTU relies on Java Communications API, which has no official implementation for Android. The only option is to use some port of RXTX for Android
- The library is not up-to-date, the lastest official release (1.2rc1) dates back to 2004
jLibModbus
jLibModbus is an implementation of the Modbus protocol in Java language. It supports the most common libraries for serial communication such as RXTX, jssc, jSerialComm, purejavacomm and Java Communications API. jLibModbus covers all the main features of the Modbus protocol, such as Modbus RTU, Modbus TCP, Modbus ASCII, Modbus Master and Modbus Slave.
jLibModbus source code is hosted in this github repository.
- Actively maintained
- Support for several different serial communication libraries (jssc, RXTX, purejavacomm, Java Communications API)
- (Quite) complete implementation of the Modbus protocol.
- Code structure needs some time to be understood
- Documentation sometimes unclear or lacking
Serial libraries for Modbus RTU in Android
An aspect which requires particular attention when using Modbus RTU on Android is the choice of the serial communication library for two reason:
- Java libraries, especially when Java Communications API are involved, try to abstract away how the serial device is accessed by the platform, thus requiring the use of an external library for serial communication
- implementations for Linux of Java serial libraries might not be easy to port to Android because of differences between the two platforms, especially regarding the compilation of the native code accessing serial port devices
Libraries like RXTX for example have ports for Android, but are generally unmaintained and not compatible with recent Android version.
jSerialComm
jSerialComm is a library written in Java which provides a way to access standard serial ports without requiring external libraries or native code. The declared purpose of the library is to be a valid alternative to RXTX and Java Communications API. jSerialComm is platform-independent (automatically uses correct native library based on current architecture) and has the ability to open multiple ports simultaneously.
See the Javadoc Library Reference for a complete overview of jSerialComm API.
- Multi-platform (in particular supports Android)
- Lightweight and efficient
- Regularly updated
- Cannot be used straight away in combination with jamod, as it’s not a Java Communications API implementation
Источник
Android studio modbus tcp
The aim of this library is to let users to leverage the power of modbus RTU protocol through RS485 on Android devices, specifically on the Ltouch multi-touch panels (picture on the right) and development boards.
Introduction
In order to communicate with your instruments and devices from Android through RS485 and modbus, you can link the modbus RTU library in your projects and call the methods, such as function code 3 Read Holding Registers or function 16 Preset Multiple Registers, the most widely used modbus functions.
This document helps you to understand how to design a project that uses the native modbus library for Android. Many approaches exist in the way a project could be structured; we suggest one of that is complete and efficient though.
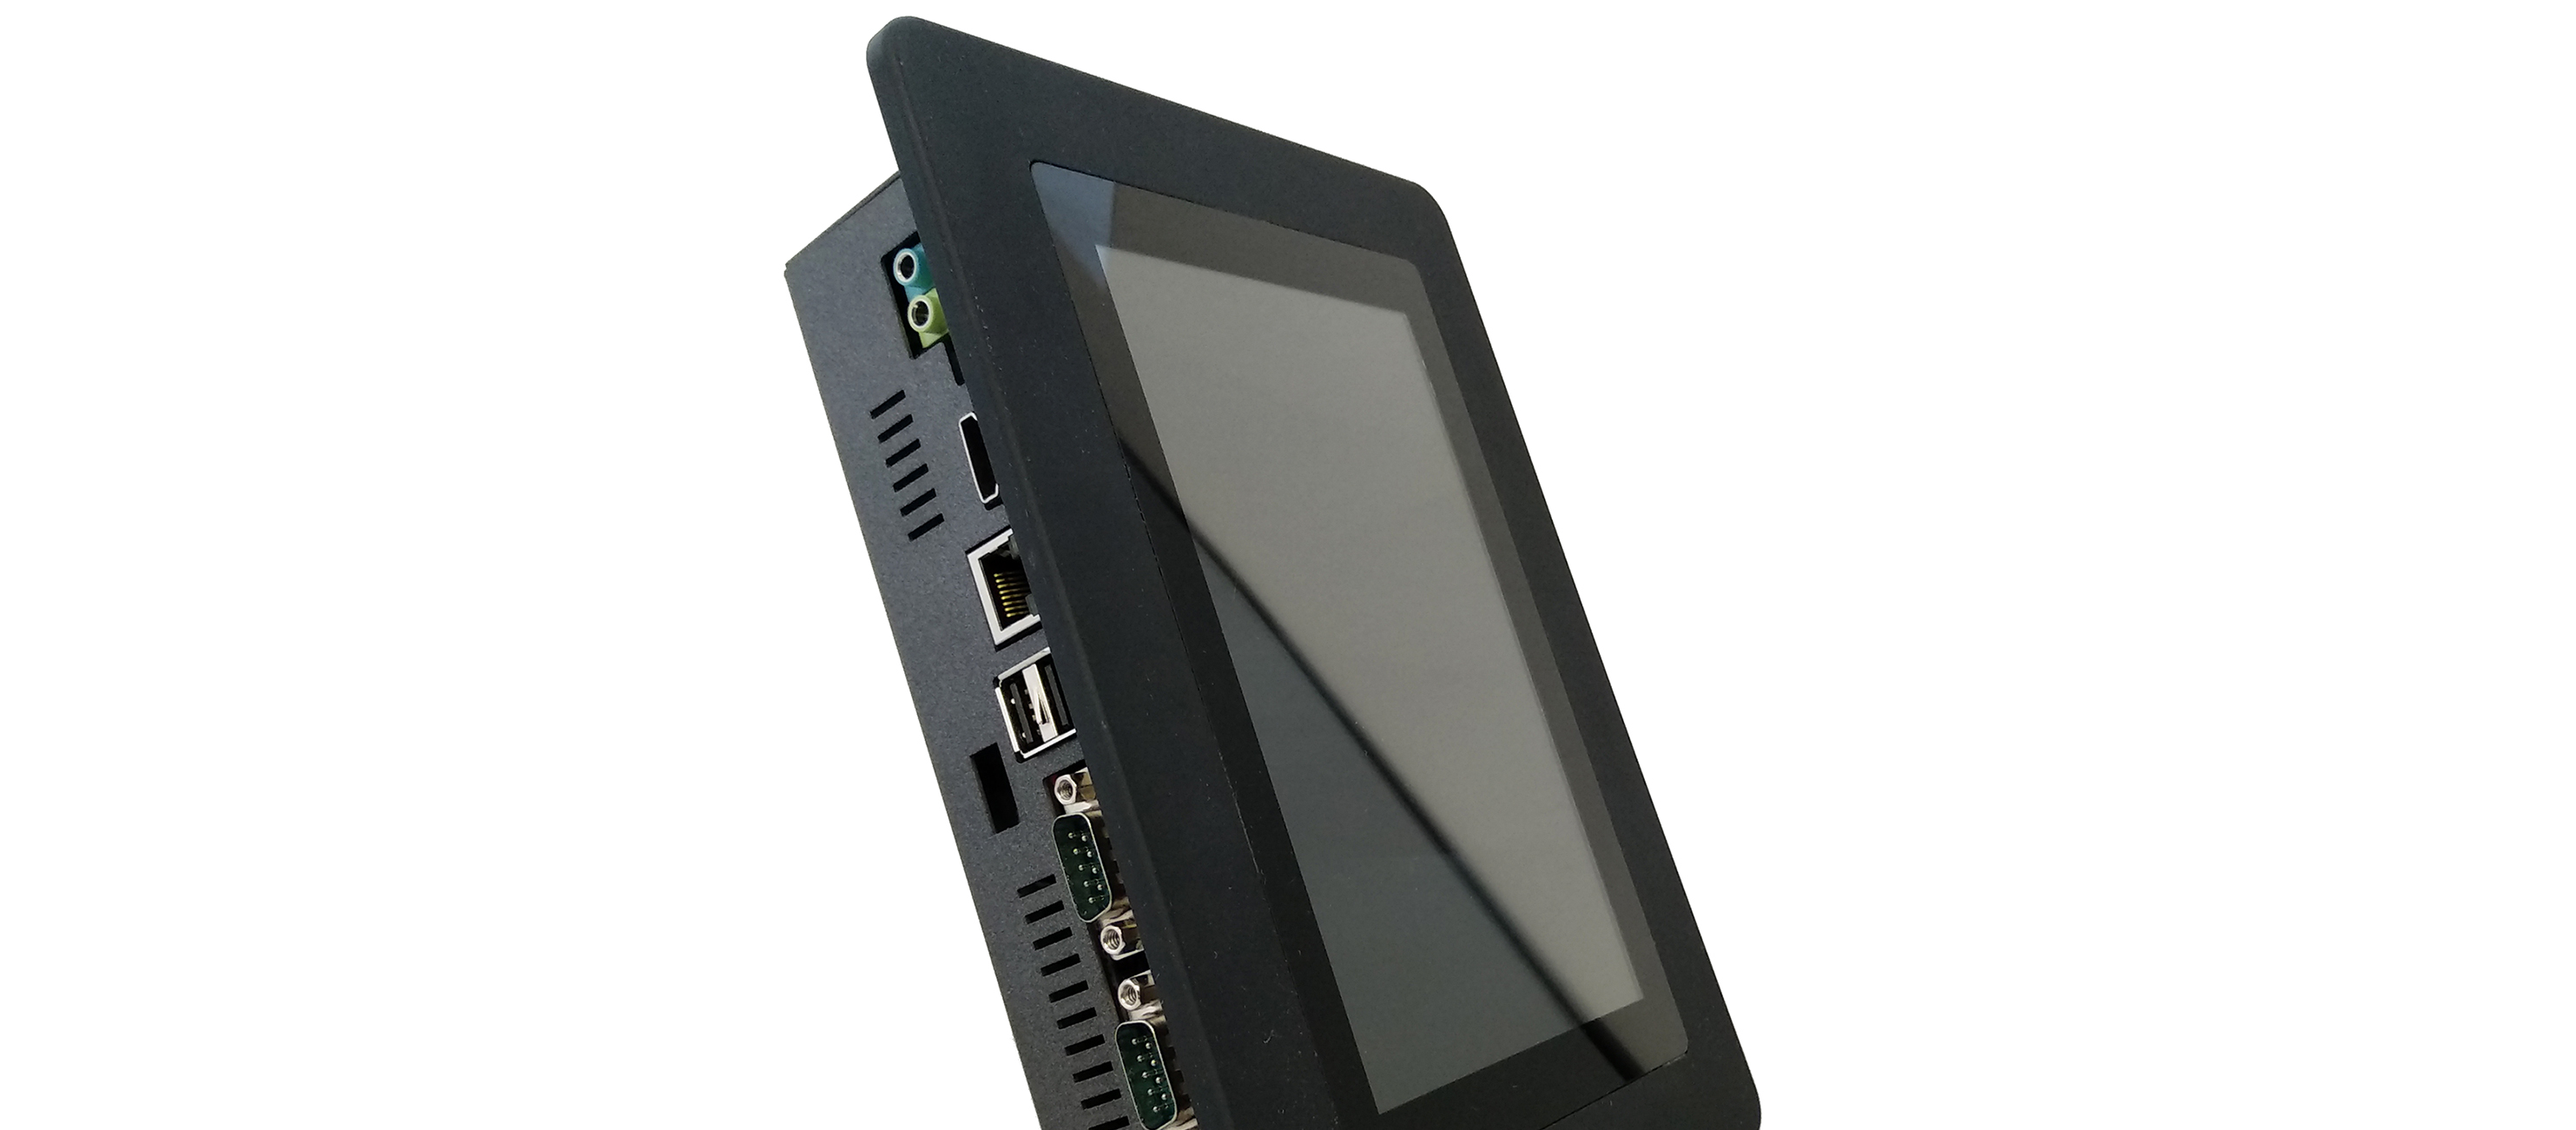
Ltouch F touch panel
The Ltouch board is a high-performance system based on the Samsung ARM Cortex-A8 microcontroller specifically designed for industrial and home automation. Supports Android 2.3 and 4.0.4.
Architecture
The most frequent situation that is encountered in industrial and home automations applications is the following: one or more slave devices (such as PLCs, Power inverters, remote I/O modules) connected in a bus line and a touch panel that acts as a master displaying devices’ states accepting commands from users. Basically, this is at the heart of Human Machine Interface (HMI).
The HMI interface is designed using the Android framework. For those of you that are not familiar with creating Android projects, we suggest to take a look at this brief tutorial on how to create your first app with Android. Many other tutorials and books are available on the net.
The high-level architecture of a hypothetical Android project can be summarized in the picture below. The rounded boxes represent respectively:
- The main activity (that runs on the MainUIthread)
- The thread that manage all the modbus requests (red)
- The native modbus library (yellow)
- A FIFO queue data structure that is used for the modbus Writes.
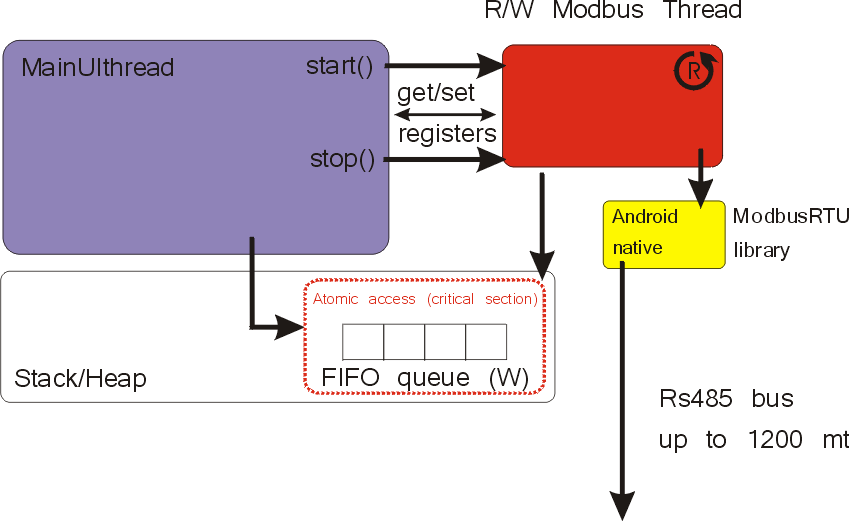
The first question may arise is the following: why using a FIFO queue and critical sections? Because we supposed that the project has to manage regular graphical updates, therefore the stream of read requests has to be correctly overlapped with writes. Indeed, the FIFO queue garantees the requests will be processed with the same order as they arrive.
In this tutorial, modbus reads and writes are considered as synonyms of modbus function 3 and 16 respectively.
The mainUIthread represent the main thread Activity(«Window») that the users see. It contains all the code necessary to manage the UI, like buttons, progress bars, text boxes, etc. We used only one Activity, but obviously, real world applications use more than one activity for accomplish their jobs. Indeed, it starts and stops the thread that manages the modbus reads/writes. The java code might be:
The onResume method accounts for opening the serial port (in this case with baudrate set to 38400bps and timeouts 40000ns for both modbus reads and writes) and for starting the thread that manages the modbus requests. When creating the modbus thread, it needs four parameters:
- a blocking queue data structure,
- an handler for returning back the modbus replies to the UI thread,
- the file id that refers to the serial port you want to work with,
- the Reads Refresh Rate that is the ideal refresh rate with which the reads will be executed.
The queue_writes is a blocking queue with a maximum length of 2000. We used a BlockingQueue data structure because the elements must be added atomically, preserving also the order with which requests arrives. Because of that, the code that inserts the elements into the queue will be in a critical section.
The objects that are stored in the queue must be of type WriteRequest. The class WriteRequest simply defines the object «modbus function» and is coded as follow:
A modbus write request can be defined as
with hr as a valid reference to an integer array. As previously stated, the code that adds write requests has to be in a critical section to preserve the order. This is accomplished by using a Java synchronized statement specifying the name of the variable to be accessed atomically (i.e., the queue), namely:
The final statement wakes up the modbus thread in case it was sleeping, therefore it can process the new requests that are on the queue.
We are now ready to analyze how can be designed the main thread that manage the modbus requests. We called this class ReadsWrites and it extends Thread in order to be executed in parallel with the other threads in the Android OS. The class private variables wrqueue, hd, fid and reads_rr are the same as those passed to the object constructor together with some other variables referring to modbus reads.
The core of the class stands in the critical section. It works in a way that when the queue is not empty, it executes all the writing requests; otherwise it cyclically reads registers from the slave(s) and pause itself for a limited timespan. The thread wakes up when a new write request has to be executed.
Since in Android background threads can not access the graphical objects directly, it is mandatory to manage the UI updates with messages and in particular using the handle that were gathered at the time of thread creation. The messages are created and sent by calling the obtainMessage and sendMessage methods. The class’ code might be the following:
In this demo project, two values only are sent back to the main UI thread. If you need to exchange more than few values, please take a look at our blog post in which Android bundle is used to figure out this issue.
Final considerations
The design we presented in this overview helps you to lay out the architecture of your Android application. It is quite general so can be adopted in many situations and by many professional and home users of our Android touch panels and development boards. We strongly suggest to starting with it and extending as your needs.
© Biemme Automations 2015
Except as otherwise noted, the content of this page is licensed under the Creative Commons Attribution 3.0 License.
Источник


