- MotionLayout: Visibility
- Android MotionLayout Tutorial – Collapsing View
- Add MotionLayout as a Gradle Dependency
- Create your layout XML as per usual
- Create the MotionScene XML
- Linking the MotionScene to the Layout
- Animating Visibility of a View
- It’s a wrap!
- Advanced Android in Kotlin 03.2: Animation with MotionLayout
- 1. Before you begin
- Prerequisites
- What you’ll do
- What you’ll need
- 2. Getting Started
- 3. Creating animations with MotionLayout
- Step 1: Explore the existing code
- activity_step1.xml
- Step 2: Convert to Motion Layout
- activity_step1**.xml**
- Step 3: Define start and end constraints
- activity_step1_scene.xml
- activitiy_step1_scene.xml
- Step 4: Define a transition
- activity_step1_scene.xml
- Step 5: Preview animation in Motion Editor
- Step 6: Add an on click handler
- activity_step1_scene.xml
- Step 5: Animations in action
- 4. Animating based on drag events
- Step 1: Inspect the initial code
- activity_step2.xml
- Step 2: Animate the scene
- Define the start ConstraintSet
- step2.xml
- Define the end ConstraintSet
- step2.xml
- Animating based on user swipe
- step2.xml
- Try it out
- 5. Modifying a path
- Step 1: Explore the existing code
- Step 2: Enable path debugging
- activity_step3.xml
- Step 3: Modify a path
- step3.xml
- Try it out
- 6. Understanding keyPositionType
- What is a coordinate system?
- parentRelative coordinates
- deltaRelative coordinates
- pathRelative coordinates
- 7. Building complex paths
- Modify a path with multiple KeyPosition elements
- step4.xml
- Try it out
- Explore on your own
- step4.xml
- 8. Changing attributes during motion
- Step 1: Resize and rotate with KeyAttribute
- step5.xml
- Step 2: Delay the appearance of credits
- step5.xml
- Try it out
- Explore on your own
- 9. Changing custom attributes
- Define custom attributes
- step6.xml
- Try it out
- 10. Drag events and complex paths
- Step 1: Explore OnSwipe behavior
- step7.xml
- Step 2: Use the right side
- step7.xml
- Step 3: Use dragDirection
- step7.xml
- Try it out
- 11. Running motion with code
- Step 1: Explore the existing code
- activity_step8.xml
- Step 2: Make the MotionLayout scroll
- activity_step8.xml
- Step 3: Move the motion with code
- Step8Activity.kt
- Try it out
- 12. Congratulations
- Learn More
MotionLayout: Visibility
MotionLayout is a wonderful tool for creating complex layout animations. However it does have some foibles which are easy enough to work around, but can initially be baffling. In this post we’ll look at some oddities concerning the visibility of views within the layout.
For this particular issue, the setup will actually take much longer than the fix, but please bear with me because it is important to understand that the initial MotionLayout XML initially looks correct yet doesn’t give us the behaviour that we might expect.
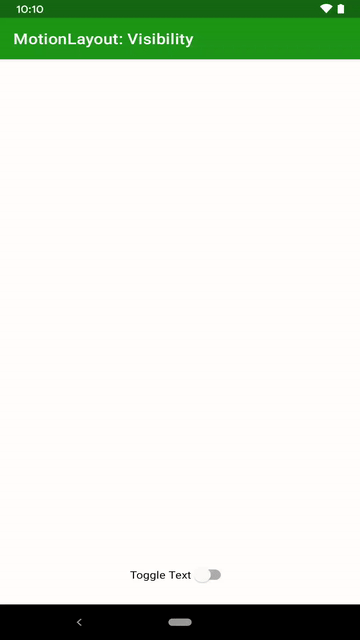
We’ll begin by setting up a very simple ConstraintLayout consisting of two views – a TextView and a MaterialSwitch :
The TextView has default visibility of GONE and we wire ip the switch to toggle the visibility:
This gives us a behaviour of the switch toggling the visibility of the TextView :
So far so good. We now convert the ConstraintLayout to MotionLayout :
Then we create the corresponding MotionScene XML:
The MotionScene actually does nothing because we never trigger the transition. I have included a Constraint for the TextView which specifies an initial state. We get exactly the same behaviour if we omit it – but I just wanted to be clear that including it does not avoid the issue we’re about to see.
Given that MotionLayout is a subclass of ConstraintLayout it would seem to be a reasonable assumption that we’ll get exactly the same behaviour as before, but this is not the case:
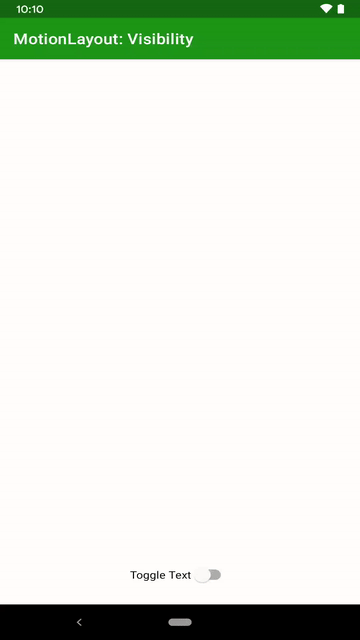
The visibility control of our TextView no longer works. The reason for this is that MotionLayout actually takes control of various aspects of the layout in order to correctly manipulate things when it comes to running a MotionLayout transition. That is what has broken our programmatic control of the TextView s visibility. To overcome this we need to tell MotionLayout that we want to control the visibility of this particular control, and there’s an attribute that we can set to do precisely that:
Источник
Android MotionLayout Tutorial – Collapsing View
By Rebecca Franks
Post date
MotionLayout is a layout class that extends from ConstraintLayout. MotionLayout has all the features of ConstraintLayout . On top of that, it also provides the ability to easily animate changes to your UI, without needing to know much about UI interactions and the Android Animation Frameworks.
Take for example this subtle animation of a view being scrolled and the profile picture shrinking. Before MotionLayout, this would be a tedious task to complete. We may have needed a CollapsingToolbar and some other custom animation code to ensure the profile picture scales correctly. Now with MotionLayout, this is really easy to achieve with one extra XML file.

In this article, we will be looking at implementing a simple swipe action on a RecyclerView and how we can achieve the scaling animation with MotionLayout .
Add MotionLayout as a Gradle Dependency
To get started with MotionLayout, you need to make sure we have the latest version in your build.gradle file. (Note: MotionLayout is still in alpha at the time of writing)
Create your layout XML as per usual
The great part about MotionLayout is that it uses the same constructs as ConstraintLayout . Everything you’ve previously learnt about ConstraintLayout (ie barriers, chains etc) is applicable to layouts that we build with MotionLayout .
To get started, open up your editor and change the root element of your layout to use MotionLayout . Add a RecyclerView and an ImageView to your layout. Make sure the RecyclerView is constrained to the bottom of the ImageView .
 RecyclerView with ImageView above
The XML behind the following layout should look similar to this:
Create the MotionScene XML
In order to animate this layout we need to describe how views should animate in the layout. To do this, create an XML file in the xml folder of your application. We will call it motion_scene.xml .
The first thing that we will do, is define the Transition for this MotionScene . We set the reference to the start and end ConstraintSets on the Transition object . We can also set the duration of the transition.
The next step, that can be seen in the code snippet above, is to create the OnSwipe declaration . This indicates to the MotionLayout that it should monitor the layout for a swipe movement. When the user performs a dragUp gesture on the specified touchAnchorId , the MotionScene will start interpolating between the two states defined (start and end). In this case, it is the recyclerViewStatus view that it will be monitoring for the dragUp gesture.
In the code snippet above, you may notice that there are two ConstraintSet tags defined in the MotionScene . These tags are for the start and end constraints of the view. The beautiful part about MotionLayout is that it will automatically interpolate between these two states and produce some pretty magical animations. At the moment, we don’t have any constraint changes applied, so let’s change that.
The first view we want to animate is the ImageView . We want the size of the view to decrease as a user scrolls up on the RecyclerView . To do that, we will add an end Constraint to the ImageView to adjust the width and height to 40dp .
Linking the MotionScene to the Layout
In order to link the MotionScene to the Layout, you will need to set the property app:layoutDescription=»@xml/motion_layout_example» to point to your newly created XML file on the root MotionLayout element.
Running this on device , you will observe that as you scroll up on the RecyclerView , the ImageView decreases in size.
Animating Visibility of a View
Now if you wanted to animate the background to go from invisible to visible, we can just add a Property animation to the start and end constraints . The final XML will look as follows:
It’s a wrap!
As you can see from the short example above, using MotionLayout can decrease the amount of code you need to write in order to achieve delightful animations. In the next few posts, we will be covering more of the features of MotionLayout , as this article has just touched the surface. Till next time!
Источник
Advanced Android in Kotlin 03.2: Animation with MotionLayout
1. Before you begin
This codelab is part of the Advanced Android in Kotlin course. You’ll get the most value out of this course if you work through the codelabs in sequence, but it is not mandatory. All the course codelabs are listed on the Advanced Android in Kotlin codelabs landing page.
This codelab is part of a series about Animation with Android. We recommend that you do all the codelabs in order, because they progress through tasks step-by-step.
The codelabs in this series are:
Animations with MotionLayout utilize many of the same concepts as Keyframe animations with Constraint Layout, and extend those concepts to allow you to finely customize the animation.
MotionLayout is a library that lets you add rich motion into your Android app. It’s based upon ConstraintLayout, and lets you animate anything that you can build using ConstraintLayout .
You can use MotionLayout to animate the location, size, visibility, alpha, color, elevation, rotation, and other attributes of multiple views at the same time. Using declarative XML you can create coordinated animations, involving multiple views, that are difficult to achieve in code.
Animations are a great way to enhance an app experience. You can use animations to:
- Show changes—animating between states lets the user naturally track changes in your UI.
- Draw attention—use animations to draw attention to important UI elements.
- Build beautiful designs—effective motion in design makes apps look polished.
Prerequisites
This codelab has been designed for developers with some Android development experience. Before attempting to complete this codelab, you should:
- Know how to create an app with an activity, a basic layout, and run it on a device or emulator using Android Studio. Be familiar with ConstraintLayout . Read through the Constraint Layout codelab to learn more about ConstraintLayout .
What you’ll do
- Define an animation with ConstraintSets and MotionLayout
- Animate based on drag events
- Change the animation with KeyPosition
- Change attributes with KeyAttribute
- Run animations with code
- Animate collapsible headers with MotionLayout
What you’ll need
- Android Studio 4.0 (The MotionLayout editor only works with this version of Android Studio.)
2. Getting Started
It is highly recommended that you use the latest 4.2 canary to complete this codelab using Motion Editor.
This codelab can be completed Android Studio 4.0 or higher, though you may see inconsistent UI in the Motion Editor.
Download the latest Android Studio canary.
To download the sample app, you can either:
. or clone the GitHub repository from the command line by using the following command:
The motionlayout repository contains one app project:
 motionlayout-start
 motionlayout-start
All files that you will edit in this codelab have a completed version next to them showing the solution to each step.
3. Creating animations with MotionLayout
First, you’ll build an animation that moves a view from the top start of the screen to the bottom end in response to user clicks.
Remember, the starter code for this step is missing several important elements that you’ll add later.
Because of this, MotionLayout won’t display this screen correctly and you’ll see an empty screen or you might experience a crash until you complete this step.
To create an animation from the starter code, you’ll need the following major pieces:
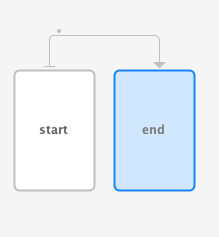
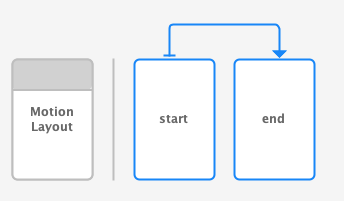
- A MotionLayout, which is a subclass of ConstraintLayout . You specify all the views to be animated inside the MotionLayout tag.
- A MotionScene, which is an XML file that describes an animation for MotionLayout.
- A Transition, which is part of the MotionScene that specifies the animation duration, trigger, and how to move the views.
- A ConstraintSet that specifies both the start and the end constraints of the transition.
Let’s take a look at each of these in turn, starting with the MotionLayout .
Step 1: Explore the existing code
MotionLayout is a subclass of ConstraintLayout , so it supports all the same features while adding animation. To use MotionLayout , you add a MotionLayout view where you would use ConstraintLayout.
- In res/layout , open activity_step1.xml. Here you have a ConstraintLayout with a single ImageView of a star, with a tint applied inside of it.
activity_step1.xml
This ConstraintLayout does not have any constraints on it, so if you were to run the app now you would see the star display unconstrained, which means they would be positioned in an unknown location. Android Studio will give you a warning about the lack of constraints.
Step 2: Convert to Motion Layout
To animate using MotionLayout, you have to convert the ConstraintLayout to a MotionLayout .
For your layout to use a motion scene, it has to point at it.
- To do this, open the design surface. In Android Studio 4.0, you open the design surface by using the split or design icon at the top right when looking at a layout XML file.
- Once you open the design surface, right click the preview and select Convert to MotionLayout.
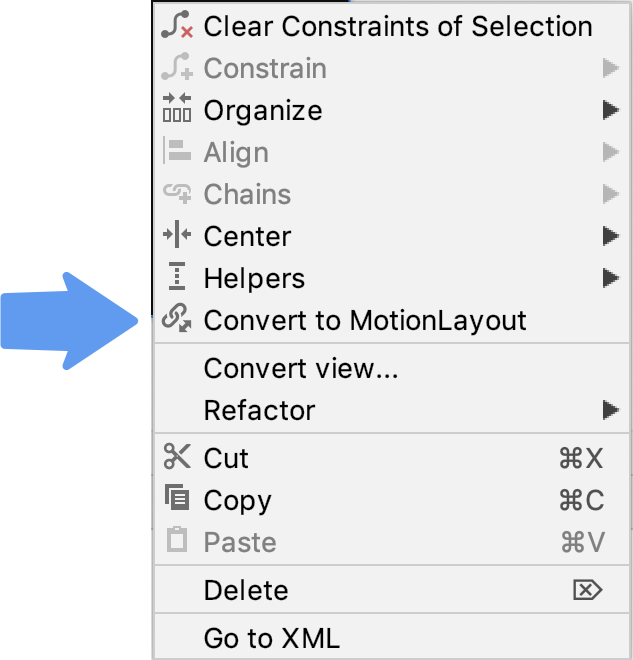
This replaces the ConstraintLayout tag with a MotionLayout tag and adds a motion:layoutDescription to the MotionLayout tag that points to @xml/activity_step1_scene.
activity_step1**.xml**
A motion scene is a single XML file that describes an animation in a MotionLayout .
As soon as you convert to a MotionLayout , the design surface will display Motion Editor
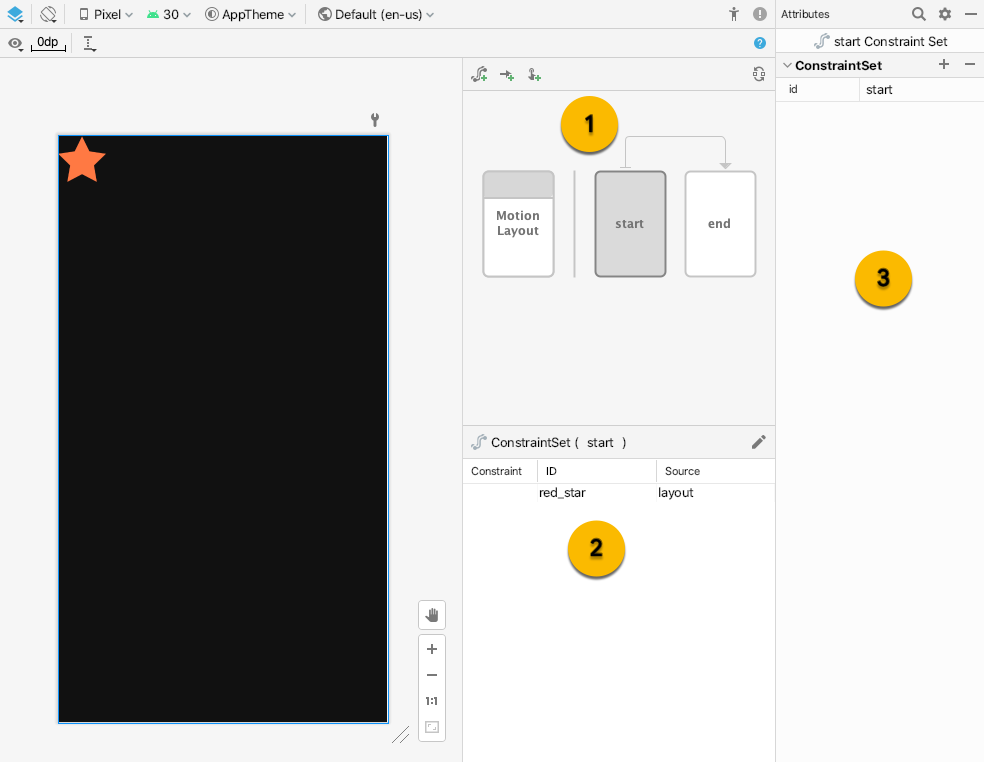
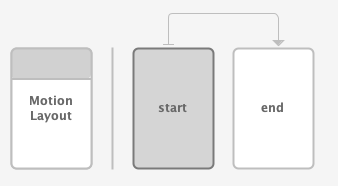
There are three new UI elements in the Motion Editor:
- Overview – This is a modal selection that allows you to select different parts of the animation. In this image the start ConstraintSet is selected. You can also select the transition between start and end by clicking on the arrow between them.
- Section – Below the overview is a section window that changes based on the currently selected overview item. In this image, the start ConstraintSet information is displayed in the selection window.
- Attribute – The attribute panel shows and allows you to edit the attributes of the current selected item from either the overview or selection window. In this image, it’s showing the attributes for the start ConstraintSet .
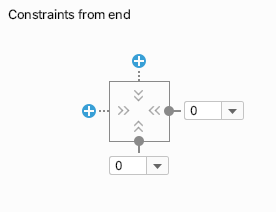
Step 3: Define start and end constraints
All animations can be defined in terms of a start and an end. The start describes what the screen looks like before the animation, and the end describes what the screen looks like after the animation has completed. MotionLayout is responsible for figuring out how to animate between the start and end state (over time).
MotionScene uses a ConstraintSet tag to define the start and end states. A ConstraintSet is what it sounds like, a set of constraints that can be applied to views. This includes width, height, and ConstraintLayout constraints. It also includes some attributes such as alpha . It doesn’t contain the views themselves, just the constraints on those views.
Any constraints specified in a ConstraintSet will override the constraints specified in the layout file. If you define constraints in both the layout and the MotionScene , only the constraints in the MotionScene are applied.
Constraint sets only contain the constraints or layout information such as width, height, alpha, or visibility. They don’t contain other information such as the type of view or any view specific attributes like text on a TextView .
In this step, you’ll constrain the star view to begin at the top start of the screen, and finish at the bottom end of the screen.
You can complete this step either using the Motion Editor, or by editing the text of activity_step1_scene.xml directly.
- Select the start ConstraintSet in the overview panel
- In the selection panel, select red_star . Currently it shows Source of layout – this means it’s not constrained in this ConstraintSet . Use the pencil icon in the upper right to Create Constraint
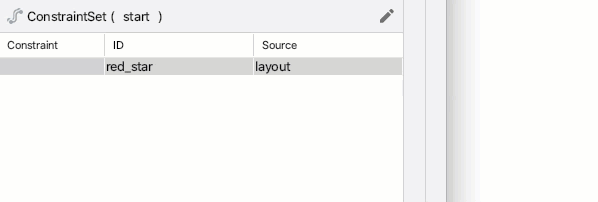
- Confirm that red_star shows a Source of start when the start ConstraintSet is selected in the overview panel.
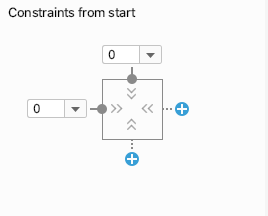
- In the Attributes panel, with red_star selected in the start ConstraintSet , add a Constraint on the top and start by clicking on the blue + buttons.
- Open xml/activity_step1_scene.xml to see the code that Motion Editor generated for this constraint.
activity_step1_scene.xml
The ConstraintSet has an id of @id/start , and specifies all the constraints to apply to all the views in the MotionLayout . Since this MotionLayout only has one view, it only needs one Constraint .
The Constraint inside the ConstraintSet specifies the id of the view that it’s constraining, @id/red_star defined in activity_step1.xml . It’s important to note that Constraint tags specify only constraints and layout information. The Constraint tag doesn’t know that it’s being applied to an ImageView .
This constraint specifies the height, width, and the two other constraints needed to constrain the red_star view to the top start of its parent.
- Select the end ConstraintSet in the overview panel.
- Follow the same steps as you did before to add a Constraint for red_star in the end ConstraintSet .
- To use Motion Editor to complete this step, add a constraint to the bottom and end by clicking on the blue + buttons.
- The code in XML looks like this:
activitiy_step1_scene.xml
Just like @id/start , this ConstraintSet has a single Constraint on @id/red_star . This time it constrains it to the bottom end of the screen.
You don’t have to name them @id/start and @id/end , but it is convenient to do so.
When using MotionLayout , you should specify the constraints of any views that are animated in the motion scene XML file instead of in the layout. Any views that are not animated may be constrained in the layout instead of the motion scene.
Step 4: Define a transition
Every MotionScene must also include at least one transition. A transition defines every part of one animation, from start to end.
A transition has to specify a start and end ConstraintSet for the transition. A transition can also specify how to modify the animation in other ways, such as how long to run the animation or how to animate by dragging views.
A Transition describes one animation in a MotionScene .
It contains the specification for a complete animation to MotionLayout , including all views that change during the animation, how long the animation should take, and how to handle user touch to drive the animation.
A MotionScene can have more than one animation and more than one Transition .
- Motion Editor created a transition for us by default when it created the MotionScene file. Open activity_step1_scene.xml to see the generated transition.
activity_step1_scene.xml
This is everything that MotionLayout needs to build an animation. Looking at each attribute:
- constraintSetStart will be applied to the views as the animation starts.
- constraintSetEnd will be applied to the views at the end of the animation.
- duration specifies how long the animation should take in milliseconds.
MotionLayout will then figure out a path between the start and end constraints and animate it for the specified duration.
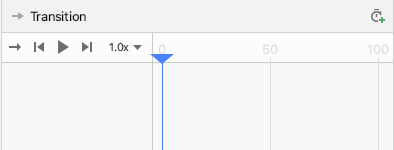
Step 5: Preview animation in Motion Editor

Animation: Video of playing a transition preview in Motion Editor
- Open Motion Editor and select the transition by clicking on the arrow between start and end in the overview panel.
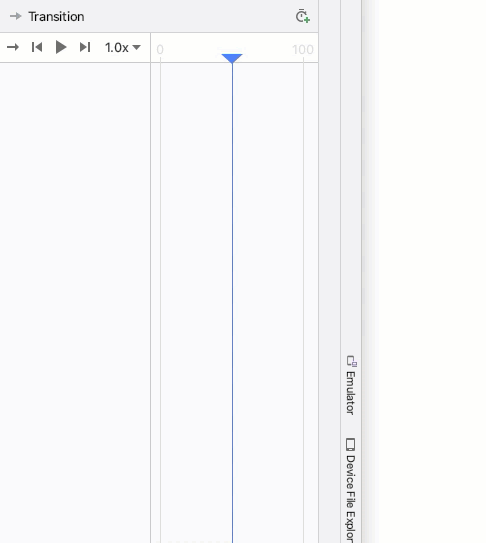
- The selection panel shows playback controls and a scrub bar when a transition is selected. Click play or drag the current position to preview the animation.
Step 6: Add an on click handler
You need a way to start the animation. One way to do this is to make the MotionLayout respond to click events on @id/red_star .
- Open up the motion editor and select the transition by clicking on the arrow between start and end in the overview panel.
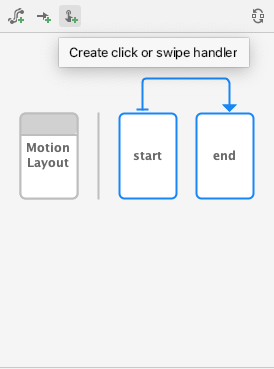
- Click Create click or swipe handler in the toolbar for the overview panel . This adds a handler that will start a transition.
- Select Click Handler from the popup
 Create click or swipe handler in the toolbar for the overview panel . This adds a handler that will start a transition.
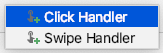
- Change the View To Click to red_star .
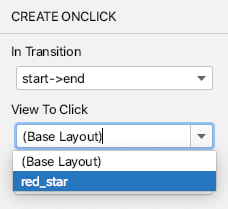
- Click Add the click handler is represented by a small dot on the Transition in Motion Editor.
- With the transition selected in the overview panel, add a clickAction attribute of toggle to the OnClick handler you just added in the attributes panel.

- Open activity_step1_scene.xml to see the code that Motion Editor generated
activity_step1_scene.xml
The Transition tells MotionLayout to run the animation in response to click events using an tag. Looking at each attribute:
- targetId is the view to watch for clicks.
- clickAction of toggle will switch between the start and end state on click. You can see other options for clickAction in the documentation.
- Run your code, click Step 1, then click the red star and see the animation!
It is possible to load a ConstraintSet from an existing ConstraintLayout by pointing start or end to a layout file instead of a ConstraintSet .
Step 5: Animations in action
Run the app! You should see your animation run when you click on the star.
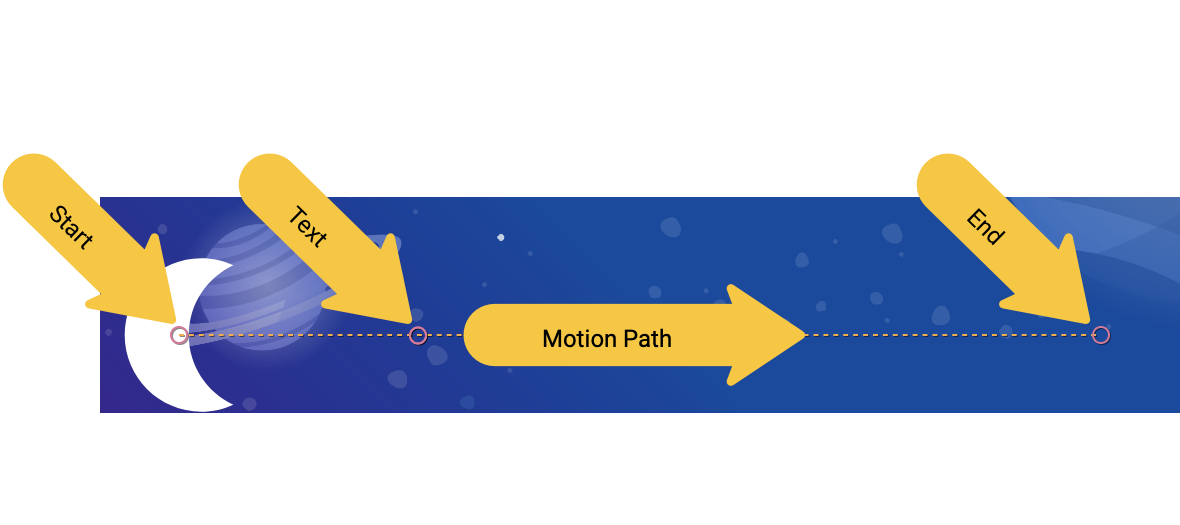
The completed motion scene file defines one Transition which points to a start and end ConstraintSet .
At the start of the animation ( @id/start ), the star icon is constrained to the top start of the screen. At the end of the animation ( @id/end ) the star icon is constrained to the bottom end of the screen.
4. Animating based on drag events
The last section served as an introduction to Motion Layout and Motion Editor. The remaining steps of this codelab will focus on XML.
You can also complete this codelab using Motion Editor and new UI elements in the Motion Editor will be called out in tip like this.
For this step you will build an animation that responds to a user drag event (when the user swipes the screen) to run the animation. MotionLayout supports tracking touch events to move views, as well as physics-based fling gestures to make the motion fluid.
Motion Editor currently does not support creating chains via the UI. An alternate solution would be:
- Left start connect to start+top of parent, margin 32dp
- Right star connected to end + top of parent, margin 32dp
- Red star connected center in parent, top of parent, margin 32dp
Step 1: Inspect the initial code
- To get started, open the layout file activity_step2.xml , which has an existing MotionLayout . Take a look at the code.
activity_step2.xml
This layout defines all the views for the animation. The three star icons are not constrained in the layout because they will be animated in the motion scene.
The credits TextView does have constraints applied, because it stays in the same place for the entire animation and doesn’t modify any attributes.
Views that are not animated by a MotionLayout animation should specify their constraints in the layout XML file. MotionLayout will not modify constraints that aren’t referenced by a in the .
Views that are animated should have their constraints set in the motion scene XML file.
Step 2: Animate the scene
Just like the last animation, the animation will be defined by a start and end ConstraintSet, and a Transition .
Define the start ConstraintSet
- Open the motion scene xml/step2.xml to define the animation.
- Add the constraints for the starting constraint start . At the start, all three stars are centered at the bottom of the screen. The right and left stars have an alpha value of 0.0 , which means that they’re fully transparent and hidden.
step2.xml
In this ConstraintSet , you specify one Constraint for each of the stars. Each constraint will be applied by MotionLayout at the start of the animation.
Each star view is centered at the bottom of the screen using start, end, and bottom constraints. The two stars @id/left_star and @id/right_star both have an additional alpha value that makes them invisible and that will be applied at the start of the animation.
The start and end constraint sets define the start and end of the animation. A constraint on the start, like motion:layout_constraintStart_toStartOf will constrain a view’s start to the start of another view. This can be confusing at first, because the name start is used for both and they’re both used in the context of constraints. To help draw out the distinction, the start in layout_constraintStart refers to the «start» of the view, which is the left in a left to right language and right in a right to left language. The start constraint set refers to the start of the animation.
You can specify an alpha value in a Constraint . This value determines the transparency of the view, where «0.0» is fully transparent and «1.0» is fully opaque.
When animating between two alpha values, MotionLayout will smoothly transition between them. For example, when animating between alpha=»0.0″ and alpha=»1.0″ , MotionLayout will create a fade-in effect.
Define the end ConstraintSet
- Define the end constraint to use a chain to position all three stars together below @id/credits . In addition, it will set the end value of the alpha of the left and right stars to 1.0 .
step2.xml
The end result is that the views will spread out and up from the center as they animate.
In addition, since the alpha property is set on @id/right_start and @id/left_star in both ConstraintSets , both views will fade in as the animation progresses.
Animating based on user swipe
MotionLayout can track user drag events, or a swipe, to create a physics-based «fling» animation. This means the views will keep going if the user flings them and will slow down like a physical object would when rolling across a surface. You can add this type of animation with an OnSwipe tag in the Transition .
- Replace the TODO for adding an OnSwipe tag with .
step2.xml
OnSwipe contains a few attributes, the most important being touchAnchorId .
- touchAnchorId is the tracked view that moves in response to touch. MotionLayout will keep this view the same distance from the finger that’s swiping.
- touchAnchorSide determines which side of the view should be tracked. This is important for views that resize, follow complex paths, or have one side that moves faster than the other.
- dragDirection determines which direction matters for this animation (up, down, left or right).
When MotionLayout listens for drag events, the listener will be registered on the MotionLayout view and not the view specified by touchAnchorId . When a user starts a gesture anywhere on the screen, MotionLayout will keep the distance between their finger and the touchAnchorSide of the touchAnchorId view constant. If they touch 100dp away from the anchor side, for example, MotionLayout will keep that side 100dp away from their finger for the entire animation.
OnSwipe listens for swipes on the MotionLayout and not the view specified in touchAnchorId .
This means the user may swipe outside of the specified view to run the animation.
Try it out
- Run the app again, and open the Step 2 screen. You will see the animation.
- Try «flinging» or releasing your finger halfway through the animation to explore how MotionLayout displays fluid physics based animations!

MotionLayout can animate between very different designs using the features from ConstraintLayout to create rich effects.
In this animation, all three views are positioned relative to their parent at the bottom of the screen to start. At the end, the three views are positioned relative to @id/credits in a chain.
Despite these very different layouts, MotionLayout will create a fluid animation between start and end.
5. Modifying a path
In this step you’ll build an animation that follows a complex path during the animation and animates the credits during the motion. MotionLayout can modify the path that a view will take between the start and the end using a KeyPosition .
Step 1: Explore the existing code
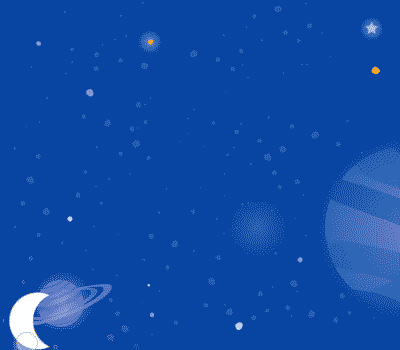
- Open layout/activity_step3.xml and xml/step3.xml to see the existing layout and motion scene. An ImageView and TextView display the moon and credits text.
- Open the motion scene file ( xml/step3.xml ). You see that a Transition from @id/start to @id/end is defined. The animation moves the moon image from the lower left of the screen to the bottom right of the screen using two ConstraintSets . The credits text fades in from alpha=»0.0″ to alpha=»1.0″ as the moon is moving.
- Run the app now and select Step 3. You’ll see that the moon follows a linear path (or a straight line) from start to end when you click on the moon.
Step 2: Enable path debugging
Before you add an arc to the moon’s motion, it’s helpful to enable path debugging in MotionLayout .
To help develop complex animations with MotionLayout , you can draw the animation path of every view. This is helpful when you want to visualize your animation, and for fine tuning the small details of motion.
You can also SHOW_PATH in the design surface by holding control while playing a transition.
- To enable debugging paths, open layout/activity_step3.xml and add motion:motionDebug=»SHOW_PATH» to the MotionLayout tag.
activity_step3.xml
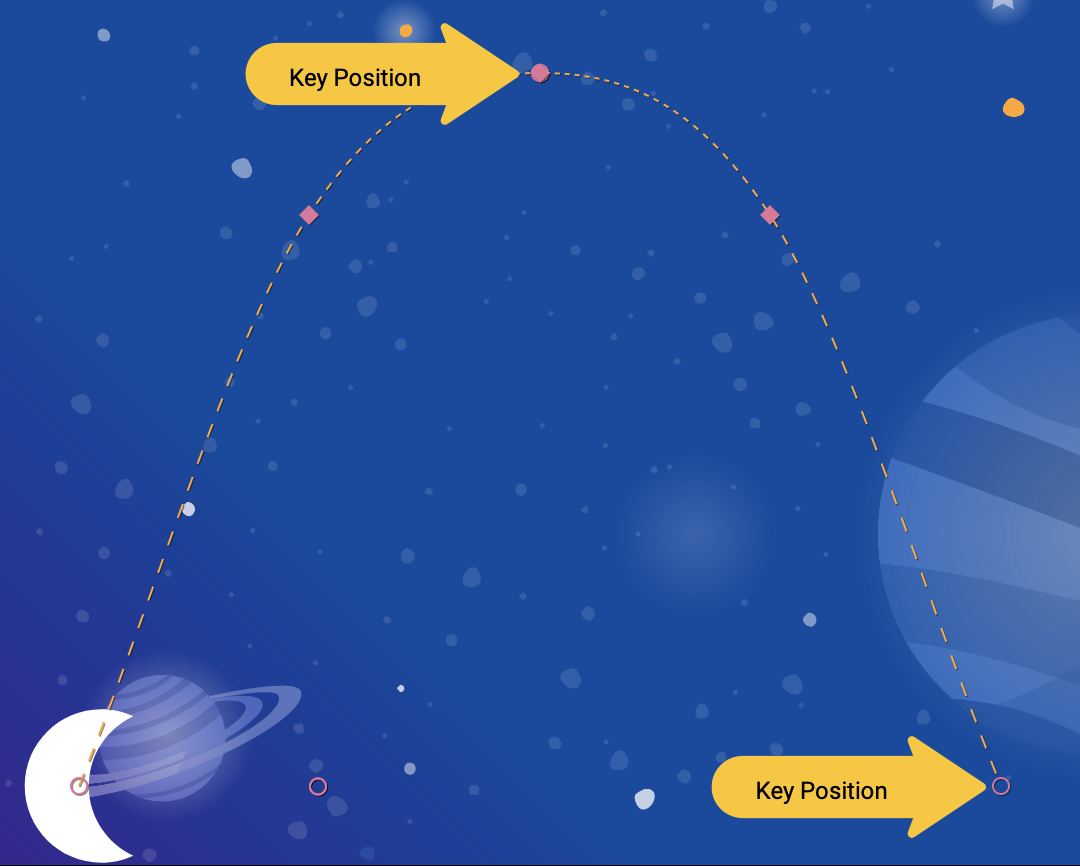
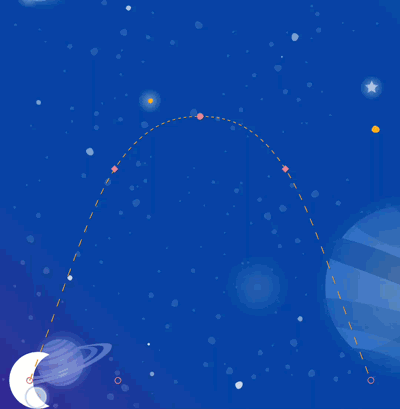
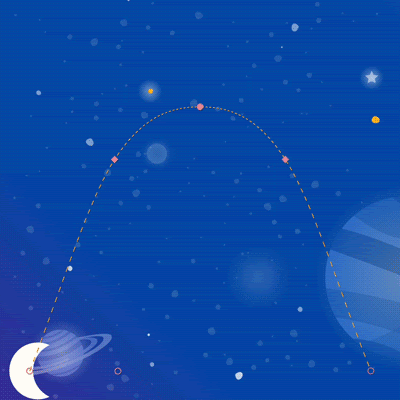
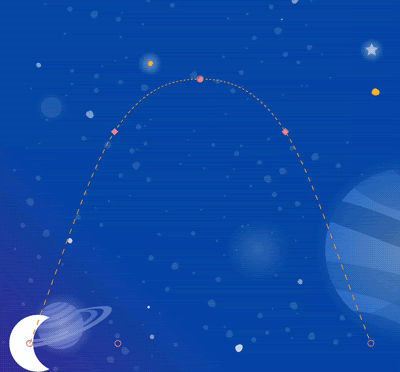
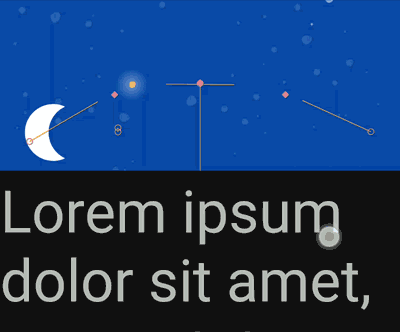
After you enable path debugging, when you run the app again, you’ll see the paths of all views visualized with a dotted line.
- Circles represent the start or end position of one view.
- Lines represent the path of one view.
- Diamonds represent a KeyPosition that modifies the path.
For example, in this animation, the middle circle is the position of the credits text.
Step 3: Modify a path
All animations in MotionLayout are defined by a start and an end ConstraintSet that defines what the screen looks like before the animation starts and after the animation is done. By default, MotionLayout plots a linear path (a straight line) between the start and end position of each view that changes position.
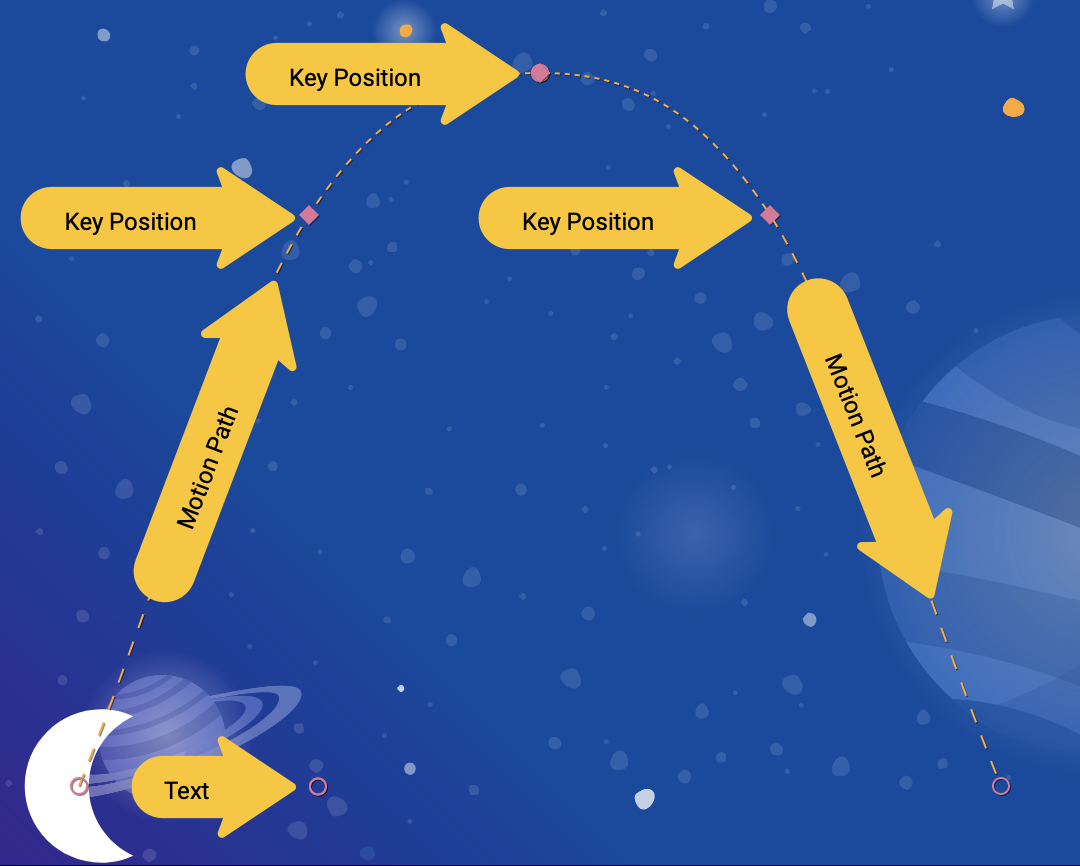
To build complex paths like the arc of the moon in this example, MotionLayout uses a KeyPosition to modify the path that a view takes between the start and end.
A KeyPosition modifies the path a view takes between the start and the end ConstraintSet .
It can distort the path of a view to go through a third (or fourth, or fifth, . ) point between the start and end positions. Or, it can even speed up and slow down progress along either the X or Y axis.
A KeyPosition can only change the path during the animation, it cannot change the start or the end.
The ConstraintSet will always specify the final position for the views at the start and end of the animation.
- Open xml/step3.xml and add a KeyPosition to the scene. The KeyPosition tag is placed inside the Transition tag.
step3.xml
To complete this step in Motion Editor, select the transition in the overview panel then follow this video.
A KeyFrameSet is a child of a Transition , and it is a set of all the KeyFrames , such as KeyPosition , that should be applied during the transition.
As MotionLayout is calculating the path for the moon between the start and the end, it modifies the path based on the KeyPosition specified in the KeyFrameSet . You can see how this modifies the path by running the app again.
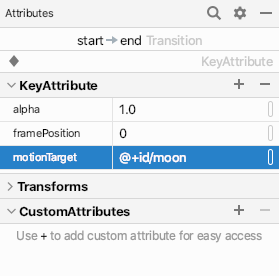
A KeyPosition has several attributes that describe how it modifies the path. The most important ones are:
- framePosition is a number between 0 and 100. It defines when in the animation this KeyPosition should be applied, with 1 being 1% through the animation, and 99 being 99% through the animation. So if the value is 50, you apply it right in the middle.
- motionTarget is the view for which this KeyPosition modifies the path.
- keyPositionType is how this KeyPosition modifies the path. It can be either parentRelative , pathRelative , or deltaRelative (as explained in the next step).
- percentX | percentY is how much to modify the path at framePosition (values between 0.0 and 1.0, with negative values and values >1 allowed).
You can think of it this way: «At framePosition modify the path of motionTarget by moving it by percentX or percentY according to the coordinates determined by keyPositionType .»
By default MotionLayout will round any corners that are introduced by modifying the path. If you look at the animation you just created, you can see that the moon follows a curved path at the bend. For most animations, this is what you want, and if not, you can specify the curveFit attribute to customize it.
Try it out
If you run the app again, you’ll see the animation for this step.

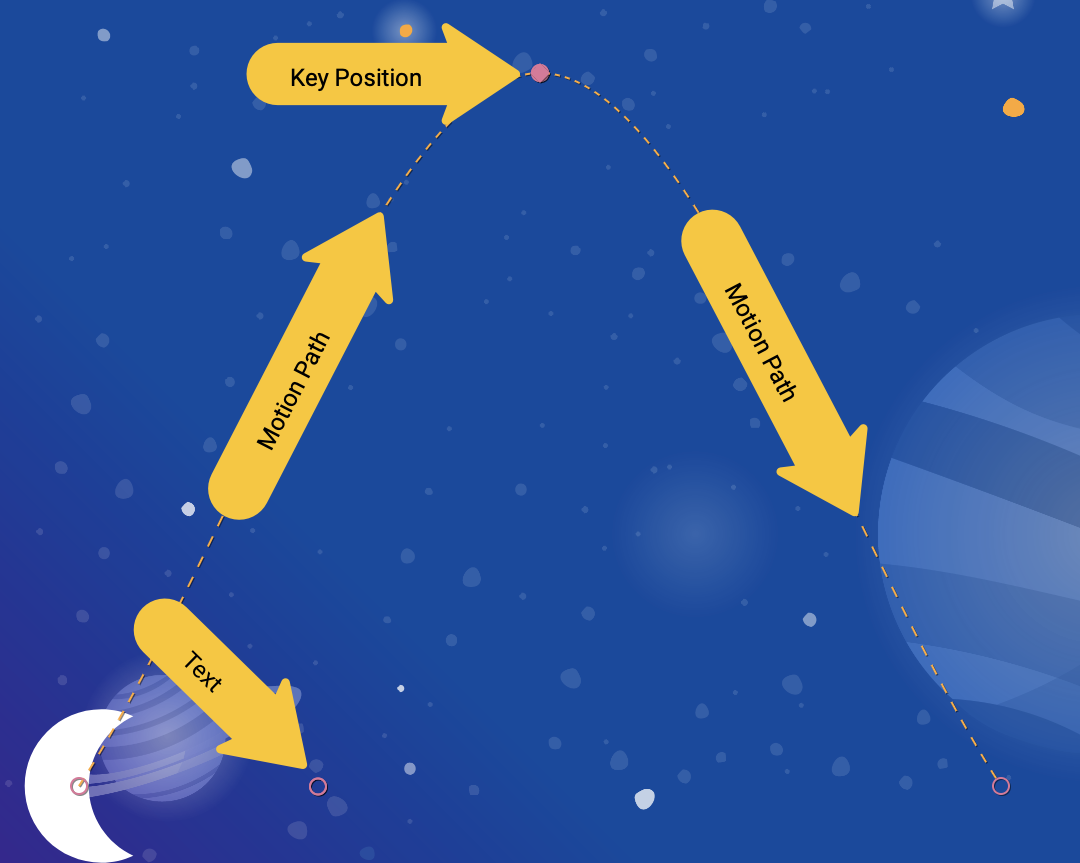
The moon follows an arc because it goes through a KeyPosition specified in the Transition .
You can read this KeyPosition as: «At framePosition 50 (halfway through the animation) modify the path of motionTarget @id/moon by moving it by 50% Y (halfway down the screen) according to the coordinates determined by parentRelative (the entire MotionLayout ).»
So, half-way through the animation, the moon must go through a KeyPosition that’s 50% down on the screen. This KeyPosition doesn’t modify the X motion at all, so the moon will still go from start to end horizontally. MotionLayout will figure out a smooth path that goes through this KeyPosition while moving between start and end.
If you look closely, the credits text is constrained by the position of the moon. Why isn’t it moving vertically as well?

It turns out, even though you’re modifying the path that the moon takes, the start and end positions of the moon don’t move it vertically at all. The KeyPosition doesn’t modify the start or the end position, so the credits text is constrained to the final end position of the moon.
If you did want the credits to move with the moon, you could add a KeyPosition to the credits, or modify the start constraints on @id/credits .
Start and end constraints are never modified by a KeyPosition .
Even if a view is following a complex motion path, like @id/moon , the start and end constraints will always rest at their initial or final positions. Other views constrained to @id/moon will not follow the path in between.
In the next section you’ll dive into the different types of keyPositionType in MotionLayout .
6. Understanding keyPositionType
In the last step you used a keyPosition type of parentRelative to offset the path by 50% of the screen. The attribute keyPositionType determines how MotionLayout will modify the path according to percentX or percentY .
There are three different types of keyPosition possible: parentRelative , pathRelative , and deltaRelative . Specifying a type will change the coordinate system by which percentX and percentY are calculated.
What is a coordinate system?
A coordinate system gives a way to specify a point in space. They are also useful for describing a position on the screen.
MotionLayout coordinate systems are a cartesian coordinate system. This means they have an X and a Y axis defined by two perpendicular lines. The key difference between them is where on the screen the X axis goes (the Y axis is always perpendicular to the X axis).
All coordinate systems in MotionLayout use values between 0.0 and 1.0 on both the X and Y axis. They allow negative values, and values larger than 1.0 . So for example, an percentX value of -2.0 would mean, go in the opposite direction of the X axis twice.
If that all sounds a bit too much like Algebra class, check out the pictures below!
parentRelative coordinates

The keyPositionType of parentRelative uses the same coordinate system as the screen. It defines (0, 0) to the top left of the entire MotionLayout , and (1, 1) to the bottom right.
You can use parentRelative whenever you want to make an animation that moves through the entire MotionLayout – like the moon arc in this example.
However, if you want to modify a path relative to the motion, for example make it curve just a little bit, the other two coordinate systems are a better choice.
deltaRelative coordinates
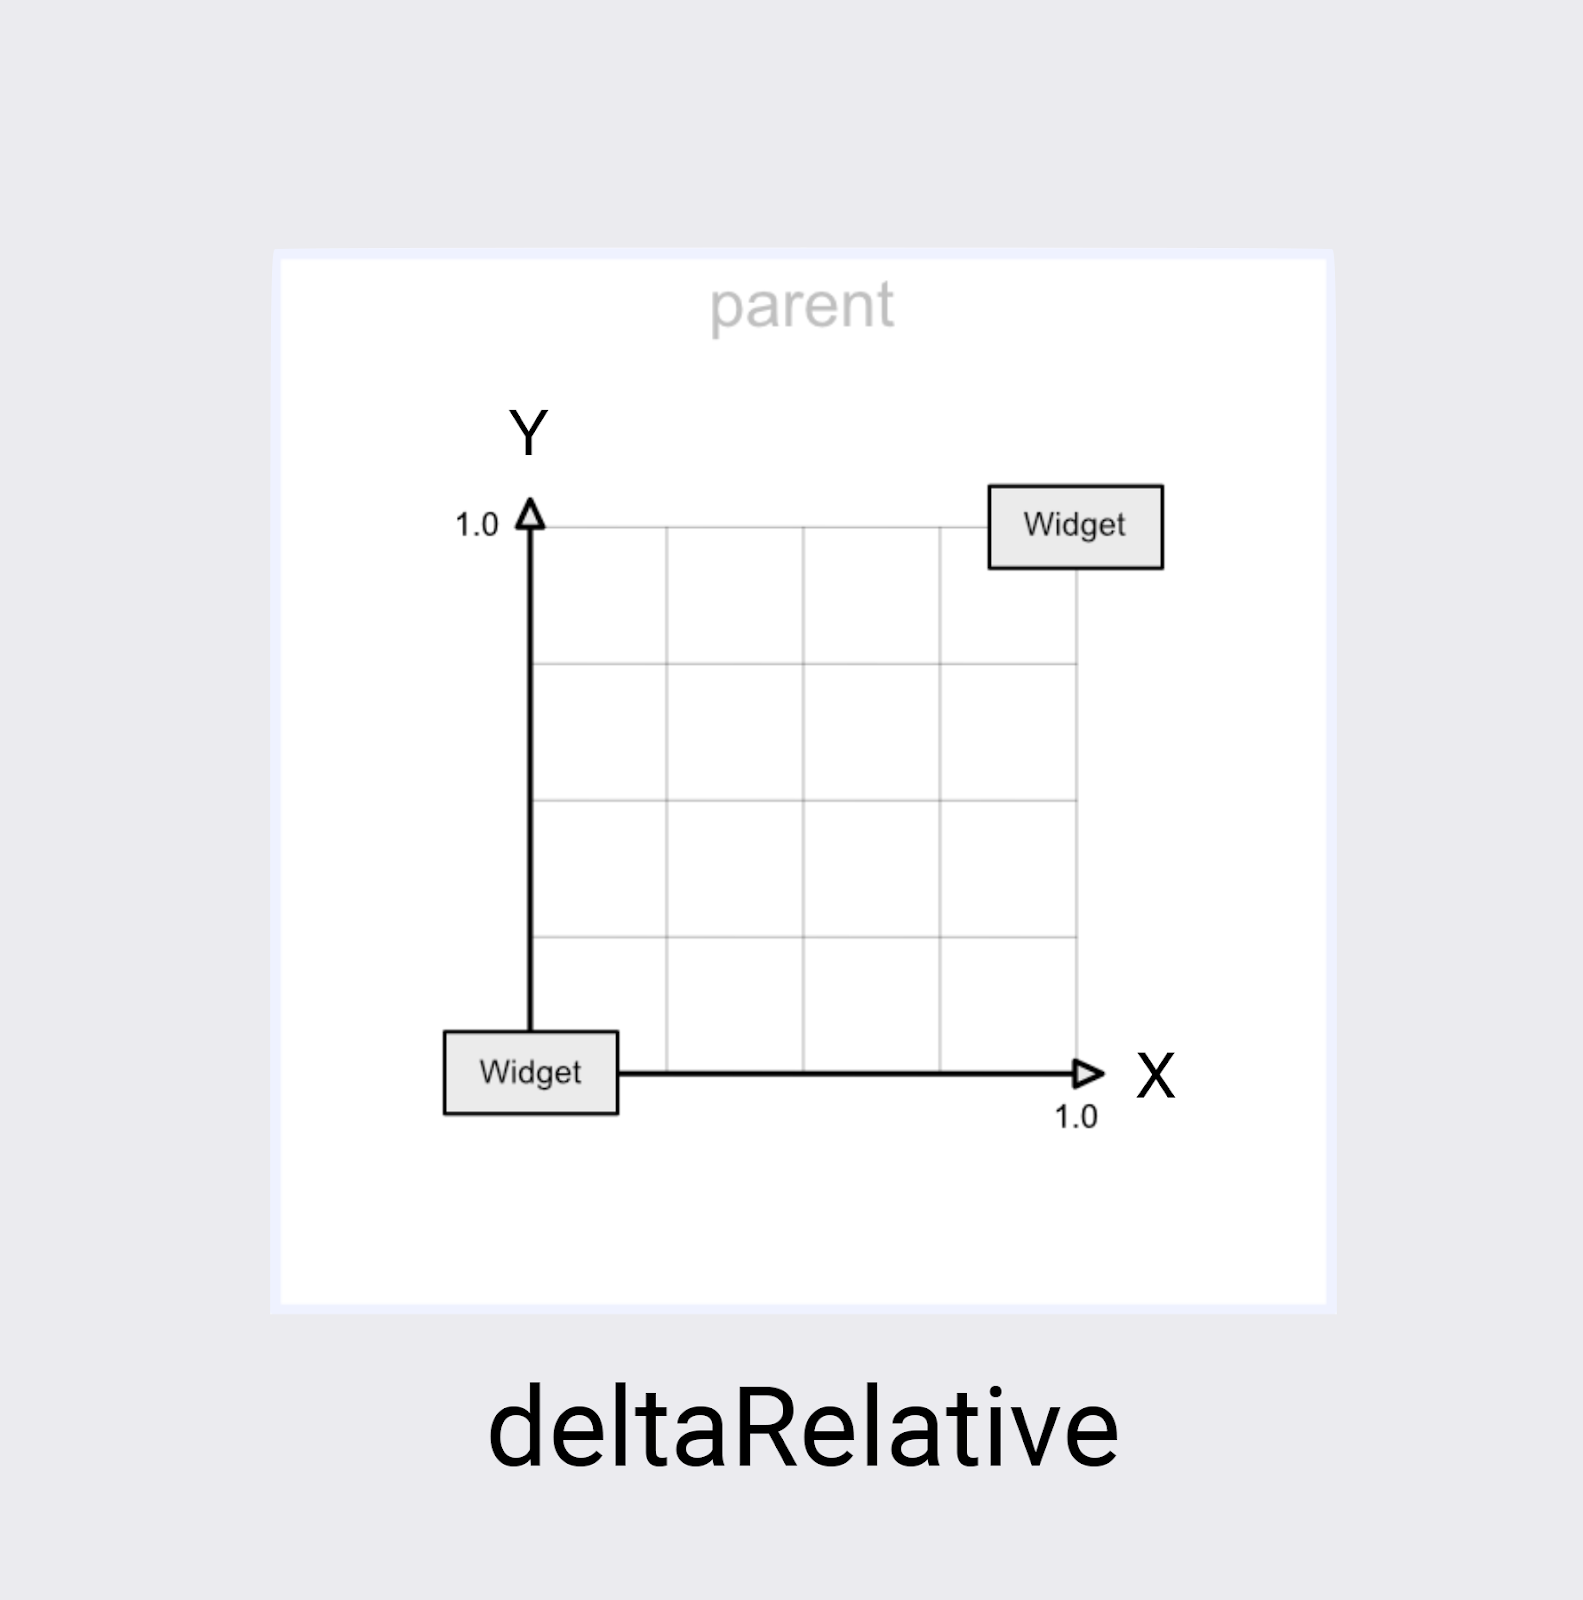
Delta is a math term for change, so deltaRelative is a way of saying «change relative.» In deltaRelative coordinates (0,0) is the starting position of the view, and (1,1) is the ending position. The X and Y axes are aligned with the screen.
The X axis is always horizontal on the screen, and the Y axis is always vertical on the screen. Compared to parentRelative , the main difference is that the coordinates describe just the part of the screen in which the view will be moving.
deltaRelative is a great coordinate system for controlling the horizontal or vertical motion in isolation. For example, you could create an animation that completes just its vertical (Y) movement at 50%, and continues animating horizontally (X).
Coordinates in deltaRelative are relative to the motion of the view.
So if the view moves to the right, X will go to the right. If the view moves to the left, X will go to the left. Similarly, the Y dimension will follow the view and go up or down.
Of course, you can always use negative values or values larger than 1.0 if you want the view to bounce past the start or stop position!
The coordinates of deltaRelative will expand or shrink based on the distance the view moves in both the X and the Y direction.
So, if you have a view that doesn’t move very much, or at all, in one direction, deltaRelative won’t create a useful coordinate system in that direction. For example, a view that moves horizontally from the right to left will not have a useful Y axis in deltaRelative .
pathRelative coordinates
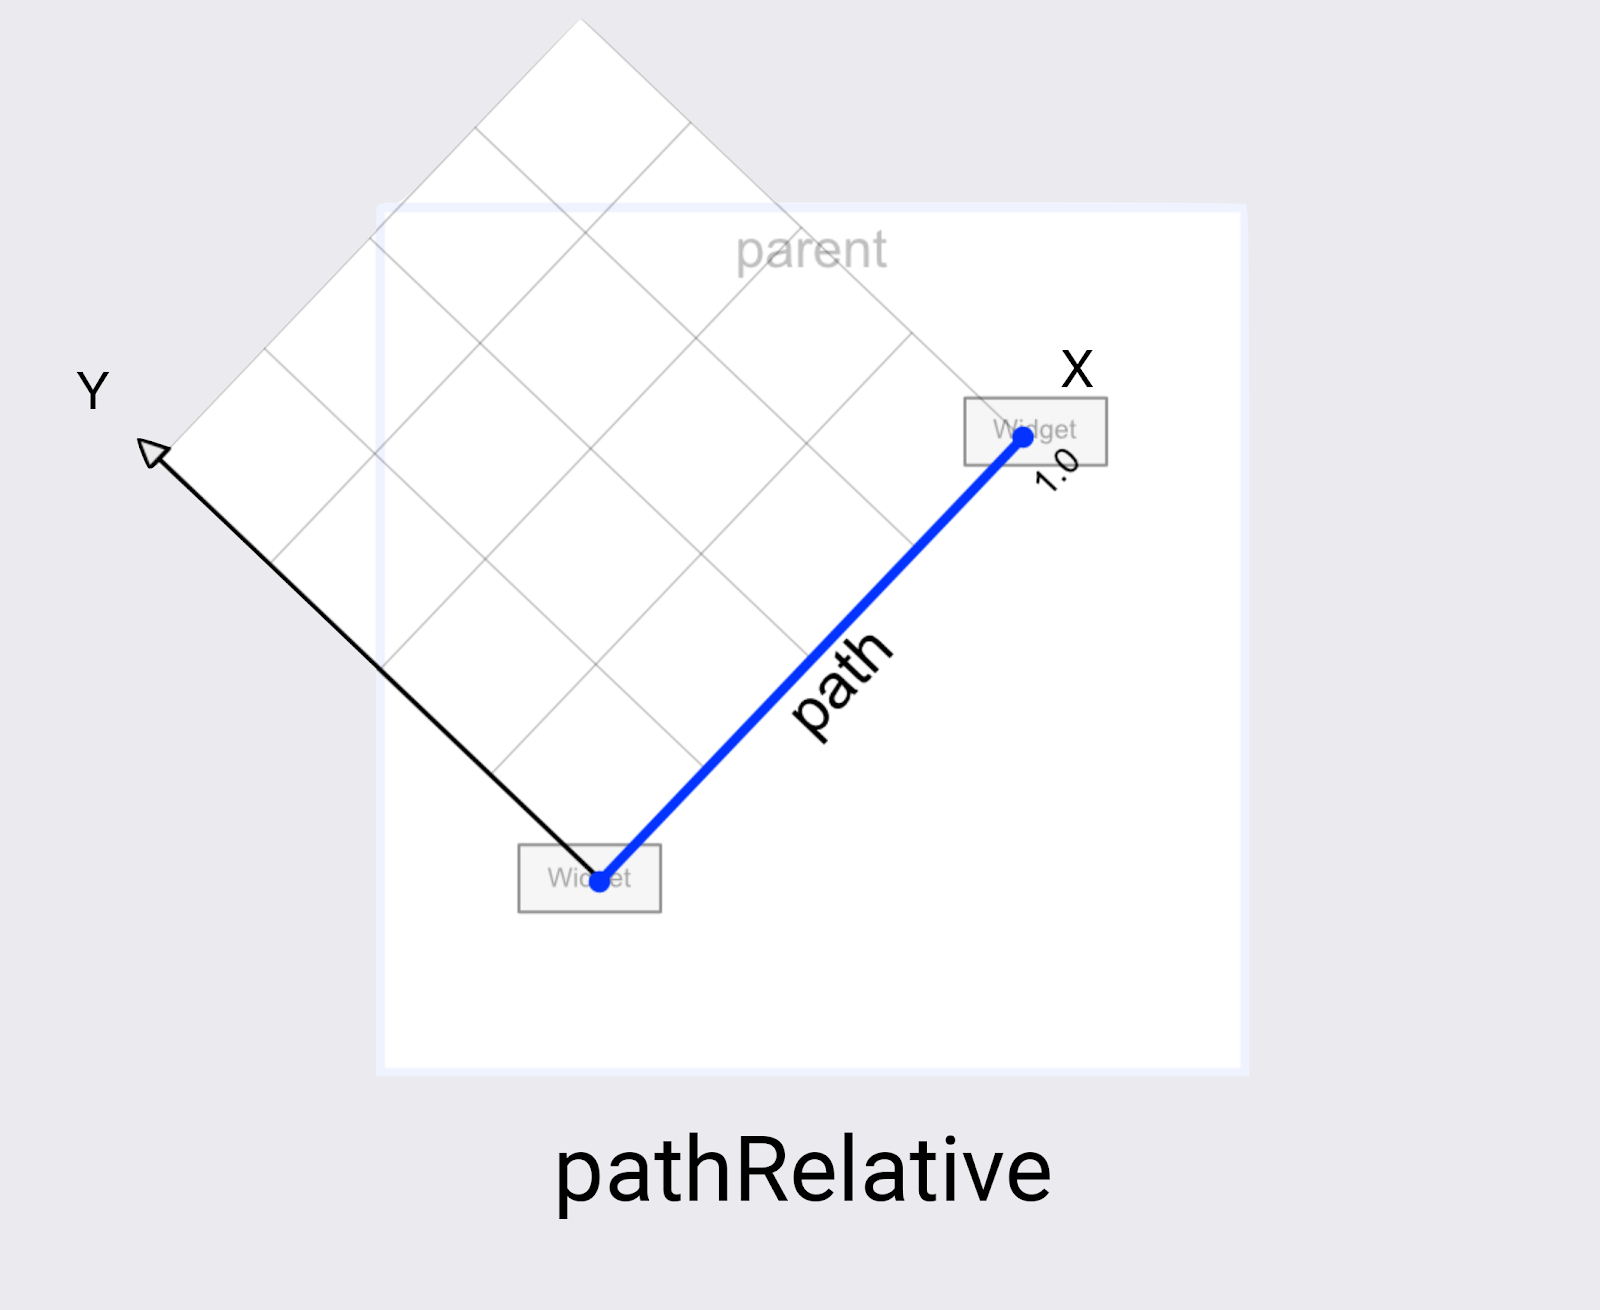
The last coordinate system in MotionLayout is pathRelative . It’s quite different from the other two as the X axis follows the motion path from start to end. So (0,0) is the starting position, and (1,0) is the ending position.
Why would you want this? It’s quite surprising at first glance, especially since this coordinate system isn’t even aligned to the screen coordinate system.
It turns out pathRelative is really useful for a few things.
- Speeding up, slowing down, or stopping a view during part of the animation. Since the X dimension will always match the path the view takes exactly, you can use a pathRelative KeyPosition to change which framePosition a particular point in that path is reached. So a KeyPosition at framePosition=»50″ with a percentX=»0.1″ would cause the animation to take 50% of the time to travel the first 10% of the motion.
- Adding a subtle arc to a path. Since the Y dimension is always perpendicular to motion, changing Y will change the path to curve relative to the overall motion.
- Adding a second dimension whendeltaRelativewon’t work. For completely horizontal and vertical motion, deltaRelative will only create one useful dimension. However, pathRelative will always create usable X and Y coordinates.
It’s important to note that pathRelative will always define a coordinate system in terms of the motion, not of the screen.
This means it may be at an angle to the overall screen. If you need to modify the horizontal or vertical motion in terms of screen coordinates, one of the other coordinate systems is a better choice.
In the next step you’ll learn how to build even more complex paths using more than one KeyPosition .
7. Building complex paths
Looking at the animation you built in the last step, it does create a smooth curve, but the shape could be more «moon like.»
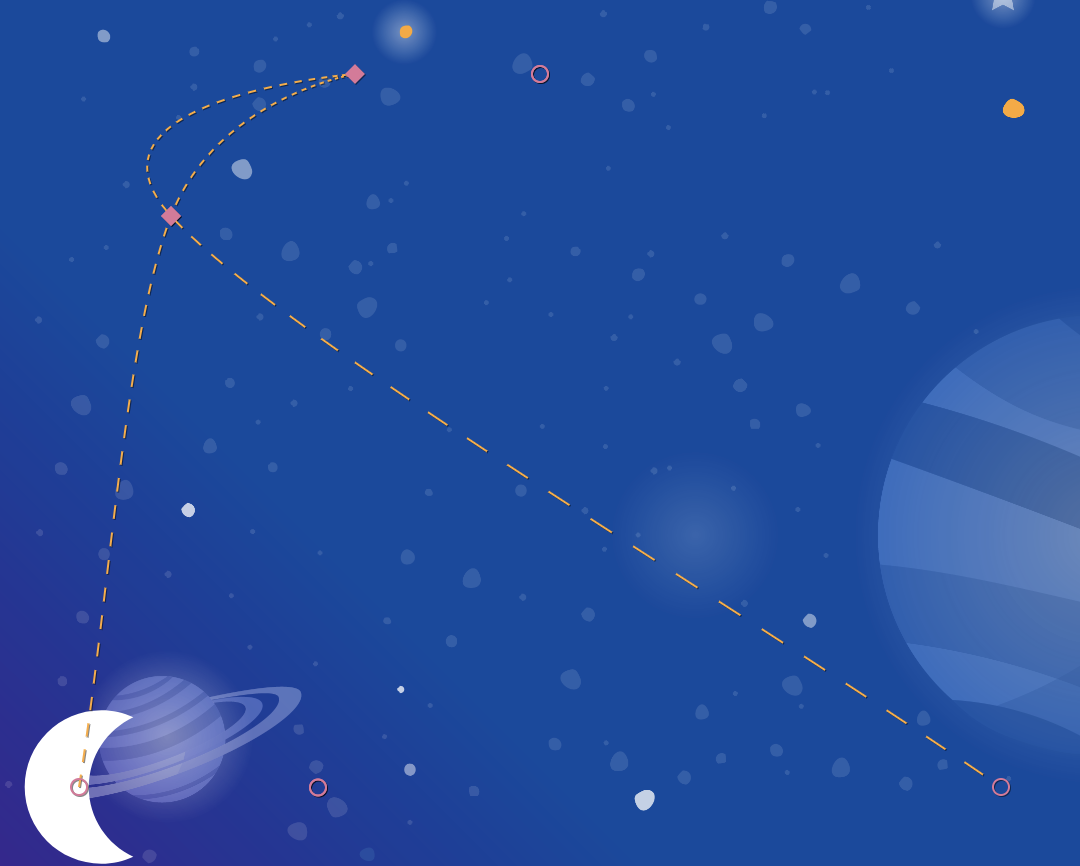
Modify a path with multiple KeyPosition elements
MotionLayout can modify a path further by defining as many KeyPosition as needed to get any motion. For this animation you will build an arc, but you could make the moon jump up and down in the middle of the screen, if you wanted.
- Open xml/step4.xml . You see it has the same views and the KeyFrame you added in the last step.
- To round out the top of the curve, add two more KeyPositions to the path of @id/moon , one just before it reaches the top, and one after.
step4.xml
These KeyPositions will be applied 25% and 75% of the way through the animation, and cause @id/moon to move through a path that is 60% from the top of the screen. Combined with the existing KeyPosition at 50%, this creates a smooth arc for the moon to follow.
In MotionLayout , you can add as many KeyPositions as you would need to get the motion path you want. MotionLayout will apply each KeyPosition at the specified framePosition , and figure out how to create a smooth motion that goes through all of the KeyPositions .
A KeyPosition always defines an (x, y, width, height) position that the View must move through during the transition from start to end.
If you don’t specify one dimension, it will have a default value (zero, or an appropriate value based on the framePosition ). In this example, by specifying only percentY , the percentX keeps its default value for that keyPosition .
Try it out
- Run the app again. Go to Step 4 to see the animation in action. When you click on the moon, it follows the path from start to end, going through each KeyPosition that was specified in the KeyFrameSet .
Modifying a path with several KeyPositon tags allows you to build complex motion.
You can build arcs, configure sharp corners, make views bounce around, or hop from start to end. Since MotionLayout lets you apply several KeyPositions to the same path, you can modify the path a view takes from start to end dramatically.
Explore on your own
Before you move on to other types of KeyFrame , try adding some more KeyPositions to the KeyFrameSet to see what kind of effects you can create just using KeyPosition .
Here’s one example showing how to build a complex path that moves back and forth during the animation.
step4.xml
Once you’re done exploring KeyPosition , in the next step you’ll move on to other types of KeyFrames .
8. Changing attributes during motion
Building dynamic animations often means changing the size , rotation , or alpha of views as the animation progresses. MotionLayout supports animating many attributes on any view using a KeyAttribute .
In this step, you will use KeyAttribute to make the moon scale and rotate. You will also use a KeyAttribute to delay the appearance of the text until the moon has almost completed its journey.
Step 1: Resize and rotate with KeyAttribute
- Open xml/step5.xml which contains the same animation you built in the last step. For variety, this screen uses a different space picture as the background.
- To make the moon expand in size and rotate, add two KeyAttribute tags in the KeyFrameSet at keyFrame=»50″ and keyFrame=»100″
step5.xml
To complete this step with Motion Editor, select the transition in the overview panel and add a KeyAttribute the same way you added a KeyPosition .
You can add multiple attributes to the same KeyAttribute by selecting the KeyAttribute by clicking on the  (diamond) it in the timeline and editing it in the attributes panel.
These KeyAttributes are applied at 50% and 100% of the animation. The first KeyAttribute at 50% will happen at the top of the arc, and causes the view to be doubled in size as well as rotate -360 degrees (or one full circle). The second KeyAttribute will finish the second rotation to -720 degrees (two full circles) and shrink the size back to regular since the scaleX and scaleY values default to 1.0.
Just like a KeyPosition , a KeyAttribute uses the framePosition and motionTarget to specify when to apply the KeyFrame , and which view to modify. MotionLayout will interpolate between KeyPositions to create fluid animations.
KeyAttributes support attributes that can be applied to all views. They support changing basic attributes such as the visibility , alpha , or elevation . You can also change the rotation like you’re doing here, rotate in three dimensions with rotateX and rotateY , scale the size with scaleX and scaleY , or translate the view’s position in X, Y, or Z.
Multiple attributes can be modified at the same time by a single KeyAttribute .
In this animation, the KeyAttribute at keyFrame=»50″ sets scaleX , scaleY , and rotation . All three attributes will be modified at the same time by MotionLayout .
Step 2: Delay the appearance of credits
One of the goals of this step is to update the animation so that the credits text doesn’t appear until the animation is mostly complete.
- To delay the appearance of credits, define one more KeyAttribute that ensures that alpha will remain 0 until keyPosition=»85″ . MotionLayout will still smoothly transition from 0 to 100 alpha, but it will do it over the last 15% of the animation.
step5.xml
This KeyAttribute keeps the alpha of @id/credits at 0.0 for the first 85% of the animation. Since it starts at an alpha of 0, this means it will be invisible for the first 85% of the animation.
The end effect of this KeyAttribute is that the credits appear towards the end of the animation. This gives the appearance of them being coordinated with the moon settling down in the right corner of the screen.
By delaying animations on one view while another view moves like this, you can build impressive animations that feel dynamic to the user.
A KeyAttribute will never change the appearance of a view at the start or end position.
If a view is rotated, translated, or scaled at framePosition=»100″ (or 100% through the animation), it will «jump» to its final value. To change the starting or end states, modify the Constraints in the ConstraintSet .
Try it out
- Run the app again and go to Step 5 to see the animation in action. When you click on the moon, it’ll follow the path from start to end, going through each KeyAttribute that was specified in the KeyFrameSet .
Because you rotate the moon two full circles, it will now do a double back flip, and the credits will delay their appearance until the animation is almost done.
Explore on your own
Before you move on to the final type of KeyFrame , try modifying other standard attributes in the KeyAttributes . For example, try changing rotation to rotationX to see what animation it produces.
Here’s a list of the standard attributes that you can try:
- android:visibility
- android:alpha
- android:elevation
- android:rotation
- android:rotationX
- android:rotationY
- android:scaleX
- android:scaleY
- android:translationX
- android:translationY
- android:translationZ
9. Changing custom attributes
Rich animations involve changing the color or other attributes of a view. While MotionLayout can use a KeyAttribute to change any of the standard attributes listed in the previous task, you use a CustomAttribute to specify any other attribute.
A CustomAttribute can be used to set any value that has a setter. For example, you can set the backgroundColor on a View using a CustomAttribute . MotionLayout will use reflection to find the setter, then call it repeatedly to animate the view.
In this step, you will use a CustomAttribute to set the colorFilter attribute on the moon to build the animation shown below.
To add a custom attribute in Motion Editor, first create a KeyAttribute then edit it in the attributes panel.
There is a new section in the attributes panel CustomAttributes with a + button to add new custom attributes.
Define custom attributes
- To get started open xml/step6.xml which contains the same animation you built in the last step.
- To make the moon change colors, add two KeyAttribute with a CustomAttribute in the KeyFrameSet at keyFrame=»0″ , keyFrame=»50″ and keyFrame=»100″.
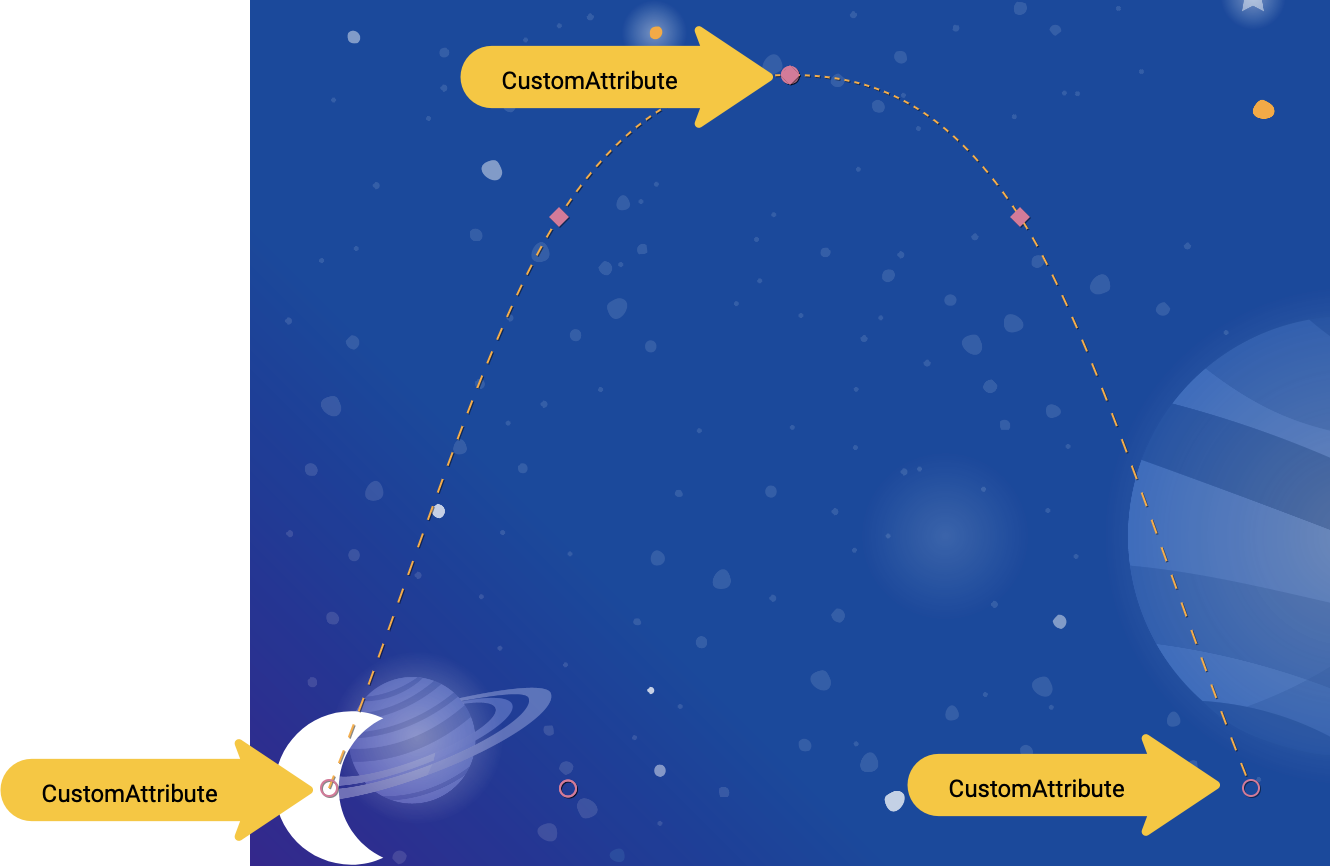
step6.xml
You add a CustomAttribute inside a KeyAttribute . The CustomAttribute will be applied at the framePosition specified by the KeyAttribute .
Inside the CustomAttribute you must specify an attributeName and one value to set.
- motion:attributeName is the name of the setter that will be called by this custom attribute. In this example setColorFilter on Drawable will be called.
- motion:custom*Value is a custom value of the type noted in the name, in this example the custom value is a color specified.
Custom values can have any of the following types:
Using this API, MotionLayout can animate anything that provides a setter on any view.
Custom views can be animated using a CustomAttribute .
As long as MotionLayout can find a setter that takes the correct type, it can animate changes between values.
Try it out
- Run the app again and go to Step 6 to see the animation in action. When you click on the moon, it’ll follow the path from start to end, going through each KeyAttribute that was specified in the KeyFrameSet .
When you add more KeyFrames , MotionLayout changes the path of the moon from a straight line to a complex curve, adding a double backflip, resize, and a color change midway through the animation.
In real animations, you’ll often animate several views at the same time controlling their motion along different paths and speeds. By specifying a different KeyFrame for each view, it’s possible to choreograph rich animations that animate multiple views with MotionLayout .
10. Drag events and complex paths
In this step you’ll explore using OnSwipe with complex paths. So far, the animation of the moon has been triggered by an OnClick listener and runs for a fixed duration.
Controlling animations that have complex paths using OnSwipe , like the moon animation you’ve built in the last few steps, requires understanding how OnSwipe works.
Step 1: Explore OnSwipe behavior
- Open xml/step7.xml and find the existing OnSwipe declaration.
step7.xml
- Run the app on your device and go to Step 7. See if you can produce a smooth animation by dragging the moon along the path of the arc.
When you run this animation, it doesn’t look very good. After the moon reaches the top of the arc, it starts jumping around.
To understand the bug, consider what happens when the user is touching just below the top of the arc. Because the OnSwipe tag has an motion:touchAnchorSide=»bottom» MotionLayout will try to make the distance between the finger and the bottom of the view constant throughout the animation.
But, since the bottom of the moon doesn’t always go in the same direction, it goes up then comes back down, MotionLayout doesn’t know what to do when the user has just passed the top of the arc. To consider this, since you’re tracking the bottom of the moon, where should it be placed when the user is touching here?
Step 2: Use the right side
To avoid bugs like this, it is important to always choose a touchAnchorId and touchAnchorSide that always progresses in one direction throughout the duration of the entire animation.
In this animation, both the right side and the left side of the moon will progress across the screen in one direction.
However, both the bottom and the top will reverse direction. When OnSwipe attempts to track them, it will get confused when their direction changes.
To complete these steps in the Motion Editor, select the transition in the overview panel and edit OnSwipe in the attributes panel.
- To make this animation follow touch events, change the touchAnchorSide to right .
step7.xml
The touchAnchorSide passed to OnSwipe must progress in a single direction through the entire animation.
If the anchored side reverses its path, or pauses, MotionLayout will get confused and not progress in a smooth motion.
In some animations, no view has an appropriate touchAnchorSide .
This may happen if every side follows a complex path through the motion, or views resize in ways that would cause surprising animations. In these situations, consider adding an invisible view that follows a simpler path to track.
Step 3: Use dragDirection
You can also combine dragDirection with touchAnchorSide to make a side track a different direction than it normally would. It’s still important that the touchAnchorSide only progresses in one direction, but you can tell MotionLayout which direction to track. For example, you can keep the touchAnchorSide=»bottom» , but add dragDirection=»dragRight» . This will cause MotionLayout to track the position of the bottom of the view, but only consider its location when moving right (it ignores vertical motion). So, even though the bottom goes up and down, it will still animate correctly with OnSwipe .
- Update OnSwipe to track the moon’s motion correctly.
step7.xml
Try it out
- Run the app again and try dragging the moon through the entire path. Even though it follows a complex arc, MotionLayout will be able to progress the animation in response to swipe events.
11. Running motion with code
MotionLayout can be used to build rich animations when used with CoordinatorLayout . In this step, you’ll build a collapsible header using MotionLayout .
Step 1: Explore the existing code
- To get started, open layout/activity_step8.xml .
- In layout/activity_step8.xml , you see that a working CoordinatorLayout and AppBarLayout is already built.
activity_step8.xml
This layout uses a CoordinatorLayout to share scrolling information between the NestedScrollView and the AppBarLayout . So, when the NestedScrollView scrolls up, it will tell the AppBarLayout about the change. That’s how you implement a collapsing toolbar like this on Android—the scrolling of the text will be «coordinated» with the collapsing header.
The motion scene that @id/motion_layout points to is similar to the motion scene in the last step. However, the OnSwipe declaration was removed to enable it to work with CoordinatorLayout .
- Run the app and go to Step 8. You see that when you scroll the text, the moon does not move.
Step 2: Make the MotionLayout scroll
- To make the MotionLayout view scroll as soon as the NestedScrollView scrolls, add motion:minHeight and motion:layout_scrollFlags to the MotionLayout .
activity_step8.xml
- Run the app again and go to Step 8. You see that the MotionLayout collapses as you scroll up. However, the animation does not progress based on the scroll behavior yet.
Step 3: Move the motion with code
- Open Step8Activity.kt . Edit the coordinateMotion() function to tell MotionLayout about the changes in scroll position.
Step8Activity.kt
This code will register a OnOffsetChangedListener that will be called every time the user scrolls with the current scroll offset.
MotionLayout supports seeking its transition by setting the progress property. To convert between a verticalOffset and a percentage progress, divide by the total scroll range.
MotionLayout can seek to a specific point in the animation in code.
Do this by setting motionLayout.progress . MotionLayout will immediately «jump» to the position that was specified.
So, for example, if you set the progress to 0.43, MotionLayout will jump to 43% through the animation.
Try it out
- Deploy the app again and run the Step 8 animation. You see that MotionLayout will progress the animation based on the scroll position.
It’s possible to build custom dynamic collapsing toolbar animations using MotionLayout . By using a sequence of KeyFrames you can achieve very bold effects.
AppBarLayout does not resize the MotionLayout .
The MotionLayout view will be moved partially offscreen when AppBarLayout collapses it. It will not be resized, but just moved up. If you have constraints to the top of the MotionLayout , they will be offscreen at the end of the animation. To work with AppBarLayout ensure end constraints are anchored to the bottom of the parent.
12. Congratulations
This codelab covered the basic API of MotionLayout .
To see more examples of MotionLayout in practice, check out the official sample. And be sure to check out the documentation!
Learn More
MotionLayout supports even more features not covered in this codelab, like KeyCycle, which lets you control paths or attributes with repeating cycles, and KeyTimeCycle, which lets you animate based on clock time. Check out the samples for examples of each.
For links to other codelabs in this course, see the Advanced Android in Kotlin codelabs landing page.
Except as otherwise noted, the content of this page is licensed under the Creative Commons Attribution 4.0 License, and code samples are licensed under the Apache 2.0 License. For details, see the Google Developers Site Policies. Java is a registered trademark of Oracle and/or its affiliates.
Источник


