- Android studio mysql connector java
- Android Connect MySQL Database Programmatically
- Download Source code.
- mysql connector java или соединение с базой данных MySQL в Java
- Установка
- Установка Java Connector в Microsoft Windows
- Соединение с MySQL с помощью MySQL Connector/J
- Компиляция и исполнение кода
- Запросы к данным с использованием MySQL Connector/J
- Компиляция и исполнение кода
Android studio mysql connector java
This is (as far as we are aware) the first and only native MySQL connector for Android. It connects directly to your database instead of relying on some sort of web service to act as a middleware between Android and the MySQL Server.
Using a webservice is still the recommended way of connecting to your database as it ensures only clients that are supposed to are connecting to your database and avoids the requirement of needing to expose your MySQL server to the Internet.
However, if you want, or have a need to connect directly to your database, then this is the library you need. This is a fairly basic MySQL connector compared to the official connectors that are available on other platforms. Therefore, below is a list of the known limitations of the library:
- Doesn’t support compression, if the MySQL server reports that it supports compression, the connector will turn it off
- Doesn’t support prepared statements
- Only supports UTF8 or Latin 1 encodings
- If authentication is required, then only mysql_native_password is supported
The library has been tested on the following MySQL Servers
We’ve so far only tested on the the highest minor version of each MySQL major version. You’ll notice that this doesn’t include MySQL 8.0. This is due to MySQL 8 changing the default authentication mechanism, this is something we plan on adding in the future. We haven’t yet tested with MariaDB however, the equivalent MeriaDB and MySQL version should be compatible and therefore should work in the same way.
Adding the library to your project couldn’t be simpler. Add the following to your apps build.gradle
The TAG above will be the tagged version number of the library.
Using the Library
Due to the way Android works, using the library is a little different compared to using the official connector on other platforms. This is due to to Android completely restricting any network activity on the main thread. Obviously you shouldn’t do any network activity on the main thread on any platform, but most platforms don’t stop you if you want to, however, Android will throw an exception if any network activity is done on the main thread. Therefore for each action you wish to take, such as connecting, switching databases, performing a query, the relevant method or constructor will take an interface which will get called once the action has completed which you can then handle.
Connecting to a MySQL Server
To connect to a MySQL server you first need to create the MySQL Connection object. You can do this as follows:
In the above example, is an optional parameter. By setting this, when the connection is established, the database name will be the default database used. The IConnectionInterface parameter handles connection specific events, such as successfully connected or exception handlers.
For example, when creating a new IConnectionInterface, you will need to provide the following methods: actionCompleted This means that the connection was successfully established and authenticated and the connection is ready for use
handleInvalidSQLException You shouldn’t really ever get this, but you might if you are connecting to a MySQL server that either is configured slightly differently as to what has bee tested or isn’t compatible with the connector, and has caused the connector to receive a network packet from the MySQL server that the connector wasn’t expecting.
handleMySQLException This will happen if a generic MySQL exception occurs within the connector
handleIOException This is used if an internal socket error occurs within the connector, for example, if server aborted the connection but the library didn’t realise and tried to perform an operation on the MySQL socket which is now closed
handleMySQLConnException This will be an exception related to a connection error, such as authentication failure
handleException This is a generic exception handler if any of the above doesn’t match the exception
That’s it, you have successfully connected, now we can execute some queries. Remember though, keep your connection object available in your class as this will be required in order to run queries on the DB.
You can change the default database to use in your established MySQL Connection. To do this, do not execute a standard USE DATABASE query as it won’t work.
You need to use your connection object and call the method switchDatabase(db, new IConnectionInterface()) . db being a String of your database name, and again, pass in the IConnectionInterface. If it switched successfully you will receive a call back to the actionCompleted method.
Execute Statement (Such as INSERT or UPDATE where no resultset is returned)
First of all you need to create a statement object from your connection object. You can do this using the following code snippet
Then in order to execute your statement you then do the following
query is your statement that you want to execute such as an INSERT or UPDATE statement. Again the second parameter is the IConnectionInterface and if the statement execute successfully, then actionCompleted will be called.
Execute Query (Such as SELECT)
The execute query function allows you to execute a query such as SELECT or DESCRIBE, basically any query which return a result set. Same with executing a statement, you need to create the statement object from your connection object. This can be done using the following code snippet:
Then you need to call the executeQuery withn your statement object, but this time passing in a new IResultInterface as shown below:
The IResultInterface is pretty similar to the IConnectionInterface, you’ll have the same exception handlers, the main difference that if the query executes successfully, you’ll receive executionComplete which will have a parameter to the result set.
Processing a result set
When you execute a query such as SELECT or DESCRIBE, you will get a call back which will provide a result set object. This result set object contains all the information about what was returned such as the columns and the rows.
Get total number of rows returned
To get the total number of rows you can call resultset.getNumRows(); .
Get column definitions
The column definitions are stored in a List . You can get this using the following code snipper:
You can then loop over the list to get ColumnDefinition for each column returned in the result set. Within the column definition class, you can use the following methods: getDatabase The database name where the column was retrieved from
getTable The table name where the column was retrieved from
getColumnName The name of the column
getColumnType Returns an enum of type ColumnType
isPrimaryKey Returns a boolean as to whether or not the column is a primary key
Iterating through each row
You can iterate through each row, you first need to create an empty MySQLRow variable that can be used to be set within a while loop to get each row. You can call getNextRow() on the result set to get a MySQLRow. Once there are no rows left, null is returned. The following code snippet provides an example:
Once you have your MySQLRow you can then call the following methods to return the value of the field. Each of the following methods, take a String parameter which is the column name that should be retrieved.
- getString(String column)
- getInt(String column)
- getFloat(String column)
- getDouble(String column)
- getBlob(String column) (Returns a byte[] array)
When sending dynamic paraters in your MySQL query, the string should be escaped to avoid SQL injection attacks. This can be done by using the following code snippet:
Currently the connection object can’t be passed between Android activities, so if you do need to create a new Activity and perform database action, you should close the DB connection in your current activity, pass the connection details to your new activity, and then create a new connection object in your new activity.
Also, to avoid leaving the DB connection open for no reason, in your activities onPause and onDestroy methods you should close the DB connection and then create a new instance to restablish the connection in the onCreate and/or onResume
You can close the DB by calling connection.close() .
Below you will find some examples on some of the common actions you might do with the MySQL Connector.
Each of the below examples creates a Connection object called mysqlConnection. This can be done using the following:
Switching Default Database
When you need to change the default database, (if a default database is set you do not need to prepend the database with the table name). You cannot use the the statement USE new_database , you have to use the method switchDatabase within the connection object as follows:
Executing statement (SQL statements that do not return a result set, e.g. INSERT, UPDATE, DELETE, TRUNCATE, CREATE, DROP ALTER)
Executing query (Statement which returns a MySQL Result Set, e.g. SELECT, SHOW, DESCRIBE)
Performing a query to return a result set is pretty much the same as above, the only difference is that instead of passing an IConnectionInterface , you instead pass an IResultInterface() and the executionComplete method provides you with a ResultSet object
Cannot Resolve Symbol Error
If you have added the library and the gradle sync works successfully but you are getting errors like cannot resolve symbol make sure that the imports at the top of the class file have been referenced.
This can be done in one of two ways:
- Put the cursor somewhere in the area of code which is showing red and hit Ctrl + Alt + Enter. Android Studio will provide tips on how to fix — one of them being to import the class. Select import and the error should go away.
- You can add the following two lines:
which will import all available classes from the library. However, this tends to be bad practice as only what’s needed from the library by your class should be imported. You can get round this by adding the two lines above, then when your class is finished, you can then do Ctrl + Alt + O which will organise your imports into what ones are required instead of a wildcard import.
javax.net.ssl.SSLHandshakeException: Handshake failed
If you see this error then connect to your DB via command line and run the following query:
If it shows TLSv1 then this won’t be supported by the Android MySQL Connector library. TLS 1.0 is a deprecated version of TLS and Java and/or Android no longer supports this TLS version.
If MySQL supports it, you can add tls_version=TLSv1.1 or tls_version=TLSv1.2 (Check your mysql version documentation to determine the supported TLS) to your /etc/main.cf file and restart MySQL. This needs to be added under the mysqld section of the config file.
If you are using Amazon RDS then you will need to use at least MySQL 5.7.16. Previous version of Amazon RDS for MySQL only support TLS 1.0 so the library won’t be able to connect.
Источник
Android Connect MySQL Database Programmatically
In this post we will see How we can Connect Android to MySQL Database using mysql-connector.jar. You can download Jar Library using this Link.
Note : I’m not using any type of Webservice or other web api library.
Android Connect MySQL Database Programmatically :
Create a new Android Application in Android Studio with
Package name : parallelcodes.mysqlapp
Application name : MySQLApp
You can always name your Package and Application name according to your requirements.
Application Working :
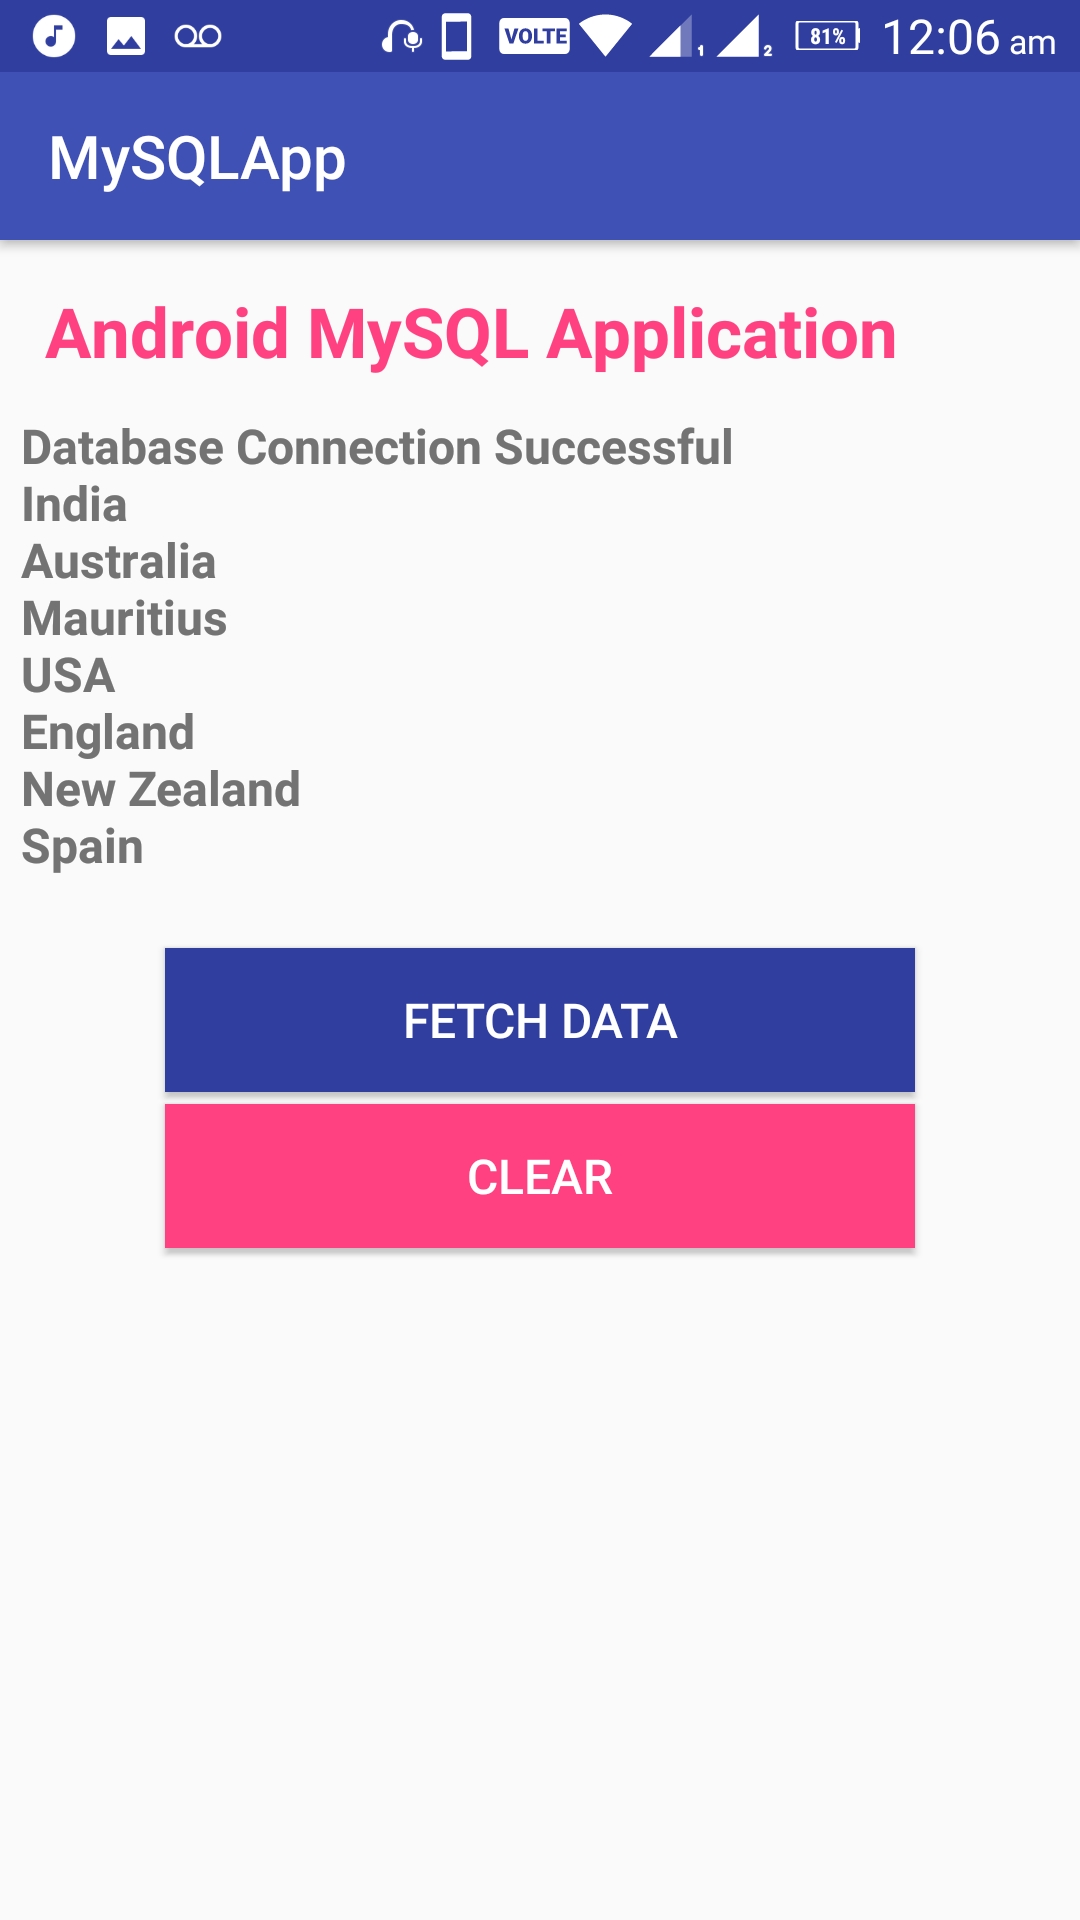
Application will first try to connect with the MySQL Database and on successful Database connection, android application will display data from a table on a Android TextView. It will connect via IP address of the Database with a correct Database Credentials.
Download Source code.
MySQL Database Script :
Now, open your activity_main.xml file and edit it as below :
activity_main.xml:
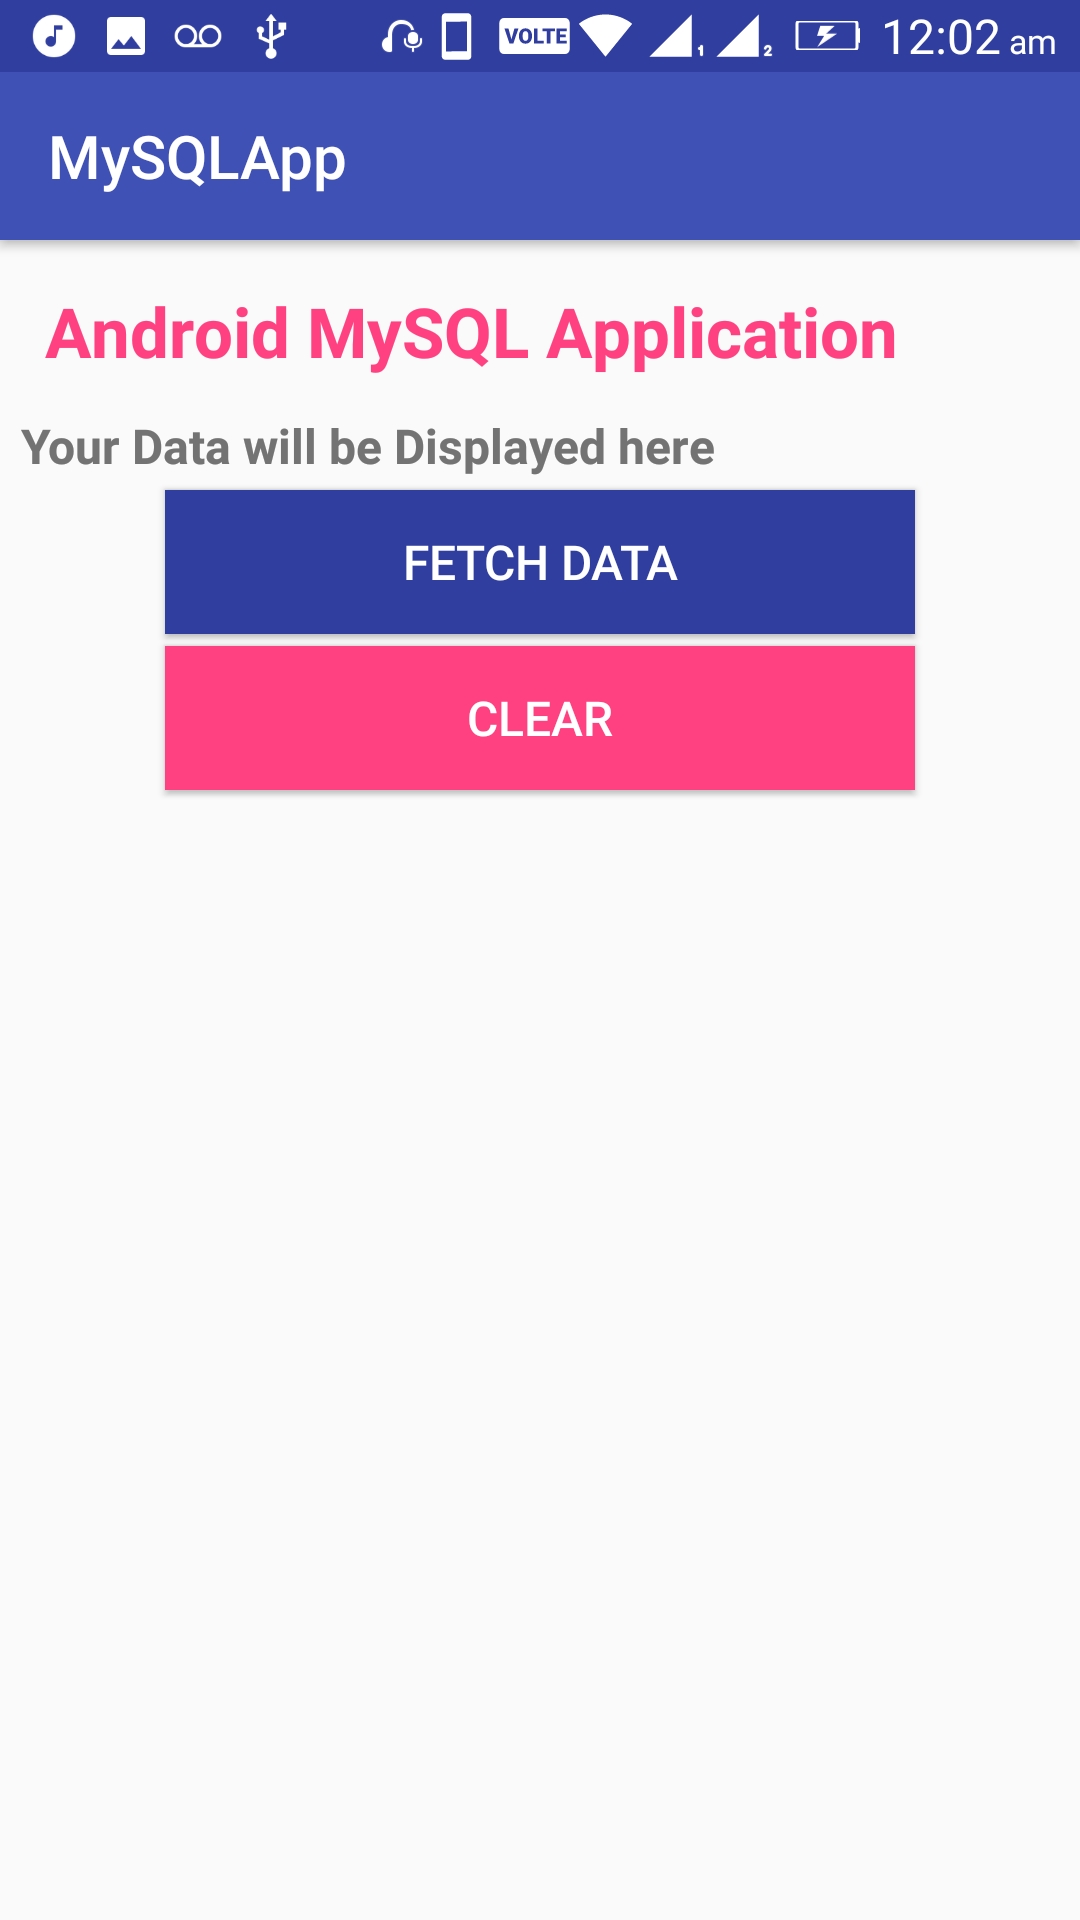
The layout contains a Android TextView to show our Table data from MySQL Database and two buttons, one for connecting to Database and other for clearing the TextView content.
Now, let’s code it.
MainActivity.java:
Declare this variables in your Java class
And initialize them onCreate method :
url,user,pass must be valid and correct credentials of your mySql database for a successful Android-MySQL Connection.
192.168.0.192 is my Laptop’s IP Address and 3306 is my Port number to connect on.
Make an Android ASyncTask. This will accept the command and try to connect with your Database and on successful connection with MySQL assign a String variable with the table data.
Code :
Full Code of MainActivity.java file
MainActivity.java:
And now run your application. On Pressing on the “Fetch Data” button it will fetch Data from MySQL Database table.
Note : If you are on personal Laptop or PC with WiFi router connected to it and your Android Device connected to the same router, it will work, i.e. It must be same network to work in. If your Database is out your Device’s network, it will not work. Also, if you are using Cellular Data network, your Database must be on Internet and it should be able to be connected remotely.
Источник
mysql connector java или соединение с базой данных MySQL в Java
СУБД MySQL предоставляет приложениям Java возможность соединения с базой данных при помощи драйвера MySQL Connector , который реализует интерфейс API Java Database Connectivity (JDBC) . Этот API является независимым от СУБД стандартом связи языка программирования Java с широким спектром баз данных, электронных таблиц и т.п.
API JDBC позволяет осуществлять следующие операции:
- Устанавливать соединение с базой данных;
- Выполнять SQL запросы;
- Обрабатывать результаты, полученные из базы данных.
Далее мы узнаем, как установить и настроить MySQL Connector/J ( драйвер JDBC ), а также используем его при создании приложения.
Версии MySQL Connector/J :
| Версия Connector/J | Версия JDBC | Версия MySQL сервера | Статус |
| 5.1 | 3.0, 4.0 | 4.1, 5.0, 5.1, 5.5, 5.6, 5.7 | Рекомендуемая версия |
| 5.0 | 3.0 | 4.1, 5.0 | Выпущенная версия |
| 3.1 | 3.0 | 4.1, 5.0 | Устаревшая |
| 3.0 | 3.0 | 3.x, 4.1 | Устаревшая |
MySQL Connector J — это официальный драйвер JDBC для MySQL . Вы можете загрузить последнюю версию драйвера отсюда . Выберите одну из кроссплатформенных версий:

Или версию для Microsoft Windows :

Установка
Вы можете установить пакет драйверов Connector/J , используя либо бинарный установочный файл, либо исходный код. Метод с установочным файлом прост, поскольку он представляет собой набор библиотек и прочих скомпилированных файлов.
Метод с использованием исходного кода пригодится, если вы хотите настроить или изменить процесс установки. Помимо этого нужно будет вручную добавить путь к Connector/J в переменную Java classpath .
MySQL Connector/J поставляется как архив .zip или .tar.gz , содержащий файлы исходных классов. После распаковки архива установите драйвер, поместив MySQL-connector-java-version-bin.jar в ваш classpath . Для этого добавьте полный путь к нему в переменную окружения classpath или укажите его в параметре -cp при старте JVM .
Переменную окружения classpath можно установить в системах Unix , Linux или Mac OS X локально для пользователя в его файле .profile , .login или ином login-файле . Или же установить её, изменив глобальный файл /etc/profile .
Например, добавьте драйвер MySQL Connector J ava в переменную classpath с помощью любой из следующих команд в зависимости от используемой оболочки командной строки:
В Windows 2000 , Windows XP , Windows Server 2003 и Windows Vista можно установить переменную окружения в панели управления.
Установка Java Connector в Microsoft Windows
Выберите и загрузите нужный вам установщик здесь .
Затем выполните следующие шаги :
Дважды щёлкните по файлу установщика.

Нажмите ‘ Run ‘ и дождитесь завершения процесса.

Соединение с MySQL с помощью MySQL Connector/J
Приведенный ниже пример MySQL Connector показывает, как соединиться с базой данных, разорвать соединение и обработать ошибки.
Версия Java 7 Update 25 (сборка 1.7.0_25-b16):
Чтобы создать jdbc-подключение к базе данных c помощью MySQL Connector ODBC , нужно импортировать следующие пакеты из java.sql :
- sql.Connection ;
- sql.DriverManager ;
- sql.SQLException ;
Далее мы создаём класс ‘ test ‘ и метод main .
Приведенный ниже код создаёт соединение с базой данных:
Класс JDBC DriverManager определяет объекты, которые могут соединять приложения Java с драйвером JDBC . Этот класс включает в себя метод getConnection() . Он использует url-адрес jdbc , имя пользователя и пароль, чтобы установить соединение с базой данных, и возвращает объект подключения.
В коде, приведенном выше, мы использовали следующие url-адрес , имя пользователя и пароль:
- Строка url «jdbc:MySQL://localhost/sakila» , в которой первая часть — « jdbc:MySQL://localhost » — это тип базы данных ( в данном случае MySQL ) и сервер ( в данном случае — localhost ). Остальная часть — название базы данных ( в данном случае — ‘ sakila ‘ ).
- Имя пользователя MySQL определяется в переменной ‘ userName ‘.
- Пароль для MySQL определяется в переменной ‘ password ‘.
DriverManager пытается соединиться с базой данных. Если соединение проходит успешно, создаётся объект Connection (сохраняется в переменной ‘ conn ’) и программа отображает сообщение “ Database Connection Established… ” (“ Соединение с базой данных установлено …”).
Если попытка соединения c помощью MySQL Connector оканчивается неудачей ( например, если указан неверный пароль, адрес сервера и т.п .), тогда нужно обработать эту ситуацию. Мы ловим эту ошибку в блоке catch выражения try … catch , отображаем соответствующие сообщения и в конце закрываем соединение.
Компиляция и исполнение кода
Предположим, что файл ‘ test.java ’ находится на диске E :, а ‘ MySQL-connector-java-5.1.31-bin.jar ’ хранится в « C:Program FilesMySQLMySQL Connector J «.

Примечание : Путь class path – это путь, по которому Java Runtime Environment (JRE) ищет классы и другие файлы ресурсов. Можно изменить этот путь, используя опции -classpath или -cp некоторых команд Java , когда вы вызываете JWM или другие инструменты JDK , или изменив переменную окружения classpath .
Запросы к данным с использованием MySQL Connector/J
Предположим, что мы хотим получить имена ( first_name, last_name ) и размер зарплаты ( salary ) работников, которые получают больше средней зарплаты и работают в ИТ-отделе.
Структура базы данных ‘ hr’:

Пример таблицы ‘ работники ’ (‘ employees ’) :
Далее следует код Java ( версия 7 Update 25 (сборка 1.7.0_25-b16 ) ) с использованием MySQL Connector J :
Компиляция и исполнение кода
Предположим, что файл ‘ testsql.java ’ находится на диске E :, а ‘ MySQL-connector-java-5.1.31-bin.jar ‘ хранится в « C:Program FilesMySQLMySQL Connector J» .

Примечание : Путь class path – это путь к MySQL Connector Java , по которому Java Runtime Environment ( JRE ) ищет классы и другие файлы ресурсов. Можно изменить этот путь, используя опции -classpath или -cp некоторых команд Java , когда вы вызываете JWM или другие инструменты JDK , либо изменив переменную окружения classpath .
Пожалуйста, оставьте ваши мнения по текущей теме статьи. За комментарии, подписки, лайки, дизлайки, отклики огромное вам спасибо!
Дайте знать, что вы думаете по данной теме материала в комментариях. Мы очень благодарим вас за ваши комментарии, отклики, подписки, лайки, дизлайки!
Источник


