- Настройка Android Studio
- Отображение номера строки
- Разделители методов
- Выделение изменённых файлов звёздочкой
- Использование стиля «Верблюжьи горбы»
- Импортирование на лету, «imports on the fly»
- Цветовая гамма
- Настройка цветовой гаммы редактора Java
- Настройка цветовой гаммы окна консоли
- Кодировка
- Именование полей, методы get/set
- brianmwadime / gradle.properties
- This comment has been minimized.
- brianmwadime commented Feb 15, 2016
- This comment has been minimized.
- brianmwadime commented Feb 15, 2016
- Reduce DEX Compiler Heap Size
- Native Memory Profiling with Android Studio 4.1
- Getting Started
- Native Memory Table View
- Memory Visualization (Native and non-native)
- Filtering / Navigation
- Verifying the findings
- Startup profiling and sample rate setting.
- Wrapping up
Настройка Android Studio
В Android Studio имеется возможность определить собственный стиль представления информации в редакторе, сохранить все настройки в отдельный файл, который в дальнейшем можно импортировать в новую версию IDE. Здесь на странице описываются некоторые возможности настройки интерфейса среды разработки. Это даёт Вам возможность понять где искать и как определить тот или иной стиль представления информации.
Чтобы открыть окно настроек в окне приветствия нажмите «Configure» в нижней части формы и во всплывающем меню выберите пункт «Settings». как это представлено на следующем скриншоте :
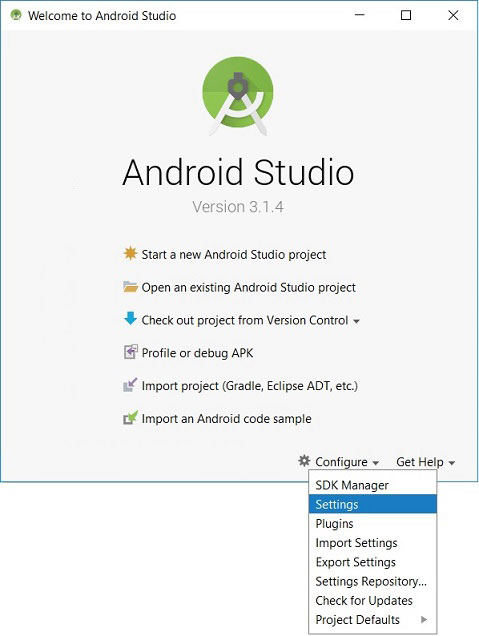
Всплывающее меню раздела конфигурации включает пункты импорта и экспорта настроек (Import Settings, Export Settings), о чем было сказано выше.
Отображение номера строки
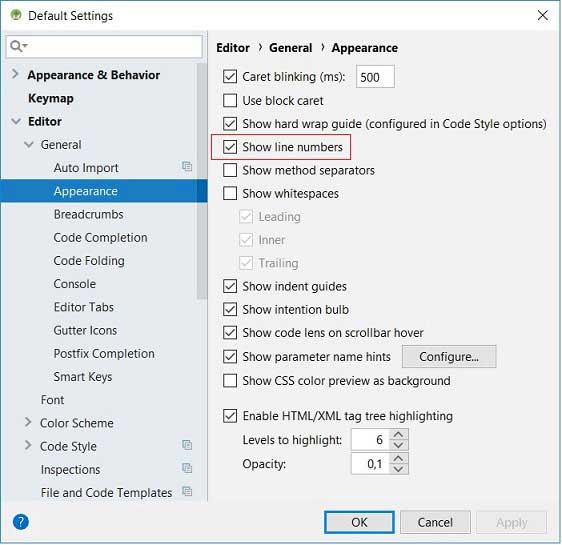
Чтобы отображать номера строк кода в среде разработки необходимо в левой части окна настроек среды разработки IDE выбрать пункт меню Editor/General/Appearance и в правой части установить (не снимать) галочку в чекбоксе «Show line numbers».
Разделители методов
Между методами класса можно установить разделительную черту. Это очень удобно для наглядного отделения одного метода от другого. Чтобы не делать это вручную, можно процесс автоматизировать установкой флага в чекбоксе «Show method separators» (см. скриншот выше).
Выделение изменённых файлов звёздочкой
Часто в различных редакторах изменённые, но не сохранённые файлы на вкладках помечаются звёздочкой. Так работает в Eclipse, Notepad++ и многих других редакторах. Чтобы данную функцию включить в Android Studio необходимо выделить пункт меню Editor/General/Editor Tabs и в панели установить флажок в чекбоксе «Mark modified tabs with asterisk».
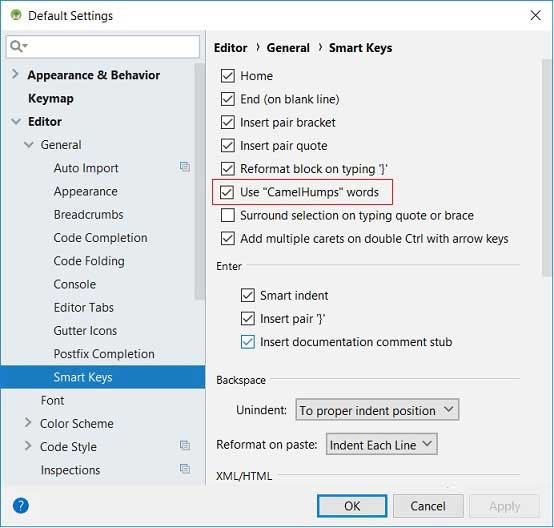
Использование стиля «Верблюжьи горбы»
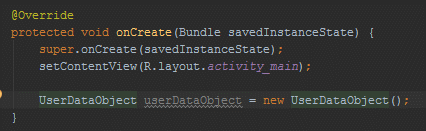
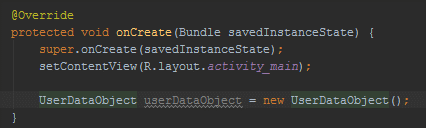
Стиль редактирования «Верблюжьи горбы» определяет навигацию курсора при использовании клавиш ‘Ctrl+ стрелки влево/вправо’. Ниже представлены анимационные изображения, демонстрирующие использование стиля «Верблюжьи горбы».
 |
| Навигация по словам |
 |
| Навигация с помощью «Верблюжьих горбов» |
Для использования в среде разработки стиля навигации «Верблюжьи горбы» выберите в окне настроек пункт меню Editor/General/Smart Keys и в правой части установите галочку в чекбоксе «Use «CamelHumps» words».
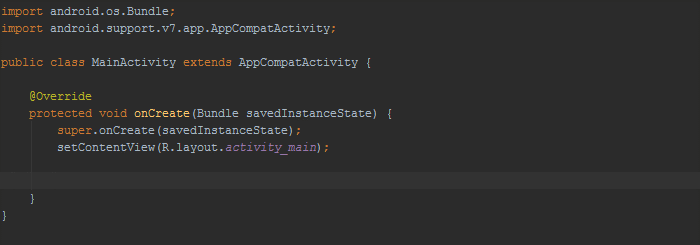
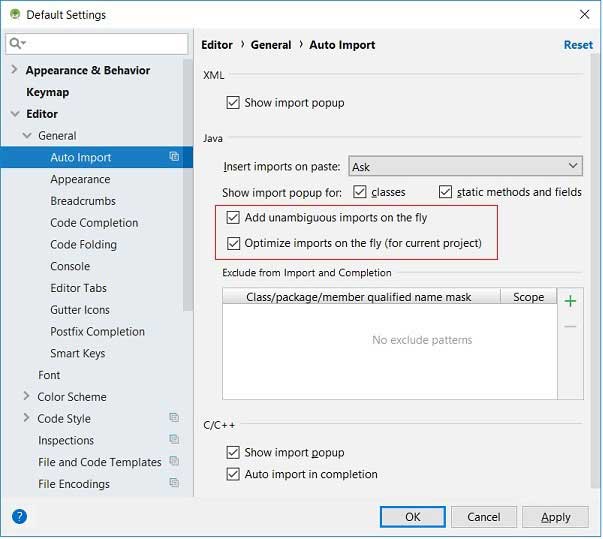
Импортирование на лету, «imports on the fly»
В Android Studio имеется функция автоматического импорта («imports on the fly») и очистки неиспользуемых импортов в Java коде. Ниже представлены анимационные изображения, демонстрирующие использование функции «imports on the fly».
 |
| Без функции «импорт на лету» |
 |
| С функцией «импорт на лету» |
Для установки в среде разработки функции «импорт на лету» выберите в окне настроек пункт меню Editor/General/Auto Import и в правой части установите галочку в чекбоксах «Add unambiguous imports on the fly» и «Optimize imports on the fly», как это представлено на следующем скриншоте.
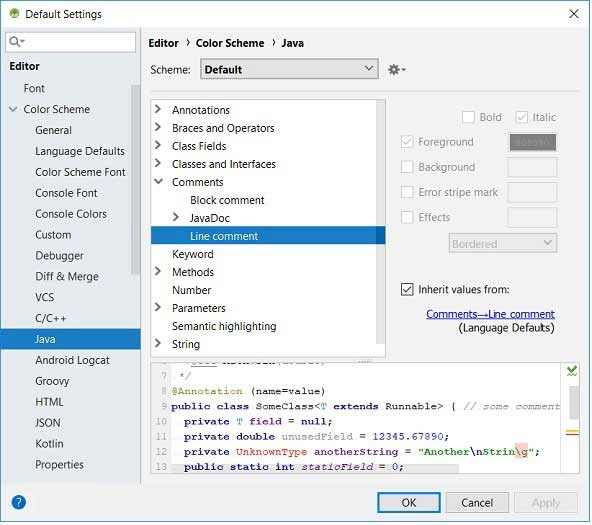
Цветовая гамма
Android Studio позволяет настроить шрифты и цветовую гамму окон редактирования, отладки, консоли для различных языков программирования (Java, C/C++, Groovy) и форматов представления информации (HTML, JSON). На следующих двух скриншотах представлены панели настроек Java и консоли.
Настройка цветовой гаммы редактора Java
Настройка цветовой гаммы окна консоли
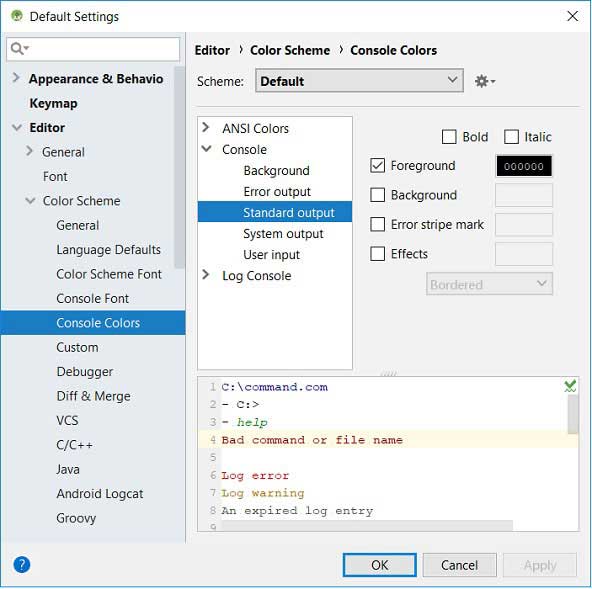
Студия версии 3.1.4 поставляется с двумя предустановленными темами: Default (IntelliJ), Darcula. По умолчанию, используется тема Default со светлым фоном (выпадающий список Scheme). Интерес для программистов IntelliJ представляет тема с чёрным фоном Darcula; здесь обыгрывается слово «dark». Чтобы переключиться на «тёмную тему», поменяйте её в выпадающем списке Scheme.
Кодировка
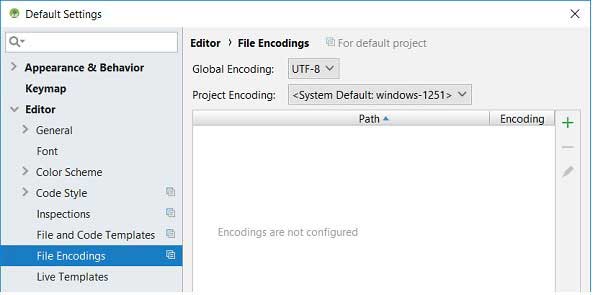
Для изменения кодировки новых проектов и текущего необходимо выделить пункт меню в окне конфигурации File/Settings/Editor/File Encodings и определить значения «Global Encoding» и «Project Encoding». В Android Studio по умолчанию используется в качестве глобальной кодировки UTF-8, а для кодировки проектов используется «системная по умолчанию». У многих разработчиков в качестве системной используется win-1251, с которой могут быть связаны проблемы при выводе строковых сообщений.
Именование полей, методы get/set
Android Studio умеет самостоятельно генерировать так называемые методы get/set класса на основе его полей. Чтобы использовать правильный стиль кодирования согласно ковенции ‘Android Code Style Guidelines for Contributors’, необходимо сначала определить настройки распознавания префиксов ‘m’ (member) и ‘s’ (static) в названии переменных. Для этого следует открыть панель настроек Editor/Code Style/Java и перейти на вкладку ‘Code Generation’. В разделе Naming в поле Naming Prefix строки Field введите префикс ‘m’. После добавьте префикс ‘s’ для статических полей в строке ‘Static field’.
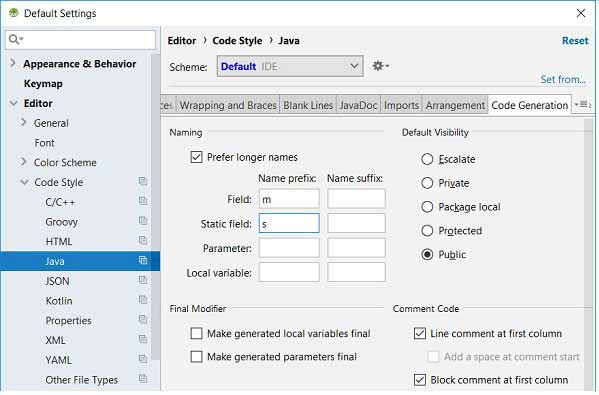
Подобная настройка подскажет IDE о необходимости генерирации методов для поля без соответствующего префикса в его наименовании. Например, для поля mCatName будет создан метод setCatName() вместо setMCatName().
Для генерации в файле класса с полями методов get/set щёлкните правой кнопкой мыши после конструктора и в раскрывшемся меню выберите команду ‘Generate…| Getter And Setter’, определите в открывшемся окне поля класса и щёлкните на кнопке OK, чтобы IDE сгенерировала get/set методы для каждого выделенного поля класса.
Источник
brianmwadime / gradle.properties
This file contains bidirectional Unicode text that may be interpreted or compiled differently than what appears below. To review, open the file in an editor that reveals hidden Unicode characters. Learn more about bidirectional Unicode characters
| org.gradle.jvmargs =-Xms512m -Xmx1024m |
This comment has been minimized.
Copy link Quote reply
brianmwadime commented Feb 15, 2016
Disabling VCS in android studio and using an external program to handle VCS helped some users a lot. You can disable VCS by going to File->Settings->Plugins and disable the following:
- CVS Integration
- Git Integration
- GitHub
- Google Cloud Tools for Android Studio
- Subversion Integration
This comment has been minimized.
Copy link Quote reply
brianmwadime commented Feb 15, 2016
Reduce DEX Compiler Heap Size
File->Other Settings->Default Settings->Build, Execution, Deployment->Compiler->Android Compiler
You can’t perform that action at this time.
You signed in with another tab or window. Reload to refresh your session. You signed out in another tab or window. Reload to refresh your session.
Источник
Native Memory Profiling with Android Studio 4.1

This is second in a two part series on What’s New in Profilers in Android Studio 4.1. Our previous post focused on What’s New in System Trace .
We’ve heard from those of you using C++ that debugging native memory can be fairly difficult, particularly in games. With Android Studio 4.1, we’ve implemented the ability to record call stacks of native memory allocations in our Memory Profiler. The native memory recording is built on top of the Perfetto backend, the next generation performance instrumentation and tracing solution for Android.
A common technique when trying to debug memory issues is to understand what is allocating memory and what is freeing memory. The rest of this article will walk you through how to use the Native Memory Profiler to help track down a leak, using the Gpu Emulation Stress Test as an example project.
Getting Started
When a memory leak is suspected, it’s often a good idea to start at a high level and watch for patterns in the system memory. To do this click the profile button in Android Studio, and enter the memory profiler for more detailed memory tracking information.
After running the simulation a few times we can see a few interesting patterns.
- The GPU memory increases as one may expect from a GPU emulation app, however it also looks like this memory gets properly cleaned up after the Activity is finished.
- The Native memory grows each time we enter the GpuEmulationStressTestActivity, however this memory does not seem to reset after each run, which might be indicative of a leak.
Native Memory Table View
Starting with Android Studio 4.1 Canary 6, we can grab a recording of native memory allocations to analyze why memory isn’t being released. To do this with the GPU emulation app, I stopped the running app and started profiling a fresh instance. Starting from a clean state, especially when looking at an unfamiliar codebase, can help narrow our focus. From the memory profiler I captured a native allocation recording throughout the duration of the GPU emulation demo. To do this restart the app by selecting Run-> Profile ‘app’. After the application starts and the profile window opens, click on the memory profiler and select “record native allocation”
The table view is useful for games/applications that use libraries implementing their own allocators highlighting malloc calls that are made outside of new.
When a recording is loaded, the data is first presented in a table. The table shows the leaf functions calling malloc. In addition to the function name, the table shows module, count, size, and delta. This information is sampled so it is possible not all malloc / free calls will be captured. This largely depends on the sampling rate, which will be discussed a bit later.
It is also useful to know where these functions that allocate memory are being called from. There are two ways to visualize this information. The first is by changing the “Arrange by allocation method” dropdown to “Arrange by call stack”. The table shows a tree of callstacks, similar to what you may expect from a CPU recording. If the current project has symbols (which is usually the case for debuggable builds; if you’re profiling an external APK check out the guide here) they will automatically be picked up and used. This allows you to right click on a function and “Jump to source”.
Memory Visualization (Native and non-native)
We’ve also added a new flame chart visualization to the memory profilers, allowing you to quickly see what callstacks are responsible for allocating the most memory. This is especially useful when a call stack is really deep.
There are four ways you can sort this data along the X axis:
- “Allocation Size” is the default, showing the total amount of memory tracked.
- “Allocation Count” shows the total number of objects allocated.
- “Total Remaining Size” is the size of memory sampled throughout the capture that was not freed before the end of the capture.
- “Total Remaining Count”, like the remaining size, is the count of objects captured but not freed before the end of the capture.
From here we can right click on the call stacks and select “Jump to Source” to take us to the line of code responsible for the allocation. However, taking a second glance at the visualization, we notice that the common parent, WorldState, is responsible for multiple leaks. To validate this, it can help to filter the results.
Filtering / Navigation
Like with the table view, the chart can be filtered using the filter bar. When the filter is used, the data in the chart is automatically updated to show only call stacks that have functions matching the word/regex searched.
70MB of our total assumed leak
Sometimes call stacks can get fairly long, or there just isn’t enough room to display the function name on screen. To assist with this, ctrl + mouse wheel will zoom in/out, or you can click on the chart to use W,A,S,D to navigate.
Verifying the findings
Adding a breakpoint and running the Emulation twice quickly reveals that on the second run we cause the leak by overwrite the pointer from our first run.
As a quick fix to the sample we can delete the world after it is marked done, profiling the application again to validate the fix.
Ending where we started by looking at the high level memory stats. Validating that deleting sWorld at the end of the simulation frees up the 70mb held by our first run.
Startup profiling and sample rate setting.
The sample above shows how native memory tracking can be used to find and fix memory leaks. Another common use for native memory tracking is understanding where memory is going during startup of the application. In Android Studio 4.1, we also added the ability to capture native memory recordings from the startup of the application. This is available in the “Run/Debug Configurations” dialog under the “Profiling” tab.
You can customize the sampling interval or record memory at startup in the Run configuration dialog.
Here you can also change the sampling rate for new captures. A smaller sampling rate can have a large impact on overall performance, while a larger sampling rate can miss some allocations. Different sampling rates work for different types of memory problems.
Wrapping up
With the new native memory profiler finding memory leaks and understanding where memory is being held on to just got a little bit easier. Give the native memory profiler a try in Android Studio 4.1, and leave any feedback on our bug tracker. For additional tips and tricks be sure to also check out our talk earlier this year at the Google for Games summit, Android memory tools and best practices.
Источник


