- ndk-build
- On this page
- Internals
- Invoking from the Command Line
- Options
- Invoking from Eclipse
- Debuggable versus Release builds
- 64-Bit and 32-Bit Toolchains
- Requirements
- Интеграция Android Studio, Gradle и NDK
- Интегрируем .so файлы в APK
- Строим один APK на архитектуру и добиваемся успеха!
- Автоматически устанавливаем различные коды версий для ABI-зависимых APK
- Работа с ndk в Android Studio
- Мой пример файла .gradle
- Устранение неисправностей
- Получение информации по интеграции NDK
- Install and configure the NDK and CMake
- Install NDK and CMake automatically
- Install the NDK and CMake
- Configure a specific version of CMake
- Groovy
- Kotlin
- Install a specific version of the NDK
- Configure specific versions of the NDK in your project
- Groovy
- Kotlin
- Default NDK version per AGP version
ndk-build
On this page
The ndk-build file is a shell script introduced in Android NDK r4. Its purpose is to invoke the right NDK build script.
Internals
Running the ndk-build script is equivalent to running the following command:
$GNUMAKE points to GNU Make 3.81 or later, and points to your NDK installation directory. You can use this information to invoke ndk-build from other shell scripts, or even your own make files.
Invoking from the Command Line
The ndk-build file lives in the top level the NDK installation directory. To run it from the command line, invoke it while in or under your application project directory. For example:
In this example,
points to your project’s root directory, and is the directory where you installed the NDK.
Options
All parameters to ndk-build are passed directly to the underlying GNU make command that runs the NDK build scripts. Combine ndk-build and options in the form ndk-build . For example:
The following options are available:
clean Remove any previously generated binaries. V=1 Launch build, and display build commands. -B Force a complete rebuild. -B V=1 Force a complete rebuild, and display build commands. NDK_LOG=1 Display internal NDK log messages (used for debugging the NDK itself). NDK_DEBUG=1 Force a debuggable build (see Table 1). NDK_DEBUG=0 Force a release build (see Table 1). NDK_HOST_32BIT=1 Always use the toolchain in 32-bit mode (see 64-bit and 32-bit Toolchains). NDK_APPLICATION_MK= Build, using a specific Application.mk file pointed to by the NDK_APPLICATION_MK variable. -C
Build the native code for the project path located at
. Useful if you don’t want to cd to it in your terminal.
Invoking from Eclipse
To build from Eclipse, make sure that you have configured it as described in Setup. If you wish to build using the default ndk-build command, with no options, you can just build your project just as you would any Android project. To get Eclipse to add any of the options described above, follow these steps:
- In the Project Explorer pane, right-click your project name.
- Select Properties.
- Click C/C++ Build.
- Under the Builder Settings tab, uncheck Use default build command.
- In the Build command field, enter the entire build string as if you were typing it on the command line.
- Click OK.
Figure 1 shows an example of an entered string.

Figure 1. Specifying a debug build from within Eclipse
Debuggable versus Release builds
Use the NDK_DEBUG option and, in certain cases, AndroidManifest.xml to specify debug or release build, optimization-related behavior, and inclusion of symbols. Table 1 shows the results of each possible combination of settings.
Table 1. Results of NDK_DEBUG (command line) and android:debuggable (manifest) combinations.
| NDK_DEBUG=0 | NDK_DEBUG=1 | NDK_DEBUG not specified | |
|---|---|---|---|
| android:debuggble=»true» | Debug; Symbols; Optimized*1 | Debug; Symbols; Not optimized*2 | (same as NDK_DEBUG=1) |
| android:debuggable=»false» | Release; Symbols; Optimized | Release; Symbols; Not optimized | Release; No symbols; Optimized*3 |
*1: Useful for profiling.
*2: Default for running ndk-gdb .
*3: Default mode.
Note: NDK_DEBUG=0 is the equivalent of APP_OPTIM=release , and complies with the GCC -O2 option. NDK_DEBUG=1 is the equivalent of APP_OPTIM=debug in Application.mk , and complies with the GCC -O0 option. For more information about APP_OPTIM , see Application.mk.
The syntax on the command line is, for example:
If you are using build tools from prior to SDK r8, you must also modify your AndroidManifest.xml file to specify debug mode. The syntax for doing so resembles the following:
From SDK r8 onward, you do not need to touch AndroidManifest.xml . Building a debug package (e.g. with ant debug or the corresponding option of the ADT plugin) causes the tool automatically to pick the native debug files generated with NDK_DEBUG=1 .
64-Bit and 32-Bit Toolchains
Some toolchains come with both 64-bit and 32-bit versions. For example, directories /toolchain/ /prebuilt/ and /prebuilt/ may contain both linux-x86 and linux-x86_64 folders for Linux tools in 32-bit and 64-bit modes, respectively. The ndk-build script automatically chooses a 64-bit version of the toolchain if the host OS supports it. You can force the use of a 32-bit toolchain by using NDK_HOST_32BIT=1 either in your environment or on the ndk-build command line.
Note that 64-bit tools utilize host resources better (for instance, they are faster, and handle larger programs), and they can still generate 32-bit binaries for Android.
Requirements
You need GNU Make 3.81 or later to use ndk-build or the NDK in general. The build scripts will detect a non-compliant Make tool, and generate an error message.
If you have GNU Make 3.81 installed, but the default make command doesn’t launch it, define GNUMAKE in your environment to point to it before launching ndk-build. For example:
You can override other host prebuilt tools in $NDK/prebuilt/ /bin/ with the following environment variables:
Источник
Интеграция Android Studio, Gradle и NDK
Интегрируем .so файлы в APK
Если вы используете Android Studio, то для интеграции нативных библиотек в приложение раньше было необходимо применение различных сложных способов, включая maven и пакеты .aar/.jar … Хорошая новость состоит в том, что теперь этого уже не требуется.

Вам только требуется положить .so библиотеки в каталог jniLibs в поддиректории, названные соответственно каждой поддерживаемой ABI (x86, mips, armeabi-v7a, armeabi) – и всё! Теперь все файлы .so будут интегрированы в APK во время сборки:
Если название папки jniLibs вас не устраивает, вы можете задать другое расположение в build.gradle:
Строим один APK на архитектуру и добиваемся успеха!
Построить один APK на архитектуру очень просто с использованием свойства abiFilter.
По умолчанию ndk.abiFilter(s) имеет значение all. Это свойство оказывает влияние на интеграцию .so файлов, а также на обращения к ndk-build (мы поговорим об этом в конце поста).
Давайте внесем некоторые архитектурные особенности (конфигурации) в build.gradle:
А затем синхронизируем проект с файлами gradle:
Теперь вы можете наслаждаться новыми возможностями, выбирая желаемые варианты сборки:
Каждый из этих вариантов даст вам APK для выбранной архитектуры:
Полный (Release|Debug) APK будет все еще содержать все библиотеки, как и стандартный пакет, упомянутый в начале этого поста.
Но не прекращайте читать на этом месте! Архитектурно-зависимые APK удобны при разработке, но если вы хотите залить несколько из них в Google Play Store, вам необходимо установить различный versionCode для каждого. Сделать это с помощью новейшей системы сборки очень просто.
Автоматически устанавливаем различные коды версий для ABI-зависимых APK
Свойство android.defaultConfig.versionCode отвечает за versionCode для вашего приложения. По умолчанию оно установлено в -1 и, если вы не измените это значение, будет использован versionCode, указанный в файле AndroidManifest.xml.
Поскольку мы хотим динамически изменять наш versionCode, сначала необходимо указать его внутри build.gradle:
Однако все еще возможно хранить эту переменную в AndroidManifest.xml, если вы получаете ее «вручную» перед изменением:
Теперь вы можете использовать versionCode с различными модификаторами:
Здесь мы поставили префикс 6 для x86, 4 для mips, 2 для ARMv7 и 1 для ARMv5.
Работа с ndk в Android Studio
Если в исходниках проекта есть папка jni, система сборки попытается вызвать ndk-build автоматически.
В текущей реализации ваши Android.mk мейкфайлы игнорируются, вместо них создается новый на лету. Это действительно удобно для небольших проектов (вам больше вообще не требуются .mk файлы!), но в больших может раздражать, если вам требуются все возможности, предоставляемые мейкфайлами. Существует возможность отключить это свойство в build.gradle:
Если вы хотите использовать генерируемый на лету мейкфайл, вы можете настроить его изначально, установив свойство ndk.moduleName, например, так:
Вы также можете установить другие свойства ndk:
- cFlags,
- ldLibs,
- stl (т.е.: gnustl_shared, stlport_static …),
- abiFilters (т.е.: «x86», «armeabi-v7a»).
Генерация отладочного APK достигается заданием значения true для свойства android.buildTypes.debug.jniDebugBuild; в этом случае ndk-build будет передано NDK_DEBUG=1.
Если вы используете RenderScript из NDK, вам потребуется установить значение true для свойства defaultConfig.renderscriptNdkMode.
Если вы доверяете авто-генерируемым мейкфайлам, то можете задавать различные cFlags в зависимости от конечной архитектуры, когда вы собираете многоархитектурные APK. Так что если вы хотите полностью довериться gradle, мы рекомендуем генерировать различные APK для архитектур, используя ранее описанные модификаторы конфигурации:
Мой пример файла .gradle
Соединяя все вместе, привожу файл build.gradle, который сам сейчас использую. В нем нет модификаторов для различных поддерживаемых ABI, он не использует интеграцию с ndk-build, поэтому работает в Windows окружении и не требует ни изменения обычных мест расположения исходников и библиотек, ни содержимого моих .mk файлов.
Устранение неисправностей
NDK не сконфигурирован
Если вы получаете ошибку:
Это означает, что инструменты не найдены в каталоге NDK. Имеется два выхода: установить переменную ANDROID_NDK_HOME в соответствии с вашим каталогом NDK и удалить local.properties или же установить ее вручную внутри local.properties:
Не существует правила для создания цели
Если вы получаете ошибку:
Ее причиной может быть имеющаяся ошибка в NDK для Windows, когда имеется только один исходный файл для компилирования. Добавьте еще один пустой файл – и все заработает.
Прочие вопросы
Вы, возможно, сможете найти ответы на интересующие вас вопросы в google группе adt-dev.
Получение информации по интеграции NDK
Лучшее место для нахождения более подробной информации – официальная страница проекта.
Посмотрите на список изменений и, если пролистаете его целиком, найдете примеры проектов, связанных с интеграцией NDK, внутри самых свежих архивов gradle-samples-XXX.zip.
На видео ниже показано, как настроить проект с исходниками NDK из Android Studio.
Источник
Install and configure the NDK and CMake
To compile and debug native code for your app, you need the following components:
- The Android Native Development Kit (NDK): a set of tools that allows you to use C and C++ code with Android.
- CMake: an external build tool that works alongside Gradle to build your native library. You do not need this component if you only plan to use ndk-build.
- LLDB: the debugger Android Studio uses to debug native code. By default, LLDB will be installed alongside Android Studio.
This page describes how to install these components automatically, or by using Android Studio or the sdkmanager tool to download and install them manually.
Install NDK and CMake automatically
Android Gradle Plugin 4.2.0+ can automatically install the required NDK and CMake the first time you build your project if their licenses have been accepted in advance. If you’ve already read and agree to the license terms, then you can pre-accept the licenses in scripts with the following command:
Install the NDK and CMake
When you install the NDK, Android Studio selects the latest available NDK. For most projects, installing this default version of the NDK is sufficient. If your project needs one or more specific versions of the NDK, though, you can download and configure specific versions. Doing so helps you ensure reproducible builds across projects that each depend on a specific version of the NDK. Android Studio installs all versions of the NDK in the android-sdk /ndk/ directory.
To install CMake and the default NDK in Android Studio, do the following:
With a project open, click Tools > SDK Manager.
Click the SDK Tools tab.
Select the NDK (Side by side) and CMake checkboxes.
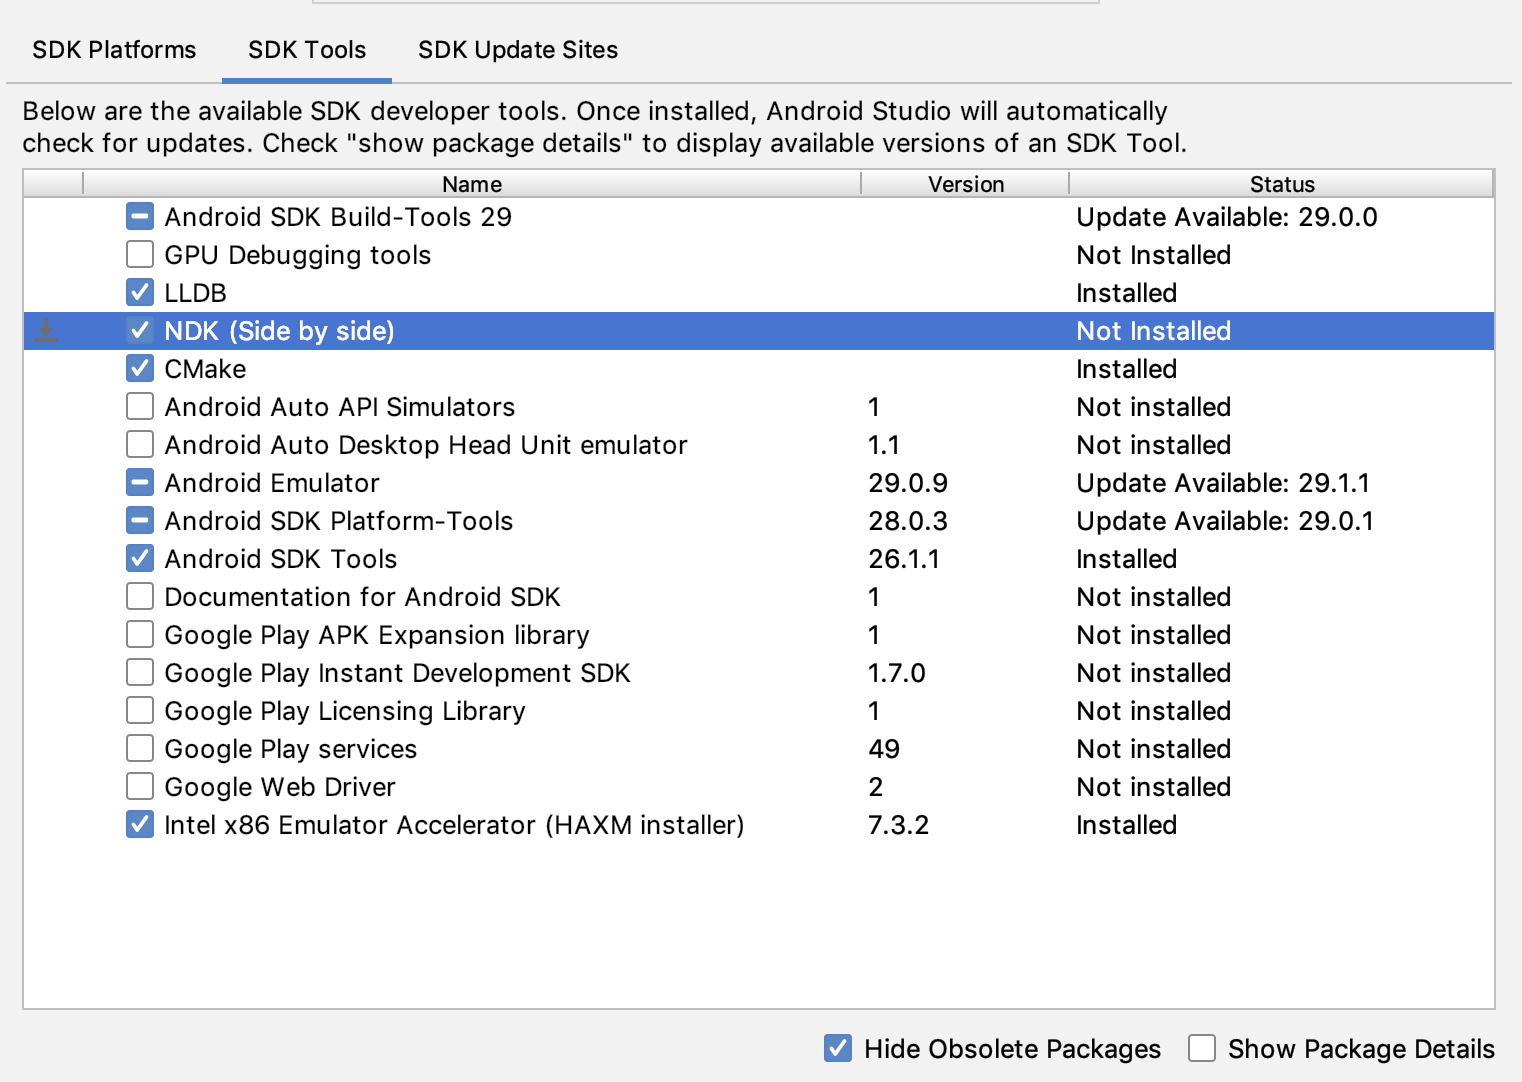 Figure 1: The SDK Tools window showing the NDK (Side by side) option
Click OK.
A dialog box tells you how much space the NDK package consumes on disk.
Click OK.
When the installation is complete, click Finish.
Your project automatically syncs the build file and performs a build. Resolve any errors that occur.
Configure a specific version of CMake
The SDK Manager includes the 3.6.0 forked version of CMake and version 3.10.2. Projects that don’t set a specific CMake version are built with CMake 3.10.2. To set the CMake version, add the following to your module’s build.gradle file:
Groovy
Kotlin
If you want to use a CMake version that is not included by the SDK Manager, follow these steps:
- Download and install CMake from the official CMake website.
- Specify the CMake version you want Gradle to use in your module’s build.gradle file.
Either add the path to the CMake installation to your PATH environment variable or include it in your project’s local.properties file, as shown. If Gradle is unable to find the version of CMake you specified in your build.gradle file, you get a build error.
If you don’t already have the Ninja build system installed on your workstation, go to the official Ninja website, and download and install the latest version of Ninja available for your OS. Make sure to also add the path to the Ninja installation to your PATH environment variable.
Install a specific version of the NDK
To install a specific version of the NDK, do the following:
With a project open, click Tools > SDK Manager.
Click the SDK Tools tab.
Select the Show Package Details checkbox.
Select the NDK (Side by side) checkbox and the checkboxes below it that correspond to the NDK versions you want to install. Android Studio installs all versions of the NDK in the android-sdk /ndk/ directory.
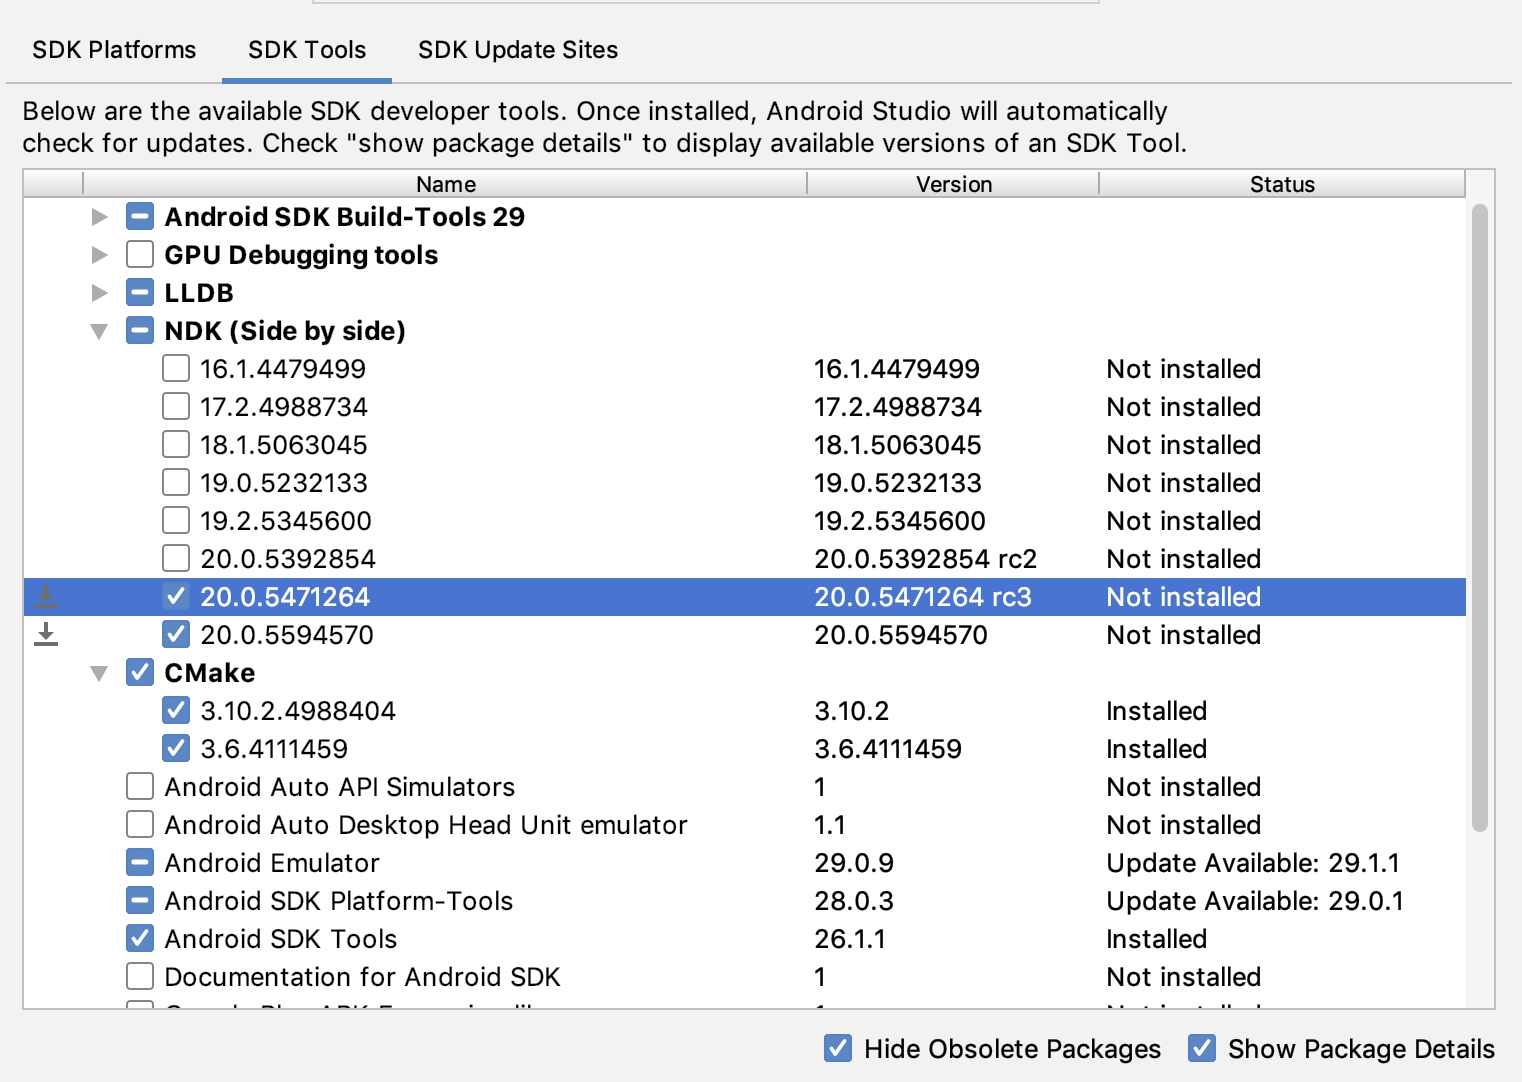 Figure 2: The SDK Tools window showing the NDK (Side by side) options
Click OK.
A dialog box tells you how much space the NDK package(s) consumes.
Click OK.
When the installation is complete, click Finish.
Your project automatically syncs the build file and performs a build. Resolve any errors that occur.
Configure each module with the version of the NDK you want it to use. When using Android Studio 3.6 or higher, if you do not specify the version, the Android Gradle plugin chooses a version that it is known to be compatible with.
Configure specific versions of the NDK in your project
You may need to configure the version of the NDK in your project if one of the following is true:
- Your project is inherited and you need to use specific versions of the NDK and the Android Gradle plugin (AGP). For more information, see Configure the NDK for the Android Gradle plugin.
You have multiple versions of the NDK installed and you want to use a specific one. In this case, specify the version using the android.ndkVersion property in the module’s build.gradle file, as shown in the following code sample.
Groovy
Kotlin
Default NDK version per AGP version
Before release, each AGP version is thoroughly tested with the latest stable NDK release at that time. For AGP version 3.6 and above, that NDK version will be used to build your projects if you do NOT specify an NDK version in the build.gradle file. The default NDK version is documented inside the AGP release notes. The current default NDK versions are listed in the following table:
| Android Studio/Gradle Plugin Version | |||||||
|---|---|---|---|---|---|---|---|
| 7.0 | 4.2 | 4.1 | 4.0 | 3.6 | 3.5 | 3.4 | |
| Default NDK version specified for the version of AGP | 21.4.7075529 | 21.4.7075529 | 21.1.6352462 | 21.0.6113669 | 20.0.5594570 | No default specified | |
Content and code samples on this page are subject to the licenses described in the Content License. Java is a registered trademark of Oracle and/or its affiliates.
Источник


