- Добавление пакетов Android SDK Manager
- Откроется окно настроек Android SDK:
- Обязательно выберите такие компоненты:
- Следующий курс: Создание вашего первого приложения
- Android SDK отсутствует в Android Studio 3
- 6 ответов
- AVD Manager & SDK Manager Missing or greyed out in Android Studio
- AVD Manager is missing
- SDK Build Tools are not installed
- SDK Path is Invalid
- Android SDK Manager not visible
- References
- Summary
- Installing the Android SDK
Добавление пакетов Android SDK Manager
По умолчанию, в Android SDK не установлено все необходимое для начала разработки. Пакет SDK содержит инструменты, платформы и другие компоненты, которые можно загрузить по мере необходимости, используя Android SDK Manager. Поэтому, прежде чем начать, вы должны добавить несколько пакетов в Android SDK.
Чтобы начать добавлять пакеты, запустите Android SDK Manager одним из следующих способов:
- В Android Studio при первом запуске в окне приветствия выберите пункт Configure> SDK Manager
- Если Android Studio уже запущена, выберите пункт меню Tools> Android> SDK Manager.
Откроется окно настроек Android SDK:

На вкладке SDK Platforms отметьте для загрузки все наиболее популярные на текущий момент версии Android. Их список постоянно обновляется на официальном сайте.
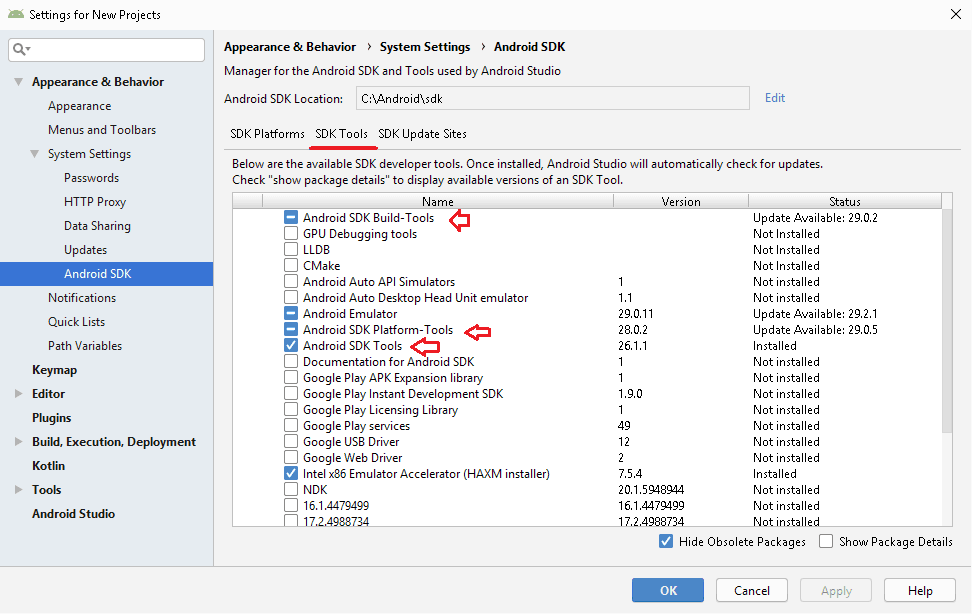
Перейдите на вкладку SDK Tools и отметьте для загрузки минимально необходимый набор компонентов, как показано на скриншоте:

Обязательно выберите такие компоненты:
- Android SDK Build-tools
- Android SDK Platform-tools (последняя версия)
- Android SDK Tools (последняя версия)
- Android Support Repository
После выбора нажмите кнопку Apply и дождитесь загрузки всех компонентов.

По окончании загрузки нажмите Finish. Среда разработки готова к работе.
Следующий курс: Создание вашего первого приложения


Прошу помощи. Только начал изучать разработку под андроид и возникла следующая проблема. Есть планшет Nexus 7 2012 WiFi, прошивка CyanogenMOD Android KitKat (4.4.4). Создаю новый пустой (Empty Activity) проект в Android Studio v 3.0.1, вообще ничего не меняю и пытаюсь запустить проект на устройстве — оно устанавливается и планшет переходит в ребут. Далее запускается очень много раз вылетает ошибка, что Trebuchet (это лаунчер) остановлен. Вообщем еле-еле удаляю приложение и всё становиться нормально. SDK установлены с версии 19 (4.4.4) по 26. Минимальный sdk установлен как 19. Такой же проект на Samsung (android 6.0) запускается без проблем. В чём может быть проблема ума не приложу. Мне кажется, что это возможно как-то связано с движком тем Cyanogen а может и нет, так как пробовал прошивку ParanoidAndroid — та же беда. Прошу поставьте меня на путь истинный
Любые сторонние прошивки вы устанавливаете на свой страх и риск. Нормальная работа системы при этом не гарантируется. Об этом все авторы прошивок пишут.
Это я прекрасно понимаю, и претензий не имею. Дело в том, что система работает стабильно. Остальные приложения которые были изначально написаны для 4.4.4 работают хорошо. И даже современные приложения устанавливаются и работаю -> а это значит, что авторы как то включили поддержку 4.4.4. Возможно ещё где-нибудь нужно нажать «галочку » для поддержки 4.4.4?
Объясните пожалуйста, зачем нужны эти пакеты?
Google APIs ARM EABI v7a System Image
Google APIs
И все пакеты в Extras.
Google APIs — ARM EABI v7a System Image — это образ эмулятора
Google APIs — API сервисов Google, например Maps или YouTube
в Extras самое необходимое — Android Support repository, android support library, google play services, google usb driver — названия как-бы не нуждаются в объяснении.
Что за WTF?! пишет отказано в доступе и доне нотхинг вас инсталед в конце чё делать
Здравствуйте
У меня установлена AS 2.1
Android SDK Build-tools не установлены (стоит прочерк)
Нужно ли устанавливать Android SDK Build-tools ? Все? И почему по умолчанию они не установлены вообще?
Для отправки комментария вам необходимо авторизоваться.
Источник
Android SDK отсутствует в Android Studio 3
Я только что скачал Android Studio 3 для Windows из официальный сайт, но когда он запускается, он отображает сообщение об ошибке о отсутствует Android SDK:
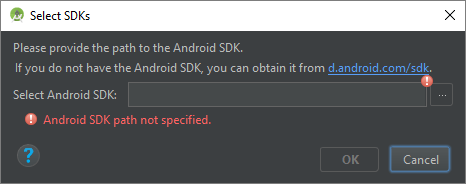
когда я нажимаю на эту ссылку, он просто перенаправляет на тот же официальный сайт. Там нет отдельной ссылки для загрузки SDK.
откуда я мог его взять? Не должен ли Android SDK быть установлен во время Android Студия 3 установки?
6 ответов
по-видимому, проблема заключалась в том, что Android Studio 3.0 уже была установлена и удалена до этого. SDK был удален, но конфигурация Android Studio этого не сделала.
удаление конфигурации из предыдущей установки ( C:\Users\ \.AndroidStudio3.0 папка) сделал трюк. Когда Android Studio запустился, он открыл диалоговое окно о том, какие части SDK для загрузки, а затем продолжил, как ожидалось.
Это случилось со мной на Windows 10 С Android Studio 3.1. The SDK отсутствовал & Я не мог загрузить или установить его С IDE. Android Studio не загружала и не устанавливала SDK должным образом, несмотря на выполнение шагов. Ан появится в конце мастера настройки SDK, сообщив мне, что SDK не был установлен b/c каталог sdk / tools не существует (нет sh1t Шерлок!—12—>). У меня было не ранее загруженный или установленный Android Studio или SDK.
оказывается, что у Android Studio 3.1 не было опции, проверенной на ‘включить встроенный репозиторий Maven’ на настройки IDE.
после включение на embedded Maven repo & перезапуск Android Studio, SDK мастер настройки запускается & успешно загружено / установлено в SDK.
попробуйте переустановить его и скачать(загружать автоматически) нужный файл после перезагрузки, но следуйте инструкциям
1 Перейдите на главный диск (рассмотрим ‘c’), затем c / user/ / androidstudioproject и скопируйте его в другое место(сохраните старый проекты в безопасное место)
2 Удалите android studio с панели управления
3 удалить следующий файл
4 Теперь установите androidstudio из его установки
эти будет автоматически загружать необходимые файлы после установки (всегда подключаться к интернету во время установки)
Я удалил Android Studio из Панели Управления. Сохраните в безопасном месте папку и подпапки ниже C:\USERS\MYNAME\ANDROIDSTUDIOPROJECTS
после того как я удалил c:\users\MYNAME\.ANDROIDSTUDIO3.1 и c:\users\MYNAME\.ANDROID
ведь я установил android studio. Это займет много времени, но проблема решена.
вы можете скачать sdk tools отдельно.
https://developer.android.com/studio/#downloads
Перейдите по этой ссылке и загрузите инструменты sdk из раздела «только инструменты командной строки».
после загрузки извлеките zip-файл и переместите его в C:\Users\USERNAME\AppData\Local\Android\Sdk
Если не сработало, измените местоположение sdk из Android studio
Я столкнулся с этим и после удаления и переустановки все еще не мог найти опцию в разделе «Инструменты».
после того, как я открыл проект, я нашел вариант. Есть кнопка (четвертая справа), которая является менеджером SDK.
Источник
AVD Manager & SDK Manager Missing or greyed out in Android Studio
AVD Manager or SDK Manager becomes greyed out or goes missing from the Android Studio is the common issue that arises in Android studio. This guide explores all the possibilities of that happenings and discusses how you can solve them.
You can find the AVD Manager & SDK Manager option under the Tools menu as shown below. In the older version of the Android studio you will find this menu under the Tools -> Android.
It may happen that you may find AVD Manager & SDK Manager options goes missing from the menu as shown below
Table of Contents
AVD Manager is missing
- Android Menu under tools is missing.
- Might see “Failed to find Build Tools revision xx.x.x” as shown below
- AVD Manager is greyed out in the toolbar
This may happen for several reasons
- SDK Build Tools are not installed
- Invalid SDK Path
SDK Build Tools are not installed
SDK Build tools are installed when you create a new project. If it fails then you may have to install it again. You look at the build tab at the bottom of the screen, it will display the error message and option to install the Build tools. Install it and you should be able to see the AVD Manager.
Another way is to go to the SDK Manager. Under SDK Tools you will find the Android SDK Build tools. Install based on the API. Also ensure that you have the latest version of Emulator, Platform-Tools & SDK Tools installed.
SDK Path is Invalid
Invalid or Missing SDK Path is another reason for such errors. Open the Android SDK Manager ( Tools -> SDK Manager) and check the Android SDK Location as shown in the image below
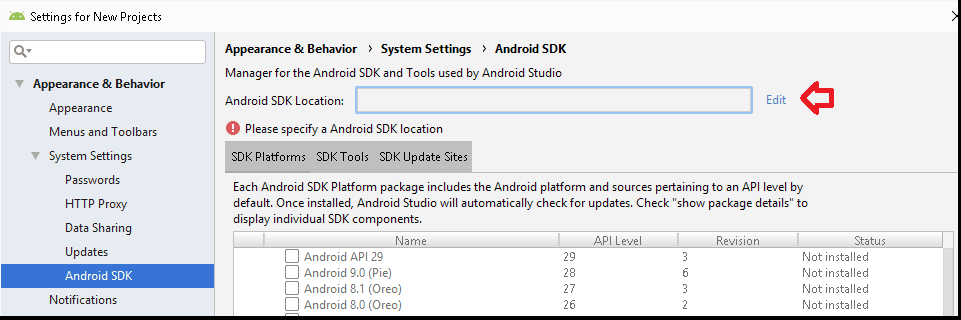 AVD Manager Missing because Android SDK Path is invalid
Ensure that it points to the correct location. The SDK is usually installed at the location C:\Users\ \AppData\Local\Android\sdk . If you cannot find the location or you have logged in as a different user, then you can create the folder and enter it here. Once the path is valid, the Android studio will download & install the required SDK on its own.
Android SDK Manager not visible
If Android SDK Manager is not visible then you need to reinstall the Android Studio. Follow these steps to Uninstall and Install Android Studio.
- Uninstall Android Studio
- Delete the folder C:\Program Files\Android ( C:\Program Files (x86)\Android if 32bit installation)
- Remove the SDK Folder. You will find it here C:\Users\ \AppData\Local\Android\sdk. (unless you have changed it)
- Install the Android Studio
References
Summary
In this guide, we learned how to solve the AVD Manager or SDK Manager missing or greyed out issue in Android Studio.
Источник
Installing the Android SDK
Android Studio provides everything you need to start developing apps for Android, including the Android Studio IDE and the Android SDK tools.
If you didn’t download Android Studio, go download Android Studio now, or switch to the stand-alone SDK Tools install instructions.
Before you set up Android Studio, be sure you have installed JDK 6 or higher (the JRE alone is not sufficient)—JDK 7 is required when developing for Android 5.0 and higher. To check if you have JDK installed (and which version), open a terminal and type javac -version . If the JDK is not available or the version is lower than 6, go download JDK.
To set up Android Studio on Windows:
- Launch the .exe file you just downloaded.
- Follow the setup wizard to install Android Studio and any necessary SDK tools.
On some Windows systems, the launcher script does not find where Java is installed. If you encounter this problem, you need to set an environment variable indicating the correct location.
Select Start menu > Computer > System Properties > Advanced System Properties. Then open Advanced tab > Environment Variables and add a new system variable JAVA_HOME that points to your JDK folder, for example C:\Program Files\Java\jdk1.7.0_21 .
The individual tools and other SDK packages are saved outside the Android Studio application directory. If you need to access the tools directly, use a terminal to navigate to the location where they are installed. For example:
To set up Android Studio on Mac OSX:
- Unzip the downloaded zip file, android-studio-ide- -mac.zip .
- Drag and drop Android Studio into the Applications folder.
- Open Android Studio and follow the setup wizard to install any necessary SDK tools.
Depending on your security settings, when you attempt to open Android Studio, you might see a warning that says the package is damaged and should be moved to the trash. If this happens, go to System Preferences > Security & Privacy and under Allow applications downloaded from, select Anywhere. Then open Android Studio again.
The individual tools and other SDK packages are saved outside the Android Studio application directory. If you need access the tools directly, use a terminal to navigate into the location where they are installed. For example:
To set up Android Studio on Linux:
- Unpack the downloaded Tar file, android-studio-ide- -linux.zip , into an appropriate location for your applications.
- To launch Android Studio, navigate to the android-studio/bin/ directory in a terminal and execute studio.sh .
You may want to add android-studio/bin/ to your PATH environmental variable so that you can start Android Studio from any directory.
If the SDK is not already installed, follow the setup wizard to install the SDK and any necessary SDK tools.
Note: You may also need to install the ia32-libs, lib32ncurses5-dev, and lib32stdc++6 packages. These packages are required to support 32-bit apps on a 64-bit machine.
Android Studio is now ready and loaded with the Android developer tools, but there are still a couple packages you should add to make your Android SDK complete.
The stand-alone SDK Tools package does not include a complete Android development environment. It includes only the core SDK tools, which you can access from a command line or with a plugin for your favorite IDE (if available).
If you didn’t download the SDK tools, go download the SDK now, or switch to the Android Studio install instructions.
To get started on Windows:
Your download package is an executable file that starts an installer. The installer checks your machine for required tools, such as the proper Java SE Development Kit (JDK) and installs it if necessary. The installer then saves the Android SDK Tools to a specified the location outside of the Android Studio directories.
- Double-click the executable ( .exe file) to start the install.
- Make a note of the name and location where you save the SDK on your system—you will need to refer to the SDK directory later when using the SDK tools from the command line.
- Once the installation completes, the installer starts the Android SDK Manager.
To get started on Mac OSX:
Unpack the ZIP file you’ve downloaded. By default, it’s unpacked into a directory named android-sdk-mac_x86 . Move it to an appropriate location on your machine, such as a «Development» directory in your home directory.
Make a note of the name and location of the SDK directory on your system—you will need to refer to the SDK directory later when using the SDK tools from the command line.
To get started on Linux:
Unpack the .zip file you’ve downloaded. The SDK files are download separately to a user-specified directory.
Make a note of the name and location of the SDK directory on your system—you will need to refer to the SDK directory later when using the SDK tools from the command line.
Troubleshooting Ubuntu
- If you need help installing and configuring Java on your development machine, you might find these resources helpful:
- https://help.ubuntu.com/community/Java
- https://help.ubuntu.com/community/JavaInstallation
- Here are the steps to install Java:
-
If you are running a 64-bit distribution on your development machine, you need to install additional packages first. For Ubuntu 13.10 (Saucy Salamander) and above, install the libncurses5:i386 , libstdc++6:i386 , and zlib1g:i386 packages using apt-get :
For earlier versions of Ubuntu, install the ia32-libs package using apt-get :
The Android SDK tools are now ready to begin developing apps, but there are still a couple packages you should add to make your Android SDK complete.
Then, select which SDK bundle you want to install:
Источник
-


