- Monitor Network Requests and Responses on Android Studio
- Monitor network connectivity change for available and lost in android app
- Avoid using Implicit Broadcast
- Explicit Broadcast
- Start using ConnectivityManager.NetworkCallback
- Use Live Data for Observing the change.
- Retrofit 2 — Analyze Network Traffic with Android Studio Profiler
- Moonshoot
- Retrofit Series Overview
- Prerequisites & Setup
- Analyze Network Traffic with Android Profiler
- Network View
- Request Details
- Summary
- Still Have Questions? Get Our Retrofit Book!
Monitor Network Requests and Responses on Android Studio

Dec 21, 2017 · 4 min read
Android Studio 3.0 has an improved Android Profiler. One nice addition in the profiler tool is that the network inspector added to Network section. Using that now we can see the network traffic originating from app in debug and see the responses as well. Those who were using Charles Proxy or similar tool will easily realise how convenient it is. We can get rid of one tool* and no more annoying HTTP proxy configuring and removing configuration after usage.
But there are few cat c hes. First thing is it will work only if you are using HttpURLConnection or OkHttp for network calls in your app. If you are using some other libraries for network request, probably you’ll get the following message on Network profiler
“Network Profiling Data Unavailable: There is no information for the network traffic you’ve selected.”
Second issue that you may face is that you might not be able to see the network request and response in all of your devices / emulators. You’ll need a device with API 26(Android 8.0) or above. Which is a serious issue for most of the developers. Android 8.0 is the latest release, and there are only very few actual devices running that. Many flagships are still awaiting Oreo update. Simulators are here to help. But how many of us really use AVDs? I personally don’t like it. They are still very slow(Definitely improved a lot in last few years)
Now let’s see how we can actually see the request-response in Android Studio and what are the things available in that
You’ll be familiar with the following Android Profiler window which sits normally at the bottom of Android Studio. And you’ll be using it once in a while or daily.

It have different profiler outputs like CPU, Memory, Network etc. Click on that network output which shows a blue and kind of orange spikes. It will expand to something like this.

The blue and orange spikes indicate received and send data respectively. So if you have a series of calls going on these spikes will be continuous. To see data that has been transferred between app and server. Select a particular region in the spike area. You can do this by dragging from start to end of the range. You’ll see something like this after selecting the area.
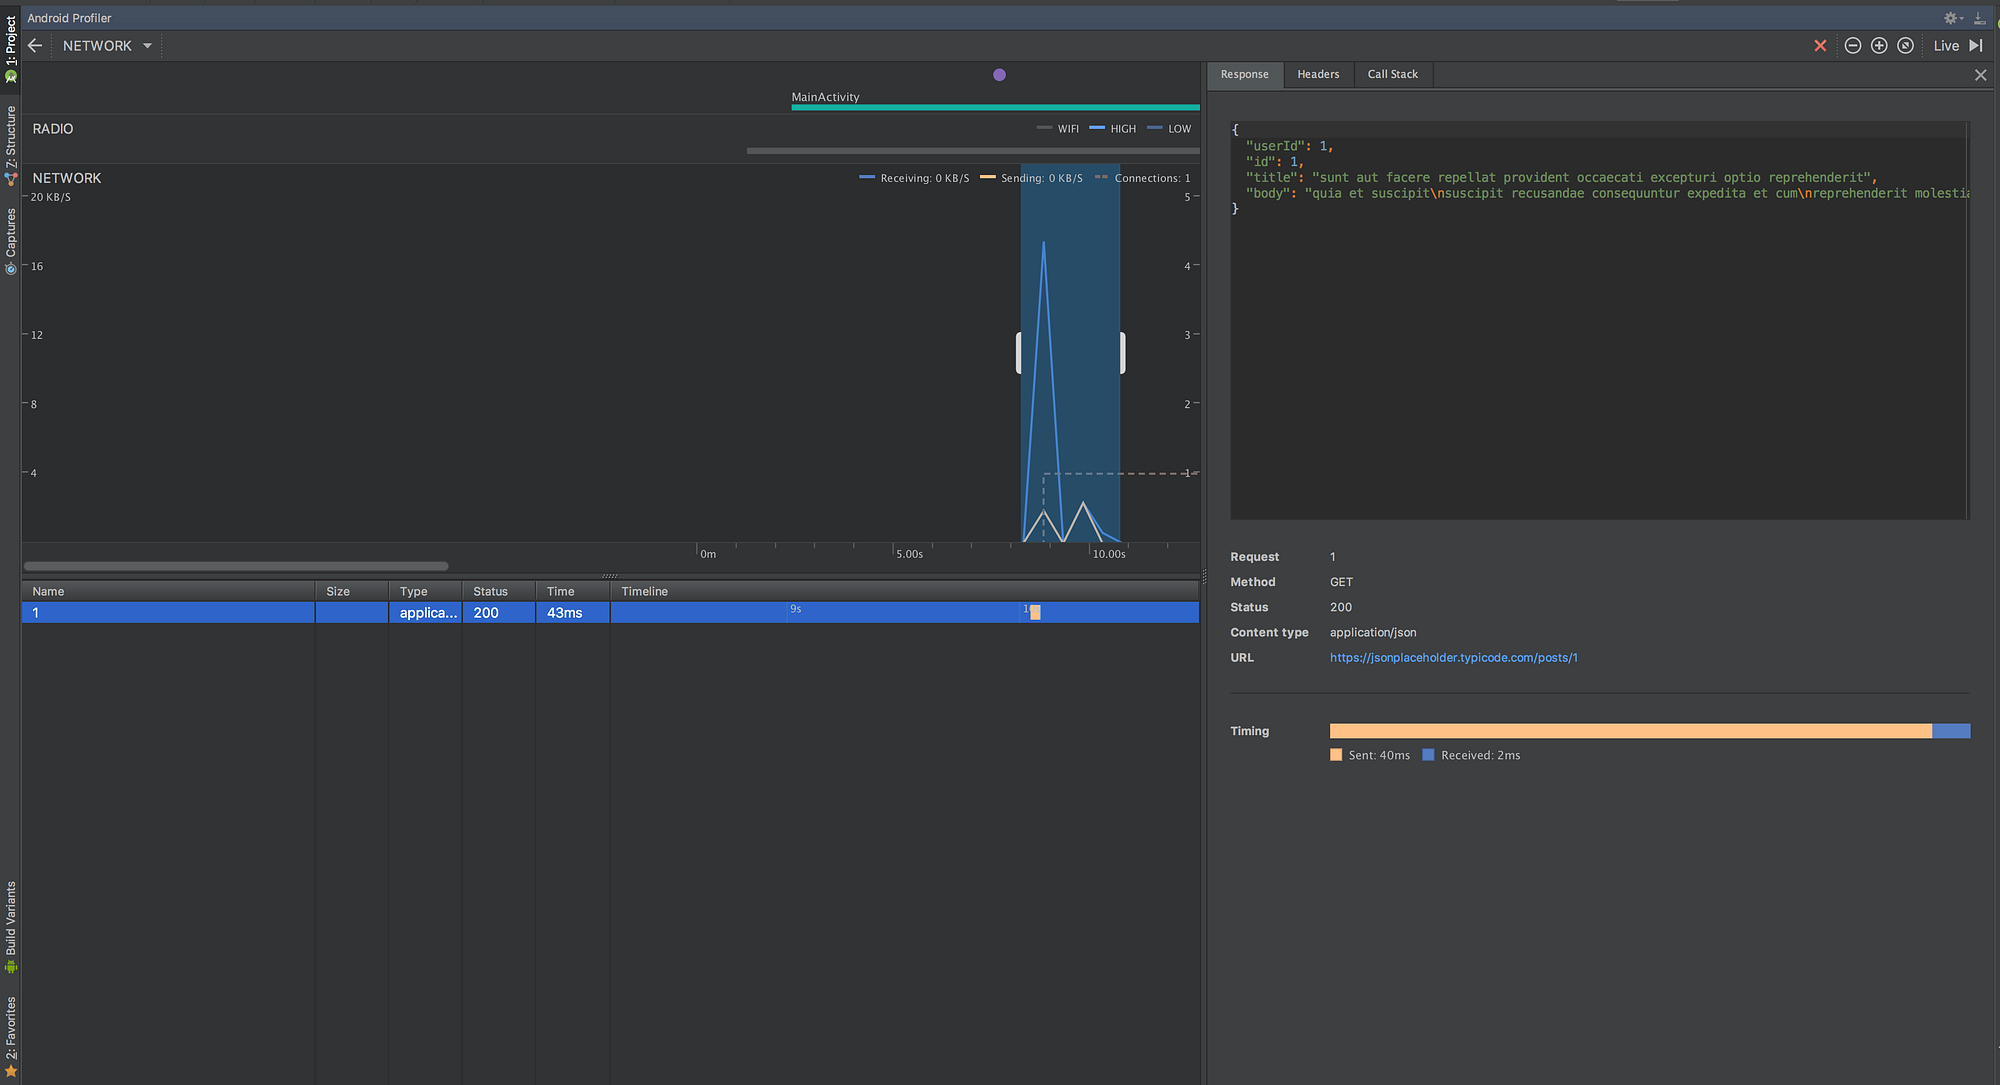
Here you can see a table below the spikes, thats the place where it lists the api calls happened between the selected range. On the right side the request response data, header etc can be inspected. In the above example name of the api is shown as one, because I have used a dummy api for this and the api was something like /posts/1.
I have tried to look into the network traffic generated from a webview. Profiler gave the default unavailable error message. I haven’t checked whether there are any tweaks to make it work. But my best guess is that it wont’t be showing data transfer originated from webviews. I will be updating that also when I have confirmation on that.
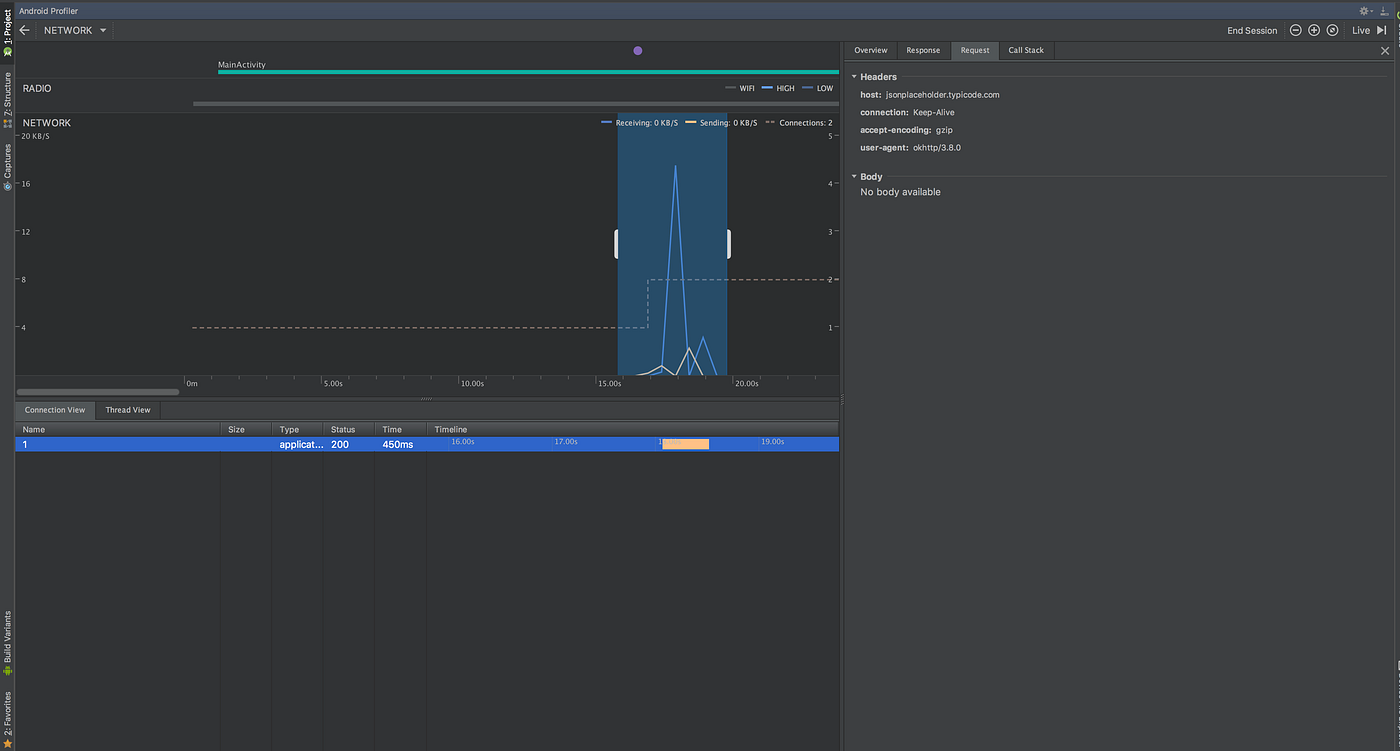
When Android Studio 3 was released the network monitor had the options only to view network responses and response headers. But no way to see the request params. But it is now available in the canary channel. Following is the screenshot of the above api response monitor example in Android Studio Canary 8 with request param option
So you might be wondering will it work only for API calls, or work with other web resources as well. I have tried monitoring the request and responses of image loading through some of the famous image loading libraries like Picasso, Glide, Fresco etch. Read more about it here.
Источник
Monitor network connectivity change for available and lost in android app

Sharing is caring!
As we all know that Google is providing very frequently version update for Android devices. Currently, Google has released the android Q a new version OS for android. Most of the people are still using the lower version of Android OS like Lollipop, marshmallow, Oreo, and Nougat because our hardware is not capable to take the upgrade for a newer version.
In every new version of OS, Google has updated the new security restriction like avoiding to use the implicit broadcast or static broadcast, background services blocked by Doze mode for battery optimization and removing few default permission for user application like SMS and many more. So its kind of headache for an android developer to maintain the application for all API version.
Avoid using Implicit Broadcast
So in this tutorial, we are going to check what is the best way of checking the network connectivity while the application is live. As I have explained in the above line that static broadcast is not going to work in android N because of holding the resource by static broadcast causing leaks. Till the Android L, we used the below static broadcast which we defined in Android Manifest.xml file.
Any object which is holding the resource for a long time is not a good approach in android. As we all know that android is providing a very limited memory of an application. Android framework has always given the first priority for a current application which is running by a user. During any time if the device is faced the memory low, then Android resource will kill the other applications which are in the stack and during the same time if any object holding the resource is causing the memory leaks.
As in the above code, we can see that registering the Broadcast Reciever as an implicit and now in new versions like android O and N, it is restricted to use. So what we need to do, we can use the explicit Broadcast Reciever for register and unregister to avoid the leaks.
Explicit Broadcast
we can use the dynamic broadcast which scop will be limited in that class only while static broadcast scop will be though out the application unnecessary holding resource for others class and View. To avoid the leaks, please unregister the broadcast when the View is inactive or detached.
Now, Google has provided the new API in a new version which is called NetworkCallback in ConnectivityManager class.
Start using ConnectivityManager.NetworkCallback
In this API Google has removed to use any static or dynamic broadcast for monitoring the network change. But the process of a register and unregister network callback will be the same to avoid leaks.
So here Android is recommended to use the network callback for lollipop onwards to the better result. This class has method override for network available and lost.
Use Live Data for Observing the change.
As we know that Live Data is a data holder class which is observing the change of an object. The best part of the Live Data is that it is aware of the Life cycle event of View.
Live Data is proving the override method for a view is an active and inactive state. When the View is in an active state we will register the broadcast and when it is inactive we will unregister the broadcast to avoid the unnecessary the holding the resource. A view can get the update regarding the status change of network connectivity easily.
Let me put all code together to handle all the API version for all devices. We can use the Live Data for observing the change in the Network.
Great. Now let’s observe the change of the Network for updating the View.
I used this StackOverflow as a reference which is available in Kotlin Version. I am really thankful of Amokrane Chentir for the good suggestion.
Wrapping
Now we have a good understanding of the network callback for monitoring the network connectivity change and live data for observing the change for View. In my next tutorial, we will learn a few more technical stuff, till then enjoy your healthy day.
If you are wondering to learn Android then Please learn from Android category and wondering to learn Kotlin then Kotlin Category will help you. If you want to learn all the python article, then learn from the python category.
Please do subscribe your email to get the newsletter on this blog on below and if you like this post then do not forget to share like and comment on the below section.
Источник
Retrofit 2 — Analyze Network Traffic with Android Studio Profiler
Moonshoot
Moonshoot is a
Student Feature.
In previous tutorials, you’ve learned how to log requests and responses in Retrofit with an OkHttp interceptor, and to analyze network traffic with facebook’s stetho tool. While the OkHttp interceptor is a fast and easy setup, and Stetho offers better analysis, both are limited in their logging capabilities.
In this tutorial, you’ll learn how to use Android Studio’s Android Profiler to really drill into details of your app’s network traffic. You’ll also see how to correlate UI events, CPU and memory behavior to network requests. The best part: all of this requires no code setup!
Retrofit Series Overview
Getting Started and Creating an Android Client
Basics of API Description
Creating a Sustainable Android Client
URL Handling, Resolution and Parsing
How to Change API Base Url at Runtime
Multiple Server Environments (Develop, Staging, Production)
Share OkHttp Client and Converters between Retrofit Instances
Upgrade Guide from 1.9
Beyond Android: Retrofit for Java Projects
How to use OkHttp 3 with Retrofit 1
- Getting Started and Creating an Android Client
- Basics of API Description
- Creating a Sustainable Android Client
- URL Handling, Resolution and Parsing
- How to Change API Base Url at Runtime
- Multiple Server Environments (Develop, Staging, Production)
- Share OkHttp Client and Converters between Retrofit Instances
- Upgrade Guide from 1.9
- Beyond Android: Retrofit for Java Projects
- How to use OkHttp 3 with Retrofit 1
Synchronous and Asynchronous Requests
Send Objects in Request Body
Add Custom Request Header
Manage Request Headers in OkHttp Interceptor
Dynamic Request Headers with @HeaderMap
Multiple Query Parameters of Same Name
Optional Query Parameters
Send Data Form-Urlencoded
Send Data Form-Urlencoded Using FieldMap
How to Add Query Parameters to Every Request
Add Multiple Query Parameter With QueryMap
How to Use Dynamic Urls for Requests
Constant, Default and Logic Values for POST and PUT Requests
Reuse and Analyze Requests
Optional Path Parameters
How to Send Plain Text Request Body
Customize Network Timeouts
How to Trust Unsafe SSL certificates (Self-signed, Expired)
Dynamic Endpoint-Dependent Interceptor Actions
How to Update Objects on the Server (PUT vs. PATCH)
How to Delete Objects on the Server
- Synchronous and Asynchronous Requests
- Send Objects in Request Body
- Add Custom Request Header
- Manage Request Headers in OkHttp Interceptor
- Dynamic Request Headers with @HeaderMap
- Multiple Query Parameters of Same Name
- Optional Query Parameters
- Send Data Form-Urlencoded
- Send Data Form-Urlencoded Using FieldMap
- How to Add Query Parameters to Every Request
- Add Multiple Query Parameter With QueryMap
- How to Use Dynamic Urls for Requests
- Constant, Default and Logic Values for POST and PUT Requests
- Cancel Requests
- Reuse and Analyze Requests
- Optional Path Parameters
- How to Send Plain Text Request Body
- Customize Network Timeouts
- How to Trust Unsafe SSL certificates (Self-signed, Expired)
- Dynamic Endpoint-Dependent Interceptor Actions
- How to Update Objects on the Server (PUT vs. PATCH)
- How to Delete Objects on the Server
Ignore Response Payload with Call
Receive Plain-String Responses
Crawl HTML Responses with jspoon (Wikipedia Example)
Loading Data into RecyclerView and CardView
- Ignore Response Payload with Call
- Receive Plain-String Responses
- Crawl HTML Responses with jspoon (Wikipedia Example)
- Loading Data into RecyclerView and CardView
Introduction to (Multiple) Converters
Adding & Customizing the Gson Converter
Implementing Custom Converters
How to Integrate XML Converter
Access Mapped Objects and Raw Response Payload
Supporting JSON and XML Responses Concurrently
Handling of Empty Server Responses with Custom Converter
Send JSON Requests and Receive XML Responses (or vice versa)
Unwrapping Envelope Responses with Custom Converter
Wrapping Requests in Envelope with Custom Converter
Define a Custom Response Converter
- Introduction to (Multiple) Converters
- Adding & Customizing the Gson Converter
- Implementing Custom Converters
- How to Integrate XML Converter
- Access Mapped Objects and Raw Response Payload
- Supporting JSON and XML Responses Concurrently
- Handling of Empty Server Responses with Custom Converter
- Send JSON Requests and Receive XML Responses (or vice versa)
- Unwrapping Envelope Responses with Custom Converter
- Wrapping Requests in Envelope with Custom Converter
- Define a Custom Response Converter
Simple Error Handling
Error Handling for Synchronous Requests
Catch Server Errors Globally with Response Interceptor
How to Detect Network and Conversion Errors in onFailure
Log Requests and Responses
Enable Logging for Development Builds Only
Log Network Traffic with Stetho and Chrome Developer Tools
Using the Log Level to Debug Requests
Analyze Network Traffic with Android Studio Profiler
Debug and Compare Requests with RequestBin
- Log Requests and Responses
- Enable Logging for Development Builds Only
- Log Network Traffic with Stetho and Chrome Developer Tools
- Using the Log Level to Debug Requests
- Analyze Network Traffic with Android Studio Profiler
- Debug and Compare Requests with RequestBin
Introduction to Call Adapters
Custom Call Adapter to Separate OnResponse Callback
How to Integrate RxJava 1.x Call Adapter
How to Integrate RxJava 2.x Call Adapter
How to Integrate Guava Call Adapter
Custom Call Adapter to Separate Network and Gson Errors
- Introduction to Call Adapters
- Custom Call Adapter to Separate OnResponse Callback
- How to Integrate RxJava 1.x Call Adapter
- How to Integrate RxJava 2.x Call Adapter
- How to Integrate Guava Call Adapter
- Custom Call Adapter to Separate Network and Gson Errors
Pagination Using Query Parameter
Pagination Using Link Header and Dynamic Urls (Like GitHub)
Pagination Using Range Header Fields (Like Heroku)
- Pagination Using Query Parameter
- Pagination Using Link Header and Dynamic Urls (Like GitHub)
- Pagination Using Range Header Fields (Like Heroku)
How to Upload Files to Server
How to Upload Multiple Files to Server
How to Upload a Dynamic Amount of Files to Server
Upload Files with Progress
Passing Multiple Parts Along a File with @PartMap
How to Download Files from Server
Download Files with Progress Updates
How to Upload Files to Server
- How to Upload Files to Server
- How to Upload Multiple Files to Server
- How to Upload a Dynamic Amount of Files to Server
- Upload Files with Progress
- Passing Multiple Parts Along a File with @PartMap
- How to Download Files from Server
- Download Files with Progress Updates
- How to Upload Files to Server
Basic Authentication on Android
Token Authentication on Android
OAuth on Android
Hawk Authentication on Android
How to Refresh an Access Token
- Basic Authentication on Android
- Token Authentication on Android
- OAuth on Android
- Hawk Authentication on Android
- How to Refresh an Access Token
Activate Response Caching (Etag, Last-Modified)
Check Response Origin (Network, Cache, or Both)
Force Server Cache Support with Response Interceptor
Support App Offline Mode by Accessing Response Caches
Analyze Cache Files
- Activate Response Caching (Etag, Last-Modified)
- Check Response Origin (Network, Cache, or Both)
- Force Server Cache Support with Response Interceptor
- Support App Offline Mode by Accessing Response Caches
- Analyze Cache Files
Basics of Mocking Server Responses
Customizing Network Behavior of Mocked Server Responses
Mock APIs with JsonServer
- Basics of Mocking Server Responses
- Customizing Network Behavior of Mocked Server Responses
- Mock APIs with JsonServer
Fluent Interface with Builders
Prerequisites & Setup
Unlike the OkHttp interceptor and Stetho you won’t have to make any changes to your code. This solution works out-of-the-box with Android Studio 3.0.
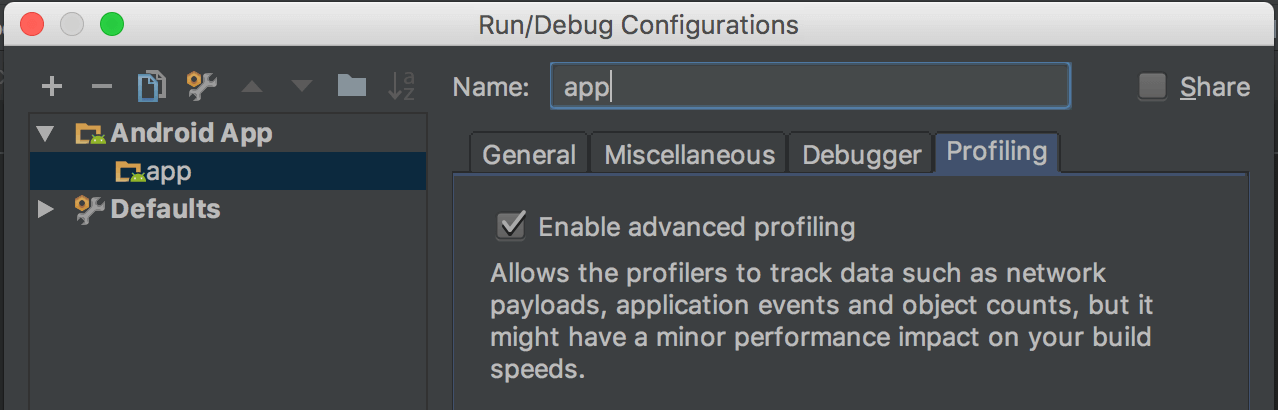
However, at the moment you still need to enable advanced profiling in your run/debug configuration. When you run the app with this updated configuration, you’ll be able to use the Android Profiler to analyze your app’s network traffic.
Analyze Network Traffic with Android Profiler
Once your app is running on a device or emulator, you can use the Android Profiler view to analyze UI, CPU, memory and network details.
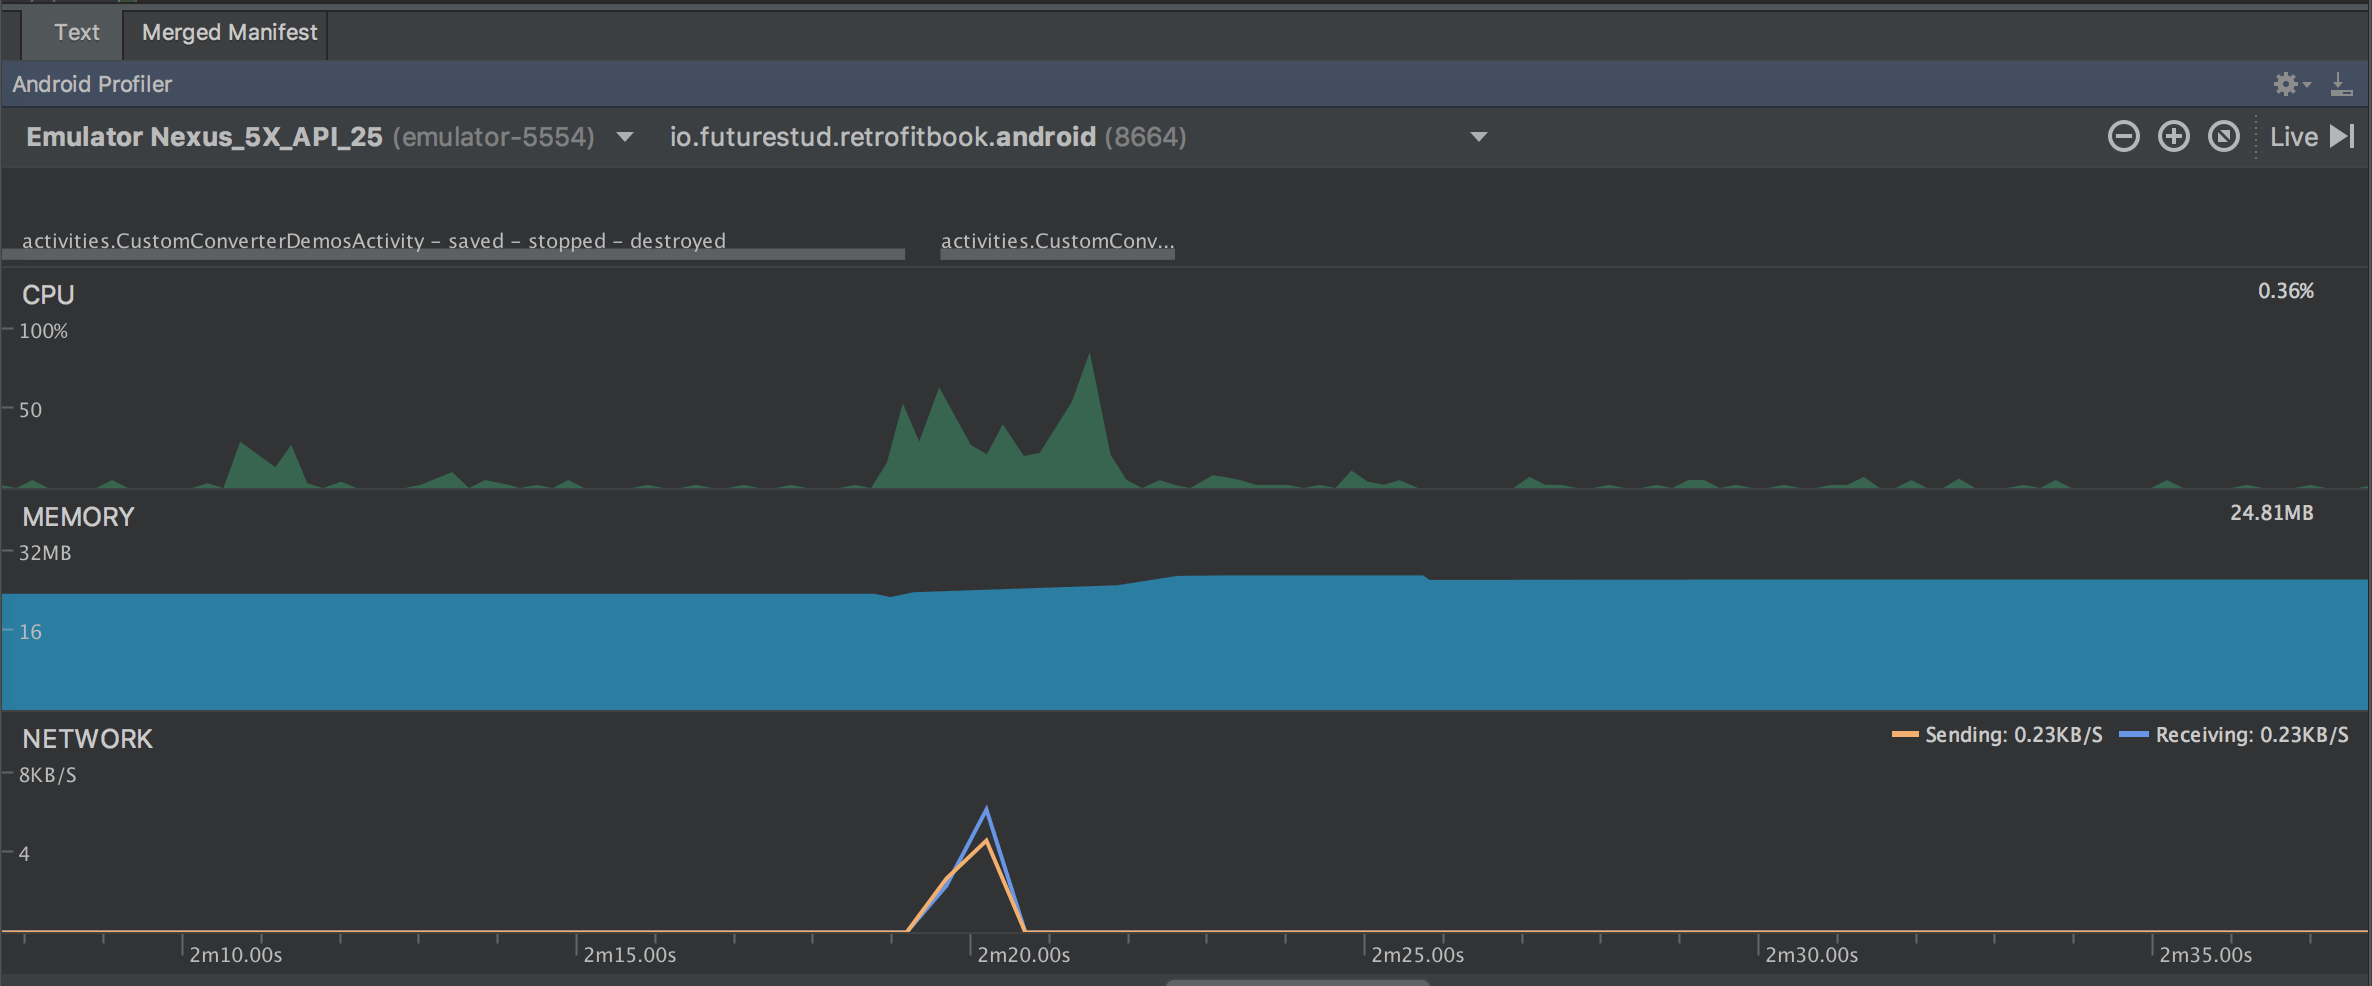
The overview is presented as a constantly updated timeline and already gives you valuable information how UI events, CPU and memory usage and the network traffic are correlated.
Because this tutorial is focused on the network part, you can click into the network section to open up a detailed network view.
Network View
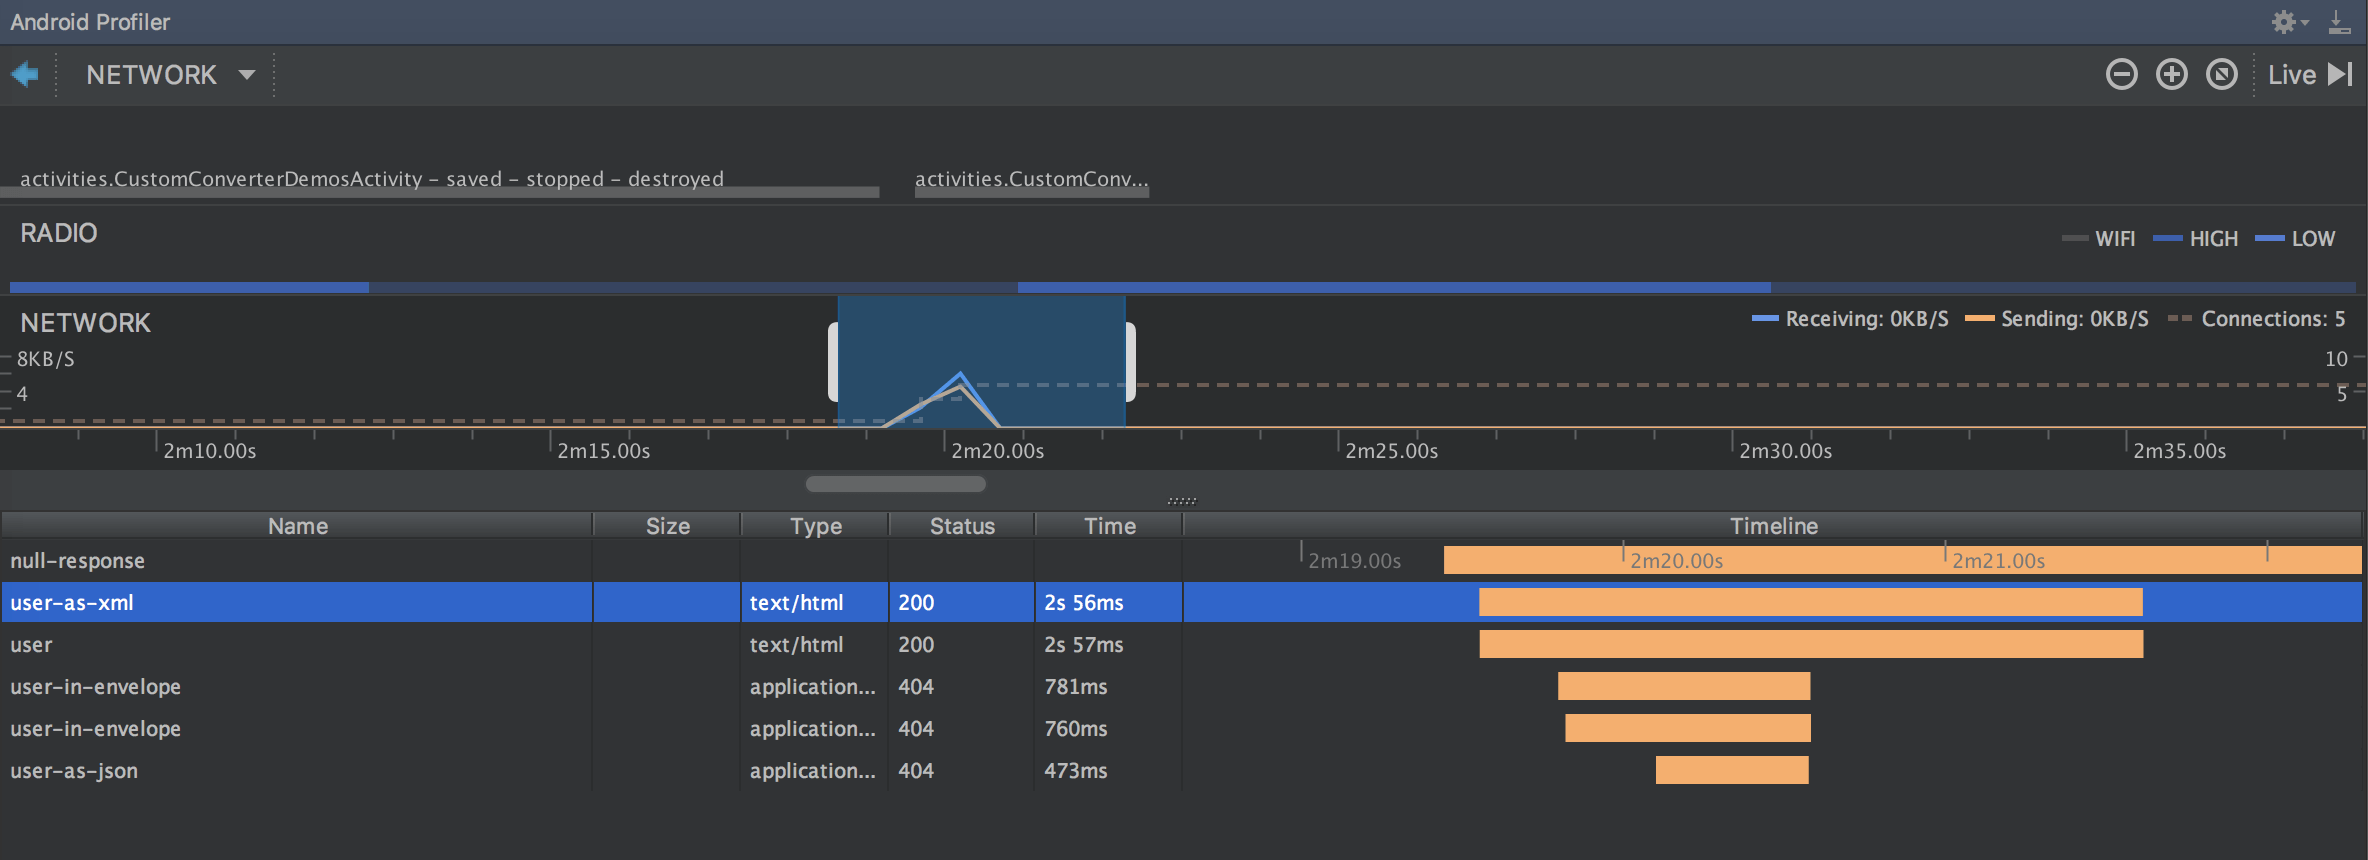
In the network view you’ll see all requests, when they were made and how long it took to complete them. This is presented in a convenient timeline, and additionally in a list.
When you click on a specific request, you can drill deeper into that request.
Request Details
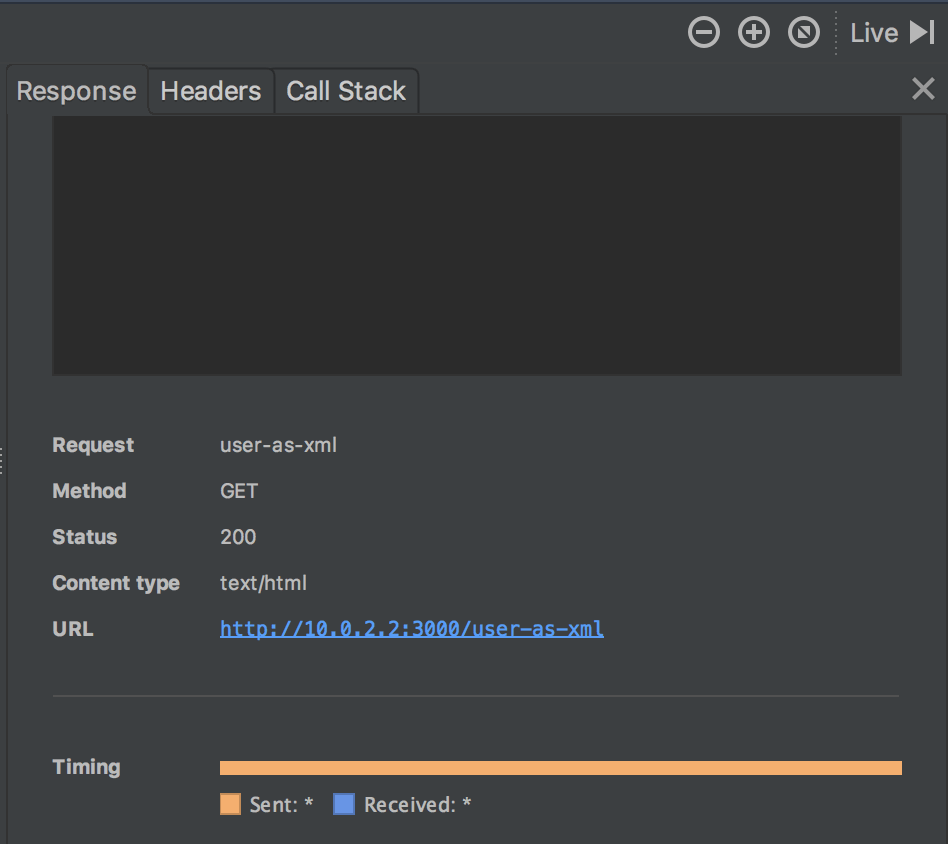
This detail view offers you exact information about the payload, the headers and meta data about the request. Additionally, you can also see the call stack of the network activity and understand where your code started the network request.
Summary
In this tutorial you’ve seen an overview of the network element of the Android Profiler in Android Studio. The Android Profiler let’s you analyze the network traffic without adding any code to your app, and offering a novel presentation of the data. Depending on your needs, it might be a superior solution to an OkHttp interceptor or Stetho.
Do you have further questions on this topic or about Retrofit in general? Just let us know on Twitter @futurestud_io or leave a comment below.
Enjoy coding & make it rock!
Still Have Questions? Get Our Retrofit Book!
All modern Android apps need to do network requests. Retrofit offers you an extremely convenient way of creating and managing network requests. From asynchronous execution on a background thread, to automatic conversion of server responses to Java objects, Retrofit does almost everything for you. Once you’ve a deep understanding of Retrofit, writing complex requests (e.g., OAuth authentication) will be done in a few minutes.
Invest time to fully understand Retrofit’s principles. It’ll pay off multiple times in the future! Our book offers you a fast and easy way to get a full overview over Retrofit. You’ll learn how to create effective REST clients on Android in every detail.
Boost your productivity and enjoy working with complex APIs.
Источник


