- Модули Android приложения
- Создание нового модуля
- 1. Design и Text
- 2. Pallete
- 3. Component Tree
- 4. Режимы представления
- 5. Экран
- 6. Свойства компонентов
- Размещение кнопки
- Обработчик события
- Подключение обработчика события
- Managing Projects from Android Studio
- In this document
- Creating an Android Project
- Step 1: Create a New Project
- Step 2: Select Form Factors and API Level
- Step 3: Add an Activity
- Step 4: Configure Your Activity
- Step 5: Develop Your App
- Creating an Android Module
- Setting up a Library Module
- Adding a dependency on a library module
- Referencing a library module
- Declaring library components in the manifest file
- Using the Android Project View
- Use the Android Project View
Модули Android приложения
Структура проекта Android может включать один или несколько различных модулей (Module). В модуле определяется интерфейс экрана и формируется код. Модуль, по сути, является приложением, а проект представляет собой контейнер для модуля/ей. При старте модуля получаем готовое Android-приложение, созданное в этом модуле. В одном проекте может быть несколько модулей, да и проектов также можно создать несколько. При старте какого-либо проекта необходимо указать запускаемый модуль.
При создании первого приложения в структуре проекта можно увидеть запись app – это и есть модуль. По умолчанию при создании нового проекта создается модуль app. Не будем его пока касаться, а будем создавать свои модули. Но удалять его тоже не следует, поскольку мастер (wizard) при создании проекта в основном касался как раз этого модуля.
В данной статье рассмотрим вопрос создания нового модуля (приложения), добавления в интерфейс приложения кнопки и подключение к ней обработчика события нажатия на кнопку.
Создание нового модуля
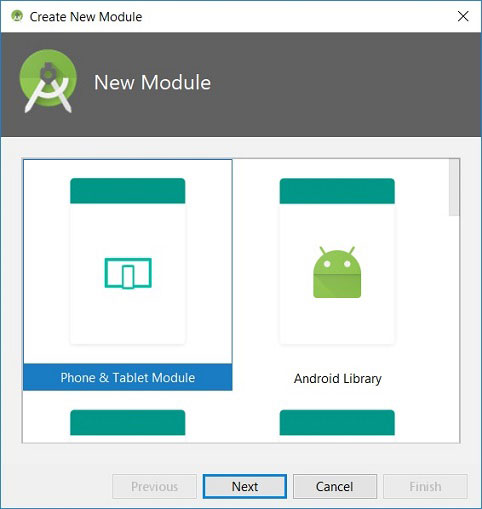
Создадим новый модуль (приложение), используя первый проект. Процедура создания модуля частично похожа на создание проекта, но с небольшими отличиями. Чтобы создать новый модуль необходимо в меню выбрать File => New => New module.
На первом шаге выбираем интерфейс приложения «Phone and Tablet Application»
На втором шаге определяем параметры модуля :
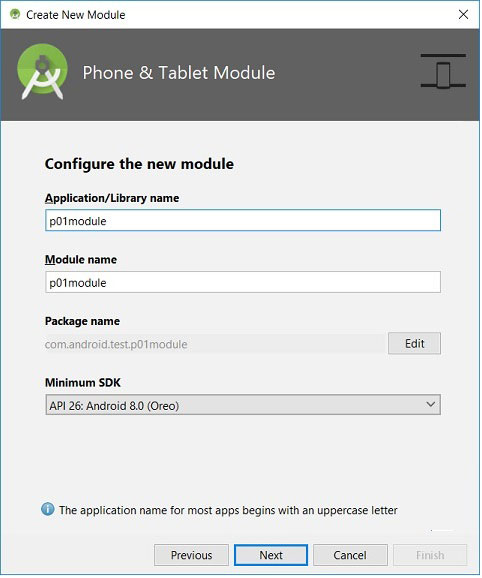
Application/Library name – это непосредственно наименование приложения, которое будет отображаться в списке приложений в смартфоне. Назовем приложение, к примеру, как p01module.
Module name – это наименование модуля. IDE Android автоматически формирует данное наименование из названия приложения, определяя символы в нижнем регистре. Наименование модуля будет отображаться в структуре проекта, там, где сейчас определен app. Можно ввести свое наименование модуля, я не стал ничего менять.
Package name – имя пакета можно отредактировать вручную, нажав кнопку «edit» справа.
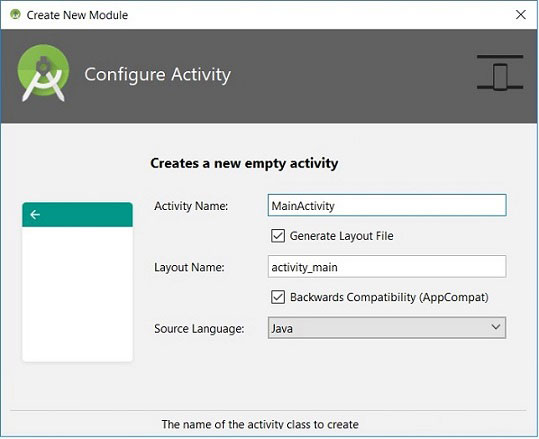
На следующем шаге (скриншот не представлен) выбираем Activity. Что такое Activity?. Это «окно». Приложение Android состоит из окон, называемых Activity. В каждый момент времени обычно отображается одно Activity, которое занимает весь экран. Приложение переключается между окнами. Окна условно можно рассматривать как страницы сайта, между которыми происходит переключение, либо окна ОС Windows. Выбираем Empty Activity и переходим к определению его параметров.
Интерфейс Activity формируется из различных компонентов, называемых View. Самые распространенные View — это кнопка, поле ввода, чекбокс и т.д. Как правило, View помещается в контейнер ViewGroup. Самым распространенным контейнером является Layout, который отвечает за расположение дочерних элементов (таблица, строка, столбец . ).
На этом шаге в компонентах окна мастера определения Activity ничего не меняем и нажимаем кнопку Finish. Через некоторое время Android Studio создаст модуль и разместит его в структуре проекта.

Содержимое модуля (приложения) в структуре проекта включает несколько папок :
- manifests — содержит конфигурационый файл приложения AndroidManifest.xml;
- java — размещает весь написанный код приложения;
- res — используется для файлов-ресурсов различного типа.
В этом модуле интерес представляет файл: res => layout => activity_main.xml . По умолчанию мастер добавил в файл компонент типа TextView, в котором, наряду с остальными параметрами, определил текстовое значение «Hello World!».
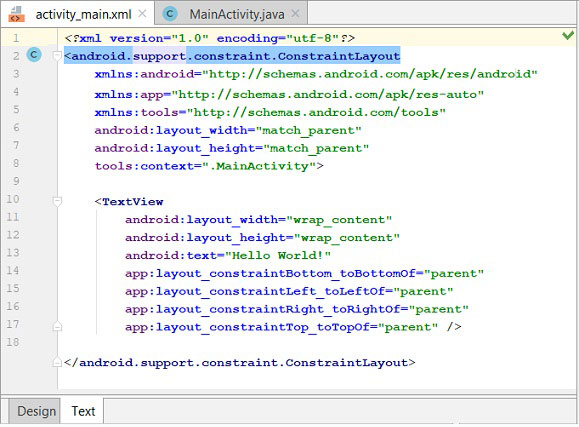
Файл activity_main.xml является макетом (шаблоном) приложения или layout-файл. Содержимое activity_main.xml включает набор и расположение View компонентов, которые должны быть отражены на экране. При запуске приложения, Activity читает этот файл и отображает его содержимое в виде компонентов. Если попытаться открыть его двойным щелчком мыши, то Android Studio откроет его в окне (след. скриншот), включающим наборы различных компонентов и панелей.
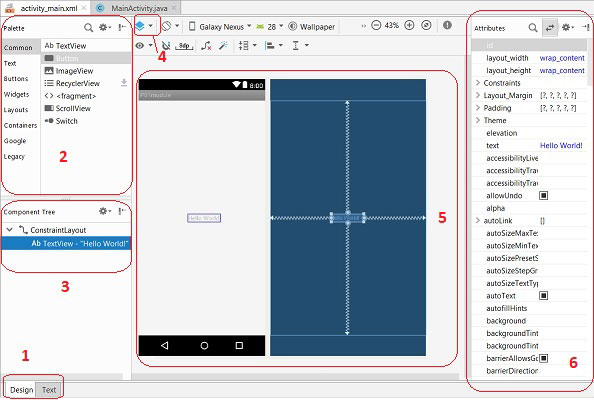
1. Design и Text
Вкладка Desing связана с графическим отображением экрана, которое представлено на скриншоте сверху. Вкладка Text — это текстовое представление файла activity_main.xml (предыдущий скриншот).
2. Pallete
В разделе палитры располагается список View компонентов, которые можно размещать в интерфейсе : кнопки, поля ввода, чекбоксы, прогресс-бары и прочее.
3. Component Tree
Дерево компонентов, определяющее иерархия View экрана. После создания модуля корневым элементом является ConstraintLayout, включающий TextView.
4. Режимы представления
На скриншоте в области 4 размещен компонент выбора экрана в виде выпадающего списка, позволяющий выбрать один из 3-х режимов представления экрана (5) :
- Design – режим представления экрана с компонентами;
- Blueprint – режим представления экрана в виде контура;
- Design + Blueprint – совмещение двух представлений.
Рядом размещается кнопка (не выделена) определения ориентации экрана : Portrait, Landscape. По умолчанию используется Portrait. Правее располагается кнопка типа смартфона, версия Android и стиль (Thema) представления.
5. Экран
Графический интерфейс экрана приложения. Здесь будут размещаться различные компоненты из области палитры 2.
6. Свойства компонентов
При выделении какого-либо компонента View (3) здесь будут отображаться его свойства. С помощью свойств можно настраивать внешний вид, расположение и содержимое компонента.
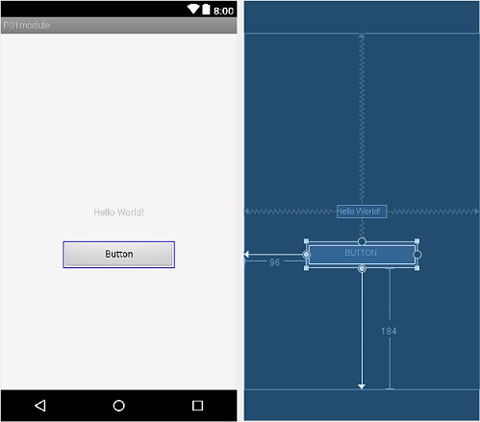
Размещение кнопки
Разместим в интерфейсе кнопку под текстовым полем, как это представлено на следующем скриншоте.
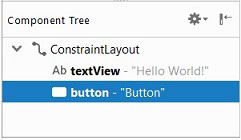
В дереве «Component Tree» появился новый компонент (View) «Button».
Обработчик события
Создадим обработчик события btnHello_Click, который по нажатию на кнопку запишет в текстовое поле строку «Здравствуй, мир». По умолчанию в тестовом поле строка «Hello World!». Обработчик события btnHello_Click определим в активности MainActivity.java :
В обработчике события btnHello_Click следует обратить внимание на первую строку, в которой определяется текстовый компонент с использованием метода findViewById. Этому методу необходимо передать идентификатор компонента. В следующей строке в компонент записывается новая текстовая строка.
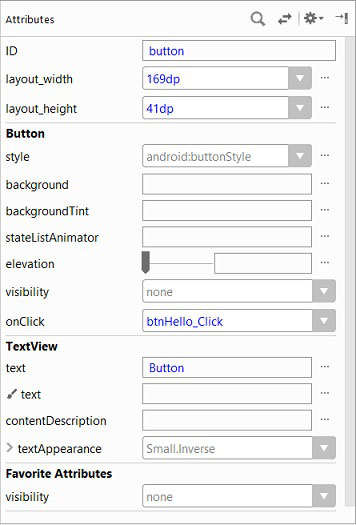
Подключение обработчика события
Подключение обработчика к событию кнопки onClick можно выполнить либо непосредственно в файле activity_main.xml, либо использовать панель атрибутов. В первом случае необходимо открыть activity_main.xml в текстовом режиме и добавить строку «android:onClick=»btnHello_Click»» в раздел описания кнопки :
Во втором случае необходимо открыть activity_main.xml в режиме Design и в поле кнопки onClick определить наименование обработчика события.
После старта приложения мы увидим наш интерфейс : в верхней части наименование модуля P01module, в центральной части строку «Hello World!», ниже которой располагается кнопка. После нажатия на кнопку текст изменится на «Здравствуй, мир».
Источник
Managing Projects from Android Studio
In this document
Android Studio provides graphical tools for creating and managing Android projects, which contain everything that define your Android apps, from app source code to build configurations and test code. Each project contains one or more different types of modules, such as application modules, library modules, and test modules.
This guide explains how to create Android projects and different modules using Android Studio. For more information about the Android project structure and module types, read Managing Projects Overview.
Creating an Android Project
Android Studio makes it easy to create Android apps for several form factors, such as phone, tablet, TV, Wear, and Google Glass. The New Project wizard lets you choose the form factors for your app and populates the project structure with everything you need to get started.
Follow the steps in this section to create a project in Android Studio.
Step 1: Create a New Project
If you didn’t have a project opened, Android Studio shows the Welcome screen. To create a new project, click New Project.
If you had a project opened, Android Studio shows the development environment. To create a new project, click File > New Project.
The next window lets you configure the name of your app, the package name, and the location of your project.

Figure 1. Choose a name for your project.
Enter the values for your project then click Next.
Step 2: Select Form Factors and API Level
The next window lets you select the form factors supported by your app, such as phone, tablet, TV, Wear, and Google Glass. The selected form factors become the application modules within the project. For each form factor, you can also select the API Level for that app. To get more information, click Help me choose.

Figure 2. Select the API Level.
The API Level window shows the distribution of mobile devices running each version of Android, as shown in figure 3. Click on an API level to see a list of features introduced in the corresponding version of Android. This helps you choose the minimum API Level that has all the features that your apps needs, so you can reach as many devices as possible. Then click OK.

Figure 3. Choose form factors for your app.
Then, on the Form Factors Window, click Next.
Step 3: Add an Activity
The next screen lets you select an activity type to add to your app, as shown in figure 4. This screen displays a different set of activities for each of the form factors you selected earlier.

Figure 4. Add an activity to your app.
Choose an activity type then click Next.
Note: If you choose «Add No Activity», click Finish to create the project.
Step 4: Configure Your Activity
The next screen lets you configure the activity to add to your app, as shown in figure 5.

Figure 5. Choose a name for your activity.
Enter the activity name, the layout name, and the activity title. Then click Finish.
Step 5: Develop Your App
Android Studio creates the default structure for your project and opens the development environment. If your app supports more than one form factor, Android Studio creates a module folder with complete source files for each of them as shown in figure 6.

Figure 6. The default project structure for a mobile app.
Now you are ready to develop your app. For more information, see the following links:
Creating an Android Module
Android application modules contain the src/main/ , AndroidManifest.xml , build.gradle , build output and other files you need to generate your app’s APK files. Android Studio provides a New Module Wizard that you can use to quickly create a new Android module (or a module from existing code) based on selected application settings, such as minimum SDK level and activity template.
To create a new module, select File > New > Module. Select the desire module type then click Next to enter the basic module settings:
- Enter an Application Name. This name is used as the title of your application launcher icon when it is installed on a device.
- Enter a Module Name. This text is used as the name of the folder where your Java-based activity files are stored.
- Enter a Package Name and Package Location. This class package namespace creates the initial package structure for your applications code files and is added as the package attribute in your application’s Android manifest file. This manifest value serves as the unique identifier for your application app when you distribute it to users. The package name must follow the same rules as packages in the Java programming language.
- Select the Minimum required SDK. This setting indicates the lowest version of the Android platform that your application supports for the selected form factor. This value sets the minSdkVersion attribute in the build.gradle file.
Note: You can manually change the minimum and target SDK for your module at any time: Double-click the module’s build.gradle in the Project Explorer, set the targetSdkVersion and targetSdkVersion in the defaultConfig section.
The wizard creates a new Android application module according to the options you have chosen.
Setting up a Library Module
A library module is a standard Android module, so you can create a new one in the same way as you would a new application module, using the New Module wizard and selecting Android Library as the module type. The created library module will appear in your project view along with the other modules.
You can easily change an existing application module to a library module by changing the plugin assignment in the build.gradle file to com.android.library.
Adding a dependency on a library module
The library dependency can be declared in the module’s manifest file or in the GameActivity :
To add the dependency declaration to the build file, edit the build file for the app module ( app/build.gradle ) and add a dependency on the lib module:
In this example, the lib module can still be built and tested independently, and the build system creates an AAR package for it that you could reuse in other projects.
Note: The library settings in the app/build.gradle file will override any shared library resources declared in the manifest file.
Referencing a library module
If you are developing an application and want to include the shared code or resources from a library module, you can also do so easily by adding a reference to the library module in the module’s dependency page.
To add a reference to a library module, follow these steps:
- Make sure that both the module library and the application module that depends on it are in your project. If one of the modules is missing, import it into your project.
- In the project view, right-click the dependent module and select Open >Module Settings.
- Right-click the plus icon to add a new dependencies.
If you are adding references to multiple libraries, you can set their relative priority (and merge order) by selecting a library and using the Up and Down controls. The tools merge the referenced libraries with your application starting from lowest priority (bottom of the list) to highest (top of the list). If more than one library defines the same resource ID, the tools select the resource from the library with higher priority. The application itself has highest priority and its resources are always used in preference to identical resource IDs defined in libraries.
Android Studio rebuilds the module, including the contents of the library module the next time the project or module is built.
Declaring library components in the manifest file
In the manifest file of the application module, you must add declarations of all components that the application will use that are imported from a library module. For example, you must declare any , , ,
, and so on, as well as
, , and similar elements.
Declarations should reference the library components by their fully-qualified package names, where appropriate.
For example, the TicTacToeMain example application declares the library activity GameActivity like this:
For more information about the manifest file, see the documentation for AndroidManifest.xml.
Using the Android Project View
The Android project view in Android Studio shows a flattened version of your project’s structure that provides quick access to the key source files of Android projects and helps you work with the new Gradle-based build system. The Android project view:
- Groups the build files for all modules at the top level of the project hierarchy.
- Shows the most important source directories at the top level of the module hierarchy.
- Groups all the manifest files for each module.
- Shows resource files from all Gradle source sets.
- Groups resource files for different locales, orientations, and screen types in a single group per resource type.
Use the Android Project View
The Android project view is enabled by default and shows all the build files at the top level of the project hierarchy under Gradle Scripts. The project module appears as a folder at the top level of the project hierarchy and contains these three elements at the top level:
- manifests/ — Manifest files for the module.
- java/ — Source files for the module.
- res/ — Resource files for the module.
Notice how the Android project view groups all instances of the ic_launcher.png resource for different screen densities under the same element.
Note: The Android project view shows a hierarchy that helps you work with Android projects by providing a flattened structure that highlights the most commonly used files while developing Android applications. However, the project structure on disk differs from this representation and maintains the traditional project structure.


Figure 10: Android and Traditional project view
Источник


