- Полный список
- Прочее
- Работаем с GPS в Android на Java
- Create a GPS tracking application with Firebase Realtime Database
- Create a new Firebase project
- Connect your app to Firebase
- Getting access to the location
- Make sure the user knows they’re being tracked!
- Start tracking the device’s location
- Create a location-tracking service
- Testing the application
- Reading the Firebase Realtime data
Полный список
— получаем данные о местоположении
Android устройства могут предоставить нам данные по нашему текущему местоположению. Это, конечно, очень удобно и вовсю используется для, например, пользования картой, получения актуальной для вашей местности информации (прогноз погоды), всевозможных чекинов и пр.
Реализация этого всего вполне проста. Мы вешаем слушателя на провайдера и получаем данные. На данный момент есть два провайдера: GPS и Network.
GPS – тут все понятно, это данные с GPS-спутников.
Network – это координаты, которые можно получить через сотовую связь или WiFi. Для этого провайдера нужен инет.
Напишем простое приложение, которое будет запрашивать и отображать координаты.
Project name: P1381_Location
Build Target: Android 2.3.3
Application name: Location
Package name: ru.startandroid.develop.p1381location
Create Activity: MainActivity
В strings.xml добавим строки:
Несколько TextView, в которые мы будем выводить данные, и кнопка для открытия настроек местоположения.
В onCreate определяем TextView-компоненты и получаем LocationManager, через который и будем работать.
В onResume вешаем слушателя с помощью метода requestLocationUpdates. На вход передаем:
— тип провайдера: GPS_PROVIDER или NETWORK_PROVIDER
— минимальное время (в миллисекундах) между получением данных. Я укажу здесь 10 секунд, мне этого вполне хватит. Если хотите получать координаты без задержек – передавайте 0. Но учитывайте, что это только минимальное время. Реальное ожидание может быть дольше.
— минимальное расстояние (в метрах). Т.е. если ваше местоположение изменилось на указанное кол-во метров, то вам придут новые координаты.
— слушатель, объект locationListener, который рассмотрим ниже
Также здесь обновляем на экране инфу о включенности провайдеров.
В onPause отключаем слушателя методом removeUpdates.
locationListener – слушатель, реализует интерфейс LocationListener с методами:
onLocationChanged – новые данные о местоположении, объект Location. Здесь мы вызываем свой метод showLocation, который на экране отобразит данные о местоположении.
onProviderDisabled – указанный провайдер был отключен юзером. В этом методе вызываем свой метод checkEnabled, который на экране обновит текущие статусы провайдеров.
onProviderEnabled – указанный провайдер был включен юзером. Тут также вызываем checkEnabled. Далее методом getLastKnownLocation (он может вернуть null) запрашиваем последнее доступное местоположение от включенного провайдера и отображаем его. Оно может быть вполне актуальным, если вы до этого использовали какое-либо приложение с определением местоположения.
onStatusChanged – изменился статус указанного провайдера. В поле status могут быть значения OUT_OF_SERVICE (данные будут недоступны долгое время), TEMPORARILY_UNAVAILABLE (данные временно недоступны), AVAILABLE (все ок, данные доступны). В этом методе мы просто выводим новый статус на экран.
Провайдеры включаются и отключаются в настройках системы. Тем самым, просто определяется доступен ли провайдер для получения от него координат. Чуть позже увидим, как можно отправить юзера в эти настройки. Программное включение/выключение провайдеров через стандартные методы недоступно.
Далее идут свои методы.
showLocation на вход берет Location, определяет его провайдера методом getProvider и отображает координаты в соответствующем текстовом поле.
formatLocation на вход берет Location, читает из него данные и форматирует из них строку. Какие данные он берет: getLatitude – широта, getLongitude – долгота, getTime – время определения.
checkEnabled определяет включены или выключены провайдеры методом isProviderEnabled и отображает эту инфу на экране.
Метод onClickLocationSettings срабатывает по нажатию кнопки Location settings и открывает настройки, чтобы пользователь мог включить или выключить провайдер. Для этого используется Intent с action = ACTION_LOCATION_SOURCE_SETTINGS.
Осталось в манифесте прописать разрешение на определение координат — ACCESS_FINE_LOCATION, которое позволит нам использовать и Network и GPS. Также существует разрешение ACCESS_COARSE_LOCATION, но оно дает доступ только к Network-провайдеру.
С кодом все, давайте смотреть, что получилось. Все сохраняем и запускаем приложение.
У меня на планшете сейчас выключен GPS, выключен WiFi, вставлена симка и выключен мобильный интернет.
Запускаю приложение и вижу такую картину:
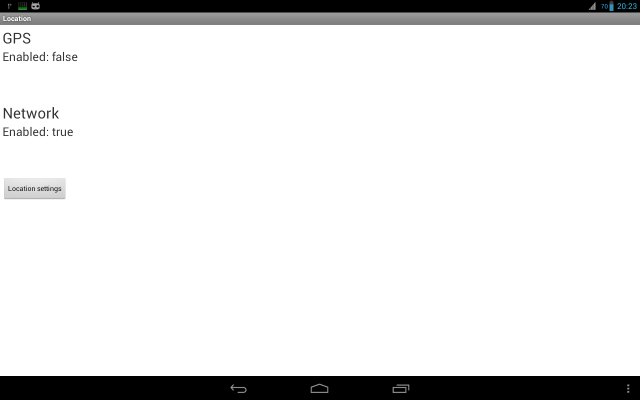
GPS выключен, Network включен. Но инета нет, поэтому Network мне ничего не дает. Надо включить либо мобильный инет, либо WiFi.
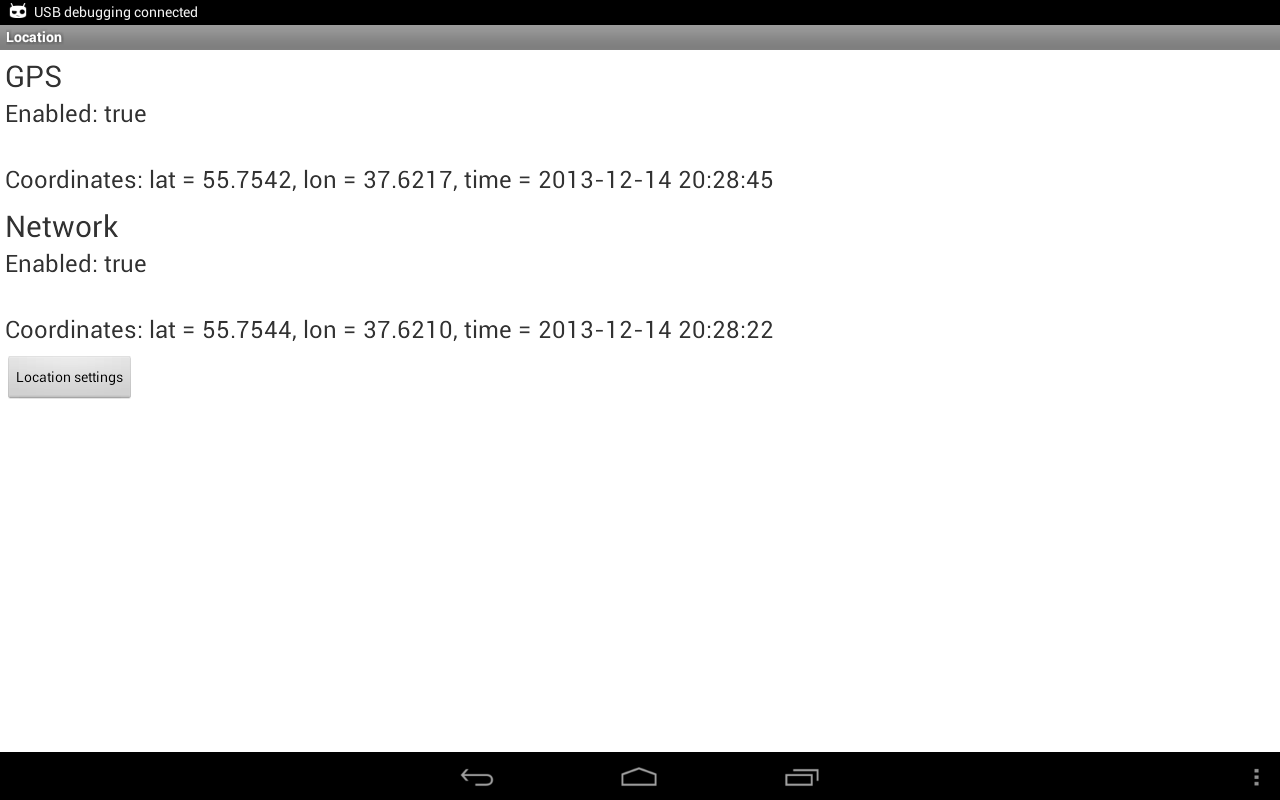
Я включаю WiFi. Проходит секунд 15-20 и инфа с Network пошла

Видим широту, долготу и время.
Напомню, что мы ставили минимальную скорость обновления – 10 сек. Но у меня провайдер Network выдает данные не чаще, чем раз в минуту.
Теперь давайте включим GPS. Для этого мы специально повесили кнопку Location settings, которую надо будет нажать пользователю, чтобы перейти в настройки. Жмем кнопку.
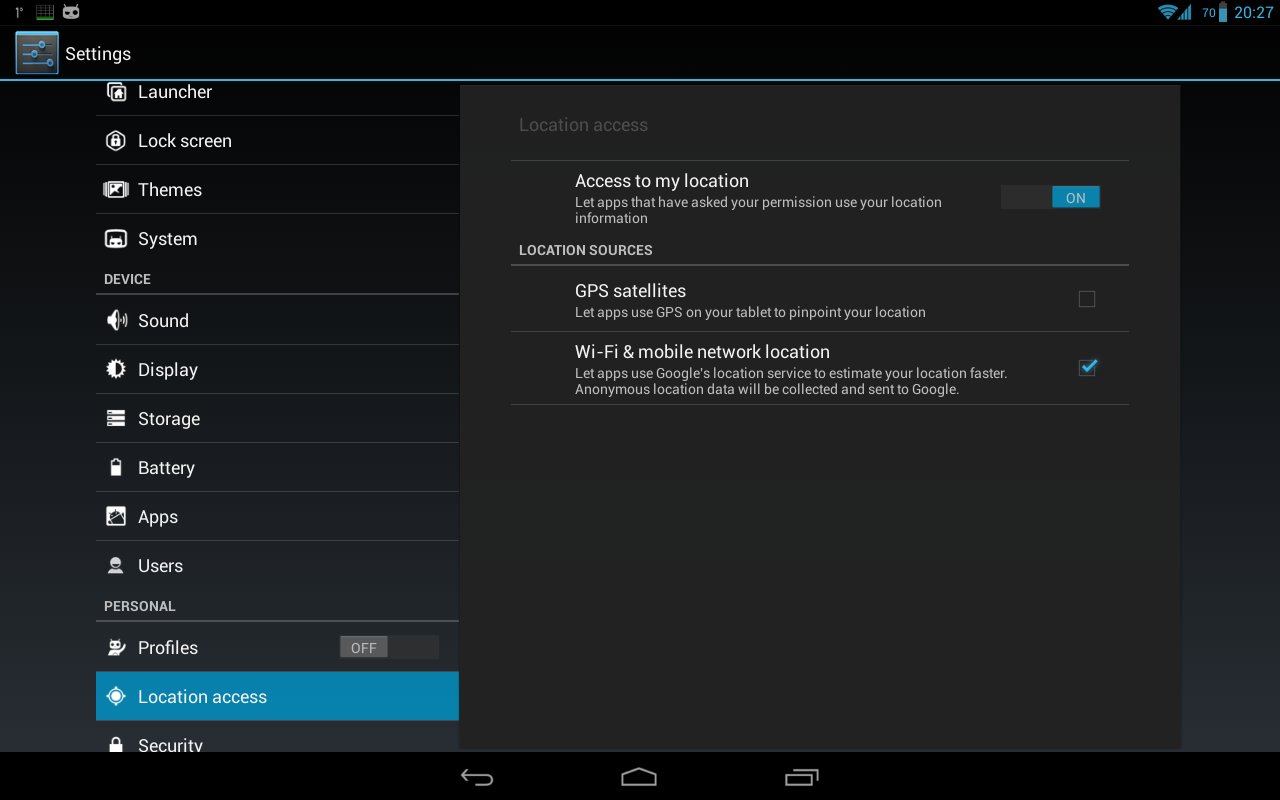
Видим, что GPS выключен, а Network включен. Наше приложение показывало все верно.
Разумеется, GPS можно включать и выключать через быстрые настройки системы (справа сверху). Но не все пользователи об этом знают. А тут мы их точно направим.
Включаем GPS и жмем Назад, чтобы вернуться в приложение.

GPS теперь показывает что он включен, ждем координаты. Для этого имеет смысл подойти к окну, больше вероятности, что поймаем сигнал.
В итоге сигнал пойман и получен результат.
У GPS через какое-то время включился статус 2 (AVAILABLE).
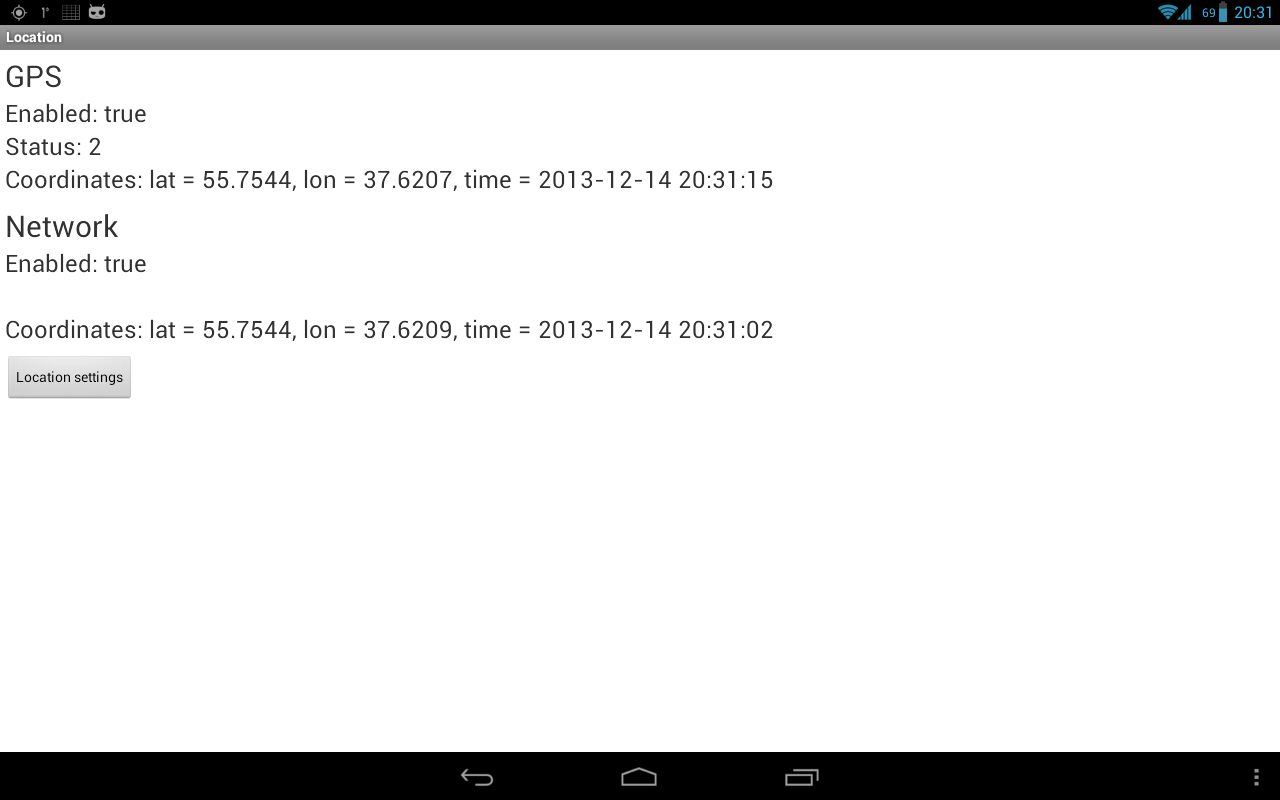
А у Network тишина со статусом. Не знаю, нормально это или нет.
Если с GPS сигналом все ок, то каждые 10 сек вы будете получать инфу о вашем местоположении. Если убрать планшет от окна, получим плохой сигнал: данные могут приходить реже и статус у меня иногда меняется на 1 (TEMPORARILY_UNAVAILABLE).
Прочее
Есть еще третий тип провайдера — PASSIVE_PROVIDER. Сам по себе этот провайдер никакие данные не вернет. Но повесив на него слушателя, вы сможете получать данные о местоположении, когда кто-то еще в системе пытается определить местоположение через обычные провайдеры. Система будет дублировать результаты и вам.
Метод getAllProviders вернет вам список всех доступных провайдеров. Метод getProviders(boolean enabledOnly) вернет либо все, либо только включенные.
Объект Location кроме координат, времени и провайдера имеет еще несколько атрибутов, которые могут прийти и пустыми:
getAccuracy – точность показания в метрах
getAltitude – высота над уровнем моря в метрах
getSpeed – скорость движения в м/с
getBearing – насколько я понял, это угол, на который текущая траектория движения отклоняется от траектории на север. Он же азимут.
Местоположение можно протестировать и через AVD эмулятор. Для этого надо в Eclipse открыть DDMS (Window > Open Perspective > DDMS) и выбрать вкладку Emulator Control. Внизу будет вкладка Manual, на которой есть поля для ввода координат и кнопка отправки.
На следующем уроке:
— создаем приложение с картой
— настраиваем карту и обрабатываем ее события
— программно меняем положение камеры
Присоединяйтесь к нам в Telegram:
— в канале StartAndroid публикуются ссылки на новые статьи с сайта startandroid.ru и интересные материалы с хабра, medium.com и т.п.
— в чатах решаем возникающие вопросы и проблемы по различным темам: Android, Kotlin, RxJava, Dagger, Тестирование
— ну и если просто хочется поговорить с коллегами по разработке, то есть чат Флудильня
— новый чат Performance для обсуждения проблем производительности и для ваших пожеланий по содержанию курса по этой теме
Источник
Работаем с GPS в Android на Java
Мобильные устройства часто используются для решения различных задач связанных с определением географических координат. Транспорт, строительство, путешественники, так или иначе, нуждаются в определении своего местоположения или других объектов.
На сегодняшний день самым простым решением для этого является использование портативных приёмников спутниковых навигационных систем, в частности встраиваемых в устройства на базе Android. При этом наиболее распространёнными являются устройства с поддержкой системы GPS.
В Android SDK весь функционал по работе с навигационными системами объединён в пакет android.location. Ключевые компоненты данного пакета:
- LocationManager – (класс) обеспечивает доступ к системной службе определения местоположения Android;
- LocationListener — (интерфейс) регламентирует обработку приложение событий службы определения местоположения Android;
- Location – (класс) представляет географические координаты полученные от навигационной системы.
Подготовка к работе
При написании Android приложения работающего с навигационными системами на Java с помощью Android SDK вначале необходимо выполнить ряд подготовительных операций.
Это связано с тем, что в отличие от Delphi, здесь отсутствуют какие-либо разрешения, предоставляемые по умолчанию и нет готовых компонентов, которые полностью брали бы на себя всю работу по взаимодействию с GPS приёмником.
Все необходимые действия потребуется выполнить самостоятельно.
Первым делом предоставляем приложению необходимые разрешения в файле манифеста.
Далее создаём в коде приложения объект LocationListener для обработки событий службы определения местоположения Android.
Назначение его методов – обработка соответствующих событий. Конкретно:
- onLocationChanged – изменение местоположения. Именно он используется для определения текущих географических координат;
- onStatusChanged – изменение состояния поставщика данных о местоположении. В частности приёмника GPS;
- onProviderEnabled – получение доступа к поставщику данных о местоположении;
- onProviderDisabled – потеря доступа к поставщику данных о местоположении.
В завершение зарегистрируем созданный нами объект LocationListener для работы с приёмником GPS.
Для этого создаём экземпляр класса LocationManager.
И выполняем регистрацию при помощи метода requestLocationUpdates.
Перед вызовом метода requestLocationUpdates обязательно необходимо проверить наличие соответствующих разрешений (оператор if). Если они отсутствуют перед оператором return можно выполнить некоторые действия. Например, записать сообщение об ошибке в журнал. Однако в любом случае при отсутствии необходимых разрешений работа с навигационной системой должна быть завершена до регистрации объекта LocationListener.
Метод requestLocationUpdates имеет несколько перегрузок. Наиболее часто используемая из них принимает четыре параметра. Именно она использована в примере выше.
- Поставщик данных о местоположении.
В данном примере используется GPS; - Минимальный интервал обновления данных о местоположения в миллисекундах.
Значение «0» соответствует использованию минимально возможного интервала времени для данного устройства; - Минимальное расстояние для обновления данных о местоположении в метрах.
Значение «0» соответствует использованию минимально возможного расстояния для данного устройства; - Регистрируемый объект LocationListener.
После регистрации приложение сможет получать информацию о местоположении устройства по мере его изменения.
Если необходимо получить её единовременно, необходимо вместо метода requestLocationUpdates использовать метод requestSingleUpdate, который также имеет несколько перегрузок.
Наиболее востребованная из них принимает три параметра:
- Поставщик данных о местоположении.
В данном примере используется GPS; - Регистрируемый объект LocationListener;
- Объект, реализующий обратный вызов.
Необязательный параметр.
Пример использования метода requestSingleUpdate:
Источник
Create a GPS tracking application with Firebase Realtime Database
![]()
There are many different ways that you can use location data in your Android apps. Previously, we’ve seen how you can display the user’s location on a Google Map; reverse geocode coordinates into a street address; and how to combine location data with the Places API.
All of these examples have one thing in common: the location data only ever exists locally on the user’s device. In this tutorial I’m going to show you how to record the device’s location to Firebase Realtime Database, so you can view this information remotely.
While an app that essentially acts as a GPS tracker may sound invasive, this functionality forms the basis of lots of different applications, including social apps such as Find My Friends, and safety-focused applications like Family GPS tracker. The ability to view a device’s location remotely is also essential for any app that helps reunite owners with their lost or stolen device.
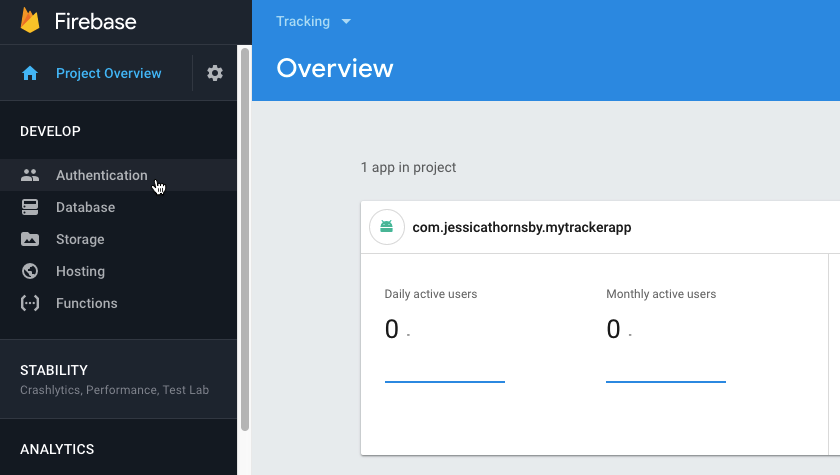
By the end of this tutorial, you’ll have created a simple app that monitors the device’s location and then records this information to a Firebase Realtime Database. Since Firebase Realtime Database receives data in, well, realtime, you’ll be able to view the device’s exact coordinates at any time, simply by logging into the Firebase Console.
Create a new Firebase project
The Firebase Realtime Database is a NoSQL, cloud-hosted database that uses data synchronization to automatically receive new information in realtime from every connected client, without requiring you to setup your own application server.
Since Realtime Database is a Firebase service, the first step is creating a connection between our project and the Firebase Console. I’m also going to register a user account in the Firebase Console, which we’ll eventually use to test our project.
- Head over to the Firebase console and select “Add project.”
- Give your project a name and then click “Create Project,” followed by “Continue.”
- Select “Authentication” from the left-hand menu.
- Select “Set up sign-in method.”
- Choose “Email/password” and then push the slider into the “On” position. Click “Save.”
- Select the “Users” tab and then click “Add User.”
- Enter the email and password for the test user; I’m opting for test@test.com and testpassword.
- Click “Add User.”
Connect your app to Firebase
Next, you need to connect this project to your application, and add support for both Firebase Realtime Database and Firebase Authentication.
- Create a new Android project and then open the Firebase Assistant, by selecting Tools > Firebase from the Android Studio toolbar.
- In the Firebase Assistant, expand the “Authentication” section and then select “Email and password authentication.”

- Select “Connect to Firebase.”
- In the subsequent dialog, select “Choose an existing Firebase or Google project.”
- Select the project that you just created, and then click “Connect to Firebase.”
- Click “Add Firebase Authentication to your app.”
- Check the subsequent popup, and if you’re happy to proceed then click “Accept Changes.”
- Once the Firebase Assistant is displaying the “Dependencies set up correctly” message, exit this part of the Assistant by clicking the little backwards-arrow in its upper-left corner.
- Expand the “Realtime Database” section, and then select the “Save and retrieve data” link.
- Select “Add the Realtime Database to your app.”
- Check the changes that Android Studio is about to make to your project, and then click “Accept Changes.”
- Even though Android Studio should have added Firebase support to your project successfully, it’s still worth opening the build.gradle file and checking that it’s added the latest versions of firebase-auth and firebase-database. Update to a newer version of these libraries, if available.
- Add play-services-location as a project dependency. Your project’s “dependencies” section should now look something like this:
Getting access to the location
Since our app is going to access the device’s location and then send this information to a remote database, it needs the location and internet permissions, so add the following to the Manifest:
Make sure the user knows they’re being tracked!
Every app that uses location data needs to request either the ACCESS_COARSE_LOCATION or the ACCESS_FINE_LOCATION permission. However, when an app is capable of tracking the user and sharing this information outside of the device, simply issuing a permission request isn’t enough. Your app should provide a visual indication the entire time it’s recording and sharing this potentially sensitive information, and the user must be able to suspend tracking at any time.
I’m going to create a persistent notification that’ll be onscreen the entire time this application is recording the device’s location. The user can suspend tracking by tapping this notification — which will be the only way of dismissing the notification.
Let’s create the icon and text that we’ll use in this notification. The easiest way to add notification icons to your project, is via Android Studio’s built-in Asset Studio:
- Control-click your project’s “res/drawable” folder and then select New > Image Asset.
- Open the “Icon Type” dropdown and then select “Notification Icons.”
- Click the little button that appears alongside the “Clip Art” label.
- Choose the icon you want to use; I’m opting for “My Location.” Click “OK.”
- Name this icon “tracking_enabled,” and then click “Next.”
- Check the information on the subsequent screen, and then click “Finish.”
Next, open the strings.xml file and create the notification text. While the strings.xml file is open, I’m also adding a firebase_path label that’ll appear alongside the data in Firebase, plus the email and password for the test user we registered in the Firebase Console. While it’s never a good idea to store usernames and passwords as plain text in production apps, in this instance it’ll make our project easier to test.
Start tracking the device’s location
We’ll perform most of the heavy lifting in a separate location tracking service, but there’s still a few things we need to do in MainActivity:
- Request access to the device’s location. In Android 6.0 and higher, applications need to request permissions at runtime, and the user can revoke previously-granted permissions at any point. MainActivity will need to check whether it currently has access to the user’s location, every single time it’s launched.
- Start location tracking. The MainActivity should check whether location tracking is enabled, and then start the location tracking service if necessary.
- Display a toast. Any app that tracks the user’s location has the potential to feel invasive, so you need to make it very clear when your app is gathering this information. In addition to the persistent notification, MainActivity should display a toast when location tracking is first enabled.
- Exit the app. Once MainActivity has started the location tracking service, its work is done. Rather than waiting for the user to close the application, MainActivity should take the initiative and shut itself down automatically.
Create a location-tracking service
We now need to create the service that’s responsible for sending the device’s location to Firebase. I’m also going to create the persistent notification that’ll provide that all-important visual reminder that the user is currently being tracked.
Create a new service, by selecting File > New > Service > Service from the Android Studio toolbar. Name the service “TrackingService,” and then add the following:
Testing the application
When testing any application that uses location data, it can help to spoof your location.
With our tracking app, just walking around your home or office won’t dramatically alter the longitude and latitude coordinates, which can make it difficult to spot whether the information in Firebase really is changing. By spoofing your location, you can send dramatically different coordinates to Firebase, so you don’t have to scour long strings of numbers, looking for a single digit that might have changed.
If you’re testing your app on a physical Android smartphone or tablet, then the easiest way to spoof your location is by installing a third party app, such as Fake GPS Location.
If you’re using Android Virtual Device (AVD) then you already have everything you need to fake a location:
- Select “More” from the strip of buttons that appears alongside the emulator window (where the cursor is positioned in the following screenshot).


- Select “Location” from the left-hand menu.
- Enter your new coordinates into the “Longitude” and “Latitude” fields, and then click “Send.” The emulator will now use these new coordinates.
To check that your app is recording the device’s location to Firebase:
- Install the project on your Android device.
- When prompted, grant the app access to your location. You should see a toast, informing you that GPS tracking is now enabled.
- Open the notification drawer, and check that the persistent notification has been created.
- In your web browser, head over to the Firebase Console and open the project that’s linked to your tracking app.
- In the left-hand menu, select “Database.”
- Select the “Data” tab, and you should see that location data is now appearing in the Firebase Console.

Reading the Firebase Realtime data
Firebase presents its data as JSON objects, which are sets of attribute-value pairs. These pairs can be numbers, strings, true/false Booleans, arrays of zero or more values, collections of name-value pairs, and nulls, so all the following are valid JSON data types:
accuracy : 1.6430000066757202
complete: true
bearing: 0
provider: “fused”
The JSON tree contains lots of data, but the easiest way to check that Firebase is recording data correctly, is to copy/paste the longitude and longitude values into Google Maps. If this data is correct, then it should return your current location, or the location you’re currently spoofing.
We’re sending location data to Firebase using the setValue() method, which replaces the previous data entry. This means that Firebase Realtime Database will only ever contain the user’s last known location. You can even see new data replacing the old data, if you have the Firebase database open in your web browser while spoofing different locations on your Android device.
When working with Firebase in your own projects, you may sometimes want to record more than a single piece of data. You can add data to Firebase without replacing the previous values, by using any of the following methods instead of setValue():
- setRawJsonValueAsync(). Replaces data with raw JSON.
- push(). Adds a new child to a list of data. Each time you call push(), Firebase generates a unique key based on a timestamp, so even if multiple clients add children to the same location at the same time, it won’t cause a write conflict.
- updateChildAsync(). Writes data to the specified location, without writing over other child nodes. By specifying different paths, you can perform simultaneous updates in multiple areas of the JSON tree, with a single call to UpdateChildrenAsync().
- runTransaction(). You should use this method if you need to update complex data that could become corrupted by concurrent updates.
If you do store multiple sets of child data within your JSON tree, then you should carefully structure your database to make sure it doesn’t get too complex.
In addition, when using the Firebase Realtime Database in your own projects, you may want to setup some Database Security Rules, which define how your data should be structured, indexed, and when your data can be read and written to. You can also use rules to specify who has access to your Firebase database, although Firebase already restricts access to authenticated users by default.
You can view your Database Security Rules, by selecting the “Rules” tab in the Firebase Console.
Источник


