- Android — PHP/MYSQL
- PHP — MYSQL
- Creating Database
- Creating Tables
- Inserting Values in tables
- PHP — GET and POST methods
- Android — Connecting MYSQL
- Connecting Via Get Method
- Connecting Via Post Method
- Example
- PHP — MYSQL part
- Android Part
- Android Server Login And Registration With PHP MySQL in Android Studio
- How to create android user registration app including same email exists condition with User Login and insert User Name, Email, Password on dynamic online server in android studio tutorial with all the source code.
- Project File Description :
- Contents in this project Android Server Login And Registration With PHP MySQL :
- 1. Watch live demo :
- 2. Create database including table on your hosting server :
- 3. Create PHP script to receive and insert registration and login details into MySQL database :
- 5. Add internet permission :
- 6. Start Coding for project Android Server Login & Register :
- Android — PHP / MYSQL
- PHP — MYSQL
- Создание базы данных
- Создание таблиц
- Вставка значений в таблицы
- PHP — методы GET и POST
- Android — Подключение MYSQL
- Подключение через метод Get
- Подключение через почтовый метод
- пример
- PHP — часть MYSQL
- Android часть
Android — PHP/MYSQL
In this chapter , we are going to explain, how you can integrate PHP and MYSQL with your android application. This is very useful in case you have a webserver, and you want to access its data on your android application.
MYSQL is used as a database at the webserver and PHP is used to fetch data from the database. Our application will communicate with the PHP page with necessary parameters and PHP will contact MYSQL database and will fetch the result and return the results to us.
PHP — MYSQL
Creating Database
MYSQL database can be created easily using this simple script. The CREATE DATABASE statement creates the database.
Creating Tables
Once database is created, its time to create some tables in the database. The CREATE TABLE statement creates the database.
Inserting Values in tables
When the database and tables are created. Now its time to insert some data into the tables. The Insert Into statement creates the database.
PHP — GET and POST methods
PHP is also used to fetch the record from the mysql database once it is created. In order to fetch record some information must be passed to PHP page regarding what record to be fetched.
The first method to pass information is through GET method in which $_GET command is used. The variables are passed in the url and the record is fetched. Its syntax is given below −
The second method is to use POST method. The only change in the above script is to replace $_GET with $_POST. In Post method, the variables are not passed through URL.
Android — Connecting MYSQL
Connecting Via Get Method
There are two ways to connect to MYSQL via PHP page. The first one is called Get method. We will use HttpGet and HttpClient class to connect. Their syntax is given below −
After that you need to call execute method of HttpClient class and receive it in a HttpResponse object. After that you need to open streams to receive the data.
Connecting Via Post Method
In the Post method, the URLEncoder,URLConnection class will be used. The urlencoder will encode the information of the passing variables. It’s syntax is given below −
The last thing you need to do is to write this data to the link. After writing, you need to open stream to receive the responded data.
Example
The below example is a complete example of connecting your android application with MYSQL database via PHP page. It creates a basic application that allows you to login using GET and POST method.
PHP — MYSQL part
In this example a database with the name of temp has been created at 000webhost.com. In that database, a table has been created with the name of table1. This table has three fields. (Username, Password, Role). The table has only one record which is («admin»,»admin»,»administrator»).
The php page has been given below which takes parameters by post method.
Android Part
To experiment with this example , you need to run this on an actual device on which wifi internet is connected.
| Steps | Description |
|---|---|
| 1 | You will use Android studio IDE to create an Android application and name it as PHPMYSQL under a package com.example.phpmysql. |
| 2 | Modify src/MainActivity.java file to add Activity code. |
| 3 | Create src/SiginActivity.java file to add PHPMYSQL code. |
| 4 | Modify layout XML file res/layout/activity_main.xml add any GUI component if required. |
| 5 | Modify res/values/string.xml file and add necessary string components. |
| 6 | Modify AndroidManifest.xml to add necessary permissions. |
| 7 | Run the application and choose a running android device and install the application on it and verify the results. |
Here is the content of src/com.example.phpmysql/MainActivity.java.
Here is the content of src/com.example.phpmysql/SigninActivity.java.
Add the following content to build.gradle and rebuild the whole project.
Here is the content of activity_main.xml.
Here is the content of Strings.xml.
Here is the content of AndroidManifest.xml.
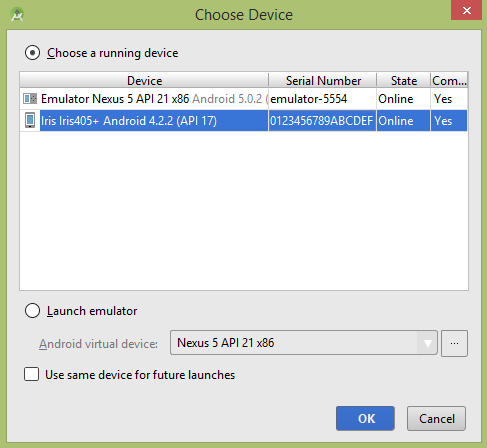
Let’s try to run your PHPMYSQL application. I assume you have connected your actual Android Mobile device with your computer. To run the app from Android studio, open one of your project’s activity files and click Run  icon from the tool bar. Before starting your application, Android studio will display following window to select an option where you want to run your Android application.

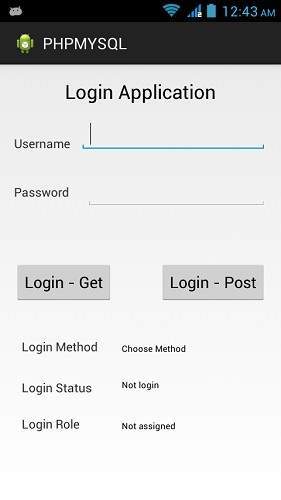
Select your mobile device as an option and then check your mobile device which will display following screen −
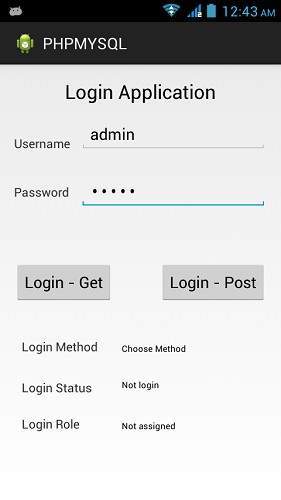
Now just type in your username and password. In my case i am typing admin as username and password. It is shown in the figure −

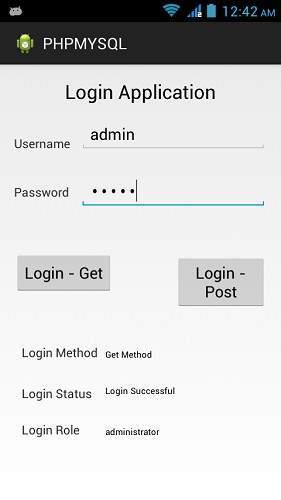
Now press the Get button and wait a few seconds and response will be downloaded and will be shown to you. In this case, the response is the ROLE that is fetched in case of admin as username and password.It is shown in the figure below −

Now again press the POST button and same result would appear. It is shown in the figure below −
Источник
Android Server Login And Registration With PHP MySQL in Android Studio
How to create android user registration app including same email exists condition with User Login and insert User Name, Email, Password on dynamic online server in android studio tutorial with all the source code.
Project Description : In this tutorial we would going to create an android application with three different activities performs the task of User Registration where application user insert their First Name, Last Name, Email and Password. All that details would store – insert directly into MySQL database present on online hosting server. The technology to insert All the data on server including receiving and inserting data is performed using PHP language. After register user would goto login screen where he put its Email and Password to login into application. After successfully login user would redirect to the User Profile Dashboard screen. So here is the complete step by step tutorial for Android Server Login And Registration With PHP MySQL.
Main features in this project :
- User Registration Form Including same email exist condition so duplicate email user would not register again.
Project File Description :
Activity Files in this project:
- MainActivity.java
- UserLoginActivity.java
- DashboardActivity.java
Java files in this project :
Layout files in this project :
- activity_main.xml
- activity_user_login.xml
- activity_dashboard.xml
PHP files in this project :
- DatabaseConfig.php
- UserRegistration.php
- UserLogin.php
Contents in this project Android Server Login And Registration With PHP MySQL :
- Watch Live Demo Video.
- Create database including table on your hosting server.
- Create PHP script to receive and insert registration and login details into MySQL database.
- Start a new android application project.
- Add internet permission.
- Start Coding.
1. Watch live demo :
2. Create database including table on your hosting server :
Next step is to create a database on your online server and inside that database create a fresh table which will used to insert User registration details like i did in below screenshot.

3. Create PHP script to receive and insert registration and login details into MySQL database :
Code for DatabaseConfig.php file.
Code for UserRegistration.php file.
Code for UserLogin.php file.
4. Start a new android application project .
5. Add internet permission :
Open your Project’s AndroidManifest.xml file and add below internet permission.
6. Start Coding for project Android Server Login & Register :
Источник
Android — PHP / MYSQL
В этой главе мы собираемся объяснить, как вы можете интегрировать PHP и MYSQL с вашим Android-приложением. Это очень полезно, если у вас есть веб-сервер, и вы хотите получить доступ к его данным в приложении для Android.
MYSQL используется в качестве базы данных на веб-сервере, а PHP используется для извлечения данных из базы данных. Наше приложение свяжется со страницей PHP с необходимыми параметрами, а PHP свяжется с базой данных MYSQL, получит результат и вернет его нам.
PHP — MYSQL
Создание базы данных
База данных MYSQL может быть легко создана с помощью этого простого скрипта. Оператор CREATE DATABASE создает базу данных.
Создание таблиц
Как только база данных создана, пришло время создать несколько таблиц в базе данных. Оператор CREATE TABLE создает базу данных.
Вставка значений в таблицы
Когда база данных и таблицы созданы. Теперь пришло время вставить некоторые данные в таблицы. Оператор Insert Into создает базу данных.
PHP — методы GET и POST
PHP также используется для извлечения записи из базы данных mysql после ее создания. Чтобы получить запись, на страницу PHP необходимо передать некоторую информацию о том, какую запись нужно извлечь.
Первый способ передачи информации — это метод GET, в котором используется команда $ _GET . Переменные передаются в URL, и запись извлекается. Его синтаксис приведен ниже —
Второй метод заключается в использовании метода POST. Единственное изменение в приведенном выше сценарии — заменить $ _GET на $ _POST . В методе Post переменные не передаются через URL.
Android — Подключение MYSQL
Подключение через метод Get
Существует два способа подключения к MYSQL через страницу PHP. Первый называется методом Get . Мы будем использовать классы HttpGet и HttpClient для подключения. Их синтаксис приведен ниже —
После этого вам нужно вызвать метод execute класса HttpClient и получить его в объекте HttpResponse. После этого вам нужно открыть потоки для получения данных.
Подключение через почтовый метод
В методе Post будет использоваться URLEncoder , класс URLConnection . Urlencoder закодирует информацию о передаваемых переменных. Это синтаксис приведен ниже —
Последнее, что вам нужно сделать, это записать эти данные по ссылке. После записи вам необходимо открыть поток, чтобы получить ответные данные.
пример
Приведенный ниже пример является полным примером подключения вашего приложения для Android к базе данных MYSQL через страницу PHP. Он создает базовое приложение, которое позволяет войти в систему, используя метод GET и POST.
PHP — часть MYSQL
В этом примере база данных с именем temp была создана на 000webhost.com. В этой базе данных была создана таблица с именем table1. Эта таблица имеет три поля. (Имя пользователя, Пароль, Роль). В таблице есть только одна запись («admin», «admin», «administrator»).
Ниже приведена страница php, которая принимает параметры методом post.
Android часть
Чтобы поэкспериментировать с этим примером, вам нужно запустить его на реальном устройстве, к которому подключен интернет Wi-Fi.
| меры | Описание |
|---|---|
| 1 | Вы будете использовать IDE Android Studio для создания приложения Android и назовите его PHPMYSQL в пакете com.example.phpmysql. |
| 2 | Измените файл src / MainActivity.java, чтобы добавить код активности. |
| 3 | Создайте файл src / SiginActivity.java, чтобы добавить код PHPMYSQL. |
| 4 | Измените XML-файл макета. Res / layout / activity_main.xml добавьте любой компонент GUI, если это необходимо. |
| 5 | Измените файл res / values / string.xml и добавьте необходимые строковые компоненты. |
| 6 | Измените AndroidManifest.xml, чтобы добавить необходимые разрешения. |
| 7 | Запустите приложение и выберите работающее устройство Android, установите на него приложение и проверьте результаты. |
Вот содержимое src / com.example.phpmysql / MainActivity.java .
Вот содержимое файла src / com.example.phpmysql / SigninActivity.java .
Добавьте следующий контент в build.gradle и пересоберите весь проект.
Вот содержание activity_main.xml .
Вот содержимое Strings.xml .
Вот содержимое AndroidManifest.xml .
Давайте попробуем запустить ваше приложение PHPMYSQL. Я предполагаю, что вы подключили свое фактическое мобильное устройство Android к компьютеру. Чтобы запустить приложение из студии Android, откройте один из файлов деятельности вашего проекта и нажмите «Выполнить».  значок из панели инструментов. Перед запуском приложения Android Studio отобразит следующее окно, чтобы выбрать опцию, в которой вы хотите запустить приложение Android.
Выберите мобильное устройство в качестве опции, а затем проверьте свое мобильное устройство, которое отобразит следующий экран —

Теперь просто введите свое имя пользователя и пароль. В моем случае я набираю admin как имя пользователя и пароль. Это показано на рисунке —
Теперь нажмите кнопку Get и подождите несколько секунд, и ответ будет загружен и будет показан вам. В этом случае ответом является РОЛЬ, которая выбирается в случае администратора как имя пользователя и пароль. Это показано на рисунке ниже —
Теперь снова нажмите кнопку POST и появится тот же результат. Это показано на рисунке ниже —
Источник


