- Методы лечения различных ошибок в Android Studio при разработке проекта
- Android studio is crashing with this error message after installing this plugin #409
- Comments
- mukherjeepritam commented Nov 2, 2018
- mabdelhafiz94 commented Nov 9, 2018
- HEMAL-PATEL commented Nov 12, 2018
- maraj91 commented Nov 30, 2018
- HEMAL-PATEL commented Nov 30, 2018
- Missing essential plugin: org.jetbrains.android #81
- Comments
- ajcasagrande commented Nov 14, 2020 •
- ajcasagrande commented Nov 14, 2020
- chetansharma10 commented Jan 3, 2021
- ajcasagrande commented Jan 3, 2021
- Sagar-2-99 commented May 1, 2021
- NunoFernandesofficial commented May 11, 2021
- spike commented May 18, 2021 •
- effiedude commented Jun 25, 2021
- simarjeet30 commented Aug 17, 2021
- simarjeet30 commented Aug 20, 2021
- erperejildo commented Aug 29, 2021 •
- gargbindu commented Aug 30, 2021
- Android studio plugin error
Методы лечения различных ошибок в Android Studio при разработке проекта
Сегодня хотел бы поделиться своим анализом и способами лечением разных ошибок при разработке своего продукта в Android Studio. Лично я, не раз сталкивался с различными проблемами и ошибками при компиляции и/или тестировании мобильного приложения. Данный процесс, всегда однообразный и в 99% случаев и всегда нужно тратить n-колличество времени на его устранение. Даже, когда ты уже сталкивался с данной проблемой, ты все равно идешь в поисковик и вспоминаешь, как же решить ту или иную ситуацию.
Я для себя завел файлик, в котором отметил самые частые ошибки — потратив на это несколько часов и перечислил самые популярные ошибки (в дальнейшем планирую просто их запомнить), чтоб сократить свое время в дальнейшем.
Итак, начну по порядку с самой распространенной проблемы и дальше буду перечислять их по мере появления:
1) Если подчеркивает красным код, где используются ресурсы: R. — попробовать (но вероятно не поможет): Build -> Clean Project.
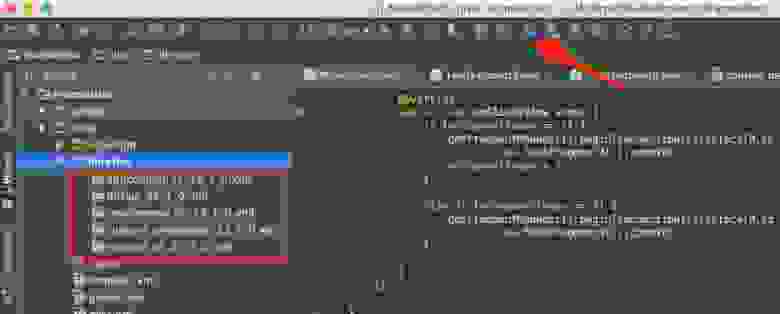
В принципе на Build -> Clean Project можно не терять времени, а лучше всего — слева переключиться на Project, открыть каталог .idea, затем каталог libraries и из него удалить все содержимое. Затем нажать кнопку Sync Project. А затем (если все еще красное, но скорее всего уже будет все ок ) Build -> Clean Project.
2) После внезапного выключения компьютера, после перезапуска может быть во всех проектах весь код красным. Перед этим может быть ошибка: Unable to create Debug Bridge: Unable to start adb server: Unable to obtain result of ‘adb version’. Есть три решения — первое помогло, второе нет (но может быть для другого случая), а третье — не пробовал:
а) File — Invalidate Caches/Restart — Invalidate and Restart
б) Закрыть студию. В корне папки проекта удалить файл(ы) .iml и папку .idea. Вновь запустить студию и импортировать проект.
в) Нажать Ctrl-Alt-O и запустить оптимизацию импорта.
Кстати, adb сервер можно проверить на версию (и работоспособность) и затем перезапустить:
3) Если Android Studio выдает приблизительно такую ошибку: Error:Execution failed for task ‘:app:dexDebug’.
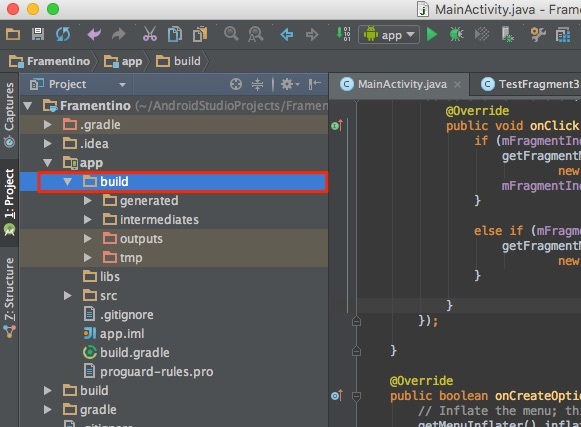
Надо слева переключиться на опцию Project, найти и удалить папку build которая лежит в папке app, т.е. по пути app/build. Затем перестроить весь проект заново: Build -> Rebuild Project.
Такое же решение если ошибка типа: «не могу удалить (создать) папку или файл» и указан путь, который в ведет в app/build. Тоже удаляем папку build и ребилдим проект.
4) В сообщении об ошибке упоминается heap — виртуальная память. А ошибка обычно вызвана ее нехваткой, т.е. невозможностью получить запрашиваемый объем. Поэтому этот запрашиваемый объем надо уменьшить, т.е. переписать дефолтное значение (обычно 2048 MB которое можно изменить в настройках), на меньшее 1024 MB.
В файле проекта gradle.properties пишем:

5) Android Studio пришет примерно такую ошибку: Plugin is too old, please update to a more recent version, or set ANDROID_DAILY_OVERRIDE environment variable to «83648b99316049d63656d7276cb19cc7e95d70a5»
Возможные причины (кроме необходимости регулярного обновления SDK):
а) Загруженный проект был скомпилирован с помощью уже несовместимого старого gradle плагина. В этом случае надо найти и подключить в своем build.gradle проекта этот более старый плагин. т.е. попробовать более старые версии, например: 1.1.3 (часто именно 1.1.x и подходит).
Найти все версии можно здесь.
б) Если в build.gradle проекта используется beta-версия плагина — это означает, что срок ее истек. Посмотреть последние релизы (продакшн и бета) можно также здесь:
6) Иногда при подключении сторонних библиотек могут дублироваться некоторые файлы (обычно связанные с лицензированием). В сообщении будет что-то содержащее слова: duplicate files. Решение — надо посмотреть в сообщении об ошибке или в документации подключенной сторонней библиотеки — какие именно файлы стали избыточными, и перечислить их в build.gradle модуля для исключения (exclude) из билда.
Это делается в директиве packagingOptions (которая, в свою очередь, находится в директиве android).
Источник
Android studio is crashing with this error message after installing this plugin #409
Comments
mukherjeepritam commented Nov 2, 2018
Error Message «Couldn’t create Engine»
Couldn’t create Engine
java.lang.IllegalStateException: Couldn’t create Engine
at com.google.android.filament.Engine.create(Engine.java:37)
at com.google.ar.sceneform.filament.wrapper.Engine.create(Engine.java:14)
at com.google.ar.sceneform.plugin.viewer.Filament$3.run(Filament.java:192)
The text was updated successfully, but these errors were encountered:
mabdelhafiz94 commented Nov 9, 2018
To get your IDE back and running you have to remove the plugin from this directory «/.AndroidStudio3.2/config/plugins».
HEMAL-PATEL commented Nov 12, 2018
I am using android studio version 3.1.4. When I am updating Google SceneForm Tools(Beta) plugin from 1.4.0 to 1.5.0, android studio stop working in Windows. I have also try to update Android Studio with the latest version (3.2.0 / 3.2.1) but the same issue occurred android studio stop working.
My PC Configuration is as below:
OS: Windows 10 Pro (64 bit)
RAM: 6GB
Processor: Intel Core i3 — 3210 CPU (3.20 GHz)
Android Studio: 3.1.4
Google SceneForm Tool: 1.4.0
Please help me to resolve this issue.
maraj91 commented Nov 30, 2018
Hi,
I am using the android studio version 3.2.1. When i am installing the google sceneform tools (beta) from plugin after restarting.Android Studio getting crashed. Please suggest some solution for that.
- Android Studio 3.2.1
- Build #AI-181.5540.7.32.5056338, built on October 9, 2018
- JRE: 1.8.0_152-release-1136-b06 amd64
- JVM: OpenJDK 64-Bit Server VM by JetBrains s.r.o
- Windows 7 6.1
HEMAL-PATEL commented Nov 30, 2018
Hi,
I am using the android studio version 3.2.1. When i am installing the google sceneform tools (beta) from plugin after restarting.Android Studio getting crashed. Please suggest some solution for that.
- Android Studio 3.2.1
- Build #AI-181.5540.7.32.5056338, built on October 9, 2018
- JRE: 1.8.0_152-release-1136-b06 amd64
- JVM: OpenJDK 64-Bit Server VM by JetBrains s.r.o
- Windows 7 6.1
Follow below steps to resolve your issue.
Step — 1: Remove your google scene tools (beta) plugin by going to below path in your PC
C:\Users***.AndroidStudio3.2\config\plugins.
And delete google scene form tools folder from your above path
Step — 2: Download Google Scene Form Tools Plugin version 1.4.0 from below link:
Step — 3: Install that plugin which you have download from above give link page. To install plugin follow below steps.
Go to File menu -> Settings -> Plugins and click on Install plugin from Disk.. and select path where plugin downloaded in your PC.
Restart after installing plugin and enjoy it.
Источник
Missing essential plugin: org.jetbrains.android #81
Comments
ajcasagrande commented Nov 14, 2020 •
Snap version 4.1.1.0
OS: Ubuntu 18.04

The text was updated successfully, but these errors were encountered:
ajcasagrande commented Nov 14, 2020
Apparently this was a system configuration issue. Somehow the kotlin plugin was disabled in my
chetansharma10 commented Jan 3, 2021
How can I fix this.
ajcasagrande commented Jan 3, 2021
In my case all I had to do was open the file
/.config/Google/AndroidStudio4.1/disabled_plugins.txt and delete the line that referenced Kotlin . Note that the file path may be different based on your version of AS.
/.config/Google/ AndroidStudio4.1/disabled_plugins.txt and delete the line that referenced Kotlin. Note that the file path may be different based on your version of AS. — You are receiving this because you commented. Reply to this email directly, view it on GitHub , or unsubscribe .
Sagar-2-99 commented May 1, 2021
in my mac i haven’t found this file so plz help me
NunoFernandesofficial commented May 11, 2021
in my mac i haven’t found this file so plz help me
only way is to reinstall the Big Sur.
spike commented May 18, 2021 •
in my mac i haven’t found this file so plz help me
On a mac, open your finder, type disabled_plugins.txt in the search box of your finder.
On my mine, it was located at MYUSERNAME > Library > Application Support > Google > AndroidStudioxx
Then just remove the line that references org.jetbrains.kotlin
By the way, the Library folder in your home user directory is a hidden folder. If you can’t see it in your finder, that’s the reason why.
effiedude commented Jun 25, 2021
Donot deleate or disable any plugin that installed by studio
simarjeet30 commented Aug 17, 2021
I am getting this error even after so many reinstallations from scratch .I even deleted disable_plugin.txt file ,but still getting the same error .If anyone knows about it ,Please respond. 
simarjeet30 commented Aug 20, 2021
erperejildo commented Aug 29, 2021 •
I don’t have any Google folder within .config
gargbindu commented Aug 30, 2021
In case of MacOS, you can find the disabled_plugins file using the command given below.
/Library -name disabled_plugins.txt
In my case next command in terminal helped to find bad files
find
/Library -name disabled_plugins.txt
I found these files and deleted all of them and fixed the issue.
Источник
Android studio plugin error
Android Studio — IDE для разработки приложений для Андроид от Google на основе IntelliJ IDEA.
Установка:
Страница загрузок на официальном сайте.
Windows:
Необходимо установить JDK и прописать системную переменную JAVA_HOME
Чтобы использовать Android Studio с эмулятором на Windows XP SP3 необходимо скачать и установить старую версию Intel Hardware Accelerated Execution Manager (extra_intel_haxm-windows_r02.zip) extra_intel_haxm-windows_r02.zip ( 1.66 МБ )
OS X:
Установка Andoid Studio на OS X намного проще — необходимо проинсталировать JDK, а затем Android Studio.
Не запускается эмулятор
Запускается эмулятор, но появляется ошибка «pixel launcher isn’t responding»
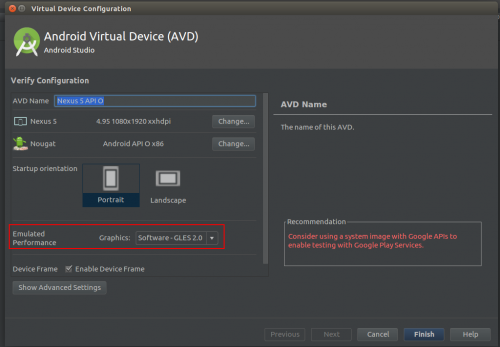
При запуске эмулятора лаунчер сообщает: Pixel launcher isn’t responding. Ни какой реакции на нажатия.
Произошло на машине с встроенной видеокартой Intel HD Graphics 3000 — в Windows 10 драйвер не поддерживает OpenGL (вероятно связанно с этим).
Решение: в наcтройках AVD установить значение Software-GLES 2.0 для Emulated performance\Graphics
|
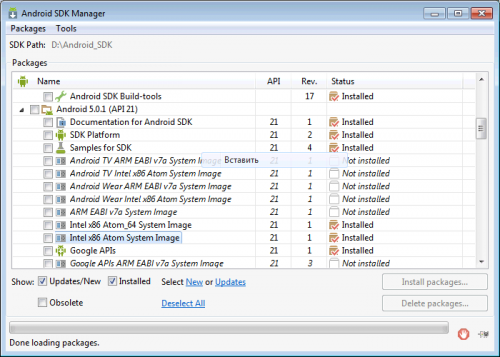
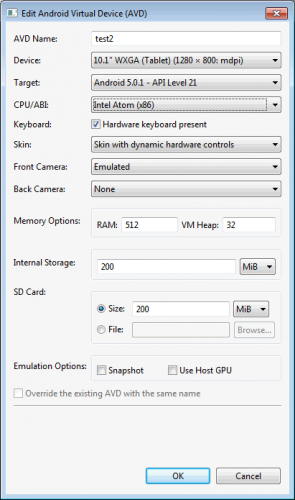
Создание быстрого x86 эмулятора Android (AVD) на примере Android 5.0.1 (API 21) Запускаем Android SDK Manager. Загружаем Intel x86 Atom System Image (ознакомьтесь также с Using Hardware Acceleration, Как разогнать эмулятор Android )
Пользуемся Изменение места хранения AVD. Инструкция.
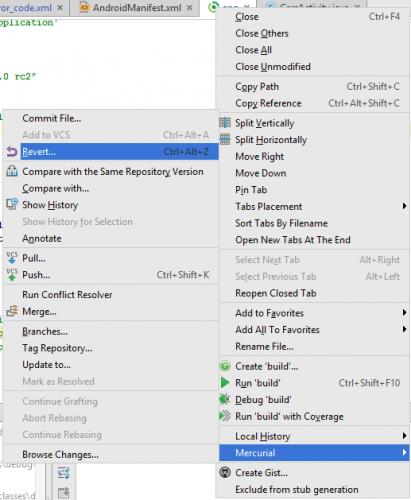
Учебники по Android Studio: Renamed Properties in BuildTypes Renamed Properties in ProductFlavors Т.е. например в build.gradle вместо runProguard false необходимо написать minifyEnabled true Просьба: если вы автор последнего сообщения — просто редактируйте его, а не добавляйте новое. Добавляем систему контроля версий Mercurial
О инсталляции и работе с Mercurial хорошо написано здесь:
Устанавливаем Mercurial, если необходимо добавляем в %PATH% путь (в моем случае D:\Program Files\TortoiseHg\). избавится от проблемы удалось только вернувшись на 0.2.0 — удалить Android Studio через uninstal, затем удалить вручную каталог — там много остается. Ошибки: Ошибка Gradle project sync failed error — Решение В теме нет куратора. По вопросам наполнения шапки обращайтесь к модераторам раздела через кнопку Сообщение отредактировал derak1129 — 26.09.20, 17:13 Источник  Когда к мобильному устройству присоединены наушники  ОС Google Android развивается, и по всему видимому |

 под сообщениями, на которые необходимо добавить ссылки.
