- Плагины
- Rainbow Brackets
- Nyan Progress Bar
- RoboPOJOGenerator
- ADB Idea
- ADB WIFI
- Android Studio Plugin Development
- Introduction
- Configuring IntelliJ Platform Projects for Android Studio Plugin Development
- Matching Versions of the IntelliJ Platform with the Android Studio Version
- Configuring the Plugin build.gradle File
- Configuring the Plugin plugin.xml File
- Android Specific Extension Points
- Additional Articles and Resources
- Open Source Plugins for Android Studio
- How to install plugins in Android Studio
- How to Install and Uninstall Plugins in Android Studio?
- Step by Step Process to Install and Uninstall Plugins in Android Studio
- Как установить плагин в Android Studio
Плагины
Установленные плагины находятся в меню File | Settings. | Plugins. Кнопка Browse repositories. позволяет найти плагин в репозитории. Кнопка Install plugin from disk. позволяет установить плагин с диска, если вы его скачали самостоятельно.
Rainbow Brackets
«Радужные скобки» позволяют пометить каждую пару скобок своим индивидуальным цветом. Это помогает визуально видеть, где находится область кода.
Nyan Progress Bar
Заменяет все индикаторы прогресса в студии на няшного котика. Если вы серьёзный программист, то просто обязаны установить плагин Nyan Progress Bar. Совместимо с другими средами разработки на основе IntelliJ IDEA: PhpStorm, WebStorm, PyCharm, RubyMine, AppCode, CLion, Gogland, DataGrip, Rider, MPS.
Появляется везде. Например, при загрузке проекта.

Во время работы при синхронизации чего-либо.

RoboPOJOGenerator
Удобный генератор готовых Java и Kotlin POJO классов из JSON: GSON, FastJSON, AutoValue (GSON), Logan Square, Jackson.

ADB Idea
Плагин для Android Studio/Intellij IDEA для быстрых операций над приложением:
- Uninstall App — удалить приложение из устройства
- Kill App — убить приложение (удалить из памяти)
- Start App — запустить приложение
- Restart App — перезапустить приложение
- Clear App Data — очистить данные
- Clear App Data and Restart — очистить данные и перезапустить
После установки эти команды можно найти через Tools | Android | ADB IDEA.
Также можно вызвать окно поиска действий через комбинацию клавиш Ctrl+Shift+A и с помощью символов ADB быстро найти конкретную команду.
Плагин удобен для проверки работоспособности приложения в разных состояниях. Например, вы ранее создали базу данных и решили посмотреть, как поведёт себя приложение при пустой базе. С помощью плагина вы быстро можете очистить данные и посмотреть на результат.
ADB WIFI
Плагин для проверки приложения на устройстве через Wi-Fi. Полезно, если ваш кот перегрыз USB-провод и вы не можете подлючить телефон к компьютеру для отладки.
Источник
Android Studio Plugin Development
Introduction
Android Studio plugins extend or add functionality to the Android Studio IDE. Plugins can be written in Kotlin or Java, or a mix of both, and are created using IntelliJ IDEA and the IntelliJ Platform. It’s also helpful to be familiar with Java Swing. Once completed, plugins can be packaged and distributed at JetBrains Plugin Repository.
Android Studio plugins are not Android modules or apps to run in the Android operating system, such as smartphones or tablets.
Configuring IntelliJ Platform Projects for Android Studio Plugin Development
To create a new Android Studio plugin project, follow the tutorial on the Getting Started with Gradle page. The tutorial produces a skeleton project suitable to use as a starting point for an Android Studio plugin. On the New Project Configuration Screen of the New Project Wizard tutorial, choose Gradle from the product category pane as described in the tutorial, not Android. Some minor modifications to the skeleton project are needed, as discussed below.
Matching Versions of the IntelliJ Platform with the Android Studio Version
For API compatibility, it is essential to match the version of the IntelliJ Platform APIs used for plugin development with the target version of Android Studio. The version number of Android Studio contains the version of the underlying IntelliJ Platform APIs that were used to build it.
To find the version of the IntelliJ Platform used to build Android Studio, use the Android Studio About dialog screen. An example is shown below. In this case, the (BRANCH.BUILD.FIX) version of the IntelliJ Platform is 191.8026.42 , which corresponds to the IntelliJ IDEA version 2019.1.4. The build.gradle configuration steps section below explains how to set the IntelliJ Platform version to match the target version of Android Studio.

Configuring the Plugin build.gradle File
The use-case of developing for a non-IntelliJ IDEA IDE is reviewed in the Plugins Targeting Alternate IntelliJ Platform-Based IDEs section of the Configuring Gradle for IntelliJ Platform Plugins page. The particular example in that section discusses configuring a plugin project for PhpStorm, so the details for an Android Studio plugin project are reviewed here.
Here are the steps to configure the build.gradle file for developing a plugin to target Android Studio:
The Gradle plugin attributes describing the configuration of the IntelliJ Platform used to build the plugin project must be explicitly set. Continuing with the example above, set the intellij.version value to 191.8026.42 . Alternatively, specify intellij.localPath to refer to a local installation of Android Studio.
Android Studio plugin projects that use APIs from the android plugin must declare a dependency on that plugin. Declare the dependency in build.gradle using the Gradle plugin intellij.plugins attribute, which in this case lists the directory name of the plugin.
The best practice is to use the target version of Android Studio as the IDE Development Instance. Set the Development Instance to the (user-specific) absolute path to the target Android Studio application.
The snippet below is an example of configuring the Setup and Running DSLs in a build.gradle specific to developing a plugin targeted at Android Studio.
Configuring the Plugin plugin.xml File
When using APIs from the android plugin, declare a dependency:
As discussed in the Plugin Dependencies section of this guide, a plugin’s dependency on Modules Specific to Functionality must be declared in plugin.xml . When using Android Studio-specific features (APIs), a dependency on com.intellij.modules.androidstudio must be declared as shown in the code snippet below. Otherwise, if only general IntelliJ Platform features (APIs) are used, then a dependency on com.intellij.modules.platform must be declared as discussed in Plugin Compatibility with IntelliJ Platform Products.
Android Specific Extension Points
See Android Plugin section in Extension Point List.
Additional Articles and Resources
Open Source Plugins for Android Studio
When learning new development configurations, it is helpful to have some representative projects for reference:
ADB Idea plugin for Android Studio and Intellij IDEA that speeds up Android development.
Источник
How to install plugins in Android Studio

Oct 11, 2017 · 3 min read

Some times little but important things like how to install a plugin can just skip ones memory or better still beginners might be trying out a tutorial and wondering, how can a plugin be installed on Android Studio. This article will address that concisely. Follow along as we walk through.
For someone who does not know what a plugin is, he r e is a simple definition. A plugin is a feature specific component added to a program such as an IDE (in this case Android Studio). A plugin is usually designed to augment for some specific features that a program did not originally come with. This helps in increasing the developers efficiency. Examples of plugins include the kotlin plugin for Android Studio 2.3.3, the android parcelable code generator plugin, Android Material Design Icon generator, Butterknife Zelezny, and so many others.
Now let’s go into the business of the day. It is assumed you have Android Studio (for this article I am using version 2.3.3) installed properly on your machine and internet connection. Follow the steps outlined below.
- Run Android Studio. You might need to create a sample demo app just to fully allow the plugin install. You can also open an existing project.
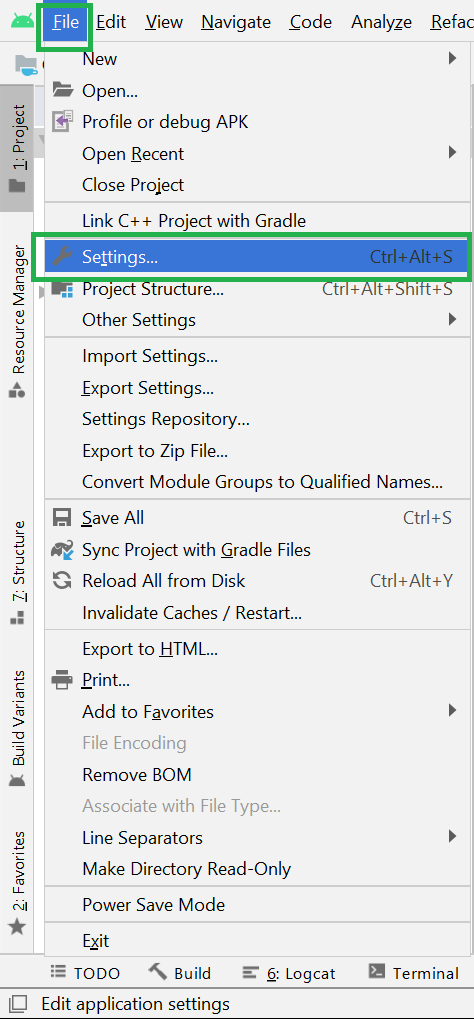
- Click on the File menu or use Alt + F to access the file menu. And then click on Settings as shown below.

The Settings Window can also be accessed directly using Ctrl + Alt + S .
3. On the Settings window, Click on the Plugins tab on the side menu. There are three buttons below the list of installed plugins displayed. The first is meant for installing JetBrains plugins, the second is for installing plugins in repositories other than that of JetBrains while the last is to install a plugin that has already been downloaded to your local disk. Click one of the buttons that fall in the most suitable category.

4. On Browse plugins window that is opened, type in the name of the plugin to be installed on the search text field and click the green Install button on the right hand side. After the installation is complete, click the Close button just at the bottom right hand corner.

5. On the Settings window you can search for the plugin to confirm the installation and click the Ok button.
After these brief steps, you have your plugin installed and functional on Android Studio.
Источник
How to Install and Uninstall Plugins in Android Studio?
Android Studio provides a platform where one can build apps for Android phones, tablets, Android Wear, Android TV, and Android Auto. Android Studio is the official IDE for Android application development, and it is based on the IntelliJ IDEA. One can develop Android Applications using Kotlin or Java as the Backend Language and it provides XML for developing Frontend Screens.
In computing, a plug-in is a software component that adds a particular characteristic to an existing computer program. When a program supports plug-ins, it enables customization. Plugins are a great way to increase productivity and overall programming experience.
Some tasks are boring and not fun to do, by using plugins in the android studio you can get more done in less time. Below is the list of some very useful plugins in the table that are highly recommendable for an android developer.
| Key Promoter X | Key Promoter X helps to get the necessary shortcuts while working on android projects. When the developers use the mouse on a button inside the IDE, the Key Promoter X shows the keyboard shortcut that you should have used instead. |
| Json To Kotlin Class | Json to Kotlin Class is a plugin to generate Kotlin data class from JSON string, in another word, a plugin that converts JSON string to Kotlin data class. With this, you can generate a Kotlin data class from the JSON string programmatically. |
| Rainbow Brackets | Rainbow Brackets adds rainbow brackets and rainbows parentheses to the code. Color coding the brackets makes it simpler to obtain paired brackets so that the developers don’t get lost in a sea of identical brackets. This is a very helpful tool and saves the confusion of selecting which bracket needs to be closed. |
| CodeGlance | Codeglance plugin illustrates a zoomed-out overview or minimap similar to the one found in Sublime into the editor pane. The minimap enables fast scrolling letting you jump straight to sections of code. |
| ADB Idea | ADB Idea is a plugin for Android Studio and Intellij IDEA that speeds up the regular android development. It allows shortcuts for different emulator functionalities that are usually very time consuming, like resetting our app data, uninstalling our app, or starting the debugger. |
Step by Step Process to Install and Uninstall Plugins in Android Studio
Step 1: Open the Android Studio and go to File > Settings as shown in the below image.
Step 2: After hitting on the Settings button a pop-up screen will arise like the following. Here select Plugins in the left panel. Make sure you are on the Marketplace tab. Then search for the required plugins as per the developer’s requirements. After selecting the required plugins then click on the green colors Install button at the right and at last click on the OK button below.
Note: There might be a need to Restart the Android Studio. For example, you may refer to How to Install Genymotion Plugin to Android Studio.

After these brief steps, you have your plugin installed and functional on Android Studio. Similarly if one wants to disable or uninstall the installed plugins then follow the last step.
Step 3: To disable or uninstall a plugin this time go to the Installed tab. And here you can find the all installed plugins in your android studio. Just click on that plugin which one you want to disable or uninstall. Then select the Disable or Uninstall button at the right as shown in the below image. At last click on the OK button and you are done.
Note: There might be a need to Restart the Android Studio.
Источник
Как установить плагин в Android Studio
Я ищу установку пользовательского плагина на Android Studio, как я могу это сделать?
1) Запустите приложение Android Studio
2) Выберите « Файл» -> «Настройки» (« Предпочтение Mac»)
3) Поиск плагинов

- Запустить приложение Android Studio
- Выберите Настройки проекта
- Выберите плагин с диска , если на диске, затем выберите это местоположение * .jar, в моем случае это банда GenyMotion
- Нажмите « Применить» и « ОК» .
- Затем студия Android попросит перезагрузить .
Это все люди! 
Файл-> Настройки-> В разделе Параметры IDE нажмите «Плагины». Теперь в правом окне Нажмите «Обзор репозиториев», и там вы найдете плагины. Выберите, какой из них вы хотите, и нажмите «Установить».
Нажмите Ctrl – Alt – S (Настройки)
Затем выберите « Плагины»
Что касается установки пользовательского плагина, в GitHub есть хорошее пошаговое руководство для библиотеки rest2mobile, которая может быть использована для любого плагина.
В основном следующие шаги:
- Запустите Android Studio.
- В строке меню выберите «Android Studio»> «Настройки».
- В разделе «Параметры среды IDE» нажмите «Плагины», а затем «Установить плагин с диска».
- Перейдите в папку, в которую вы загрузили плагин, и дважды щелкните его.
- Перезапустите Android Studio.
Если вы находитесь в Linux (Ubuntu) … перейдите в File-> Settings-> Plugin и выберите плагин из соответствующего местоположения.
Если вы находитесь в Mac OS … перейдите в File-> Preferences-> Plugin и выберите плагин из соответствующего местоположения.
Источник


