- Как пользоваться Product Flavors и Build Variants для создания нескольких версий приложения
- Android: создание динамических Product Flavors и Signing Configs
- Исходные данные
- Проблемы с которыми мы столкнулись
- Проблемы:
- Вынос информации о сертификатах
- Упрощение Product Flavors секции
- Динамическое создание Product Flavors
- Flavor Flav — Android Product Flavor Best Practices
- . I think
- Preface
- The problem, in a nut shell
- What’s a Product Flavor?
- How is that different from a build type?
- How does that help me?
- Great. How do we do it?
- Loading multiple versions side-by-side
- Changing app icons (resources) based on flavor
- Distinct launcher text
- Updated 2017-03-06
- Distinguishing between versions programmatically
Как пользоваться Product Flavors и Build Variants для создания нескольких версий приложения
Product flavors — незаменимая gradle-фича, полезная при создании нескольких версий одного Android-приложения (имею ввиду, например, версии demo/full/pro, а также вариации под различные устройства). Достаточно добавить несколько строк кода в раздел android <. >файла build.gradle :
В productFlavors могут находиться все те же правила, что и в элементе defaultConfig . В данном случае я переопределил applicationId , чтобы в Google Play это было отдельным приложением, и versionName , чтобы у пользователя отображалась соответствующая версия. Кстати, из defaultConfig эти дублирующие правила можно будет убрать.
После правки обновите проект (нажмите Sync Now, либо Refresh Gradle projects). Теперь можно добавлять классы и ресурсы специально для каждой из версий приложения.
Например, чтобы добавить ресурс, нужно кликнуть ПКМ по названию модуля и выбрать New > Android resource file. Далее можно будет указать для какой версии приложения нужен данный ресурс:

Таким образом можно легко дать приложению информацию о том, в каком режиме оно запущено, debug или release. Достаточно иметь 2 value-ресурса, один в main , другой, скажем, в debug , и в каждый из них добавить строчку с нужным значением, которое затем проверять при запуске приложения:
Идём дальше. Чтобы добавить разные классы для разных версий, нужно сначала создать соответствующую файловую структуру, например, src/free/java и src/pro/java .
Обратите внимание, что в отличие от ресурсов, нельзя создать один и тот же класс в папке main и, например, в папке pro . Возникнет ошибка дублирования. Если вам нужно иметь модификацию одного класса для разных версий, то создавайте в каждой из веток свою версию этого класса, а из папки main его убирайте. После выбора нужного Build Variant соответствующая ветка станет активной:
Источник
Android: создание динамических Product Flavors и Signing Configs
При работе над Android-проектом, представляющий собой платформу для создания приложений для просмотра видео-контента, возникла необходимость динамического конфигурирования product flavors с выносом информации о signing configs во внешний файл. Подробности под катом.
Исходные данные
Имеется Android-проект, представляющий собой платформу для создания приложений для просмотра видео-контента. Кодовая база общая для всех приложений, различия заключаются в настройках параметров REST API и настройках внешнего вида приложения (баннеры, цвета, шрифты и т.д.). В проекте использованы три flavor dimension:
- market: «google» или «amazon». Т.к. приложения распространяются как в Google Play, так и в Amazon Marketplace, имеется необходимость разделять некоторый функционал в зависимости от места распространения. Например: Amazon запрещает использование In-App Purchases механизма от Google и требует реализацию своего механизма.
- endpoint: «pro» или «staging». Специфические конфигурации для production и staging версий.
- site: собственно dimension для конкретного приложения. Задается applicationId и signingConfig.
Проблемы с которыми мы столкнулись
При создании нового приложения необходимо было добавить Product Flavor:
Также, необходимо было добавить соответствующий Signing Config:
Проблемы:
Вынос информации о сертификатах
Первым шагом был вынос информации о сертификатах в отдельный json-файл. Для примера информация так-же хранится в plain-text, но ничего не мешает хранить файл в зашифрованном виде (мы используем GPG) и расшифровывать непосредственно во время сборки приложения. JSON-файл имеет следующую структуру:
Секцию signingConfigs в build.gradle файле удаляем.
Упрощение Product Flavors секции
Для сокращения количества строк, необходимых для описания Product Flavor с dimension = «site», был создан массив с необходимой информацией для описания конкретного приложения, а все Product Flavors с dimension=»site» были удалены.
Было:
Динамическое создание Product Flavors
Последним шагом оставалось динамически создавать product flavors и signing configs используя внешний JSON-файл с информацией о сертификатах из массива applicationDefinitions.
Для добавления чтения из зашифрованного хранилища необходимо заменить секцию
Источник
Flavor Flav — Android Product Flavor Best Practices
. I think

Preface
During my time at one of my previous employers we were gifted the opportunity of working with native iOS and Android applications for the first time. The previous hybrid cordova app that we had just worked on was already a huge mess and we were looking forward to getting our hands on some all-new Objective-C and Java code.
Like many in the field, over time we found ourselves burdened by the constant loading, removing and re-loading of our mobile apps onto our test devices during the development cycles. It became difficult managing different versions of the app and being able to tell at a glance when the dev code or production code was present on our devices. If only there was something we could have used for exactly that…
Actually, there was!
The problem, in a nut shell
Here are the 4 main problems we are trying to solve:
- Have multiple app versions loaded on a phone simultaneously, based on environment or branch (dev, staging, beta, production).
- Have distinct launcher icons for each environment or branch
- Have distinct launcher text to label each environment or branch (My App Dev, My App Beta, My App)
- Have the awareness of which environment or branch we are on to make different decisions at runtime based on the current environment.
Continue reading down the page if you want an explanation of things. If this document is too long you can check out the TL;DR Cheat Sheet below.
What’s a Product Flavor?
From Android User Guide’s Configure Your Build:
Product flavors represent different versions of your app that you may release to users, such as free and paid versions of your app. You can customize product flavors to use different code and resources, while sharing and reusing the parts that are common to all versions of your app. Product flavors are optional and you must create them manually. To start creating different versions of your app, learn how to Configure Product Flavors.
A product flavor is just a variant of your app. As suggested here, the most common use of this tool is probably to have a free and paid version of the same app.
How is that different from a build type?
Well ultimately, it’s up to you how you want to use build types and build flavors. I would consider a build type to be something like debug vs release where a debug build would provide lots of debug output and a release build would have none. The debug build would allow things like a debug menu to configure the app state manually for testing where as a release version would not.
* Please note having a debug screen in your app could be a huge security flaw, if you decide to add one it would probably be best to make sure that code never gets compiled into a release build, a la pro guard
From the Android User Guide:
Build types define certain properties that Gradle uses when building and packaging your app, and are typically configured for different stages of your development lifecycle. For example, the debug build type enables debug options and signs the APK with the debug key, while the release build type may shrink, obfuscate, and sign your APK with a release key for distribution. You must define at least one build type in order to build your app—Android Studio creates the debug and release build types by default. To start customizing packaging settings for your app, learn how to Configure Build Types.
From this documentation it would seem that the better way to go about this is by using build types, but it’s important to keep in mind that the product flavor is essentially another dimension for your build types.
Each product flavor has one of each type of build.
For example, if you had product flavors called Free and Paid and you had two build types, debug and release you would essentially have a matrix of builds that looks like the following:
| Flavor | Build Type |
|---|---|
| Free | debug release |
| Paid | debug release |
This means that the Free version has its own set of debug and release builds and the Paid version has its own set of debug and release builds.
Given the kind of flexibility this provides I see this only as a benefit to be able to have a debug and release build for each type of flavor.
How does that help me?
We can use product flavors to simulate different app states in our multi-stage environment. We can even use these flavors to set different flags so that we know which version of the app we are on from the code.
Here is my proposed environment matrix:
| Flavor | Build Type |
|---|---|
| dev | debug release |
| stage * | debug release |
| beta * | debug release |
| prod | debug release |
* Depending on your app and environment you may or may not need these, you can add or remove as you see fit
Great. How do we do it?
The way to create a new flavor is by adding a productFlavor key to the app gradle file. However just adding a new productFlavor will not change anything on its own.
Loading multiple versions side-by-side
In order to be able to load these multiple flavors onto our device side-by-side we need to change the applicationId . Luckily Android provides us with a simple way of doing that. We actually have two options:
- Change each flavor to set a full applicationId
- Use the applicationIdSuffix option to append something unique to the end of our application id.
Since the introduction of the Gradle system, the android application id is now separate from the package name which you configure when you first create the project. This is great because it provides a separation between the android package name, an identifier used by the Java source code and the application id, the identifier used to uniquely identify your compiled application.
It’s generally cleaner to go with the latter (suffix) option unless you have a really good reason not to (personally, I can’t think of any but I’m sure there’s one out there).
Let’s add the new product flavors with their applicationIdSuffix es to our main app gradle:
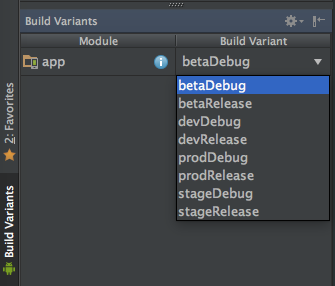
The prod flavor is empty for right now because we aren’t setting an application suffix—and we really shouldn’t! As with any gradle file change you’ll have to run a gradle sync after adding the flavors. You’ll notice new build selections in the Build Variants side bar.
Changing app icons (resources) based on flavor
In order to be able to use a different app icon based on flavor all you need is to set up your resource directories accordingly. This also allows us to have any kind of resource separate for different flavors. Images, strings, values and so on.
Since directory structures can get confusing and complicated I recommend doing this through Android studio, but I’ll show the directory structure in a hot minute for those who don’t use AS.
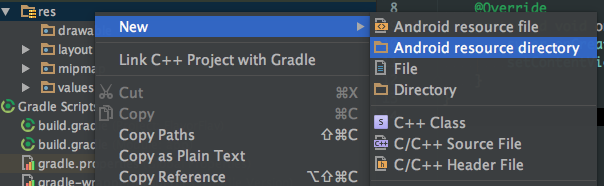
- In the Android project view area, right click on res, select New в†’ Android resource directory

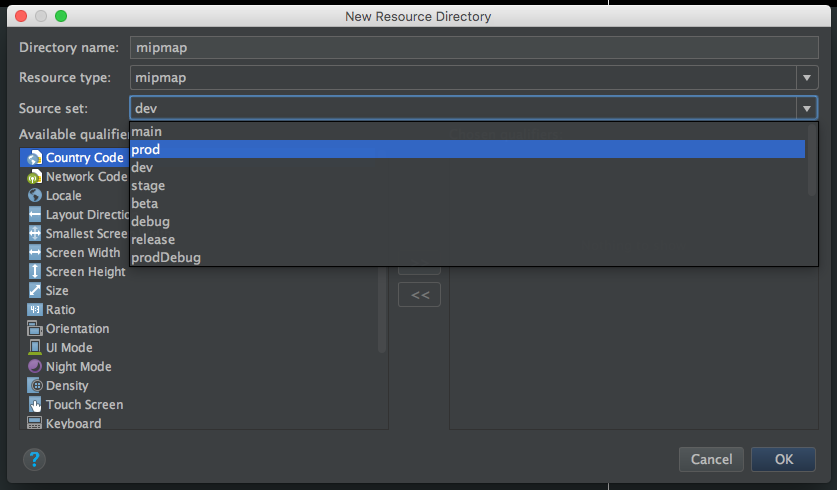
- Select mipmap as the type and select the flavor you want to target as your source set, for example: dev.
- Copy the icons using your system file browser or command line. Refer to the image below for the directory hierarchy Here I simply copied all the mipmap- directories under res .
- Compile and run any of your flavors and you’ll see the new icons appear:
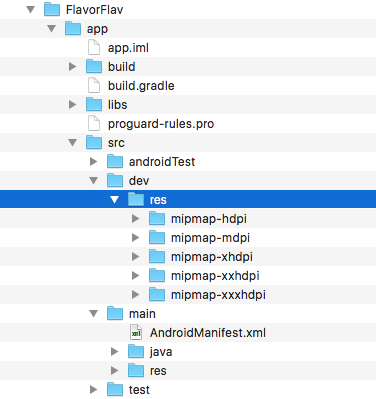 Here I simply copied all the mipmap- directories under res .
Distinct launcher text
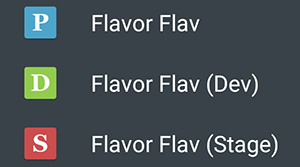
Whether you decide to change the icon or not for different versions is up to you. The next level of distinction between the different variants of your app is the launcher text that appears.
There are a few ways to do this. For example you could create a new strings.xml resource file in your variant and add an app_name string or some such.
The way I prefer to tackle this is using manifest placeholders by adding some extra variables into my gradle file under the productFlavors :
Updated 2017-03-06
I recently realized that by setting the appLabel to a string literal we are eliminating the use of the strings file. Most likely for local/internal development this is fine. For the release builds, I’ve updated the snippets below to use the strings file i.e., @string/app_name instead of a string literal, like My App Name .
Then we can use these placeholders we created in the AndroidManifest.xml :
Now build and run and you should see the new text appear.
Distinguishing between versions programmatically
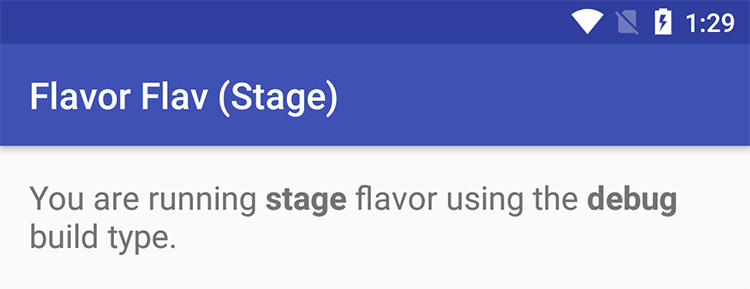
Now that we have our separate icons, app text and we can load different variants on the phone all at the same time, the final trick here is to be able to distinguish between these versions at run time. For the most part I don’t think do anything radically different logic wise in my apps, but for example if you did have a paid which gives you more content or removes ads, it could be helpful to have that kind of control flow.
Through the BuildConfig object we get a FLAVOR constant for free. Any time we access BuildConfig.FLAVOR we get the flavor name (key) from the gradle file:
You can also add extra build config fields in the gradle file using buildConfigField in the flavors:
and then in java:
The only drawback with this is that you have to define the same field for every flavor. So I’ve yet to find a good use for this, but I can see how it could be useful. The buildConfigField is a function—I think—which takes 3 parameters: data type (String), identifier name (String) and value which is strangely also a String. So for example if you wanted to declare an int constant for the number of retries in your game before a game over:
Источник


