- Профилирование приложений Android
- Xamarin Profiler
- Профилировщик Android Studio
- Запуск приложения Xamarin Android в Android Profiler
- Использование Android Profiler
- Android studio profiler and
- CPU Profiler
- Memory Profiler
- Network Profiler
- Network Connection Troubleshooting
- Inspect CPU activity with CPU Profiler
- CPU Profiler overview
Профилирование приложений Android
Перед развертыванием приложения в Магазине важно выявить и устранить все узкие места по производительности, проблемы с использованием чрезмерного количества памяти или неэффективным использованием сетевых ресурсов. Для этого доступны два средства профилирования:
- Xamarin Profiler
- Android Profiler в Android Studio
Это руководство содержит общие сведения о Xamarin Profiler, а также информацию о начале работы с Android Profiler.
Xamarin Profiler
Xamarin Profiler — это автономное приложение, интегрированное с Visual Studio и Visual Studio для Mac для профилирования приложений Xamarin из интегрированной среды разработки. Дополнительные сведения об использовании Xamarin Profiler см. в статье Xamarin Profiler.
Чтобы разблокировать компонент Xamarin Profiler в Visual Studio Enterprise для Windows или Visual Studio для Mac, вы должны быть подписчиком Visual Studio Enterprise.
Профилировщик Android Studio
Android Studio 3.0 и более поздних версий включает в себя средство Android Profiler. вы можете использовать профилировщик Android для измерения производительности приложения Xamarin Android, созданного с помощью Visual Studio — без лицензии на Visual Studio Enterprise. Однако в отличие от Xamarin Profiler средство Android Profiler не интегрировано с Visual Studio и может использоваться только для профилирования пакета приложения Android (APK), который был создан заранее и импортирован в Android Profiler.
Запуск приложения Xamarin Android в Android Profiler
Ниже описано, как запустить приложение Xamarin Android в средстве Android Profiler среды Android Studio. На примерах снимков экрана ниже приложение XamagonXuzzle Xamarin Forms создается и профилируется с помощью Android Profiler:
В параметрах сборки проекта Android отключите параметр Использовать общую среду выполнения. Это позволяет выполнить сборку пакета приложения Android (APK) без зависимости от общей среды выполнения Mono времени разработки.

Выполните сборку приложения для отладки и разверните его на физическом устройстве или в эмуляторе. В результате создается подписанная отладочная версия APK-файла. Для примера XamagonXuzzle итоговый APK-файл называется com.companyname.XamagonXuzzle Signed.apk.
Откройте папку проекта и перейдите в bin/Debug. В этой папке найдите версию Signed.apk приложения и скопируйте ее в удобное место (например, на рабочий стол). На следующем снимке экрана указан APK-файл com.companyname.XamagonXuzzle Signed.apk, копируемый на рабочий стол:

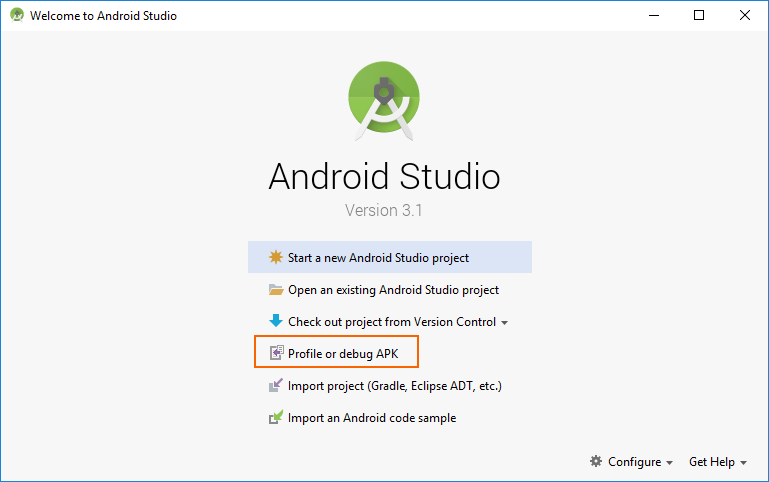
Запустите Android Studio и выберите Profile or debug APK (Профилирование или отладка APK):
В диалоговом окне Select APK File (Выбор APK-файла) перейдите к ранее созданному и скопированному APK-файлу. Выберите этот файл и нажмите кнопку ОК.

Android Studio загружает APK-файл и дизассемблирует classes.dex:

После загрузки APK среда Android Studio отображает для него приведенный ниже экран проекта. Щелкните правой кнопкой мыши имя приложения в представлении в виде дерева слева и выберите пункт Open Module Settings (Открыть параметры модуля):

перейдите в раздел Project Параметры модули, выберите подписанный узел приложения, а затем щелкните No SDK :

В раскрывающемся меню модуль SDK выберите уровень пакет SDK для Android, который использовался для создания приложения (в этом примере для сборки КСАМАГОНКСУЗЗЛЕиспользовался API уровня 26):

Нажмите кнопки Применить и ОК, чтобы сохранить этот параметр.
Запуск профилировщика с помощью значка на панели инструментов:

Выберите целевой объект развертывания для запуска и профилирования приложения и нажмите кнопку ОК. Целевым объектом развертывания может быть физическое устройство либо виртуальное устройство, запущенное в эмуляторе. В этом примере используется устройство Nexus 5X:

После запуска профилировщику потребуется несколько секунд для подключения к устройству развертывания и процессу приложения. При установке APK-файла Android Profiler выведет сообщения No connected devices (Подключенные устройства отсутствуют) и No debuggable processes (Нет отлаживаемых процессов).

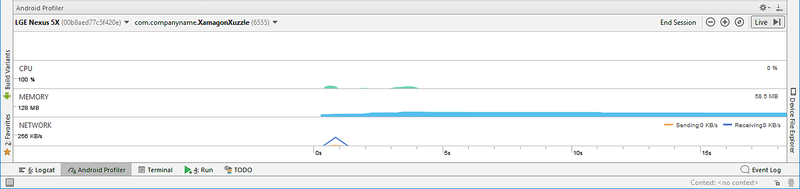
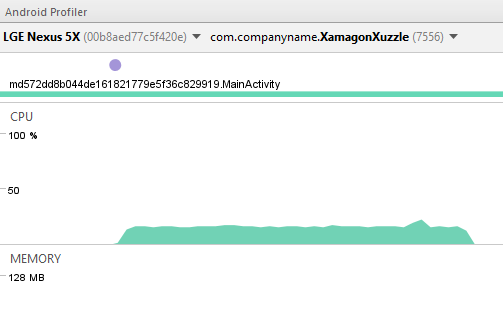
Через несколько секунд Android Profiler завершает установку APK-файла и запускает его, сообщая имя устройства и имя профилируемого процесса приложения (в данном примере это LGE Nexus 5X и com.companyname.XamagonXuzzle, соответственно):

После идентификации устройства и отлаживаемых процессов Android Profiler начинает профилирование приложения:
Если нажать кнопку RANDOMIZE (Случайный выбор) для XamagonXuzzle (что приводит к смещению и рандомизации плиток), вы заметите повышение загрузки ЦП во время интервала рандомизации приложения:
Использование Android Profiler
Подробные сведения об использовании Android Profiler приведены в документации по Android Studio. Для разработчиков Xamarin Android могут представлять интерес следующие разделы:
Профилировщик ЦП — объясняет, как проверять использование ЦП и действия потока в режиме реального времени.
Профилировщик памяти — отображает график использования памяти приложением в режиме реального времени и включает кнопку для записи выделения памяти для анализа.
Профилировщик сети — отображает активность сети в режиме реального времени данных, отправляемых и получаемых приложением.
Источник
Android studio profiler and
The new Android Profiler window in the Android Studio 2.4 preview replaces the Android Monitor . The advanced profiling tools display realtime data updates for CPU, memory, and network activity.
The default view in the Android Profiler window, as shown in figure 1, displays a simplified set of data for each profiler. You must first select (1) the device and (2) the app process you want to profile. You can then click one of the graphs to see the more detailed timeline. Every view also includes (3) timeline zoom controls, (4) a button to jump to the realtime data, and an (5) event timeline that shows the lifecycle of activities and see all input events and screen rotation events.

Figure 1. The Android Profiler overview, showing the timeline for all profilers
CPU Profiler
The CPU Profiler shows realtime CPU usage for your app process and system-wide CPU usage on a timeline.
You can select between (1) a traditional instrumented trace (method traces) and a sample-based trace. Then click (2) Record to begin tracing your code. Once you’re done recording, the timeline indicates (3) the captured region, you can (4) view the state of each thread, and (5) see either a top-down list, bottom-up list, or flame chart for the methods that have executed during the recording.

Figure 2. The CPU Profiler, with results from sampled method tracing
Memory Profiler
The Memory Profiler view combines the features from Heap Viewer, Allocation Tracker, and Memory Monitor, so you can view realtime count of allocated objects and garbage collection events on a timeline, capture heap dumps, and record memory allocations, all from one interface.
The Memory Profiler shows the amount of memory used by your app on a timeline, according to the memory size on the left y-axis. Each memory type (such as Java, Native, and Graphics) is indicated with a different color in a stacked graph. The total number of objects allocated by your app is indicated with a dotted line, according to the y-axis on the right. Values for each are also specified in a key at the top of the graph.
The toolbar at the top of the window allows you to (1) Force garbage collection, (2) Capture a heap dump , and (3) Record memory allocations.

When you capture a heap dump or record memory allocations, the (4) recording event is indicated on the timeline. Your results then appear in (5) the pane below the timeline. In figure 2, this window shows the memory allocation results during the time indicated in the timeline. When viewing either a heap dump or memory allocations, you can select a class name from this list to view the (6) list of instances on the right. Clicking an instance there, reveals (7) a third pane below, showing either the stack trace for where that memory was allocated (when viewing the allocation record), or the remaining references to that object (when viewing a heap dump).
You can also capture a heap dump while memory allocation tracking is turned on to get stack traces in the heap dump (for objects allocated after allocation was turned on).
Network Profiler
The Network Profiler displays realtime network activity on a timeline, showing data sent and received, as well as the current number of connections. At the top of the window, you can see the event timeline and (1) radio power state (high/low) vs Wi-Fi.
On the timeline, you can (2) click and drag to select a portion of the timeline to inspect the traffic. The (3) window below then shows files sent and received during the selected portion of the timeline, including file name, size, type, status, and time. You can sort this list by clicking any of the column headers. You also see a detailed breakdown of the selected portion of the timeline, showing when each file was sent or received.
Click a file name to view (4) detailed information about a selected file sent or received. Click the tabs to view the response data, header information, or the call stack.

Network Connection Troubleshooting
If the Network Profiler detects traffic values, but cannot identify any supported network requests, you will receive the following error message:
“No connections supported for instrumentation.”
Currently, the Network Profiler only supports the HttpURLConnection library for network connections. If your app uses another network connection library, you will not be able to view your network activity in the Network Profiler. If you have received this error message, but your app does use HttpURLConnection , please report a bug so we can investigate the issue.
Источник
Inspect CPU activity with CPU Profiler
Optimizing your app’s CPU usage has many advantages, such as providing a faster and smoother user experience and preserving device battery life.
You can use the CPU Profiler to inspect your app’s CPU usage and thread activity in real time while interacting with your app, or you can inspect the details in recorded method traces, function traces, and system traces.
The specific kinds of information that the CPU Profiler records and shows are determined by which recording configuration you choose:
- System Trace: Captures fine-grained details that allow you to inspect how your app interacts with system resources.
Method and function traces: For each thread in your app process, you can find out which methods (Java) or functions (C/C++) are executed over a period of time and the CPU resources each method or function consumes during its execution. You can also use method and function traces to identify callers and callees. A caller is a method or function that invokes another method or function, and a callee is one that is invoked by another method or function. You can use this information to determine which methods or functions are responsible for invoking particular resource-heavy tasks too often and optimize your app’s code to avoid unnecessary work.
When recording method traces, you can choose sampled or instrumented recording. When recording function traces, you can only use sampled recording.
For details of using and choosing each of these trace options, see Choose a recording configuration.
CPU Profiler overview
To open the CPU Profiler, follow these steps:
Select View > Tool Windows > Profiler or click Profile in the toolbar.
If prompted by the Select Deployment Target dialog, choose the device to which to deploy your app for profiling. If you’ve connected a device over USB but don’t see it listed, ensure that you have enabled USB debugging.
Click anywhere in the CPU timeline to open the CPU Profiler.
When you open the CPU Profiler, it immediately starts displaying your app’s CPU usage and thread activity. You should see something similar to figure 1.
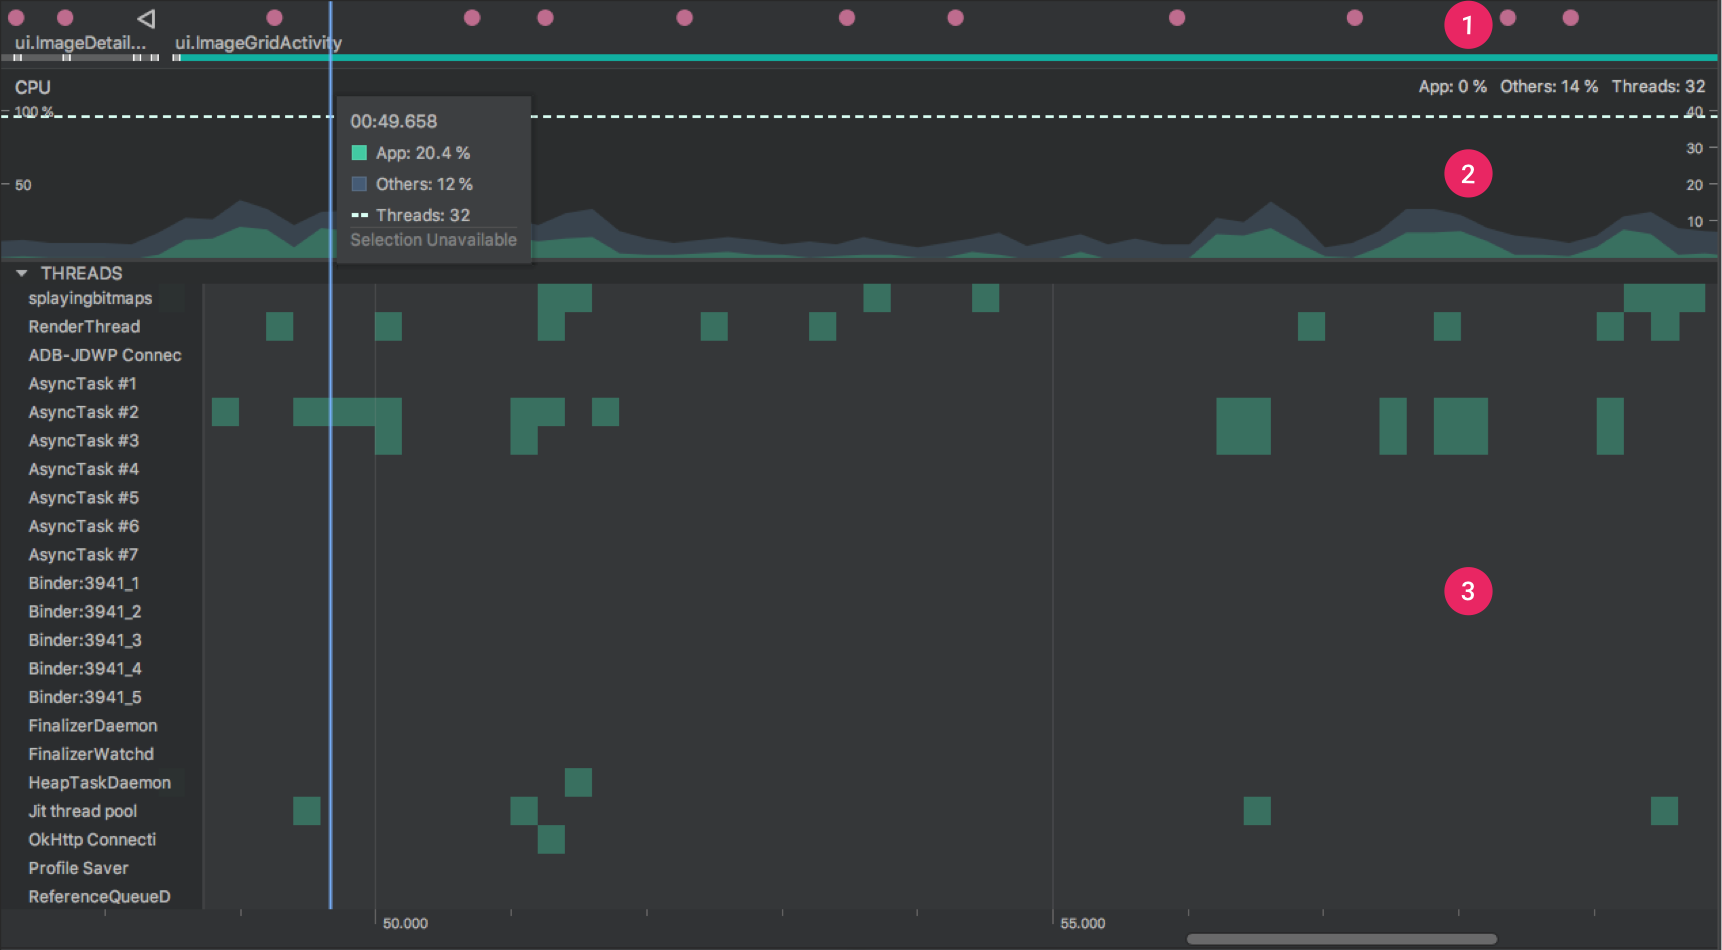
Figure 1. Timelines in the CPU Profiler.
As indicated in figure 1, the default view for the CPU Profiler includes the following timelines:
- Event timeline: Shows the activities in your app as they transition through different states in their lifecycle, and indicates user interactions with the device, including screen rotation events. For information on enabling the event timeline on devices running Android 7.1 (API level 25) and lower, see Enable advanced profiling.
- CPU timeline: Shows real-time CPU usage of your app—as a percentage of total available CPU time—and the total number of threads your app is using. The timeline also shows the CPU usage of other processes (such as system processes or other apps), so you can compare it to your app’s usage. You can inspect historical CPU usage data by moving your mouse along the horizontal axis of the timeline.
- Thread activity timeline: Lists each thread that belongs to your app process and indicates their activity along a timeline using the colors listed below. After you record a trace, you can select a thread from this timeline to inspect its data in the trace pane.
- Green: The thread is active or is ready to use the CPU. That is, it’s in a running or runnable state.
- Yellow: The thread is active, but it’s waiting on an I/O operation, such as disk or network I/O, before it can complete its work.
- Gray: The thread is sleeping and is not consuming any CPU time. This sometimes occurs when the thread requires access to a resource that is not yet available. Either the thread goes into voluntary sleep, or the kernel puts the thread to sleep until the required resource becomes available.
The CPU Profiler also reports CPU usage of threads that Android Studio and the Android platform add to your app process—such as JDWP , Profile Saver , Studio:VMStats , Studio:Perfa , and Studio:Heartbeat (although, the exact names displayed in the thread activity timeline may vary). Android Studio reports this data so that you can identify when thread activity and CPU usage are actually caused by your app’s code.
Content and code samples on this page are subject to the licenses described in the Content License. Java is a registered trademark of Oracle and/or its affiliates.
Источник


