- Connect Android Device with Wifi within Android Studio
- No More Cable Required.
- Step 1:
- Step 2 :
- Step 3:
- Adobe Photoshop CC Advanced for Photography — John Academy
- Learn the advanced functions of Adobe Photoshop CC to create and enhance your images, photos, artwork, and other…
- Define Resource Layout Id In the Constructor Activity/ Fragment — With AndroidX
- Reduce the number of methods from your activity/fragment
- Using Coil to Download Images on Android in Kotlin
- A new way to download images on Android in Kotlin
- Create an Instant App Using Android App Bundle
- Using App Bundle in place of the deprecated Instant App feature plugin
- Building UIs Using Android Jetpack Compose
- No need to write XML layouts-Jetpack Compose will do the magic
- Convert Your PNG & JPEG into WebP Images Android
- Reduce more assets size with webP images
- Беспроводная отладка Android 11
- Running Apps on Your Device
- Android studio real device wifi
- Using ADB on WiFi for Android Development
- Setting Up the ADB to Connect Over WiFi
Connect Android Device with Wifi within Android Studio
No More Cable Required.

May 31, 2018 · 3 min read
In Android Studio we have a lot of plugins available one of them is Android wifi ADB.
Every developer gets irritated when they used a cable to connect with the android device, the android cable itself irritating every time you need to plug the cable with your system this is so hectic isn’t?
So Android Studio comes up with the variety of plugins and Android wifi adb is one of them, so let’s started how you can set up this plugin in an android studio.
If you want to l earn through video then check the link below. Also, do subscribe to my channel for more Android-related videos.
Step 1:
Go to File -> Settings

Step 2 :
Go to Plugins and Browse the repository and Search Android Wifi ADB and install it.

Step 3:
Then restart your Android Studio and now you can see on the right-side panel the section of android wifi ADB, Now just plug your Android device and press the connect button after that the state will be “Connected”. Now you are able to do your testing through wifi.

That’s it you have done 🙂 now no more cable required every time.

If you want to become a Professional Photographer then check it out this below link.
Adobe Photoshop CC Advanced for Photography — John Academy
Learn the advanced functions of Adobe Photoshop CC to create and enhance your images, photos, artwork, and other…
I hope this article is helpful. If you think something is missing, have questions, or would like to give feedback, go ahead and leave a comment below. I’d appreciate the feedback.
I’ve written some other Android-related content, and if you liked what you read here, you’ll probably also enjoy this:
Define Resource Layout Id In the Constructor Activity/ Fragment — With AndroidX
Reduce the number of methods from your activity/fragment
Using Coil to Download Images on Android in Kotlin
A new way to download images on Android in Kotlin
Create an Instant App Using Android App Bundle
Using App Bundle in place of the deprecated Instant App feature plugin
Building UIs Using Android Jetpack Compose
No need to write XML layouts-Jetpack Compose will do the magic
Convert Your PNG & JPEG into WebP Images Android
Reduce more assets size with webP images
Sharing (knowledge) is caring 😊 Thanks for reading this article. Be sure to clap or recommend this article if you found it helpful. It means a lot to me.
Источник
Беспроводная отладка Android 11
Режим дебага по WiFi теперь доступен, начиная с версии ОС Android 11. Давайте разберемся, как подключить устройство по Wi-Fi и смотреть логи в Logcat.

Нам необходимо убедиться, что у нас имеется все необходимое для соединения, а именно:
- установлен компонент Android SDK Platform-Tools версии не ниже 30.0.0 (April 2020), но естественно необходимо поставить последнюю версию, в которой разработчики пофиксили существующие на данный момент баги;
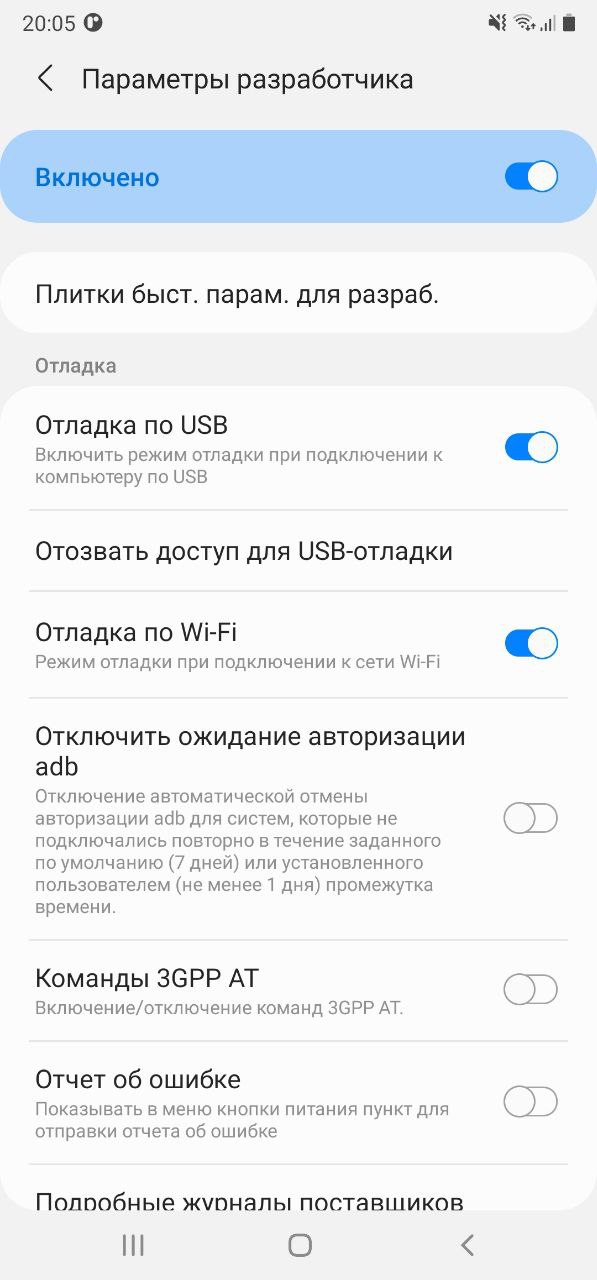
- включенрежим разработчика на вашем устройстве;
- на устройстве версия ОС Android 11.
Переходим в режим разработчика на нашем устройстве и активируем «Отладку по Wi-Fi».
Далее необходимо выбрать раздел «Подключить устройство с помощью кода подключения».
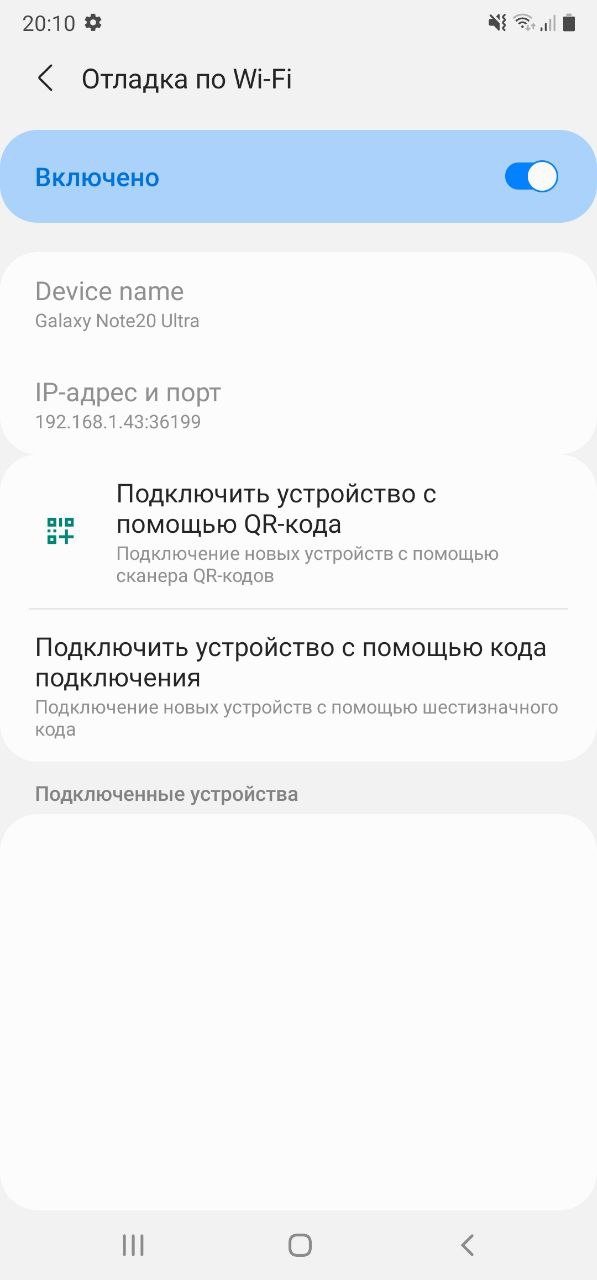
В боттомшите отобразится сам код подключения к устройству и IP-адрес и порт.

Откроем Android Studio, перейдем во вкладку Terminal, далее введем и выполним команду adb pair ipaddr:port где ipaddr и port — данные из боттомшита «Подключение к устройству». Следующим шагом — вводим код подключения и получим push на устройство об успешном подключении.
Перейдем на вкладку Logcat и все, что нам осталось — выбрать наше устройстве из списка подключенных устройств, в конкретном примере это Samsung SM-N985F.
Источник
Running Apps on Your Device
When building an Android app, it’s important that you always test your application on a real device in addition to emulators. This page describes how to set up your development environment and Android-powered device for testing and debugging on the device.
If you want an ideal SIM-unlocked phone to test on, then you might consider a Pixel phone.
Plug in your device to your computer with a USB cable. If you’re developing on Windows, you might need to install this universal ADB USB driver or find your specific USB driver for your device.
The next step is to enable USB debugging so your phone can interact with your computer in a developer mode.

The following steps are needed:
- (Windows Only) Install this ADB Driver
- Plug-in your Android Device to Computer via USB
- Open the «Settings» App on the Device
- Scroll down to bottom to find «About phone» item
- Scroll down to bottom to find «Build number» section
- Tap on «Build Number» 7 times in quick succession
- You should see the message «You are now a developer!»
- Go back to main «Settings» page
- Scroll down bottom to find «Developer options» item
- Turn on «USB Debugging» switch and hit «OK»
- Unplug and re-plug the device
- Dialog appears «Allow USB Debugging?»
- Check «Always allow from this computer» and then hit «OK»
Watch this video tutorial for a visual guide to getting USB debugging enabled.
Now, we can launch apps from Android Studio onto our device:
- Select one of your projects and click «Run» from the toolbar.
- In the «Choose Device» window that appears, select the «Choose a running device» radio button, select the device, and click OK.
Once Gradle finishes building, Android Studio should install the app on your connected device and start it.
Not seeing your device in the «Choose Device» window? Try the following:
- Unplug your device from the USB port on the computer
- Restart the device by powering off and back on
- Verify that Settings => Developer options => USB Debugging is enabled
- Quit and re-launch Android Studio
- Force restart ADB from the «Android Device Monitor»
- Plug your device back into the USB port on the computer
- Unlock the device and press «OK» on any dialog displayed
Now the phone should work as a debugging device as expected!
Still Not Working?
If after plugging the device into the computer and you don’t see any message about authorizing the device, then you may need to purchase another USB cable. Not all USB cables are enabled for data transfer. If there’s a chance that your cable may be a charging only cable, you can purchase a USB-C cable for Pixel or the micro-USB cable for Nexus 6 and prior.
Источник
Android studio real device wifi
Android WiFi ADB — IntelliJ/Android Studio Plugin ![]()
IntelliJ and Android Studio plugin created to quickly connect your Android device over WiFi to install, run and debug your applications without a USB connected. Press one button and forget about your USB cable.
Android WiFI ADB plugin adds a button to your IntelliJ/Android Studio Toolbar to connect your device to your computer over WiFi.
To use this plugin the project opened in your IntelliJ/Android Studio has to be an Android project configured with the Android SDK.
Archived repository: Maintaining this project up to date for all the different Android devices without having access to the physical devices is not possible at all right now. Most of the bugs reported ar related to the adb installation and not to the plugin code so this repository will keep archived for now.
Connect all devices button:


Connect your device to your computer using a USB cable. Then press the button, and a notification will pop up saying that the phone has been connected. Disconnect your USB once the plugin shows your device is connected. Open the Android WiFi ADB tab at the right side to see all the devices and manage your connections. Your device will be connected over WiFi now. You can now deploy, run and debug your device using your WiFi connection. Remember that your device and your computer have to be in the same WiFi connection. Also, you have to first connect your device with a USB every time you open Android Studio, for setting up the connection over WiFi.
If you want to handle your devices connection individually, open the Android WiFi ADB dashboard you will find at the right of your IDE.
Download and install Android WiFi ADB directly from Intellij / Android Studio: Preferences/Settings->Plugins->Browse Repositories
Alternatively, you can download the plugin from the JetBrains plugin site and install it manually in: Preferences/Settings->Plugins->Install plugin from disk .
Build the project
If you need some information about how to build this project review IntelliJ Idea’s Gradle Plugin documentation.
Do you want to contribute?
Please, do it! If you have any improvement or you’ve found any bug, send a pull request with the code or open an issue 🙂
Источник
Using ADB on WiFi for Android Development

I used to struggle a lot when developing an Android application, mostly because the emulator is slow, and when using real device for development, the USB cable needed to connect my phone with my laptop is just as annoying as the slow emulator.
Luckily, ADB supported WiFi to connect the debug bridge between my phone and my laptop. Since then, I only used USB cable for setting up the ADB WiFi connection. Though most of the time I still enjoy using emulator because and the emulator has been made faster.
Setting Up the ADB to Connect Over WiFi
First, you have to connect your phone with your computer using aa USB cable. Make sure that the ADB detected your phone. If not, you might need to update the driver that connects your phone and your computer.
Second, open up a command prompt and navigate to your Android SDK location (on Windows you can find it inside your user folder if you install it on the default location e.g: C:\Users\YOUR-USERNAME\AppData\Local\Android\sdk\platform-tools). You probably want to add this path to your $PATH variable.
Type android devices -l to see list of the connected device. You should see your phone on the list.

Then type adb tcpip 5555 to run the ADB in TCP mode. The number after tcpip is the port you want to attach the ADB server on your phone. I use 5555 because it is easy to remember and no apps should be using that port.

You can now plug off the USB cable from your phone and computer, and then connect to your phone via WiFi by typing adb connect :5555 or any port you set the server to be running on, and try running adb devices -l again to check if the ADB TCP server is working correctly.

Everything should be set, if you press the Run or Debug button on Android Studio, you should see your device on the list of available devices to run your app on.
Say goodbye to USB cables and broken USB port on your phone.
Источник


