- Different Ways to Format Code in Android Studio
- Method 1: By using a shortcut key for formatting a code in any file in Android Studio
- Method 2: Formatting a code from MenuBar
- Method 3: By using different shortcut keys for formatting our code
- 11 Android Studio Shortcuts every Android Developer must know
- Auto format code in Android Studio/Intellij IDEA
- Record the macro
- Play back a macro
- Edit macros
- Bind a keyboard shortcut to a macro
- Автоматический Code Improvement при коммите в Android Studio
- Используемые Hotkey в статье
- О чем вообще речь и где найти?
- Чем именно мне помогут эти галочки?
- ✓ Reformat code
- Rearrange code
- Optimize import
- Perform code analysis
- Check TODO
- Clean up
- Выводы и рекомендация
Different Ways to Format Code in Android Studio
Code formatting is very important when you are building an Android application. This will help you to organize your code properly and to maintain your code to make it easily readable. Below is a list of purposes of having a standard coding format.
Purposes of Having Coding Standards
- A coding standard gives a uniform appearance to the codes written by different engineers.
- It improves the readability, and maintainability of the code, and it reduces complexity also.
- It helps in code reuse and helps to detect errors easily.
- It promotes sound programming practices and increases the efficiency of the programmers.
In this article, we will take a look at different ways to format the code in Android Studio. We are going to discuss three different methods with the help of which we can format the code in our Android Studio.
- Method 1: By using a shortcut key for formatting a code in any file in Android Studio
- Method 2: Formatting a code from MenuBar
- Method 3: By using different shortcut keys for formatting our code
Method 1: By using a shortcut key for formatting a code in any file in Android Studio
In this method, we simply have to navigate to the file in which we have to format our code. After opening the file we have to simply press the shortcut key as Ctrl+Alt+L to reformat the code in your file. With this key, the code in your file will be rearranged according to the code standards. You can get to see below image 1 in which our code is not formatted properly and after pressing this shortcut key our code will be formatted as shown in the second image.
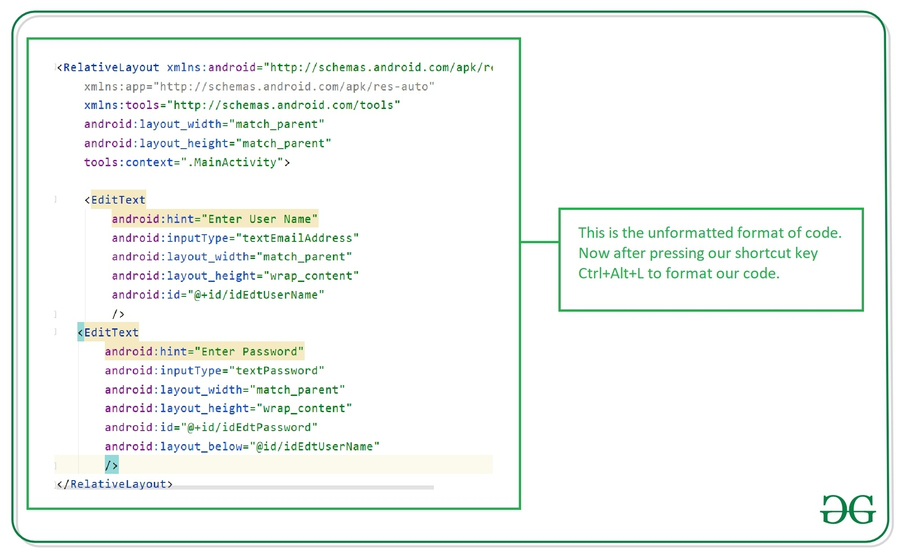
Unformatted code which we have written.

Formatted code which we get after pressing Ctrl+Alt+L
Shortcut keys for different Operating Systems
| Windows | Ctrl+Alt+L |
| Mac OS | Option+Cmd+L |
| Linux | Ctrl+Shift+Alt+L |
Method 2: Formatting a code from MenuBar
In this method, we will rearrange our code from the Menu Bar. To format our code navigate to the file in which we have to format our code and inside that file. Navigate to the top bar and click on the Code option and inside that option click on Reformat code option which is shown in the below screenshot.
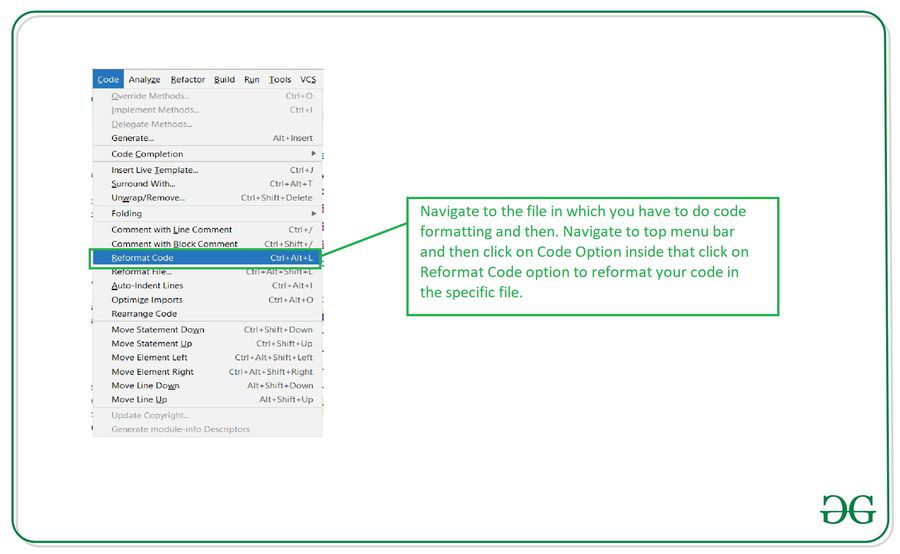
After clicking on this option your code will be formatted as shown in the above screenshot
Note: This method will be similar for all the operating systems
Method 3: By using different shortcut keys for formatting our code
Navigate to the file in which we have to format our code and then click on the shortcut key as Ctrl+Shift+Alt+L after clicking this key you will get to see the below dialog on your screen. Select the formatting options and your code will be formatted and rearranged according to selected options. The options present inside this dialog box is explained below.

After selecting the option on this dialog make sure to run it to format your code
Источник
11 Android Studio Shortcuts every Android Developer must know


This is how you may end up if you try and take a shortcut in real life, but it’s not true for the world of software !! Here you are encouraged to take shortcuts like auto complete, code generations, snippets and what not…
A software engineer must know all the shortcuts of the IDE he is using and must have the environment BENT to his will. Given a keyboard he must be able to navigate through the IDE all around. This can increase his productivity manifolds and is also less distracting than shifting to a mouse/touchpad during typing.
As an Android Engineer I can only speak of Android Studio and here I will mention my top 11 most useful Android Studio Shortcuts ( Windows / Mac ):

This is the holy grail of the navigational shortcuts. It’s really simple. Search Android assets, navigate to the Gradle files, image resources, layouts, colors.xml and much more. There is nowhere you can’t go with the Double Shift shortcut.
Just press Shift twice and a hovering menu will po2.pup. Something like this :
As you can see I searched for “color” and it presented me with all the file with name color. This is my favorite one and I use it a lot in Android Studio.

More often than not, you’ll not be working with all the project files at once. You would be working on a specific module in a project and will be playing around some specific files of that module. The Android Studio has an option where you can browse the most recently opened files on the go. Just press CTRL + E for windows and Command + E for mac and a list of recently opened files will popup.

So did you forgot what’s the shortcut for a replace action ? You forgot what’s the shortcut for a find action ? CTRL + SHIFT + A got you !! You can find actions such as Replace, Find, Run, Instant Run etc…
I searched for the Run action and it gave me all the run options Android Studio has to offer like running the garbage collector and debug runner.

This option is particularly useful if you want to search for some variable or method names. Many a times it so happens that you have declared a variable in some local code and forgot it’s origin, or you may want to find all the places it has been initialized or assigned some value. Well, android studio makes this very easy. Just press CTRL+ALT+SHIFT+N on Windows or Command+Option+O on Mac and type/guess a part of the variable name. Android studio will present you with a list of all possible options.

It can be time consuming to type out all the boilerplate code such as getters/setters in model classes, toString implementation, Parcelable Implementation and much more. Android Studio does all this for you. Press ALT+Insert on Windows or Command+N on Mac and android studio will list out all the options that are available such as override methods, implement interfaces, toString implementation etc…
Code Generation Android Studio Shortcut

When extending a Fragment or Activity class, you need to override certain methods such as onCreate and onCreateView. Apart from that you can also override lifecycle methods such as onPause, onResume, onDestroy. Android studio generates all this boilerplate code for you. Just press CTRL+O on Windows or Command+O on Mac and you’ll be presented with a list of methods that you can override.
You can see there are hundreds of methods which can be overridden and it is not possible to remember them all. So this shortcut comes in handy during development phase. You can also start typing a part of the name of method you want to override and the list will filter automagically.
If you want to delete the entire line, no need to select using a mouse or pressing backspace for the whole day. Just press CTRL+Y on Windows or Command+Backspace on Mac and you are good to go.

Forgot what all parameters your method requires ? Methods such as rawQuery (for SQLite) use many many parameters which are hard to remember. Here’s where Android Studio comes to the rescue. Just press CTRL+Space on Windows or Command+Space on Mac and you will be presented with a popup of all the variants of a method and the arguments that it expects.
Basic Completion Android Studio Shortcut
This feature is also demonstrated in the previous image. Notice the popup box in grey. This is the documentation box. Just like that we can view the documentation of a particular method, including the class it extends from and some links to more details. Press CTRL+Q on Windows or Command+J on Mac and the popup box will show up. It requires an active internet connection.

Every developer is familiar with the callback hell, OnClickListeners, Dialog Click Listeners etc… These are anonymous classes that have multitudes of methods that need to be overridden. If you have a large codebase, then looking at such code can be daunting. Android Studio provides this option of collapsing all the blocks of code, just showing the method names so that you can find the method you are looking for easily, or just close out all other distractions and make your IDE look neat!!
To expand or collapse code blocks press CTRL+ +/- on Windows or Command + +/- on Mac. Have a look at the image below. The file looks so neat, showing only the method names :
Collapse/Expand Android Studio Shortcut
Again this is one of the most important shortcut that you can use. No need to manually indent all the nested if blocks or the for loops. Android Studio takes care of all the formatting. Just Press CTRL+ALT+L on Windows or Command+Option+L on Mac. The android studio will reformat all the code for you.
And the good part is that it works for XML layouts as well. It takes care of ordering of the xml attributes and indenting nested layouts in your code so that you focus more on coding and less on figuring out what is nested under what.
So, this was my list of 11 most useful Android Studio Keyboard Shortcuts. These have helped me improve my productivity manifolds and hope it does for you as well.
Don’t forget to follow me on LinkedIn and Quora . If you have any questions or suggestions just drop a comment below and I’ll be happy to help.
Источник
Auto format code in Android Studio/Intellij IDEA
Every organization/company has certain rules for code formatting and many times developer forget about these rules and face lot of issues like merge conflicts, Jenkins builds getting failed etc. to solve this you can use a utility MACROS available in all Android Studio and all other IntelliJ products.
Record the macro
- Open any file in the editor.
- From the main menu, select Edit | Macros | Start Macro Recording.
- Press ⌥⌘L to reformat code (Code | Reformat Code ). Then press ⌘S to save all changes (File | Save All ). Android Studio/IntelliJ IDEA will show the performed actions in the status bar.

- Stop recording by selecting Edit | Macros | Stop Macro Recording.
- In the Enter Macro Name dialog, specify the name for the new macro and click OK.

- If the macro is intended for temporary use only, you can leave the name blank.
Play back a macro
- To play back a temporary macro, open the Edit menu, point to Macros, and click Play Back Last Macro.
- To play back a named macro, open the Edit menu, point to Macros, and click the necessary macro name.
Edit macros
- Open the Edit menu, point to Macros, and click Edit Macros.
Bind a keyboard shortcut to a macro
- In the Settings/Preferences dialog ⌘,, select Keymap.
- Expand the Macros node and select the created Reformat and Save macro.
- Right-click the macro and choose Add Keyboard Shortcut in the context menu

- In the Enter Keyboard Shortcut dialog, press ⌘S to be used as the shortcut and click OK.
- Android Studio/IntelliJ IDEA will warn you that the shortcut is assigned to another action. Click Remove to remove the ⌘S shortcut for the File | Save All action. You can always reassign it later if necessary.
- Click OK to apply the changes.
Now, when you press ⌘S, Android Studio/IntelliJ IDEA will invoke the new macro: reformat the current file and save your project.
Источник
Автоматический Code Improvement при коммите в Android Studio
Работать с гитом в Android Studio, как известно, можно двумя способами.
Первый способ классический — использовать консоль. Плюсом такого подхода являются в первую очередь надежность. GUI может залагать и например, зависнуть на этапе rebase так, что abort/continue/переключение на другую ветку не поможет. Консольные команды вам в помощь, они всегда безотказны.
Второй способ — использовать GUI, предоставляемый Android Studio. Плюсы очевидны — меньший порог входа, более понятно, что вообще можно делать. А также есть различные плюшки от самой студии для удобства работы с гитом. Об одном из них и пойдет речь. Кстати, используя GUI, тоже можно оставлять в покое мышку и использовать hotkey
Используемые Hotkey в статье
Shift+Shift (двойное нажатие shift) — Окно поиска. Позволяет искать как код/ресурсы, так и различные действия и настройки.
Ctrl+Alt+L (⌘+⌥+L) → Форматирование кода
Shift+Ctrl+Alt+L (⇧+⌘+⌥+L) → Форматирование кода → Форматирование кода с параметрами.

О чем вообще речь и где найти?
Неактуальные импорты, пустые строки, пробелы вместо табов — эти вещи бесят, если они попадают в готовый код, предназначенный для pull request. Исправить это легко, используя hotkey Ctrl+Alt+L, однако часто мы забываем это делать.
Idea/AndroidStudio позволяет проводить эти действия автоматически, в последний момент перед коммитом
При использовании commit’а через Android Studio можно увидеть такого вида окно:
Нас интересуют галочки, которые находятся справа от списка файлов, в блоке Before Commit. При активации этих помощников, они будут автоматически применяться при каждом коммите
Чем именно мне помогут эти галочки?
✓ Reformat code
Данное улучшение приводит код в соответствии с вашим code style. Действие полностью аналогично ctrl+shift+alt+L с включенным clean up.
Настроить code style можно здесь Settings → Editor → Code Style
Применяет отступы строк в соответствии с code style (Подробно в Code Style, в одноименном разделе)
В примере пробелы, используемые для формирования отступа (отмечены точками), будут замены табами (отмечены стрелкой)
Форматирует все пробелы в коде в соответствии с code-style.
Будут удалены лишние пробелы в конструкторе Date, добавлены пробелы между объявлением переменной button и =, а также между списком аргументов args в main и <
Этот блок управляет переносом строк. Переносятся как сами строки кода, так и закрывающие/открывающие скобки.
Строчка else, а также строчка catch должны располагаться на той же линии, что и закрывающая скобка (так настроено в code style)
Общее количество символов на строке с функцией manyArguments вышло за 80 знаков(настроено в code style), поэтому аргументы будут перенесены на новую строку
Регулирует максимальное и минимальное количество пустых строчек в коде. (Подробно в Code Style, в одноименном разделе)
В данном примере удалит лишние строки от последней функции до >, а также 2 лишних пустых строчки между функциями
Rearrange code
Располагает атрибуты и элементы в том порядке, который соответствует код-стайлу. Работает в XML и HTML файлах. Настроить расположение можно в Setting → Editor → CodeStyle → XML/HTML → Arrangement
Внимание! неправильная настройка может привести к печальным последствиям. Rearrange может влиять на очередность элементов, что может привести к неправильной работе в файлах, чувствительных к расположению. Пример: в LinearLayout, при сортировке по алфавитному порядку, элемент Button может переместится выше TextView, хотя по дизайну такого быть не должно. Выход — настраивать расположение ТОЛЬКО атрибутов
В данном примере xmlns расположились в трех первых строчках и строго по порядку, определенному в code-style(xmlns:android на первой строчке, остальные xmlns: в алфавитном порядке.
Обратите внимание, xmlns:tools и xmlns:app не были удалены даже несмотря на то, что нет случаев их использования. Это говорит о том, что rearrange влияет только на расположение элементов
В данном примере блок с атрибутами android:padding изменит порядок в соответствии с code-style. Также атрибут style расположится сразу за android:id
Optimize import
Следит за чистотой блока импортов и приводит в правильный вид, а также проверяет на соответствие code style. Само действие полностью аналогично ctrl+shift+alt+L с включенным optimize import.
В данном примере при optimize imports import java.util.* будет удален, так как нет полей или методов, нуждающихся в нем
Если n или более классов импортируются из одного пакета, то такой импорт будет заменен импортом всего пакета.
Если m или более enum или java static импортируется из одного класса, то такой импорт будет заменен на импорт всего класса
Оба параметра задаются в Settings → Editor → Code Style → Kotlin → Imports
В данном примере множественные импорты из пакета android.widget будут заменены на android.widget.*
В том случае, если стоит настройка не объединять импорты(m = 0, n=0), объединенные импорты(импорт пакета) будут заменены импортом каждого класса/функции/поля отдельно.
В случае ниже import android.widget. и import java.util. будут упразднены
После применения, все импорты отсортируются, и будут удобно располагаться в алфавитном порядке
Perform code analysis
Помогает находить проблемные места. Носит информационный характер и никак не меняет код. Самые частые случаи — неиспользуемые параметры, переменные, использование кода, помеченного как Deprecated
Перед коммитом студия подскажет, что есть проблемы с кодом и предложит их посмотреть внимательнее:
При нажатии на Review покажется список найденных предупреждений:
Check TODO
Очень полезная галочка, помогает не забыть о новых TODO, которые были поставлены именно в этом коммите. Более того, студия позволяет отслеживать не только //TODO, но и //FIXME, а также любые собственные todo, которые были добавлены через Setting → Editor → TODO.
Также можно фильтровать список todo, которые студия будет проверять.
Clean up
Очень помогает держать код в чистоте. Удаляет избыточный код (см. примеры), заменяет deprecated функции. Действие полностью аналогично Actions → Code cleanup. Достаточно интересная функция, но вместе с этим может быть и опасной.
Из замеченных особенностей можно выделить две основные:
- замена deprecated методов (подробнее ниже)
- непонятную замену вызова методов view в презентере в одном из личных случаев
! Обязательно пересматривайте получившийся коммит, если используете данную функцию!
После применения удалятся элвис-операторы, т.к. были применены к non-nullable переменным
После применения удалится оператор public, т.к. конкретно в этом случае лишний
После применения удалится вызов конструктора
Если в аннотации deprecated указан ReplaceWith(), то при cleanup старые методы и классы будут заменены в соответствии с этой пометкой. Надо быть очень внимательным с применением этой возможности, так как работает все очень банально — название старого метода меняется ровно на то, что было указано в ReplaceWith(). Анализатор не проверят даже существует ли такой код. Поэтому неправильно указание нового класса/метода может привести к невозможности компиляции кода. И даже если такая функция/класс существует, даже если у нее одинаковая сигнатура(что анализатор также НЕ проверяет), то это может привести к другой проблеме, необходимо было не просто заменить одну функцию на другую, но и изменить сценарий использования. Код в таком случае скомпилируется, но не будет правильно работать
Заменит старый метод и класс на новые
Выводы и рекомендация
Помощники, предоставленные Android Studio могут здорово облегчить жизнь вам и вашим коллегам. Да, все действия можно провести и вручную перед отправкой на коммит, но все же не имея привычки так делать, легко пропустить неправильной код дальше. Правильное использование может освободить вас от мыслей о том, что надо следить за каждой запятой и каждым пробелом.
Из приведенных выше примеров можно понять несколько моментов:
Optimize import и Reformat code можно использовать безбоязненно. Они влияют только на форматирование и явные огрехи.
Rearrange и Clean up необходимо использовать аккуратно. Да, они в целом могут хорошо помочь и выловить уже что-то посерьезнее, но при неправильной настройке (Rearrange) или неоднозначном коде (Clean up) помощники могут сильно ошибиться
Check TODO и Perform code analysis также можно использовать безбоязненно. Они никаким образом не влияют на код, только дают назойливые подсказки. Да, если у вас в проекте все полностью построено на TODO и Deprecated коде, то отбоя от них не будет, и они больше будут мозолить глаза. Но если у вас в проекте достаточно чистый код и такие моменты стараетесь минимизировать, то помощники будут давать отличный шанс пересмотреть код, где вы могли допустить упущение.
Источник


