- How to Rename Package Name in Android Studio?
- Step by Step Implementation
- 3 Methods To Change Or Rename Android App Package Name in Android Studio
- Method I – How to rename android app package name in Android Studio
- STEP 1
- STEP 2
- STEP 3
- STEP 4
- STEP 5
- STEP 6
- STEP 7
- STEP 8
- STEP 9
- STEP 10
- STEP 11
- Method 2 – How to change full package name of project by creating new package
- STEP 1
- STEP 2
- STEP 3
- STEP 4
- STEP 5
- STEP 6
- STEP 7
- STEP 8
- STEP 9
- STEP 10
- STEP 11
- STEP 12
- Method III – How to rename android app package name in Android Studio using existing package
- STEP 1
- STEP 2
- STEP 3
- STEP 4
- STEP 5
- STEP 6
- STEP 7
- STEP 8
- STEP 9
- STEP 10
How to Rename Package Name in Android Studio?
A package is a namespace that combines a set of relevant classes and interfaces. Conceptually one can consider packages as being similar to various folders on your computer. One might have HTML pages in one folder, images in another, and scripts or applications in yet another. Because in android, software written in the Java/Kotlin programming language can be made of hundreds or thousands of different classes, it makes sense to keep things organized by placing related classes and interfaces into packages.
A package is basically the directory (folder) in which source code resides. Normally, this is a directory structure that uniquely distinguishes the android application; such as com.example.app. Then the developer can build packages within the application package that divides the code; such as com.example.app.ui or com.example.app.data. The package for each android application resides within the src/main/java directory of the application module. The developer could put a different package within the application package to separate each “layer” of the application architecture.
There might be many situations when the developer wants to change the package name of the App in Android Studio. The developer might have download source code from the internet and requires to rename the package name according to his/her Application details. Here in this article, we are going to discuss step by step how to rename/change package name in Android Studio:
Step by Step Implementation
Step 1: To rename package name in Android studio open your project in Android mode first as shown in the below image.
Step 2: Now click on the setting gear icon and deselect Compact Middle Packages.
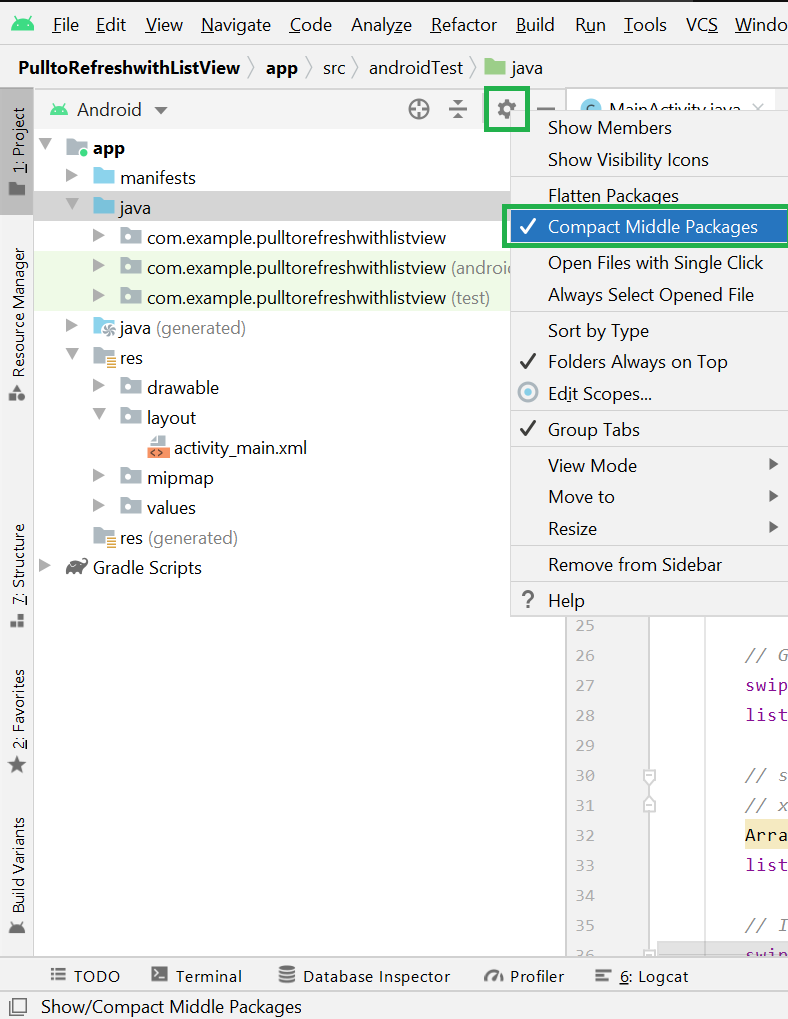
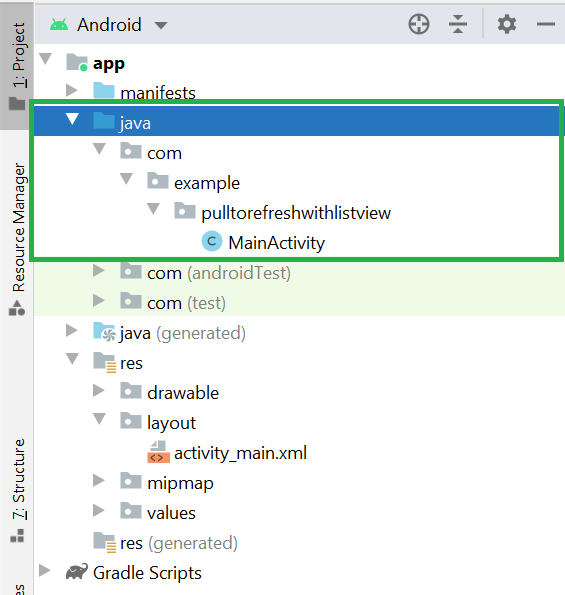
Step 3: Now the packages folder is broken into parts as shown in the below image.
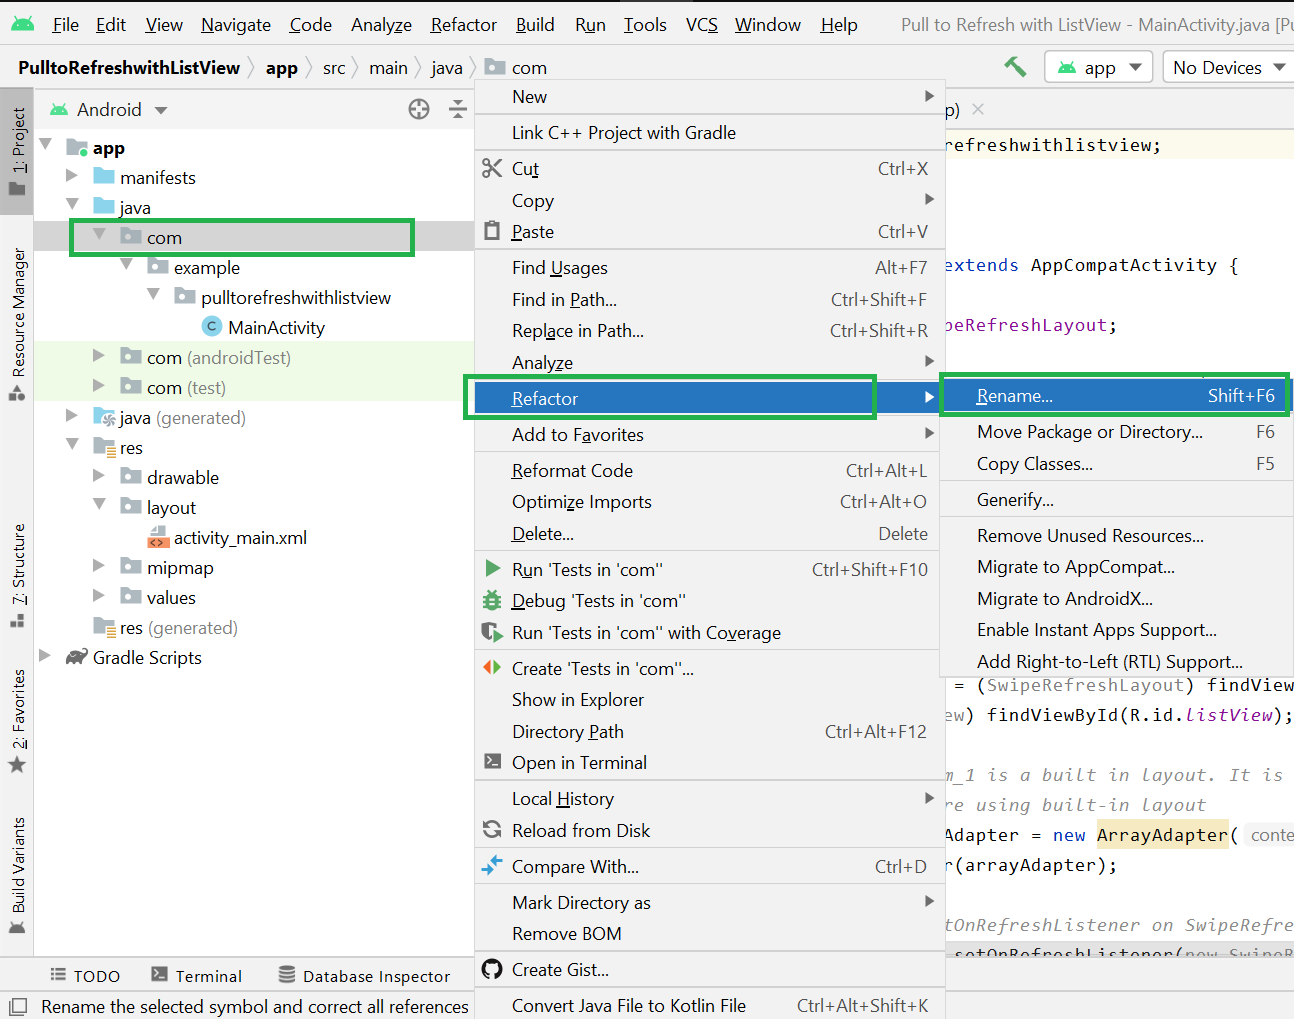
Step 4: Now right-click on the first package name (com) and Refactor > Rename. A warning message will be displayed but go ahead and click on the Rename current button.
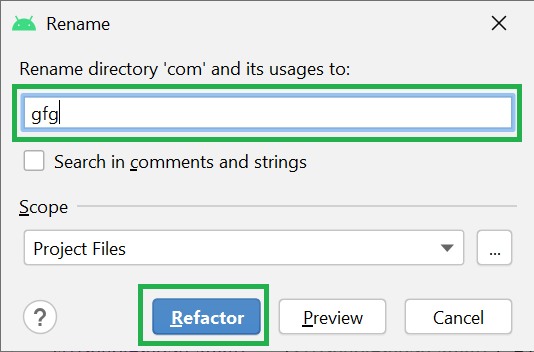
Step 5: Rename the directory name as your requirement and click on the Refactor button.
Note: Go to Build > Rebuild Project to display the updated name.
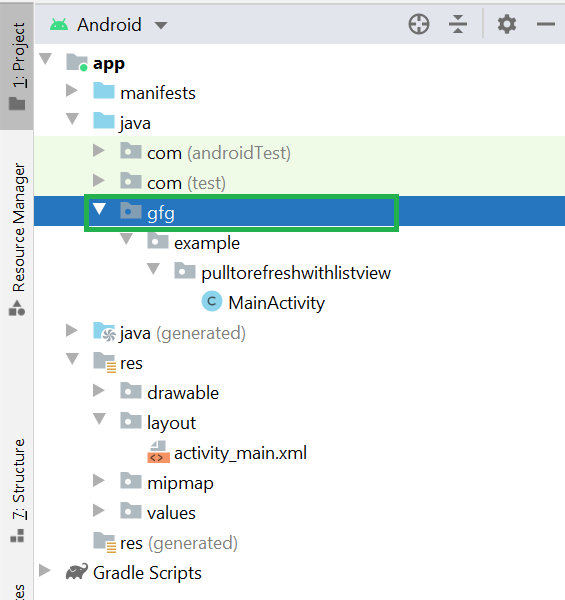
Now you can see your directory name changes from com -> gfg as shown in the below image.
Step 6: Do the same for the domain extension and App folder name according to your requirement.
Источник
3 Methods To Change Or Rename Android App Package Name in Android Studio

Sometimes, we make our app using the code from youtube tutorials and blogs and may forget to change the package name at the start. Yes, this happens, most of the time.
We don’t want to display other website name or Youtube channel name to be as our package name, We want a package name that defines us. If you are searching for a tutorial about how to change or rename the Android app package name in Android Studio, then this post is for you.
Method I – How to rename android app package name in Android Studio
In this example, we will change package name com.androidride.myapplication” to “com.xyz.yourapplication”.
STEP 1
- Open Android Studio project, Select package name or Java, Click the gear icon.
STEP 2
- Deselect Hide Empty Middle Packages. This breaks your folder structure into parts.
- The package is brocken down.
STEP 3
- Right Click on AndroidRide, Refactor -> Rename . You can also use Shift + F6.
A warning will appear.
STEP 4
- Click on Rename package
STEP 5
- Clear AndroidRide and put new Name in it. Here “xyz”
STEP 6
- Click Do Refactor
STEP 7
- Repeat the same process.
- Right click on myapplication,Refactor -> Rename and Rename package.
STEP 8
- Change myapplication to yourapplication
STEP 9
- Click on Do Refactor.
STEP 10
- After changing the package name, open build.gradle(module) and change Application Id
STEP 11
- change applicationid “com.androidride.myapplication” to “com.xyz.yourapplication”.
- After changing applicationid, click on sync now.
Method 2 – How to change full package name of project by creating new package
In this method, We are going to change package name “com.androidride.myapplication” to “info.xyz.yourapplication”
STEP 1
- Right click on com.androidride.myapplication package and select Refactor->Move
STEP 2
- Choose Move package “com.androidride.myapplication” to another package and click on OK.
STEP 3
Now you will get a warning dialog shows Multiple directories correspond to package com.androidride.myapplication
- Click on Yes
STEP 4
- Enter the new package name except the last level, For example. If you want to make package name as “info.xyz.yourapplication” then type “info.xyz” only, like above. Avoid the last part, here “yourapplication”.
STEP 5
- Click YES for creating new package.
STEP 6
- Click on Do Refactor. Now package name “com.androidride.myapplication” changes into “info.xyz.myapplication“.
STEP 7
Now we have to change the last package level name,
- Right click on package name -> Refactor -> Rename
STEP 8
- Click on Rename package
STEP 9
- Rename “myapplication” in to “yourapplication”.
STEP 10
- Click on “Do Refactor”
STEP 11
- Use CTRL key and select each package related to old package name and delete. You can use DELETE key in keyboard or right click after selecting old packages and click on delete option from the menu.
STEP 12
- Open build.gradle file, change applicationId and Click on sync now.
Package name successfully changed to “info.xyz.yourapplication“.
Method III – How to rename android app package name in Android Studio using existing package
This method is also same as the second method. Just like second, we change package name “com.androidride.myapplication” to “info.xyz.yourapplication“.
STEP 1
- Right click on Java and select New -> Package
STEP 2
- Next dialog box appears, choose …app\src\main\java as Destination Directory.
STEP 3
- Enter your package name, here info.xyz.yourapplication
STEP 4
- Now move old package files into new package. Here move files from “com.androidride.myapplication” to “info.xyz.yourapplication“. Just use CTRL key to select all files and drag it to new package.
STEP 5
- Open AndroidManifest.xml and change package name into “info.xyz.yourapplication“
STEP 6
- Open build.gradle (Module: app) file, change applicationId also. Change it to “info.xyz.yourapplication” and Click on Sync now.Now you might get errors. It is due to the R file import. There are two scenarios, we can do.
- Remove R file import line from both files and check the error still exists. If not then you can delete old package files now
It’s done. You have successfully changed the package name.
Otherwise, If the error still exists, do the below steps.
STEP 7
- Select R file import line just like above and press CTRL + SHIFT + R . Replace with new package name. Click on replace all.
STEP 8
- Click on replace
STEP 9
- Delete old package and related files
STEP 10
Yes, the package name is changed.
Express your thoughts below and tell your friends about this post. Thank you.
Источник


