How to Reset Android Studio?
Android Studio Reset, means to reset all the settings to factory(default) settings. The reset will remove all of your android studio settings, projects, and also all the Gradle files. This will make your android studio looks like a newly fresh installed software. It is recommended to make a backup of your android studio settings and projects before reset.
Steps to Reset Android Studio
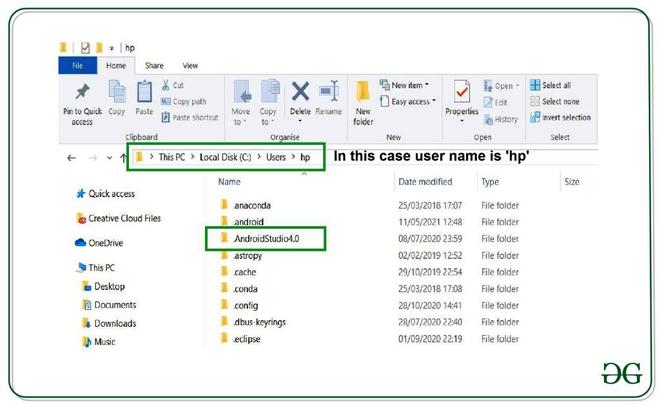
Step 1: Got to users directory in system drive
First-of-all you need to go to your user’s directory in system drive, which is generally ‘C-drive’. Go to “C:\Users\your-user-name”. Here you will find a directory with the name .AndroidStudio, make sure that it must be starting with a dot(.). This directory name is followed by the version of the android studio. For example- In the below pictures, you can see the version of the Android Studio as 4.0 and its name is “.AndroidStudio4.0”.
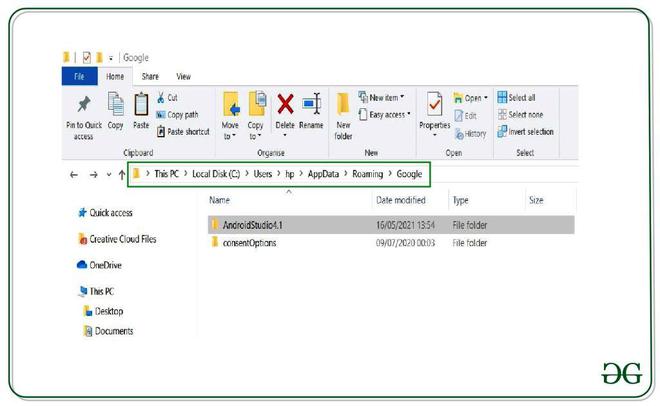
If you are not able to locate the directory in the above address, you can also check it at “C:\User\you_user_name\AppData\Roaming\Google”.
Step 2: Delete .AndroidStudio directory
You need to delete .AndroidStudio directory in order to reset your Android Studio. Make sure that you have closed all of your android studio applications and delete them. Once you delete the directory open your Android Studio.
Step 3: Setting up the Android Studio
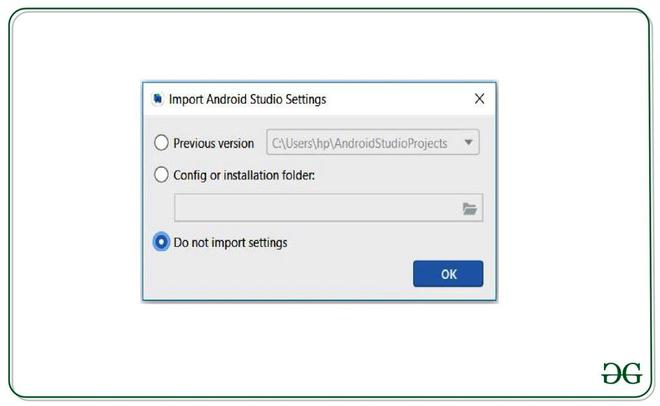
After deleting .AndroidStudio directory and re-opening the Android Studio, it will pop up few dialog boxes to set up. You need to follow the below steps to set up your android studio. When you open your Android Studio it will ask you to import your previous version. If you have the backup you can import it. Otherwise, you need to choose the second option “Do no import settings” and click ok.
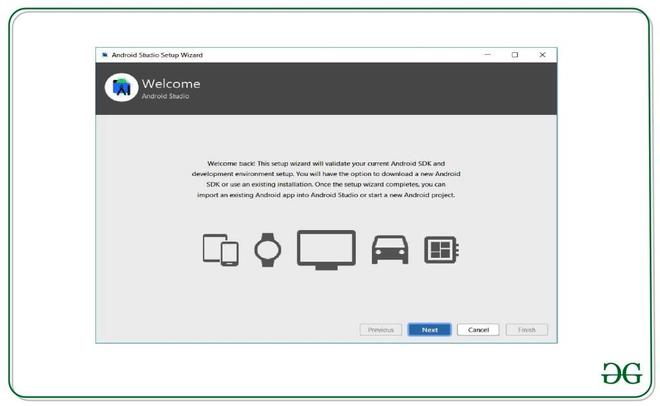
After that you will come to “Welcome Screen“, click next.
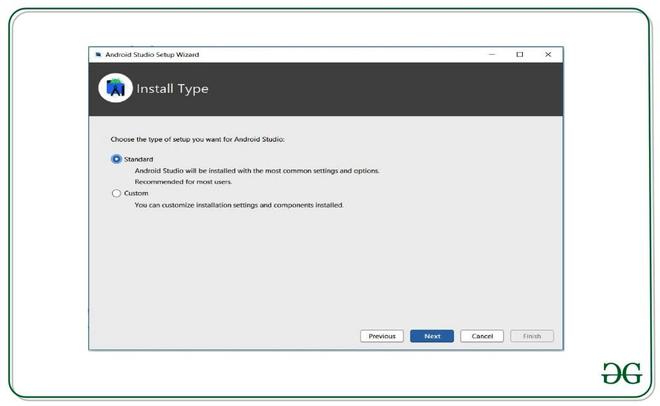
Now, it will ask you the choosing the installation type. You can either choose Standard or Custom(if you want to customize your installation settings).
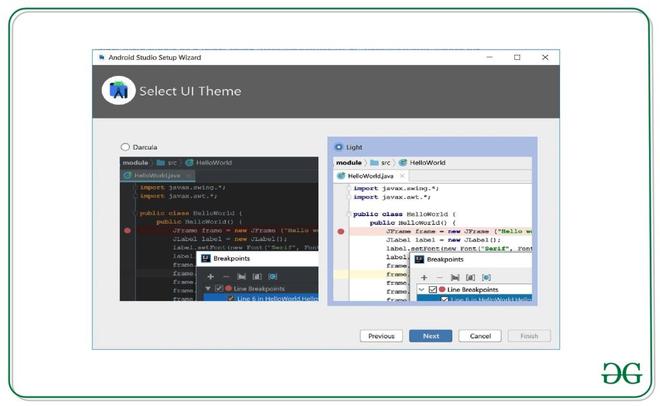
On the next screen, you will be asked to choose the UI Theme. You can choose either one. Here I’m choosing the Light theme.
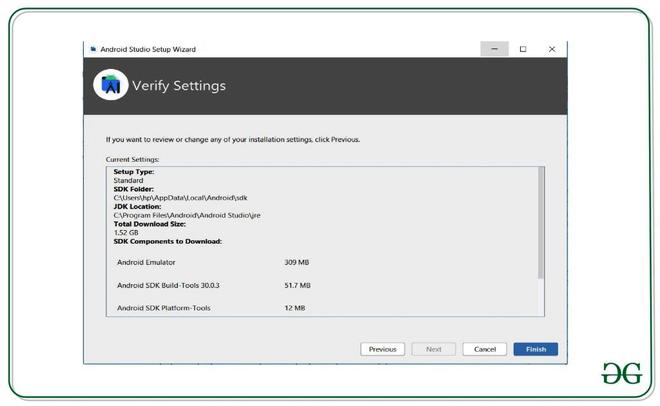
Now, it will ask you to verify your settings. After that click on the Finish button.
It will start downloading the settings.

Once android studio completes downloading its setting, you are done. Your Android Studio is reset. You can start your project.
Источник
How to Reset Android Studio to the Default Settings

September 2, 2021

September 8, 2021


This article walks you through a couple of different ways to reset Android Studio to the default settings. Without any further ado, let’s get started.
Table of Contents
Using Android Studio Restoring Feature
This approach is simple and can be done quickly on both Windows and Mac. You don’t have to use the command line or something like that.
1. Restart your Android Studio then select “Configure” > “Restore Default Settings…”.

2. Click on the “Restore and Restart” button to confirm your decision.

3. After a few seconds, your Android Studio will relaunch and you will see the setup wizard window like the first time you open the software. Just click “Next” and follow the instructions.

Manually Cleaning It Up
This method is not as easy as the first one. What you need to do is to delete the files and folders where the Android Studio’s information is saved. The paths will be different for Windows and Mac.
Open your terminal and execute the following commands:
Windows
Delete this folder:
And your Android Studio will be reset.
Final Words
We’ve discovered two approaches to make your Android Studio go back to its default settings. If you have a question then feel free to leave a comment. I will try my best to help.
Источник
Как полностью сбросить настройки Android Studio? [Дубликат]
Поскольку люди, похоже, обращаются к этому вопросу, когда речь заходит об ошибках компоновщика, я собираюсь добавить это здесь.
Одной из возможных причин ошибок компоновщика с GCC 5.2.0 является то, что новая библиотека libstdc ++ ABI теперь выбран по умолчанию.
Если вы получаете ошибки компоновщика о неопределенных ссылках на символы, которые включают типы в пространстве имен std :: __ cxx11 или теге [abi: cxx11], то это, вероятно, указывает на то, что вы пытаетесь связать файлы объектов, которые были скомпилированы с различными значениями для макроса _GLIBCXX_USE_CXX11_ABI. Это обычно происходит при подключении к сторонней библиотеке, которая была скомпилирована с более старой версией GCC. Если сторонняя библиотека не может быть перестроена с новым ABI, вам нужно будет перекомпилировать свой код со старым ABI.
. Если вы вдруг получите ошибки компоновщика при переключении на GCC после 5.1.0 это было бы замечательно.
11 ответов
Я знаю только, как это сделать в Windows (но он должен быть похож на любую ОС, вам просто нужно найти правильное местоположение самостоятельно — поиск google поможет с этим).
Перейти к папке пользователя — в Windows 7/8 это будет:
[SYSDRIVE]:\Users\[your username] (например, C:\Users\JohnDoe\ )
В этой папке должна быть папка с именем .AndroidStudioBeta или .AndroidStudio (обратите внимание на период в начале — так что на некоторых ОС она будет скрыта).
Удалите эту папку (или, еще лучше, переместите ее в резервное местоположение — чтобы вы могли вернуть его, если что-то пошло не так).
Это должно привести к изменению настроек Android Studio по умолчанию.
Источник


