- Managing AVDs with AVD Manager
- In this document
- Creating an AVD
- Creating a device definition
- Hardware options
- Creating Emulator Skins
- Install Android Development Tools
- Before You Begin
- Background
- What Do You Need?
- Install and Set Up Android Studio
- Install an Android SDK Platform Package
- Create and Start an Android Virtual Device
- Install the Java SE Development Kit 8
- Create Environment Variables
Managing AVDs with AVD Manager
In this document
The AVD Manager is a tool you can use to create and manage Android virtual devices (AVDs), which define device configurations for the Android Emulator.
To launch the AVD Manager:
- In Android Studio, select Tools > Android > AVD Manager, or click the AVD Manager icon
 in the toolbar.
 - Or, use the command line to navigate to your SDK’s tools/ directory and execute:
 in the toolbar.
The AVD Manager main screen shows your current virtual devices, as shown in figure 1.

Figure 1. The AVD Manager main screen shows your current virtual devices.
Note: If you launch the AVD Manager from the command line, the UI is different than how it appears in Android Studio, as documented here. Most of the same functionality is available, but the command-line version of the AVD Manager is currently not documented.
Creating an AVD
You can create as many AVDs as you would like to use with the Android Emulator. To effectively test your app, you should create an AVD that models each device type for which you have designed your app to support. For instance, you should create an AVD for each API level equal to and higher than the minimum version you’ve specified in your manifest tag.
To create an AVD based on an existing device definition:
- From the main screen (figure 1), click Create Virtual Device.
In the Select Hardware window, select a device configuration, such as Nexus 6, then click Next.

Figure 2. The Select Hardware window.
If necessary, click Show Advanced Settings to select a custom skin for the hardware profile and adjust other hardware settings.
To launch the AVD in the Android Emulator, click the launch button  in the list of AVDs.
Creating a device definition
In case the available device definitions do not match the device type you’d like to emulate, you can create a custom device definition for your AVD:
- From the main screen (figure 1), click Create Virtual Device.
- To begin you custom device by using an existing device profile as a template, select a device profile then click Clone Device.
Or, to start from scratch, click New Hardware Profile.
The following Configure Hardware Profile window (figure 3) allows you to specify various configurations such as the screen size, memory options, input type, and sensors.
When you’re done configuring the device, click Finish.

Figure 3. The Configure Hardware window when creating a custom device configuration.
Hardware options
If you are creating a new AVD, you can specify the following hardware options for the AVD to emulate:
| Characteristic | Description | Property |
|---|---|---|
| Device ram size | The amount of physical RAM on the device, in megabytes. Default value is «96». | hw.ramSize |
| Touch-screen support | Whether there is a touch screen or not on the device. Default value is «yes». | hw.touchScreen |
| Trackball support | Whether there is a trackball on the device. Default value is «yes». | hw.trackBall |
| Keyboard support | Whether the device has a QWERTY keyboard. Default value is «yes». | hw.keyboard |
| DPad support | Whether the device has DPad keys. Default value is «yes». | hw.dPad |
| GSM modem support | Whether there is a GSM modem in the device. Default value is «yes». | hw.gsmModem |
| Camera support | Whether the device has a camera. Default value is «no». | hw.camera |
| Maximum horizontal camera pixels | Default value is «640». | hw.camera.maxHorizontalPixels |
| Maximum vertical camera pixels | Default value is «480». | hw.camera.maxVerticalPixels |
| GPS support | Whether there is a GPS in the device. Default value is «yes». | hw.gps |
| Battery support | Whether the device can run on a battery. Default value is «yes». | hw.battery |
| Accelerometer | Whether there is an accelerometer in the device. Default value is «yes». | hw.accelerometer |
| Audio recording support | Whether the device can record audio. Default value is «yes». | hw.audioInput |
| Audio playback support | Whether the device can play audio. Default value is «yes». | hw.audioOutput |
| SD Card support | Whether the device supports insertion/removal of virtual SD Cards. Default value is «yes». | hw.sdCard |
| Cache partition support | Whether we use a /cache partition on the device. Default value is «yes». | disk.cachePartition |
| Cache partition size | Default value is «66MB». | disk.cachePartition.size |
| Abstracted LCD density | Sets the generalized density characteristic used by the AVD’s screen. Default value is «160». | hw.lcd.density |
Creating Emulator Skins
An Android emulator skin is a collection of files that define the visual and control elements of an emulator display. If the skin definitions available in the AVD settings don’t meet your needs, you can create your own custom skin definition, then apply it to your AVD from the advanced settings on the Verify Configuration screen.
Each emulator skin contains:
- A hardware.ini file
- Layout files for supported orientations (landscape, portrait) and physical configuration
- Image files for display elements, such as background, keys and buttons
To create and use a custom skin:
- Create a new directory where you will save your skin configuration files.
- Define the visual appearance of the skin in a text file named layout . This file defines many characteristics of the skin, such as the size and image assets for specific buttons. For example:
- Add the bitmap files of the device images in the same directory.
- Specify additional hardware-specific device configurations an hardware.ini file for the device settings, such as hw.keyboard and hw.lcd.density .
- Archive the files in the skin folder and select the archive file as a custom skin.
For more detailed information about creating emulator skins, see the Android Emulator Skin File Specification in the tools source code.
Источник
Install Android Development Tools
 Install Android Development Tools
Before You Begin
 Before You Begin
This 15-minute tutorial shows you how to install Android Studio, which includes the Android SDK, and create an Android Virtual Device (AVD) on which you install an Oracle JavaScript Extension Toolkit (Oracle JET) hybrid mobile application during a later tutorial. The time to complete doesn’t include processing time as a result of your activities.
Background
The Oracle JET command-line interface invokes the Android SDK that you install with Android Studio to build an Android application package (APK) file from the source files of your hybrid mobile application. This APK file is installed on an AVD to enable you to test the hybrid mobile application.
What Do You Need?
- A computer that meets the system requirements to install Android Studio. See System requirements at https://developer.android.com/studio/
Install and Set Up Android Studio
 Install and Set Up Android Studio
Depending on the operating system of your computer, the Android Studio installation wizard prompts you with dialogs where you choose between standard or custom install types. Choose the options recommended by the Android Studio installation wizard as these options include the components that you require to create and install a hybrid mobile application on an AVD. They also include an Android emulator and an emulator accelerator appropriate for your computer, be that Windows, Mac, or Linux.
- Go to the Download page for Android Studio on the Android Developer’s website at https://developer.android.com/studio/ and click DOWNLOAD ANDROID STUDIO.
- Review and accept the terms and conditions in the Download Android Studio dialog that appears and click DOWNLOAD ANDROID STUDIO FOR PLATFORM where PLATFORM refers to the operating system of your machine, such as Windows, Mac, or Linux.
- Go to the Install Android Studio guide at https://developer.android.com/studio/install and follow the instructions for your operating system to install and start Android Studio.
- If you run Android Studio behind a firewall or secure network, an Android Studio First Run dialog appears which displays a button (Setup Proxy) that you click to enter the proxy server settings for your environment. This allows Android Studio to complete the download of the components for a standard install.
- In the Welcome to Android Studio dialog, select Start a new Android Studio project, and then, in the Create New Project wizard, accept the default options to progress to the final screen in the wizard and click Finish.
This enables the Android Studio toolbar with the options that you need to create an AVD. It also downloads and configures the Gradle build tool that the Android SDK invokes to build the APK file when you complete the creation of your Oracle JET hybrid mobile application.
If you run Android Studio behind a firewall or secure network, a Proxy Settings dialog appears that enables you to configure proxy settings for the Gradle build tool that Android Studio downloads and configures. Provide the proxy settings for your environment to ensure that the Gradle build tool functions correctly.
Install an Android SDK Platform Package
 Install an Android SDK Platform Package
- In the Android Studio toolbar, click the SDK Manager icon () to open the Android SDK page in the Default Settings dialog.
- In the SDK Platforms tab, select Android 8.0 (Oreo) with an API Level value of 26, and click Apply. Description of the illustration sdkmgrdialog.png
- Click OK in the confirmation dialog that appears and accept the license agreement to proceed with the installation.
- Once the installation completes, click Finish and then click OK to close the Default Settings dialog.
 ) to open the Android SDK page in the Default Settings dialog.
 Description of the illustration sdkmgrdialog.png
Create and Start an Android Virtual Device
 Create and Start an Android Virtual Device
- In the Android Studio toolbar, click the AVD Manager icon ( ) and click Create Virtual Device in the Android Virtual Device Manager dialog that opens.
- In the Phone category of the Choose a device definition page of the Virtual Device Configuration dialog, select Nexus 5X and click Next.
- In the Recommended tab of the Select a system image page, click Download for the Oreo entry with an API Level of 26. Description of the illustration downloadoreo.png The SDK Quickfix Installation wizard opens.
- Accept the license agreement to proceed with the download of the system image for Android 8.0 with API Level 26. Once the installation completes, click Finish and then click Next in the Select a system page.
- In the Verify Configuration page, review and accept the default settings such as the AVD Name value of Nexus 5X API 26, then click Finish.
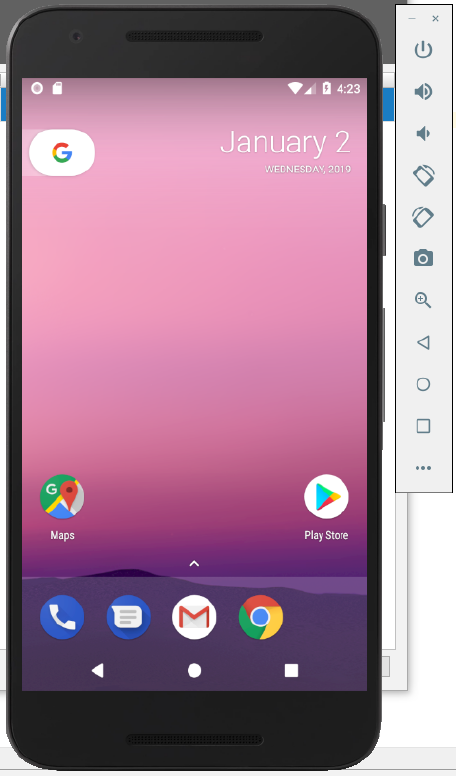
- In the Android Virtual Device Manager dialog, click the Launch this AVD in the emulator icon () under the Actions column for the newly-created Nexus 5X API 26 AVD.
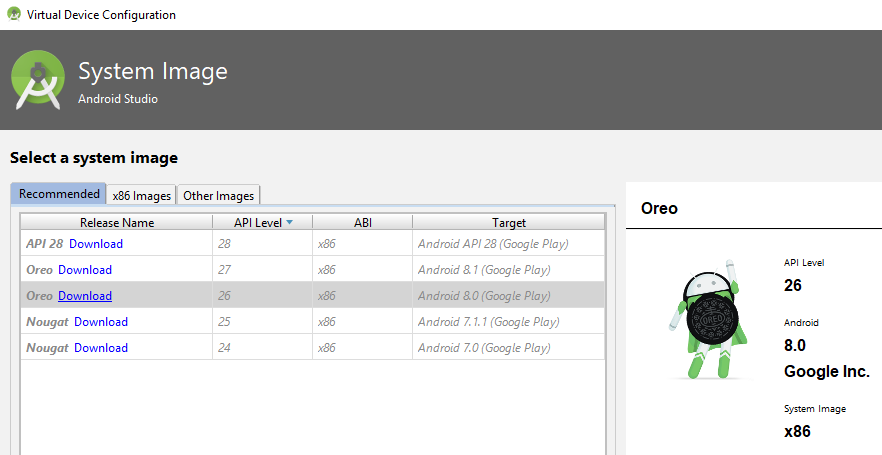 Description of the illustration downloadoreo.png The SDK Quickfix Installation wizard opens.
 ) under the Actions column for the newly-created Nexus 5X API 26 AVD.
The Android emulator starts and loads the Nexus 5X API 26 AVD. A toolbar appears to the right of the AVD that provides UI controls to interact with the AVD.
 Description of the illustration sdkmgrdialog.png
Install the Java SE Development Kit 8
 Install the Java SE Development Kit 8
- Go to the Java SE Development Kit 8 Downloads page at http://www.oracle.com/technetwork/java/javase/downloads/jdk8-downloads-2133151.html, accept the license agreement, and download the Java SE Development Kit installation file for your platform.
- Follow the JDK installation instructions for your platform at https://docs.oracle.com/javase/8/docs/technotes/guides/install/toc.html.
Create Environment Variables
 Create Environment Variables
To function correctly, the Apache Cordova command-line interface that the Oracle JET command-line interface communicates with requires that you configure environment variables. These environment variables reference the installation location of the Android SDK that is installed by Android Studio and the Java SE Development Kit 8.
- For Windows.
- Open the Environment Variables dialog from the System Properties dialog by navigating Control Panel >System and Security >System >Advanced System Settings >Environment Variables.
- Click New in the Environment Variables dialog and set the values of the variables to the location of the JDK and Android SDK locations, as shown in the following image. You can obtain the Android SDK location from the Android SDK page of the Default Settings dialog that you access in Android Studio by clicking Tools >SDK Manager. Description of the illustration envvar.png
- For Mac and Linux-type systems, the settings depend upon your default shell. For example, on a Mac system using the Bash shell, add the following lines in
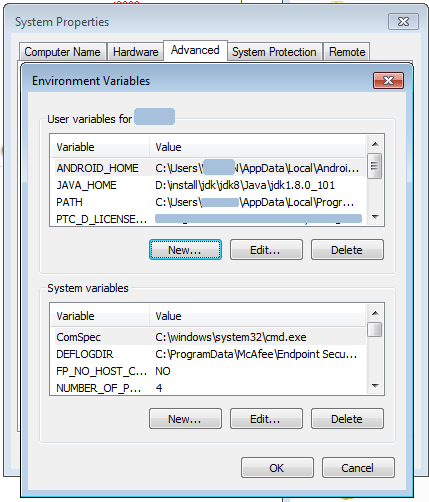 Description of the illustration envvar.png
Источник


