- Fix “SDK tools directory is missing” Error in Android Studio
- Method 1
- Method 2
- Method 3
- Method 4
- AVD Manager & SDK Manager Missing or greyed out in Android Studio
- AVD Manager is missing
- SDK Build Tools are not installed
- SDK Path is Invalid
- Android SDK Manager not visible
- References
- Summary
- Android studio – отсутствует каталог инструментов SDK «
- How to install Android SDK and setup AVD Emulator without Android Studio
- Understanding the Android SDK
- Installing the Android SDK
- Step 1 — Download the tools package
- Step 2— You need Java 8!
- Step 3 — Download the essential packages
- Step 4 — Set your environmental variables
- Step 5 — Download the platform specific packages you want
- Step 5 — Create a AVD device
- Step 6 — Run the Android Emulator
Fix “SDK tools directory is missing” Error in Android Studio
Sometimes it happens with developers that when he/she starts the “android studio” program, displayed a window of “downloading components” which says: “Android SDK was installed to C: / Users / user / AppData / Local / android / SDK2 SDK tools directory is missing “. So to fix “SDK tools directory missing” in android studio, try the following methods
Method 1
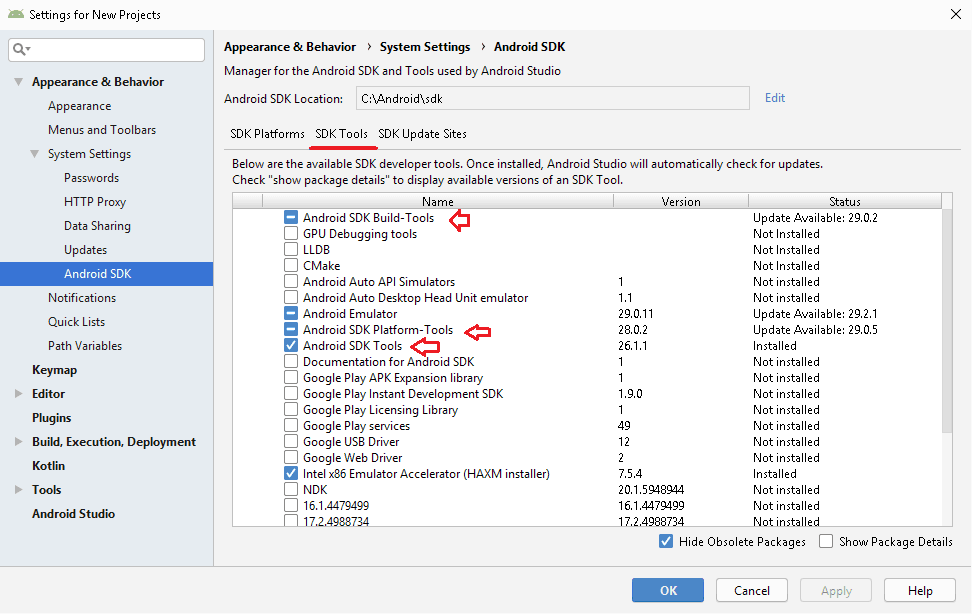
The Cause for this error -SDK tools package might not be installed.
Quick fix: Go to the Tools –> SDK manager –> SDK tools. Deselect Hide obsolete packages option on the right bottom and further install Android SDK Tools(obsolete). A new folder named Tools is now generated in the SDK directory. (C:\Users\..\AppData\Local\Android\Sdk\tools.)
“HIDE OBSOLETE PACKAGES” BY DEFAULT SELECTED
“HIDE OBSOLETE PACKAGES” DESELCTED
Method 2
Another reason -Prolly due to inadequate storage available than requisite(minimum 4.53 GB) at your place of download, android SDK tools package did not get installed
Quick fix: Uninstall Android SDK (default location C:\Users\..\AppData\Local\Android\Sdk ) and install it again. This time affirms the minimum required storage space at your place of download. After execution check, if tools folder is now added in SDK directory.
REQUIRED FREE SPACE
COMPLETE SDK FOLDER
Method 3
Alternative reason- corporate proxy jamming the installer’s call to the internet, due to which android studio installer could not install SDK.
Quick fix: List the path to your corporate PAC file. For that, you need to find the URL. So, go to System Preferences -> Network -> Advanced -> Proxies -> Automatic Proxy Configuration -> Proxy Configuration File . Now once we know the correct URL, go to Configure -> “Appearance and Behavior” -> System Settings -> HTTP Proxy. Select “Automatic proxy configuration URL:” and enter the URL.
Method 4
Just as this error pops up, in place of clicking on ‘finish’ click ‘x’. Further, when it asks to reinitialize, Choose the recommended option. Then click Configure -> Project Defaults -> Project Structure and copy-paste or browse (AppData folder may be hidden) to C: / Users / .. / AppData / Local / android / SDK. Try running the project again. Hope this helps.
Источник
AVD Manager & SDK Manager Missing or greyed out in Android Studio
AVD Manager or SDK Manager becomes greyed out or goes missing from the Android Studio is the common issue that arises in Android studio. This guide explores all the possibilities of that happenings and discusses how you can solve them.
You can find the AVD Manager & SDK Manager option under the Tools menu as shown below. In the older version of the Android studio you will find this menu under the Tools -> Android.
It may happen that you may find AVD Manager & SDK Manager options goes missing from the menu as shown below
Table of Contents
AVD Manager is missing
- Android Menu under tools is missing.
- Might see “Failed to find Build Tools revision xx.x.x” as shown below
- AVD Manager is greyed out in the toolbar
This may happen for several reasons
- SDK Build Tools are not installed
- Invalid SDK Path
SDK Build Tools are not installed
SDK Build tools are installed when you create a new project. If it fails then you may have to install it again. You look at the build tab at the bottom of the screen, it will display the error message and option to install the Build tools. Install it and you should be able to see the AVD Manager.
Another way is to go to the SDK Manager. Under SDK Tools you will find the Android SDK Build tools. Install based on the API. Also ensure that you have the latest version of Emulator, Platform-Tools & SDK Tools installed.
SDK Path is Invalid
Invalid or Missing SDK Path is another reason for such errors. Open the Android SDK Manager ( Tools -> SDK Manager) and check the Android SDK Location as shown in the image below
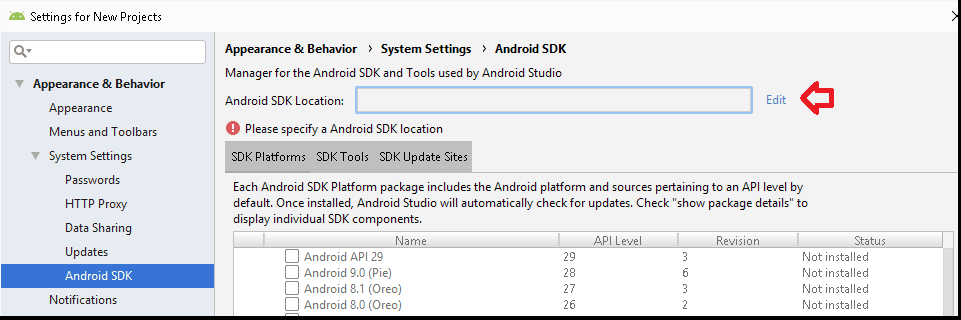 AVD Manager Missing because Android SDK Path is invalid
Ensure that it points to the correct location. The SDK is usually installed at the location C:\Users\ \AppData\Local\Android\sdk . If you cannot find the location or you have logged in as a different user, then you can create the folder and enter it here. Once the path is valid, the Android studio will download & install the required SDK on its own.
Android SDK Manager not visible
If Android SDK Manager is not visible then you need to reinstall the Android Studio. Follow these steps to Uninstall and Install Android Studio.
- Uninstall Android Studio
- Delete the folder C:\Program Files\Android ( C:\Program Files (x86)\Android if 32bit installation)
- Remove the SDK Folder. You will find it here C:\Users\ \AppData\Local\Android\sdk. (unless you have changed it)
- Install the Android Studio
References
Summary
In this guide, we learned how to solve the AVD Manager or SDK Manager missing or greyed out issue in Android Studio.
Источник
Android studio – отсутствует каталог инструментов SDK «
Когда я запускаю программу «android studio» , отобразилось окно «downloading components» котором говорится: «Android SDK was installed to: C: / Users / user / AppData / Local / android / SDK2 SDK tools directory is missing » Я могу Не исправить, и мне нужна помощь!
«Android SDK был установлен на: C: / Users / user / AppData / Local / android / SDK2 SDK tools отсутствует» Это означает, что для Android SDK требуется папка «tools» , где был установлен этот SDK. Но эта папка «Инструменты» не установлена. Вероятно, из-за низкого объема хранения.
[РЕШЕНИЕ] : Удалите Android SDK и установите его снова. На этот раз просто убедитесь, что у вас есть ATLEAST 5GB (хотя на 3.2gb будет достаточно) свободного места, где вы собираетесь установить этот SDK. Как только установка будет завершена, просто проверьте, есть ли папка «инструменты» (в месте, где вы устанавливаете SDK)
Просто сделайте следующее, и все будет хорошо.
- Когда появляется ошибка, а не щелчок на «финише», нажмите «x». Он попросит вас инициализировать. Возьмите рекомендованный вариант.
- После его реконфигурации он вернется к главному экрану. Просто перейдите к
Configure -> Project Defaults -> Структура проекта и скопировать вставку или просмотр (папка appData может быть скрыта) в местоположение C: / Users / user / AppData / Local / android / SDK. - Завершите и снова попробуйте создать проект. Будет работать как очарование !! 😉
Если ваш каталог инструментов SDK отсутствует, возможно, вы случайно удалили его, и есть простой способ загрузить его и направить на него студию Android.
Сначала перейдите на сайт разработчика android ( https://developer.android.com/studio/index.html ), прокрутите страницу до конца и выберите свою загрузку в соответствии с вашей системой (но не загружайте версию установщика для окон ) Вам нужен zip-файл, содержащий SDK.
После загрузки просто поместите его в мои документы (MAC или WINDOWS), а затем, когда вы откроете экран студии Android, вы увидите всплывающее окно для установки SDK (например, время, когда у вас возникла ошибка), не нажимайте кнопку «Далее», переходите к просмотру, найдите этот файл И нажмите ОК. После этого идите дальше, и это будет работать как шарм.
Это было проблемой для меня, потому что у меня уже был SDK, установленный в другом каталоге. Чтобы сообщить Android Studio, где вам требуется SDK, вам нужно перейти к настройкам, но диалог «Каталог инструментов SDK отсутствует» всегда выводит всю программу, когда вы нажимаете «Готово». Вот как я «решил» это:
- Удалите свои папки
/.Android* (потеряв все ваши настройки: /).
Удаление папок .Android Studio может быть ненужным – я никогда не пытался нажимать X в исходном диалоговом окне ошибки – я только пытался «Готово», который выходит из Android Studio. Это возможно, если вы нажмете X, вы можете перейти к настройкам, но, к сожалению, я не могу вернуться и проверить.
У меня была эта проблема, когда я пытался переустановить Android Studio с помощью своего мастера. У меня уже была папка «tools».
В моем случае, в то время как каталог «tools» уже существует, он также предоставит ошибку «sdk tools directory» для своих подпапок. Как-то у моей папки sdk был только подкаталог libs.
Когда я вставлял в sdk / ant, sdk / apps, sdk / proguard, sdk / qemu, sdk / support и sdk / templates, мастер наконец был доволен этой конфигурацией и пошел загружать еще несколько файлов.
Попробуйте установить его в другом месте, возможно, это решит проблему. Кроме того, вы можете попробовать установить его на USB-накопитель.
Измените каталог SDK на C: \ Users \ username \ AppData \ Local \ Android \ Sdk
Если вы используете новейшую студию Android, вы можете настроить ее, используя Configure -> Project Defaults -> Project Structure
В моем случае это была установка в уже существующий каталог. Когда вы выбираете каталог для установки. Программа не позволит вам вводить несуществующий каталог. Поэтому выберите путь, вернитесь в главное окно и введите новое имя папки, где вы хотите установить SDK, возможно, функцию.
Я испытал эту ошибку, когда устанавливал Android Studio со слишком маленькой памятью, чтобы установить все необходимое. Это не помогло освободить память или установить Android SDK. Переустановив студию Android с достаточной памятью, начался запуск загрузки, когда я впервые открыл Android Studio.
Когда вы сначала устанавливаете студию android и все, установите sdk в новый файл, например C: \ Android \ sdk, и убедитесь, что все следующие параметры установки sdk указывают на папку, в которую вы установили sdk. Теперь он будет работать нормально … он должен иметь какое-то отношение к разрешениям в папке appdata, это то, что моя догадка
Я также столкнулся с той же проблемой, проблема со мной была в моем первом запуске, я не был подключен к Интернету должным образом. После подключения к Интернету потребовались некоторые обновления для загрузки, а затем он работал без каких-либо проблем
Ваша папка AppData скрыта, вы должны открыть ее
Источник
How to install Android SDK and setup AVD Emulator without Android Studio
If you are trying to develop to Android, you probably will end up installing the Android Studio to get the Android SDK and the AVD Emulator working properly.
But if you are using another code editor, like Sublime Text or VSCode, installing the Android Studio will just mess up with your setup and consume your precious RAM for no good reason.
I had a hard time figuring out how to properly do this setup due the lack of documentation about it, so i hope this article helps you. 🙂
Recommended previous knowledge:
- SDK (Standard Development Kit); Read about on Wikipedia;
- AVD (Android Virtual Device); Read about on docs;
- CLI (Command Line Interface); Read about on Wikipedia;
- Android API levels; Read about on Vanderbilt University;
- How to open, navigate and execute files in your OS terminal;
- Know what are environmental variables;
Understanding the Android SDK
Basically, the Android SDK is a bunch of packages necessary to develop for Android.
These packages stays in subfolders of a folder called “sdk” (or “android-sdk” sometimes). You do not need to know how these packages really work, just what they do.
The picture below is my Android SDK folder, these are the basic packages you will need in order to get everything working properly.
Here is a brief explanation of each package:
- tools: This package is mainly used to manage the other packages and to create AVD’s;
- emulator: As the name suggest, this is the Android emulator;
- platform-tools: Some tools to communicate with Android devices when you plug then in your computer;
- patcher: This package is automatically downloaded by the SDK. I didn’t find what exactly this is for, so just leave it as it is;
The folders bellow contain sub-folders with the packages for each Android API level.
- platforms: The platform packages are required to compile your app for the specified API level.
- system-images: These are the android images used in the emulator.
- build-tools: These are necessary to build your Android apps
Installing the Android SDK
In order to install the SDK we will use the Command Line Tools. These are some quite simple CLI’s used to manage the Android SDK. You can read the documentation here for more details.
Step 1 — Download the tools package
First, you need to download the tools package. And with this package you can download the others.
- First, go to the Android Studio download page: https://developer.android.com/studio;
- Then click in “ Download Options”;
- There you will find a table named “ Command line tools only”;
- This table contain some zip files. Download the appropriate file for your system ( Windows, Mac or Linux);
- Extract this zip and you will get a folder called tools: This is the tools package i explained earlier;
Create a folder anywhere you prefer to place your SDK. I recommend you to stick with one of these commonly used places:
- Globally: C:\Android\sdk or C:\android-sdk (this is not default, but i usually set my SDK here on Windows)
- One user only: C:\Users\ \AppData\Local\Android\sdk
- Globally: /Library/Android/sdk
- One user only: /Users/ /Library/Android/sdk
And move the tools folder to this new sdk folder. Make sure you have admin access to this folder and any sub-folders inside it, or the tools package will fail to download new packages.
Note: You can also download a pre-build package for your SO (like the one available on Ubuntu repository). But i do not recommend you do to so, because they probably will not be updated and will be harder to manage, since it was automatically installed.
Step 2— You need Java 8!
The Android SDK packages require Java 8. If you do not have it, you need to download. If you are using a newer version, you have to downgrade to Java 8 or you will eventually get some errors, because it is not compatible.
If you do not have the Java 8 SDK, here is how you can install it:
On Ubuntu run these commands:
- # sudo apt-get update
- # sudo apt-get install openjdk-8-jdk
Sorry for MacOS users, i don’t know how to install it on this OS.
Step 3 — Download the essential packages
Now, download the platform-tools and the emulator packages, because they contain some CLI binary files you will need later. I decided to download these packages first in order to set all the necessary environment variables at once and make the rest of the process easier.
Open a terminal window (you need to use a terminal, not the file explorer), go to your sdk folder and navigate to the /tools/bin directory.
This folder contain the SDKManager binary: this is a CLI used to list the available packages in the Google’s repository and download, update or remove them from your SDK folder.
The bellow command will list all packages installed (the first items on the list) and all packages available to download:
To download the packages, simply copy the package names and pass it as a parameter to the SDKManager CLI using the terminal:
# ./sdkmanager platform-tools emulator
If you open your sdk folder you should see these packages folders there.
Step 4 — Set your environmental variables
You need to set the below environmental variables containing the path to our SDK, so any running program can find it in your pc:
ANDROID_SDK_ROOT = Path to your SDK folder
ANDROID_HOME = The same as ANDROID_SDK_ROOT. This variable is now deprecated, but i recommend setting it because some programs still using it to locate your sdk.
And add these folders to the PATH variable, making their binary files accessible from everywhere:
To add the environment variables on WIndows, just follow these steps:
- Open the “Control Panel”;
- Go to “ System and Security” option in the side menu;
- In the window “ System Properties” open the tab “ Advanced”;
- Click in the button “ Environment Variables” in the bottom of the page;
- In the “ Environment Variables” window you will see two tables: “User Variables” and ” System Variables”.
- If you created your sdk folder for one user only, set the variables in the “ User Variables” table;
- But, if you create your sdk folder globally, set the variables in the “ System Variables” table instead;
On Linux, you can set your environment variables in many places. So i choose the ones I found the most appropriate:
- If you created your sdk folder for one user only, set your environment variables in the file
/.bashrc;
Here is how i set these variables in my Ubuntu, using the file /etc/environment:
And sorry again, no MacOS instructions for this task.
You can find more about these environmental variables in the oficial docs here.
Now your SDK is ready! If you do not need to run the emulator there’s no need to follow the next steps.
Step 5 — Download the platform specific packages you want
You need more three packages: The platform, the system-image and the build-tools. You can download these packages for any Android version you prefer. In this article, i will download the packages for the API Level 28.
Use the “ sdkmanager — list” command to find these packages and download them using the command “ sdkmanager
Here’s an example:
Step 5 — Create a AVD device
Creating a AVD device is a simple task: run the AVDManager command (this is a binary file located in the tools/bin folder of your sdk) with the create avd option, a name for the new AVD and the image you want to use.
Here is a example:
# avdmanager create avd — name android28 — package “system-images;android-28;default;x86”
You will be asked if you want to alter some configurations. You can also modify these configurations later in the file config.ini, located in the avd folder (this folder usually is created in your user folder, under the android directory). The currently active configurations can be find in the file hardware-qemu.ini (this file just will be created after the emulator runs for the first time).
Step 6 — Run the Android Emulator
Now you just need to run the emulator command (remember that we added this package to the environmental variables?):
The emulator take some time to init for the first time. But if you done everything correctly you should see this screen:
Источник


