- Android Sliding Menu using ActionbarSherlock
- Objective
- Step 1 Import needed Library
- Step 2 Create Project SlidingDemo for Android Sliding Menu
- Step 3 Create Fragment For Sliding Menu
- 3.1 Create list.xml in layout folder
- 3.2 Make and Set List Adapter
- 3.3 Create row.xml file
- 3.4 Create Fragments
- Step 4 Create BaseActivity
- Step 5 Create MainActivity
- Step 6 Create Frame Layouts
- 6.1 content_frame.xml Layout
- 6.2 menu_frame.xml Layout
- Prince Rabara
- Sliders — Material Component For Android
- Types of sliders
- Continuous Slider
- Values changes Listeners
- Discrete Slider
- Setup the Slider Label
- app:labelBehavior
- LabelFormatter
- key properties of sliders
- Компонент Slider из библиотеки материального дизайна
- Android Slider Menu
- You must have noticed that a lot of android applications introduced a sliding panel menu to navigate between major modules of the application which is also known as Android Slider Menu.
- Android Studio Navigation Drawer Template
- Starting new Project
- Creating Activities
- Android studio slider menu
Android Sliding Menu using ActionbarSherlock
To download the code, login with one of the following social providers.
Login Login 
Be patient. we are fetching your source code.

Objective
A Sliding Menu in Android is an Open Source Android library. Sliding Menu is used in lot of different types of Android application.
Following are the steps to create sliding menu in Android:
Step 1 Import needed Library
First you need following two library projects to create Sliding Menu:
Step 2 Create Project SlidingDemo for Android Sliding Menu
Now add ActionbarSherlock library project into SlidingMenuLib. And create new Android project named SlidingDemo and link SlidingMenuLib project with this project.
Step 3 Create Fragment For Sliding Menu
Now create SampleListFragment in SlidingDemo project which extends ListFragment. Add following into your class menus is for your menulist items.
3.1 Create list.xml in layout folder
In onCreateView() Method set Layout, which contains ListView. Create list.xml in layout folder.
3.2 Make and Set List Adapter
In onActivityCreated() Method set List Adapter. And create SampleItem and SampleAdapter outside the onActivityCreated() .
3.3 Create row.xml file
Create menu row layout for SampleAdapter row.xml in layout folder.
3.4 Create Fragments
Create some Fragments. Fragment1 extends Fragment.
Add Layout in layout folder activity_main.xml
Now override onListItemClick() and add following code.
Step 4 Create BaseActivity
Create BaseActivity in SlidingDemo project which extends SlidingFragmentActivity.
Add following into your class:
Add following into onCreate() Method:
New Fragments are set in setBehindContentView() . It’s a frame layout. Which stores our menu items. In customize the SlidingMenu tag, we set different property of SlidingMenu. Now add constructor for dynamically change the title of fragment.
Step 5 Create MainActivity
Finally now Create MainActivty which extends BaseActivity. In onCreate() method add following code.
Step 6 Create Frame Layouts
Add following layouts into layout folder.
6.1 content_frame.xml Layout
6.2 menu_frame.xml Layout
I hope you have learnt a lot from this sliding menu Android example. If you have got any query related to Sliding Menu in Android comment them below. We will try to solve them out.
Got an Idea of Android App Development? What are you still waiting for? Contact us now and see the Idea live soon. Our company has been named as one of the best Android App Development Company in India.
Prince Rabara

I am professional Android application developer with experience of one and half years in Android Application Development. Android has attracted me by its open source platform and the ability to deliver high performance mobile applications.
Источник
Sliders — Material Component For Android

Sliders used to view and select a value or range from the given slider bar.They’re mainly used for adjusting settings such as volume and brightness, etc.
Sliders can use icons on both ends of the bar to represent a numeric or relative scale. The range of values or the nature of the values, such as volume change, can be communicated with icons.
Sliders add into Material design in library version 1.2.0. So, you need to add 1.2.0 or higher version on material design.
Types of sliders
There are two types of sliders.
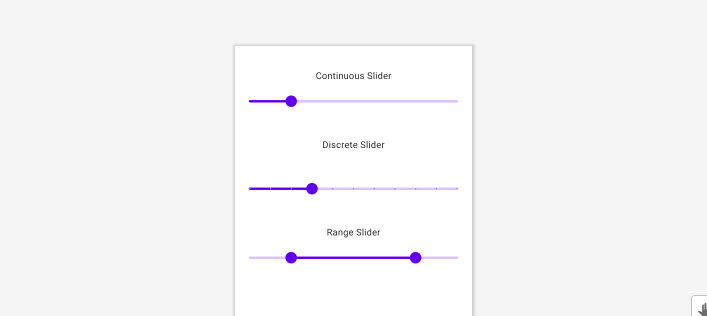
- Continuous Slider
- Discrete Slider
Also, We have a another slider called range slider.
Lets see about these sliders in detail.
Continuous Slider
Continuous sliders allow us to select any value between the given start and end value.
For example, valueFrom = “0.0” and valueTo=”100.0″ in this case, you can select any values between from and to values like 55.5, 62.0, etc.

defining the slider In the layout,
valueFrom : starting value of the slider.
valueTo : ending value of the slider.
value: setting the initial value of the slider.
Similarly, we can add a RangeSlider in a layout:
The RangeSlider has app:values attribute to set the range for the slider. we need to provide the range in arrays.

Values changes Listeners
We can observe the changes of the slider in two different ways.
by using addOnSliderTouchListener, we can observe the sliders start and stop touch position values.
similarly, we can add touch listener for the range slider.
Sliders OnChangeListener notified eveerytime the slider value changes.
Also, OnChangeListener for the RangeSlider.
Discrete Slider
Discrete slider allows user to select an exact value in the given input range.
If you want to slider to be discrete, then you need to add attribute call android:stepSize=”5.0″. This will setup the step between valueFrom and valueTo values based on the stepSize value.
For example, valueFrom = 10.0, valueTo = 50.0 and stepSize = 10.0, then you can able to select values 10.0, 20.0, 30.0, 40.0, 50.0 only.

defining discrete slider in the layout:
Also, we can add discrete in the RangeSlider.

We can observe the discrete slider values change same as continuous slider. Please check value changes Listeners above.
Setup the Slider Label
The label will be shown at the top of the slider thumb after you touch the thumb. Basically, Slider layout holding the current selected value of the slider.
We can change the behavior and label format using the below methods.
app:labelBehavior
You can change how it’s drawn via the app:labelBehavior attribute or setLabelBehavior method.
app:labelBehavior having three different modes.
- floating (default) — draw the label above the slider view.


LabelFormatter
By using a LabelFormatter you can change the display format of the selected values based on your requirement like 10KG, 12MB, like that.
That can be achieved through the setLabelFormatter method.That can be achieved through the setLabelFormatter method.
In above code, I have rounded the selected values and converted into dollars.

key properties of sliders
A Slider has a four UI elements.
- Track
- Thumb
- Value Label
- Tick Mark (only for discrete slider)
Источник
Компонент Slider из библиотеки материального дизайна
Началось с небольшой детективной истории — разглядывая сайт Material Design, наткнулся на страницу Sliders. В описании говорилось, что данный компонент доступен для Android и даже дана ссылка на Гитхаб. Меня это немножко удивило, так как я ни разу о нём не слышал. Перехожу по ссылке — на Гитхабе говорится, что компонент пока находится в активной разработке и даны куцые примеры на Java. «В этих ваших интернетах» упоминания о Slider не нашёл. В официальной документации по библиотеке тоже нет никаких упоминаний.
Любопытство взяло верх и я стал самостоятельно копаться.
По своему внешнему виду Slider похож на стандартный Seekbar. Но небольшие отличия есть. Чтобы их увидеть, набросал простой проект. Добавим пару слайдеров на экран, кнопку и посмотрим на компонент в действии.
Я использовал последнюю версию библиотеки.
На всякий случай замечу, что когда я вручную прописал код, то Android Studio отказывалась показывать экран активности в режиме «Design», пришлось перезапускать студию. После этого всё нормализовалось.
Код для класса активности.
Запускаем и смотрим на результат.

Первое что бросается в глаза — мы можем установить несколько ползунков через slider.values. Они ведут себя независимо и не мешают друг другу.
У второго слайдера установлен дискретный режим через атрибут android:stepSize. Можно заметить, что в этом режиме на дорожке появились маленькие точки.
Если нажать на ползунок, то сверху появляется плашка с указанием текущего значения.
Щелчок на кнопке программно установит ползунок в нужном месте у первого слайдера. Учтите, что в нашем случае компонент превратится в тыкву слайдер с одним ползунком, так как мы сбросили список значений, оставив только одно.
У слайдера есть несколько слушателей. Для демонстрации привёл один из них — Slider.OnSliderTouchListener.
Текст на плашке можно менять. Это пригодится, когда используются большие числа. Тогда вместо чисел с большим количеством нулей (миллионы, триллионы и т.д.) можно использовать сокращенные варианты. За это поведение отвечает интерфейс LabelFormatter. Также существует вспомогательный интерфейс BasicLabelFormatter, который уже содержит полезные сокращения больших чисел типа 9.1K вместо 9100.
Давайте немного пошалим и напишем слово из трёх букв.
Новый элемент показался интересным и вполне пригодным для использования в проекте.
Источник
Android Slider Menu

You must have noticed that a lot of android applications introduced a sliding panel menu to navigate between major modules of the application which is also known as Android Slider Menu.
Previously this kind of UI or Android Slider Menu was done using some third party libraries where a list view and some swiping gestures used to achieve this. But now android itself officially introduced sliding panel menu by introducing a newer concept called Navigation Drawer in which we combine DrawerLayout and NavigationView to achieve the desired output.
Maximum of the time sliding menu (navigation drawer) will be hidden and may be proven by means of swiping the screen from left aspect to right or tapping the app icon on the movement bar.
Android Studio Navigation Drawer Template
You can add Navigation Drawer in your app in two ways. The quick and easy way is choosing the Navigation Drawer Activity from Android Studio when the new project is created. This creates an empty project with navigation drawer added.
Starting new Project
1. Create a new project in Android Studio from File ⇒ New Project by filling the required details. When it prompts you to select the activity, choose Empty Activity and continue.
2. Open build.gradle located in app level and add dependencies. I am adding material design library dependency.
3. Open strings.xml, styles.xml, located under res ⇒ values and add the below values.
4. Under res ⇒ menu directory, create two menu xml files named nav_menu.xml . These menus are used to render different toolbar overflow menus when the user switches between navigation drawer items.
5. Download person, setting, icons from Material Icons and add them to your project’s res folder. These icons will be used as navigation menu item icons.
Creating Activities
 6. Create 2 activity naming nav_action.xml and nav_header.xml. Right click on layout package, New ⇒ Layout Resource File.
7. Now we have all the required elements in place. It’s time to open the main activity and do the necessary changes to make the navigation drawer functional. Open MainActivity.java and modify as explained below.
Run and test the app once. You should able to see the app as shown below. Also, check the Video demo of fully implemented navigation drawer.
Источник
Android studio slider menu
SlidingMenu is an Open Source Android library that allows developers to easily create applications with sliding menus like those made popular in the Google+, YouTube, and Facebook apps. Feel free to use it all you want in your Android apps provided that you cite this project and include the license in your app.
SlidingMenu is currently used in some awesome Android apps. Here’s a list of some of them:
If you are using SlidingMenu in your app and would like to be listed here, please let me know via Twitter!
Here’s an older video of the example application in this repository : http://youtu.be/8vNaANLHw-c
Also, you can follow the project on Twitter : @SlidingMenu
- In Eclipse, just import the library as an Android library project. Project > Clean to generate the binaries you need, like R.java, etc.
- Then, just add SlidingMenu as a dependency to your existing project and you’re good to go!
Setup with ActionBarSherlock
- Setup as above.
- Checkout a clean copy of ActionBarSherlock and import into your Eclipse workspace.
- Add ActionBarSherlock as a dependency to SlidingMenu
- Go into the SlidingActivities that you plan on using make them extend Sherlock___Activity instead of ___Activity.
How to Integrate this Library into Your Projects
In order to integrate SlidingMenu into your own projects you can do one of two things.
1. You can wrap your Activities in a SlidingMenu by constructing it programmatically ( new SlidingMenu(Context context) ) and then calling SlidingMenu.attachToActivity(Activity activity, SlidingMenu.SLIDING_WINDOW | SlidingMenu.SLIDING_CONTENT) . SLIDING_WINDOW will include the Title/ActionBar in the content section of the SlidingMenu, while SLIDING_CONTENT does not. You can check it out in the example app AttachExample Activity.
2. You can embed the SlidingMenu at the Activity level by making your Activity extend SlidingActivity .
- In your Activity’s onCreate method, you will have to call setContentView , as usual, and also setBehindContentView , which has the same syntax as setContentView. setBehindContentView will place the view in the «behind» portion of the SlidingMenu. You will have access to the getSlidingMenu method so you can customize the SlidingMenu to your liking.
- If you want to use another library such as ActionBarSherlock, you can just change the SlidingActivities to extend the SherlockActivities instead of the regular Activities.
3. You can use the SlidingMenu view directly in your xml layouts or programmatically in your Java code.
- This way, you can treat SlidingMenu as you would any other view type and put it in crazy awesome places like in the rows of a ListView.
- So. Many. Possibilities.
If you decide to use SlidingMenu as a view, you can define it in your xml layouts like this:
NOTE : you cannot use both behindOffset and behindWidth. You will get an exception if you try.
Источник


