- Android Reverse Engineering: Debugging Smali in Smalidea
- Introduction
- Prerequisites
- Step 1 — Installing the Smalidea plugin
- Step 2 — Decompiling an APK file
- Step 3 — Configuring Debugger
- Step 4 — Port number 8700
- Step 5 — Debugging Smali code
- Step 6 — Debugging Smali in Android Studio
- Bonus — Rebuilding decompiled app
- Conclusion
- Android studio smali to java
- About
- Начинаем со Smali. Как реверсить приложения для Android
- Меняем цветовые схемы
- colors.xml
- styles.xml
- Layout
- Smali
- setTextColor
- Меняем функциональность приложения
Android Reverse Engineering: Debugging Smali in Smalidea
Smali is an assembler for the Dalvik Virtual Machine bytecode. Furthermore, code produced by the baksmali often considered to be written in the Smali language. Of course if there is an assembler, there should be a disassembler and there is no exception in this case. Baksmali is an disassembler for the dex bytecode format. The words “Smali” and “Baksmali” are just the Icelandic equivalents of “assembler” and “disassembler” respectively. Before now debugging smali code was not an easy task, but recently a great plugin for Intellij IDEA/Android Studio has been published – Smalidea. It makes the Smali debugging much more easier.
Introduction
This tutorial covers some advanced topics, therefore appropriate skills are required. The most important question you need to have answer to: “Why do you need to debug Smali code ?”. But anyway I will try to keep things as simple as possible.
Prerequisites
In order to follow all steps in this tutorial you need to have the following software packages installed:
- Android Studio and Intellij IDEA 14.1 or above
- Java Runtime Environment (JRE)
- Java Development Kit (JDK)
- The latest APK Tool (Jar file)
Step 1 — Installing the Smalidea plugin
To start with, download the latest plugin package from this page. At the time of writing this post it is the archive smalidea-0.05.zip.
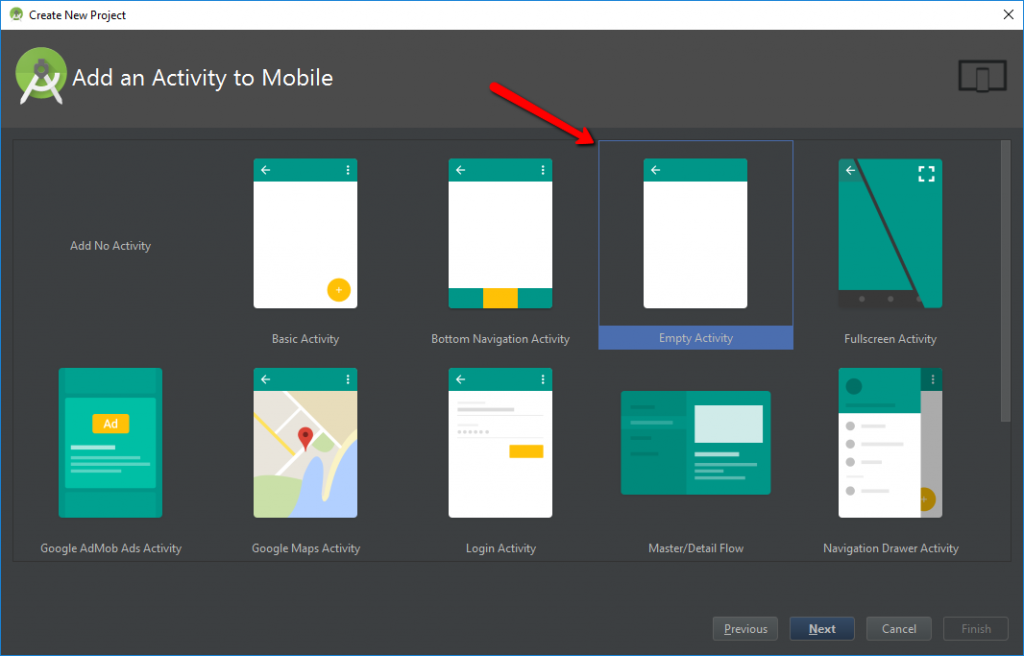
Before we start, I suggest you to create a new project in Android Studio for this tutorial. I will create a project from the Empty Activity template. You are free to use any project you want.
You can either use Android Studio or Intellij IDEA, I have tested both of them, but for this tutorial I will use Intellij IDEA. And in the fifth step I will show briefly how to use Android Studio.
Now, go to the settings by clicking File > Settings or using the shortcut ⌘ + , or Ctrl + Alt + S. Then, open the Plugins section and click on the “Install plugin from disk button”.
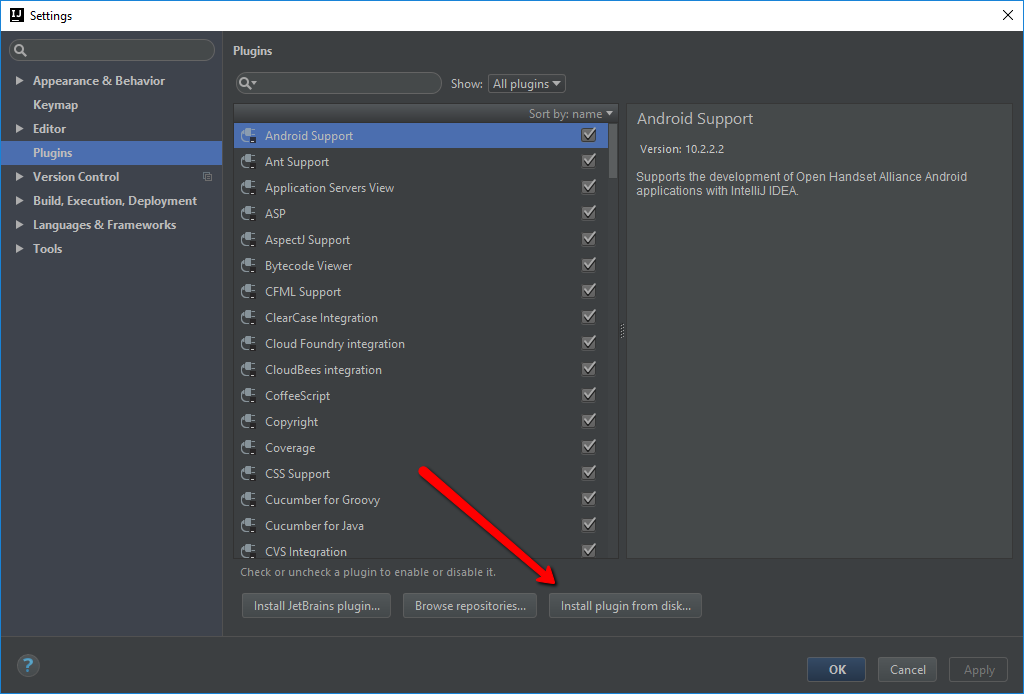
Select the downloaded file. After that you should see the Smalidea plugin in the list.
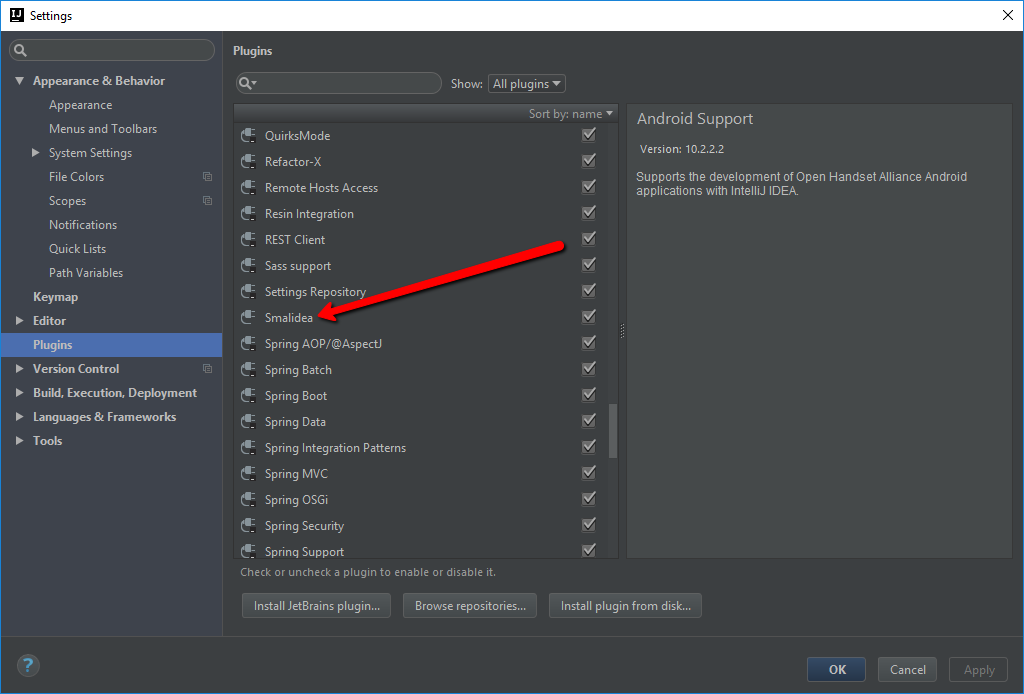
Now, restart Intellij IDEA.
Step 2 — Decompiling an APK file
First of all, in order to decompile an apk file, you need to have it :). So compile at least once the created project. After that you should be able to find compiled apk file in the folder YourProjectPath/app/build/outputs/apk/.
Follow the steps described in this Installation Guide to install and use APKTool.
Next, copy the compiled apk file to a directory, that is going to be used as the root directory for a new project.
Now is the time to decompile the apk file. To do this use the APKTool command.
You should get the similar output:
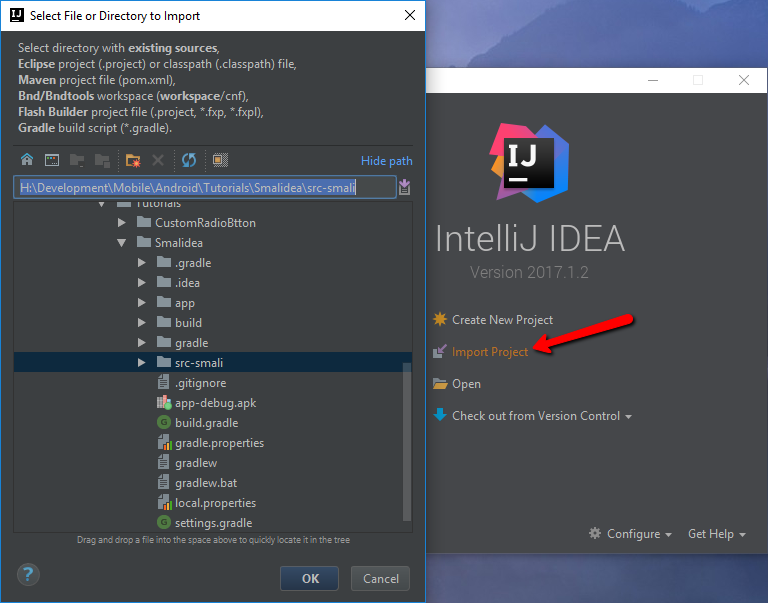
Next, open Intellij IDEA and click on the Import Project option or in case you have an opened project, use File > New > Project From Existing Sources. Select the folder where you have decompiled the APK file to.
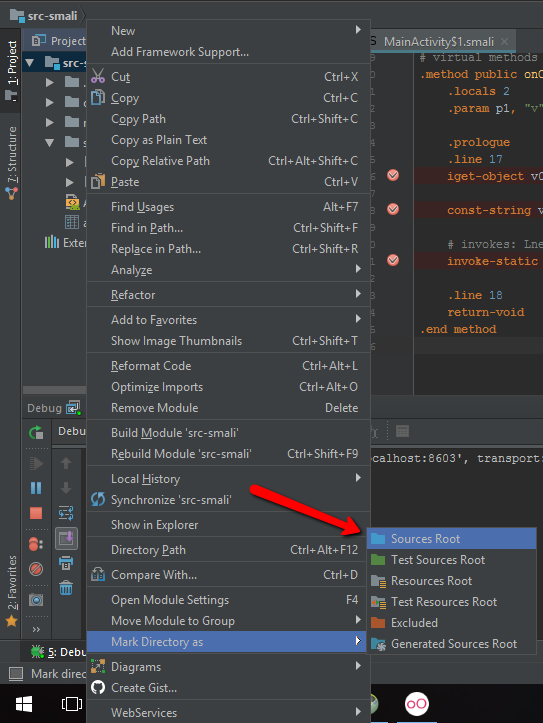
After you have the project opened, right click on the root folder, then select Mark Directory As and Source Root.
Step 3 — Configuring Debugger
In order to start debugging smali code you have to setup remote debugger to your application.
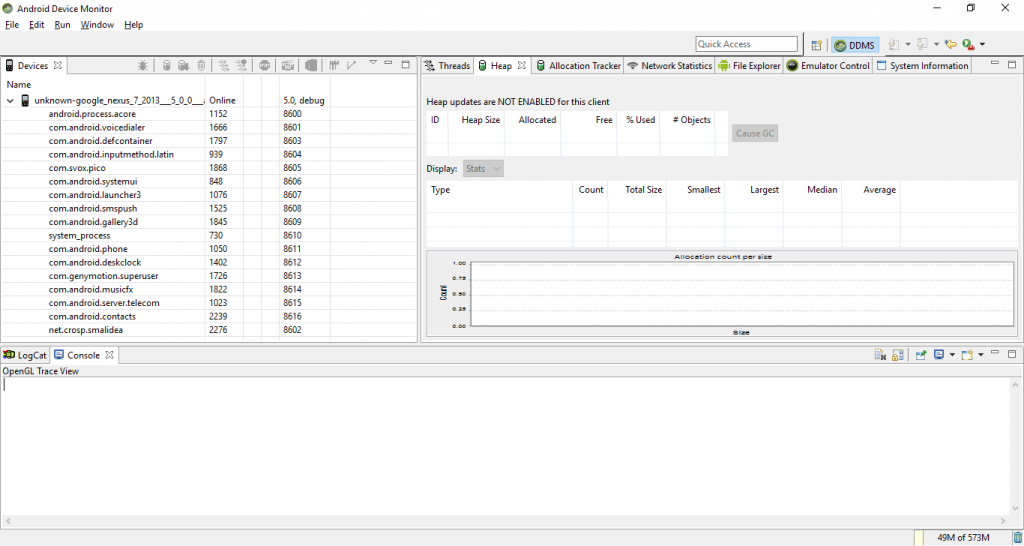
First of all, start Android Dalvik Debug Monitor Server (DDMS). You can start it from Android Studio by selecting Tools > Android > Android Device Monitor or directly from the SDK directory, in my case it is C:/Users/CROSP/AppData/Local/Android/sdk/tools and the .bat file name is monitor.bat.
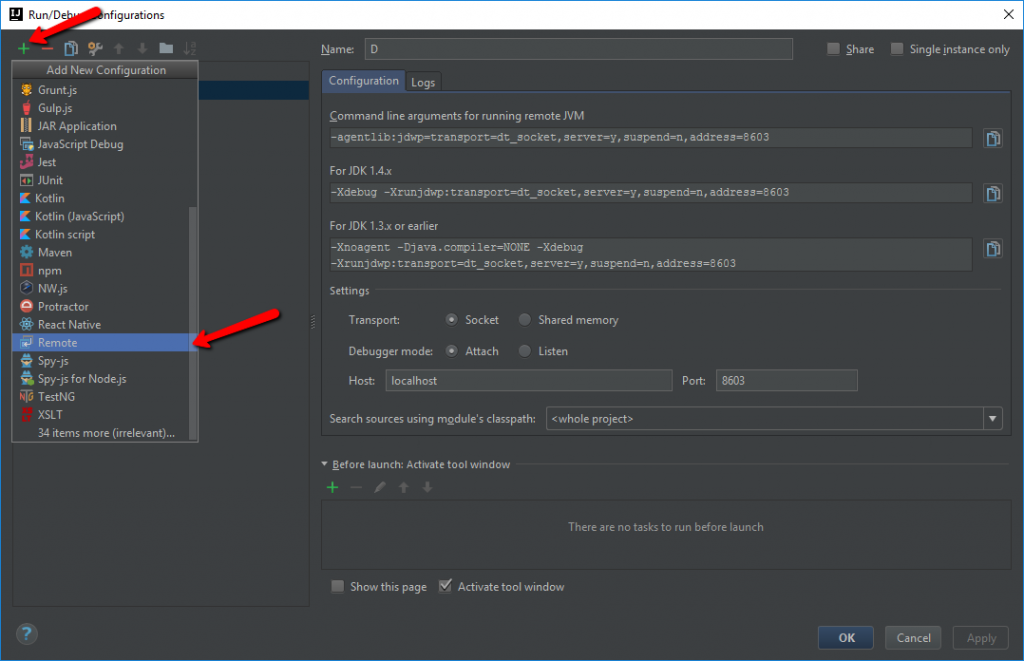
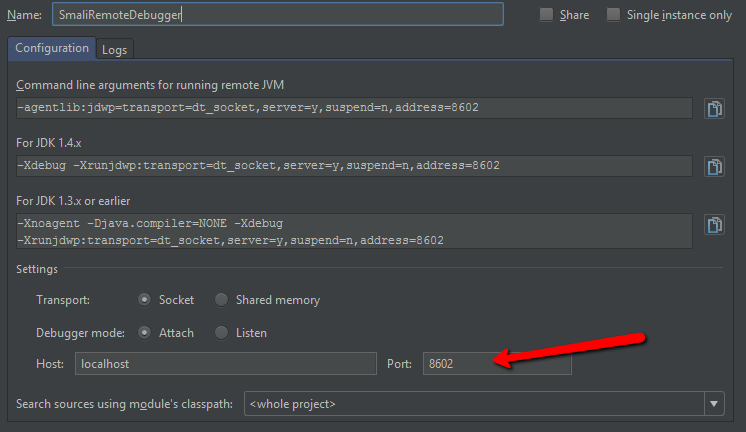
The next step is to create Remote Debug Configuration. To do this click Run > Edit Configuration, then click on the plus sign and select Remote from the dropdown list.
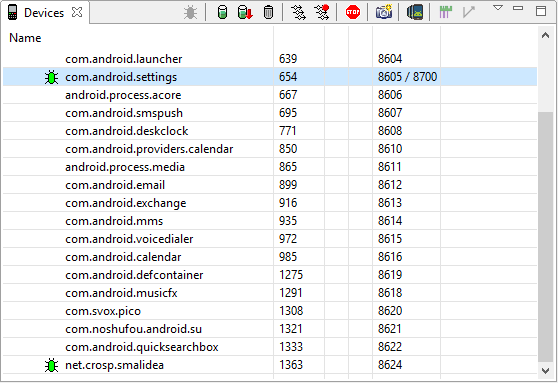
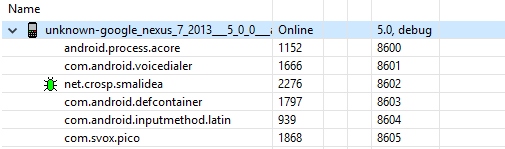
Now switch to DDMS. I also assume that you have a running device or emulator. Start your application on a device. It should be in the list of device running process.
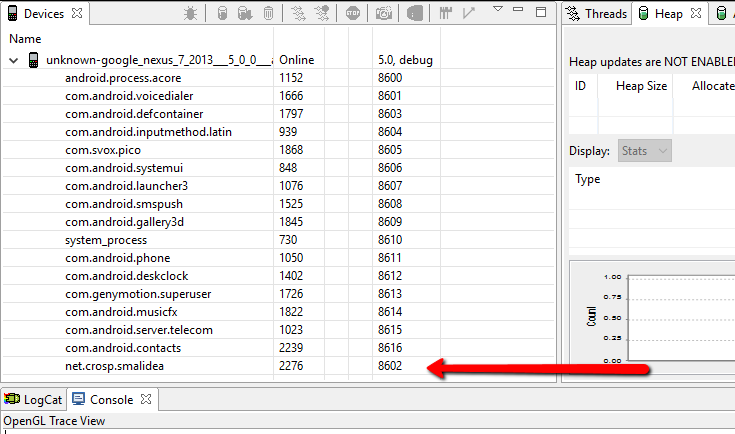
In the last column you can find the debug port number for each process. In my case the port number is 8602.
Switch back to Intellij IDEA and enter the port number of your running process in the Debug Configuration window.
Save the configuration.
Step 4 — Port number 8700
In the previous step I have used the concrete port that is uniquely assigned for each running application. But a port number is not a constant value and can be changed even for the same application.
DDMS provides the ability to use the same port number 8700 to dynamically assign it to a desired application.
Let’s modify the debug configuration, changing the port number to 8700.
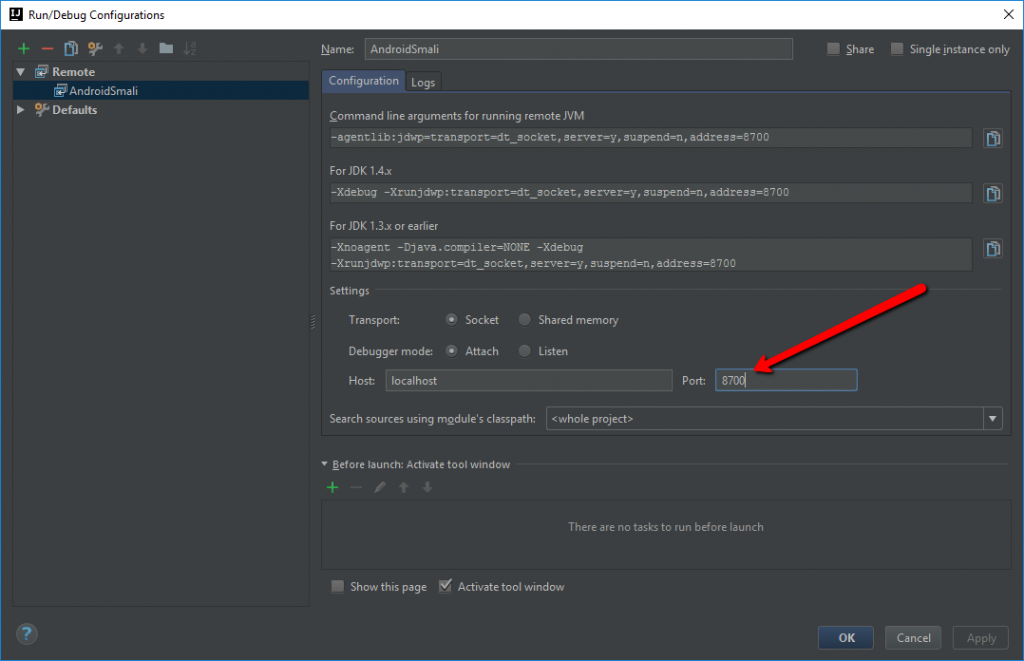
Save the configuration and switch back to DDMS.
Now select an application you want to debug from the list. You should see the port number 8700 just appeared after the default application port separated by the slash ( / ).
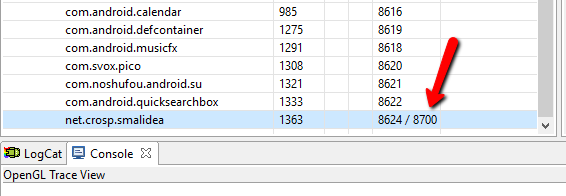
As a result you don’t have to change a port number each time it is changed by the system. But on the other hand if you need to debug multiple applications simultaneously you are need to use concrete port numbers.
Go to the next step.
Step 5 — Debugging Smali code
You should have everything set up for now to start debugging smali code.
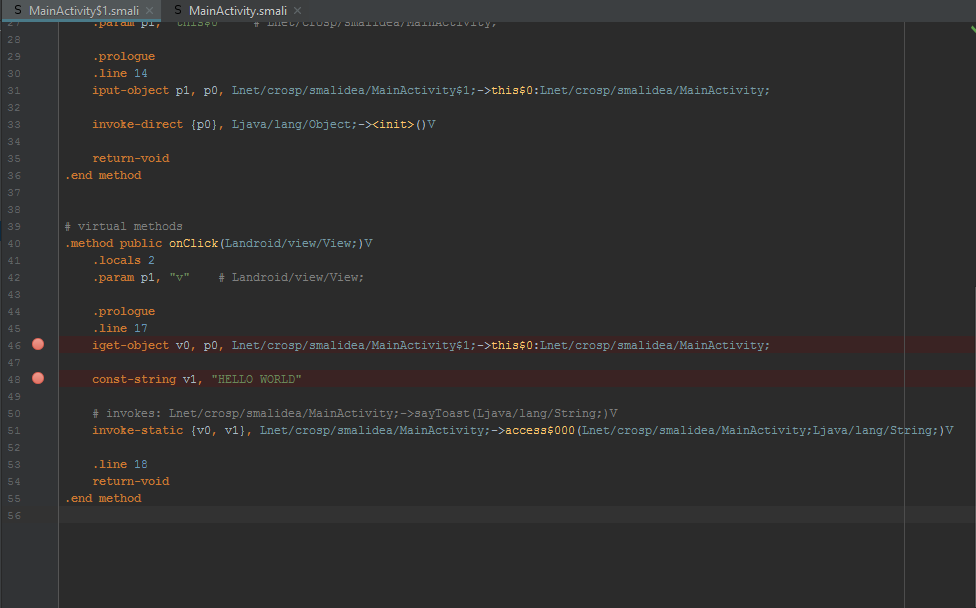
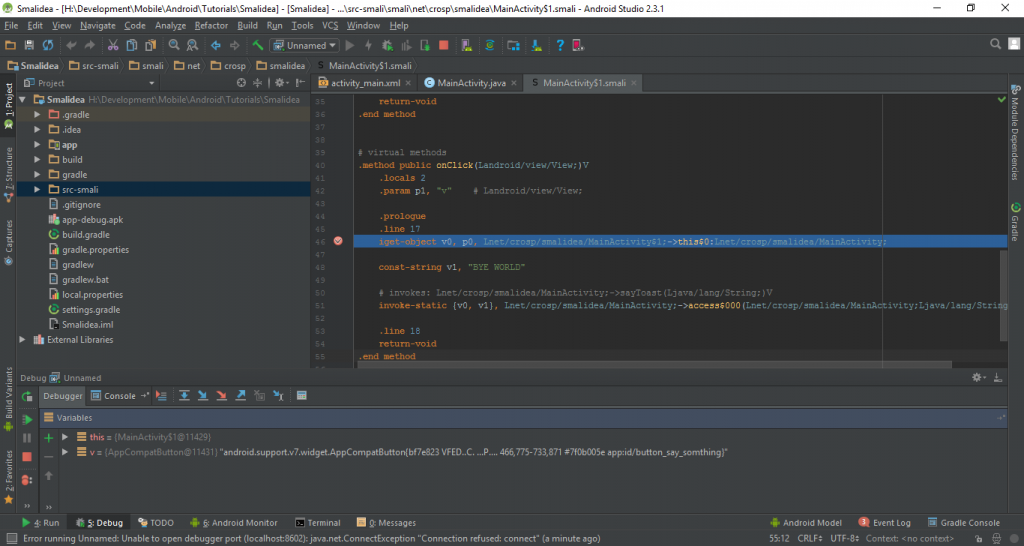
Set brakepoints where you need, but of course they should reachable, for instance, a function call triggered by clicking on a button. I have implemented the button click listener, that shows the toast message.
Here are the breakpoints I’ve set.
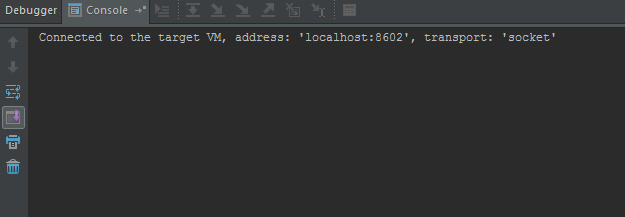
Finally, ensure that your app is still running and visible in the DDMS, in case of using the port number 8700 for debugging check that the right application is selected. Run Debug in your IDE.
You should see a similar message in the console.
And in DDMS a little green bug should appear near your process name.
Eventually, trigger an event to reach your breakpoints.
Congratulations, now you are able to debug the decompiled app step by step in the traditional way.
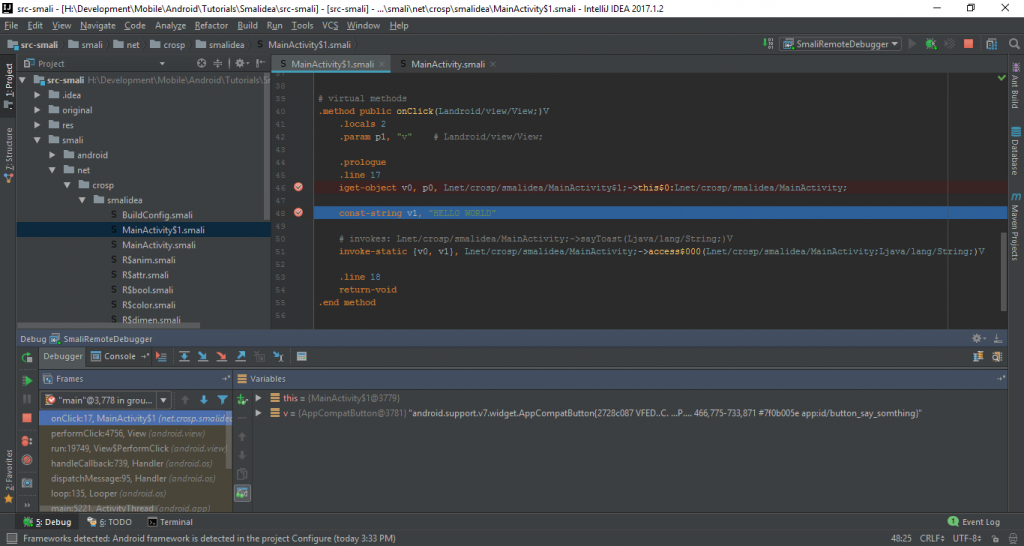
Step 6 — Debugging Smali in Android Studio
If you want to use Android Studio instead, follow the similar steps. But you probably won’t find the option Mark Folder As, but it works just fine without this step. Furthermore, it could be much more convenient to use Android Studio to keep both smali and java code in the same directory.
- Just copy the directory with decompiled source code to the Android project root directory (or any other directory in a project).
- In order to see this folder switch to the Project view
- Run > Edit Configurations
- Create a debug configuration in the same way as described in the Step 3
- Set breakpoints and run debugging
Bonus — Rebuilding decompiled app
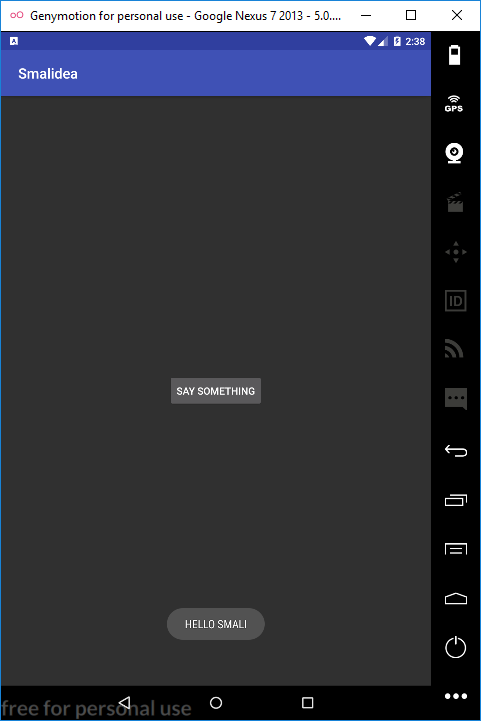
The last thing I want to cover in this tutorial is how to build a modified decompiled application. But let’s modify something at first. I will change the toast message from “HELLO WORLD” to “HELLO SMALI” as follows.
With APKTool the build process is really simple.
But you will not be able to install just compiled apk file, as it is unsigned.
If you have a Google Developer Account, you are probably aware of the signing process. But I will show how to do this manually with self-signed key.
First and foremost, we need a tool called keytool in order to generate keys. To use it add the path_to_jdk/bin/ folder to system Path variable or just open Command Prompt in this directory.
Generate a keystore file
And finally sign the apk file.
Finally, install the just signed apk file. And check the result.
Conclusion
In this tutorial I’ve described simple steps to install the Smalidea plugin, that makes the Smali Debugging process much easier. This plugin is available in “alpha” version, but according to the Github page, it is in active development. If you have any troubles, please feel free to leave comments below.
Источник
Android studio smali to java


Simple plugin for IntelliJ IDEA & Android Studio to easily compile Java & Kotlin files to smali.
Have you ever compiled and packaged a dummy Android application just to grab some Java sources in smali? Stop that! Transforming Java to smali just got easier.
- create or open a Java source file with your desired functionality
- click ‘Build’ and ‘Compile to smali’
- wait while IDEA’s indicating the compilation process
- the smali file is opened automatically in your editor

java2smali is available at JetBrains Plugin Repository and can therefore be found in your IDE’s plugin manager! Alternatively, you can download the plugin from the release section.
Build From Source
This plugin uses JetBrains gradle-intellij-plugin and can easily build from source.
Clone the repository:
Build the plugin with Gradle:
The plugin can be found in /build/distributions/java2smali-$VERSION.zip .
To enable debug logging of the plugin, select Help -> Diagnostic Tools -> Debug Log Settings… and add the following line:
Third-Party Libraries & Credits
- dx from the Android platform-tools is used to create a .dex version of the compiled Java (.class) file
- baksmali – a great disassembler for Android’s dex format is used to create the final .smali output file
- intellij-emberjs – a nicely written plugin which uses the gradle-intellij-plugin with Kotlin
About
A plugin for IntelliJ IDEA & Android Studio to easily compile Java & Kotlin files to smali.
Источник
Начинаем со Smali. Как реверсить приложения для Android
 Обратная разработка позволяет не только разобраться в существующих приложениях, но и модифицировать их. В этом смысле приложения на Android — клад для начинающего хакера и настоящий аттракцион для любителя. Сегодня мы разберем несколько приложений, чтобы потренироваться в реверс-инжиниринге и узнать о подлинных возможностях твоего смартфона.
Какое приложение мы будем препарировать? Я выбрал для своих целей VK Admin — программу для управления сообществами «ВКонтакте» со смартфона. В нем не предусмотрена темная тема, поэтому мы с тобой попробуем эту тему добавить.
Собираем и разбираем
Сначала извлечем все ресурсы приложения, используя утилиту apktool — она распаковывает и запаковывает файлы пакетов APK, которые хранятся в сжатом, бинарном виде, и дизассемблирует программный код, заключенный в них.
Чтобы получить установочный пакет, можно воспользоваться Android Debugging Bridge — системой для отладки программ на устройстве. В *nix-подобных системах ADB ставится стандартно, с помощью пакетного менеджера, а в Windows — идет в составе Android Studioили Android SDK Platform Tools.
В первую очередь установим приложение из Google Play Store на смартфон, подключим его к компьютеру с помощью USB, затем воспользуемся ADB для переноса пакета приложения на компьютер и извлечем его содержимое.
После этого мы получим папку com.vk.admin/ , внутри которой хранится все содержимое исходного .apk, только в декодированном виде. Чтобы применить изменения, необходимо будет снова воспользоваться рядом утилит.
Сначала собери приложение обратно в пакет .apk .
Затем необходимо подписать приложение. Это нужно, чтобы и Google Play Store, и устройство не обновляли приложение, если подписи не совпадают. Поэтому не забудь удалить приложение с телефона, прежде чем установить свое, подписанное своим ключом. Для создания подписи в первый раз нужно воспользоваться утилитой keytool (входит в Java Development Kit):
Когда ты уже создал ключ, подпиши приложение.
После этого установи приложение на телефон.
Меняем цветовые схемы
Цвета в приложении можно настроить несколькими способами:
- использовать встроенные цвета, к примеру @android:color/white ;
- создать палитру собственных цветов в файле colors.xml , которые затем используются в виде @color/text_primary ;
- задать цвет шестнадцатеричным кодом, главное — не забывай, что цвета в приложении записаны в формате #AARRGGBB — прозрачность на первом месте;
- воспользоваться параметрами setTextColor , setBackgroundColor внутри кода Java или Kotlin.
Все эти варианты жизнеспособны и постоянно используются.
colors.xml
Цветовая палитра приложения содержится в файле com.vk.admin/res/values/colors.xml . Структура файла выглядит так:
Каждый цвет, который в дальнейшем используется в статичных экранах приложения, записан здесь. Наша задача — изменить цвета, самый простой способ это сделать — инвертировать. Для записи цвета в формате hex можно отнять из 255 каждый компонент: R , G и B , то есть 255 — R , 255 — G , 255 — B . Параметры @android:color/white и @android:color/black можно изменить вручную.
styles.xml
В файле com.vk.admin/res/values/styles.xml заданы цвета, но только некоторые. Этот файл используется самими разработчиками, когда они хотят сделать несколько цветовых схем приложения. Если же этих схем нет, работать приходится нам с тобой.
Некоторые цвета текста и фона заданы именно здесь, поэтому их нужно изменить аналогично с colors.xml .
Layout
В папке com.vk.admin/res/ находятся описания экранов приложения.
- com.vk.admin/res/layout/ — универсальное хранилище экранов для всех смартфонов. Если нет каких-то специальных указаний, то будут использованы эти ресурсы;
- com.vk.admin/res/layout-v«XX (где XX — версия SDK смартфона, зависит от версии Android на устройстве) используются для работы с самыми передовыми элементами UI;
- остальные com.vk.admin/res/layout-. задают специфичные экраны приложения для ориентации устройства, разрешения и так далее.
Некоторые цвета приложения, чаще всего задний фон, можно найти здесь и изменить.
Но закончить мы пока не можем — есть экраны, цвет фона и текста которых задан не в файлах .xml, а прямо в исполняемом коде приложения. Туда нам и дорога.
Smali
Внутри приложений на Android используется собственный формат файлов — .dex , или Dalvik EXecutable, и собственная виртуальная машина, чтобы эти файлы исполнять, — Dalvik.
Как и с любым компилируемым языком, для .dex есть байт-код — smali — человекочитаемый и понятный с первого взгляда.
Машина Dalvik, в отличие от JVM, — регистровая, а не стековая. Регистры не имеют типов и могут хранить всё: числа, строки, экземпляры классов. При этом язык smali строго типизирован.
Вот небольшая последовательность инструкций, чтобы вывести содержимое регистра v0 в лог.
const-string v1, «MyTag» — записать в регистр v1 строку «MyTag» .
invoke-static
move-result-object v2 — записать результат предыдущей операции в v2 .
invoke-static
Если не удается понять, что значит тот или иной регистр или что делает та или иная функция, используй декомпилятор smali в Java — Jadx.
 Интуитивно понятный интерфейс Jadx
Использовать Jadx просто — нужно лишь выбрать файл и открыть его, код будет автоматически декомпилирован и показан.
Для некоторых экранов приложения используется параметр setBackgroundColor(I)V , который устанавливает цвет фона. Часто это не статичные экраны, а динамические: с поддержкой скролла, различные списки и карточки.
Эта строка занимается изменением. Чтобы изменить цвет, нужно его записать в регистр, а затем передать в функцию вместо настоящего.
Теперь пройдись по всем файлам и замени цвет.
Бывают случаи на порядок проще.
Нужно просто изменить -0x1 на -0x1000000 , и приложение погрузится во тьму.
Стоит быть внимательным и пытаться разобраться в коде: иногда оптимизатор кода будет перемещать инструкции const вверх, и ты можешь их не заметить.
setTextColor
Иногда текст, который меняется в ходе работы с приложением, может менять свой цвет. За это отвечает параметр setTextColor(I)V , второй аргумент которого можно подменить на нужный, в нашем случае — белый.
На этом борьбу со светлым фоном и ярким экраном можно закончить. Большинство элементов экрана поменяли свой цвет на противоположный. Так ты можешь изменить любое приложение, особенно если ты любишь потыкать в телефон поздно ночью.
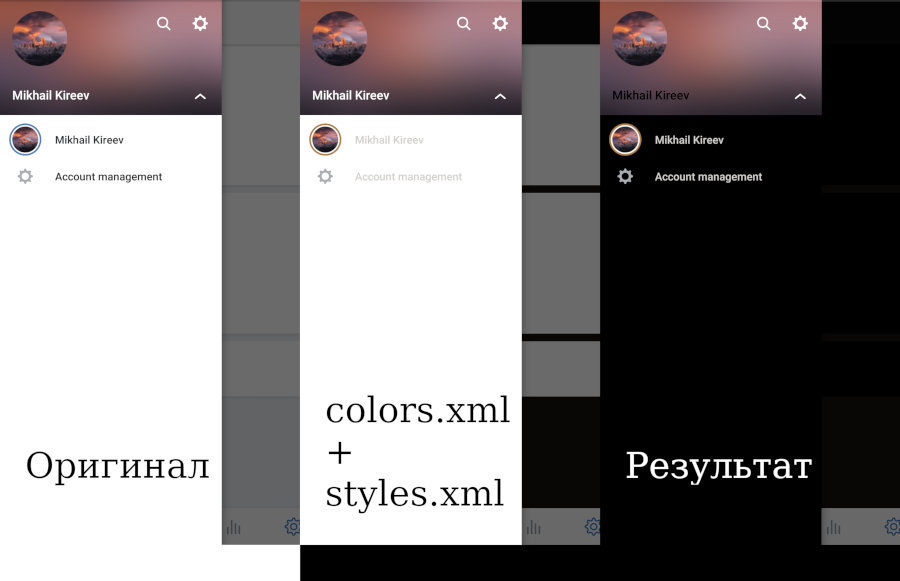 Результат изменений
Меняем функциональность приложения
Чтобы ощутить всю мощь smali, давай попробуем изменить какую-то часть приложения. Например, обойдем проверку на внутренние покупки.
Возьмем другое приложение — ISS Detector. Оно показывает положение МКС над Землей. В нем можно купить расширения: показ комет, планет, Луны, телескопа «Хаббл».
При копировании приложения на компьютер может возникнуть проблема: в составе приложения не один и не два, а целых три файла apk !
Копируем все. При переустановке приложения файлы split_config.en.apk и split_config.xxhdpi.apk потеряются, а без них приложение будет вылетать. Поэтому их нужно будет переподписать: зайти в них как в архивы ZIP, удалить папку META_INF и прогнать через стандартную процедуру утилиты jarsigner. Основной же файл мы будем препарировать с помощью apktool.
Покупками в приложении занимается интерфейс IInAppBillingService . Для него прописана обертка com.runar.issdetector.util : IabHelper, IabResult, Purchase, Security, Inventory.
В этом приложении можно не идти напролом, обманывая сервис покупок. Проще заставить приложение думать, что все уже куплено. В этом нам поможет Inventory.smali .
Открыв файл, ты увидишь поле mPurchaseMap , которое содержит в себе все покупки: номер товара, сопоставленный с покупкой, которую совершил пользователь.
Далее в коде мы видим строку hasPurchase(String sku) -> boolean , которая проверяет, совершал ли пользователь покупку. Для этого делается проверка на существование ключа sku в mPurchaseMap .
А что будет, если в любом случае отдавать true ?
Собираем приложение и устанавливаем его.
$ adb install-multiplie com.runar.issdetector.apk split_config.xxhdpi.apk split_config.en.apk
Success
С этого можно начать свой путь в реверс-инжиниринг. Я рассказал тебе основы, с которых начинал сам. Небольшие изменения могут улучшить твою жизнь — надеюсь, я смог тебе это показать.
Источник


